刚刚写出来的SSM登录注册案例,网上随便翻一下都有 ,本篇直接上手,使用Maven工程搭建一个简单的SSM框架实现简单的登录注册,验证重名功能。
链接:https://pan.baidu.com/s/1qJ8aN7rheZXWT2_O_uiBKg
提取码:6666
目录
项目结构图
持久层相关配置文件 applicationContext-dao.xml
applicationContext-service.xml
jdbc.properties
spring-mvc.xml
web.xml
1.先写一个User.java
2.写一个接口UserMapper.java
3.在写一个UserMapper.xml与之相关联
4.接下来就是Service层了,先写一个接口:UserService.java,内容与UserMapper.java 一样,这里就不再展示了。
5.然后写一个类实现UserService.java,代码比较简单,不做过多解释,大家不要忘了要给给它标记@Service
UserController.java
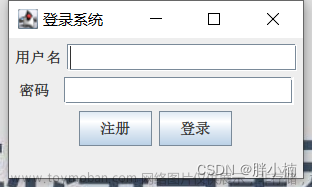
登录页面 log.jsp
登录成功和失败页面 logok.jsp 和 logno.jsp
最后就是注册页面了 reg.jsp
注册成功和失败页面 regok.jsp 和regno.jsp
在数据库中新建user表:

项目结构图
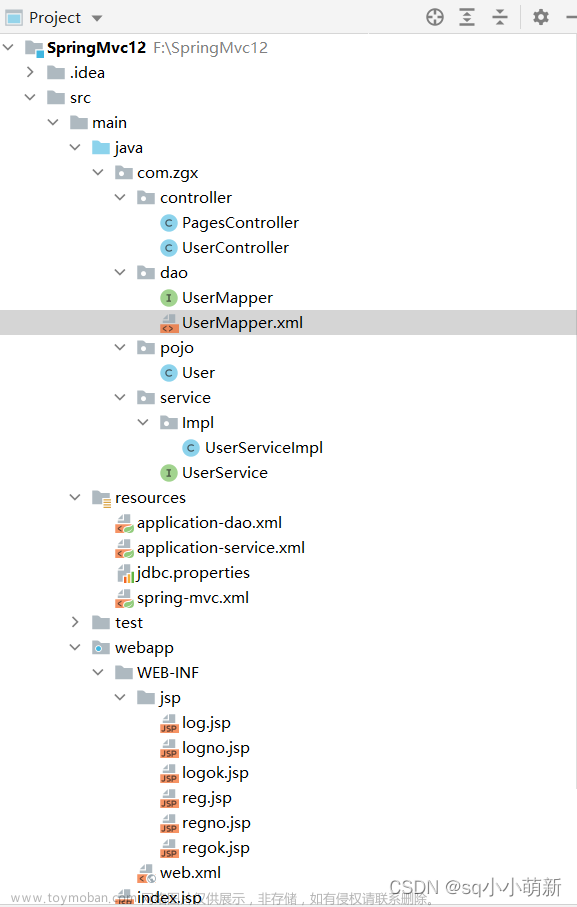
有几个主要的配置文件,先了解下每个配置文件的作用。
1. web.xml:当服务启动时首先会去加载web.xml这个资源文件,里面包括了对前端控制器、乱码问题等配置。
2.applicatonContext.xml : 一般配置数据源,事物,注解 等。
在这里我使用的是applicatonContext-*.xml的形式将DAO层、Service层、分开配置,这样便于管理
分别为applicatonContext-dao.xml、applicatonContext-service.xml、
分开配置时,需要在web.xml中配置上下文位置
3.springmvc.xml: 里面配置的是控制层的 ,如视图解析器静态资源、配置注解驱动 。
持久层相关配置文件 applicationContext-dao.xml
<?xml version="1.0" encoding="UTF-8"?>
<beans xmlns="http://www.springframework.org/schema/beans"
       xmlns:xsi="http://www.w3.org/2001/XMLSchema-instance"
       xmlns:context="http://www.springframework.org/schema/context"
       xsi:schemaLocation="
 	       http://www.springframework.org/schema/beans
 	       http://www.springframework.org/schema/beans/spring-beans.xsd
 	       http://www.springframework.org/schema/context
 	       http://www.springframework.org/schema/context/spring-context.xsd">
    <!--引入属性文件-->
    <context:property-placeholder location="classpath:jdbc.properties"/>
    <!--数据源-->
    <bean id="dataSource" class="com.alibaba.druid.pool.DruidDataSource">
        <property name="driverClassName" value="${mysql.driver}"/>
        <property name="url" value="${mysql.url}"/>
        <property name="username" value="${mysql.username}"/>
        <property name="password" value="${mysql.password}"/>
    </bean>
    <!--创建SqlSessionFactory对象-->
    <bean id="sqlSessionFactory"
          class="org.mybatis.spring.SqlSessionFactoryBean">
        <!--数据源-->
        <property name="dataSource" ref="dataSource"/>
        <property name="typeAliasesPackage" value="com.sq.pojo"/>
    </bean>
    <!--扫描Dao包,创建动态代理对象, 会自动存储到spring IOC容器中-->
    <bean class="org.mybatis.spring.mapper.MapperScannerConfigurer">
        <!--指定要扫描的dao的包-->
        <property name="basePackage" value="com.sq.dao"/>
    </bean>
</beans>
applicationContext-service.xml
<?xml version="1.0" encoding="UTF-8"?>
<beans xmlns="http://www.springframework.org/schema/beans"
       xmlns:xsi="http://www.w3.org/2001/XMLSchema-instance"
       xmlns:context="http://www.springframework.org/schema/context"
       xsi:schemaLocation="
       	       http://www.springframework.org/schema/beans
       	       http://www.springframework.org/schema/beans/spring-beans.xsd
       	       http://www.springframework.org/schema/context
       	       http://www.springframework.org/schema/context/spring-context.xsd">
    <!--开启注解扫描, 扫描包-->
    <context:component-scan base-package="com.sq.service"/>
</beans>
jdbc.properties
mysql.driver=com.mysql.cj.jdbc.Driver
mysql.url=jdbc:mysql://localhost:3306/mybatis?serverTimezone=UTC&characterEncoding=utf8&useUnicode=true&useSSL=false
mysql.username=root
mysql.password=root
spring-mvc.xml
<?xml version="1.0" encoding="UTF-8"?>
<beans xmlns="http://www.springframework.org/schema/beans"
       xmlns:context="http://www.springframework.org/schema/context"
       xmlns:mvc="http://www.springframework.org/schema/mvc"
       xmlns:xsi="http://www.w3.org/2001/XMLSchema-instance"
       xsi:schemaLocation="http://www.springframework.org/schema/beans
       	    http://www.springframework.org/schema/beans/spring-beans.xsd
       	    http://www.springframework.org/schema/mvc
       	    http://www.springframework.org/schema/mvc/spring-mvc.xsd
       	    http://www.springframework.org/schema/context
       	    http://www.springframework.org/schema/context/spring-context.xsd">
    <!-- 配置要扫描的包 -->
        <context:component-scan base-package="com.sq.controller"/>
    <!--静态资源代码块-->
    <!--<mvc:resources mapping="/statics/**" location="/statics/"/>-->
    <bean class="org.springframework.web.servlet.view.InternalResourceViewResolver">
        <property name="prefix" value="/WEB-INF/jsp/"/>
        <property name="suffix" value=".jsp"/>
    </bean>
    <!-- 配置注解驱动 -->
    <mvc:annotation-driven/>

</beans>
web.xml
<?xml version="1.0" encoding="UTF-8"?>
<web-app xmlns="http://java.sun.com/xml/ns/javaee"
         xmlns:xsi="http://www.w3.org/2001/XMLSchema-instance"
         xsi:schemaLocation="http://java.sun.com/xml/ns/javaee
         http://java.sun.com/xml/ns/javaee/web-app_3_0.xsd" version="3.0">
    <!-- 配置 Spring MVC 的前端控制器 -->
    <welcome-file-list>
        <!--欢迎页面   项目运行之后  没有指定路径的情况   会跳转-->
        <welcome-file>index.jsp</welcome-file>
        <welcome-file>index.html</welcome-file>
    </welcome-file-list>
    <!--配置文件加载-->
    <context-param>
        <param-name>contextConfigLocation</param-name>
        <param-value>classpath:application-*.xml</param-value>
    </context-param>
    <listener>
        <listener-class>
            org.springframework.web.context.ContextLoaderListener
        </listener-class>
    </listener>
    <servlet>
        <!--servlet-name  名称-->
        <servlet-name>DispatcherServlet</servlet-name>
        <!--路径  class-->
        <servlet-class>
            org.springframework.web.servlet.DispatcherServlet
        </servlet-class>
        <!-- 配置初始化参数,用于读取 Spring MVC 的配置文件 -->
        <init-param>
            <param-name>contextConfigLocation</param-name>
            <param-value>classpath:spring-mvc.xml</param-value>
        </init-param>
        <!-- 应用加载时创建    优先级别  1最高级别-->
        <load-on-startup>1</load-on-startup>
    </servlet>
    <servlet-mapping>
        <servlet-name>DispatcherServlet</servlet-name>
        <url-pattern>/</url-pattern> <!--路径  什么情况下会开启-->
    </servlet-mapping>

    <filter>
        <filter-name>CharacterEncodingFilter</filter-name>
        <filter-class> org.springframework.web.filter.CharacterEncodingFilter</filter-class>
        <init-param>
            <param-name>encoding</param-name>
            <param-value>UTF-8</param-value>
        </init-param>
    </filter>
    <filter-mapping>
        <filter-name>CharacterEncodingFilter</filter-name>
        <url-pattern>/*</url-pattern>
    </filter-mapping>
</web-app>
配置文件写好了,接下来就开始写代码
先从实体类开始写:文章来源:https://www.toymoban.com/news/detail-401024.html
1.先写一个User.java
package com.sq.pojo;

public class User {
    private String username;
    private String userpwd;

    public String getUsername() {
        return username;
    }

    public void setUsername(String username) {
        this.username = username;
    }

    public String getUserpwd() {
        return userpwd;
    }

    public void setUserpwd(String userpwd) {
        this.userpwd = userpwd;
    }

    @Override
    public String toString() {
        return "User [username=" + username + ", userpwd=" + userpwd + "]";
    }

}
2.写一个接口UserMapper.java
package com.sq.dao;

import com.sq.pojo.User;

public interface UserMapper {
    //用户登录
    User findOne(User user);
    //用户注册
    int addOne(User user);
    //注册时的重名检测
    User checkReg(String username);
}
3.在写一个UserMapper.xml与之相关联
<?xml version="1.0" encoding="utf-8" ?>
<!DOCTYPE mapper
        PUBLIC "-//mybatis.org//DTD Mapper 3.0//EN"
        "http://mybatis.org/dtd/mybatis-3-mapper.dtd">
<mapper namespace="com.sq.dao.UserMapper">
    <select id="findOne" parameterType="User" resultType="User">
        SELECT * FROM user where username=#{username} and userpwd=#{userpwd}
    </select>
    <insert id="addOne" parameterType="User" >
        insert into user(username,userpwd) values(#{username},#{userpwd})
    </insert>
    <select id="checkReg" resultType="User">
        select * from user where username=#{username}
    </select>
</mapper>
4.接下来就是Service层了,先写一个接口:UserService.java,内容与UserMapper.java一样,这里就不再展示了。
5.然后写一个类实现UserService.java,代码比较简单,不做过多解释,大家不要忘了要给给它标记@Service
package com.sq.service.Impl;
import com.sq.service.UserService;
import org.springframework.stereotype.Service;
import com.sq.dao.UserMapper;
import com.sq.pojo.User;
import javax.annotation.Resource;


@Service
public class UserServiceImpl implements UserService {
    @Resource
    private UserMapper userMapper;
    @Override
    public User findOne(User user) {
        return userMapper.findOne(user);
    }
    @Override
    public int addOne(User user) {
       return userMapper.addOne(user);

    }
    @Override
    public User checkReg(String username) {
        return userMapper.checkReg(username);
    }

}
6.最后就是Controller层了,Controller层的代码主要是调用Service层实现的方法,实现一些操作,并与前端进行交互。文章来源地址https://www.toymoban.com/news/detail-401024.html
UserController.java
package com.sq.controller;
import com.sq.pojo.User;
import com.sq.service.UserService;
import org.springframework.stereotype.Controller;
import org.springframework.ui.Model;
import org.springframework.web.bind.annotation.RequestMapping;
import javax.annotation.Resource;

@Controller
public class UserController {
    @Resource
    private UserService userService;

    @RequestMapping("/golog")
    public String log(User user, Model model) {
        User u = userService.findOne(user);
        model.addAttribute("user", u);
        if (u != null) {
            return "logok";
        } else
            return "logno";
    }


    @RequestMapping("/goreg")
    public String reg(User user) {
        User u = userService.checkReg(user.getUsername());
        if (u == null) {
            userService.addOne(user);
            return "regok";
        }
        return "regno";
    }
}
登录页面 log.jsp
<%@ page language="java" contentType="text/html; charset=UTF-8" pageEncoding="UTF-8"%>
<!DOCTYPE html>
<html>
<head>
<meta charset="UTF-8">
<title>用户登录</title>
<style type="text/css">
div {
width: 300px;
height: 200px;
margin-left: auto;
margin-right: auto;
}
</style>
</head>
<body>
<div>
<form action="golog" method="post">
<table border="1">
<tr>
<td>用户名:</td>
<td><input type="text" name="username"></td>
</tr>
<tr>
<td>密 码:</td>
<td><input type="password" name="userpwd"></td>
</tr>
<tr>
<td colspan="2" style="text-align: center;"><input
type="submit" value="登录"></td>
</tr>
<tr>
<td colspan="2" style="text-align: center;"><a
href="http://localhost:8080/SpringMvc12_war/reg">还没有账号?点此注册</a></td>
</tr>
</table>
</form>
</div>
</body>
</html>
登录成功和失败页面 logok.jsp 和 logno.jsp
<!-- logok.jsp -->
<%@ page language="java" contentType="text/html; charset=UTF-8"
         pageEncoding="UTF-8"%>
<!DOCTYPE html>
<html>
<head>
    <meta charset="UTF-8">
    <title>Insert title here</title>
</head>
<body >
<h1>如果你能看见我,说明你成功了</h1>
<hr>
您的用户名是:${user.username}<br>
您的密码是:${user.userpwd}<br>
</body>
</html>


<!-- logno.jsp -->
<%@ page language="java" contentType="text/html; charset=UTF-8"
         pageEncoding="UTF-8"%>
<!DOCTYPE html>
<html>
<head>
    <meta charset="UTF-8">
    <title>Insert title here</title>
</head>
<body>
<h1>用户名或者密码错误</h1>
</body>
</html>
最后就是注册页面了 reg.jsp
<%@ page language="java" contentType="text/html; charset=UTF-8"
pageEncoding="UTF-8"%>
<!DOCTYPE html>
<html>
<head>
<meta charset="UTF-8">
<title>用户注册</title>
<style type="text/css">
div {
width: 300px;
height: 200px;
margin-left: auto;
margin-right: auto;
}
</style>
</head>
<body>
<div>
<form action="goreg" method="post">
<table border="1">
<tr>
<td>用户名:</td>
<td><input type="text" name="username" ></td>
</tr>
<tr>
<td>密 码:</td>
<td><input type="password" name="userpwd" ></td>
</tr>
<tr>
<td colspan="2" style="text-align: center;"><input type="submit" value="注册"></td>
</tr>
</table>
</form>
</div>
</body>
</html>
注册成功和失败页面 regok.jsp 和regno.jsp
<!-- regok.jsp -->
<%@ page language="java" contentType="text/html; charset=UTF-8"
         pageEncoding="UTF-8"%>
<!DOCTYPE html>
<html>
<head>
    <meta charset="UTF-8">
    <title>Insert title here</title>
</head>
<body >
<h1>注册成功如果你能看见我,说明你成功了</h1><br>
<a href="log">点此返回登录界面</a>
</body>
</html>


<!-- regno.jsp -->
<%@ page language="java" contentType="text/html; charset=UTF-8"
         pageEncoding="UTF-8"%>
<!DOCTYPE html>
<html>
<head>
    <meta charset="UTF-8">
    <title>Insert title here</title>
</head>
<body>
<h1>该用户名已被注册</h1>
</body>
</html>
到了这里,关于SSM框架实现登录注册功能的文章就介绍完了。如果您还想了解更多内容,请在右上角搜索TOY模板网以前的文章或继续浏览下面的相关文章,希望大家以后多多支持TOY模板网!

