目录
前言
一、WebSocket简介
二、API接口
三、后台服务器
四、实例
视频流框
类“遥控器”模块控制视频画面
五、完整功能展示(视频不懂上传,泪目)
六、完整代码
总结
文章来源地址https://www.toymoban.com/news/detail-401361.html
前言
一、WebSocket简介
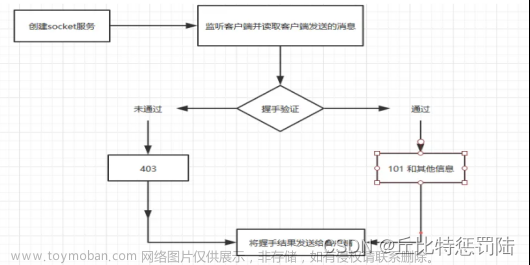
WebSocket是一种全双工通信的数据通信协议。WebSocket的主要功能用处是允许服务器主动地向客户端推送数据信息,使得客户端和服务端之间的数据交换变得更加的简单。简单而言,其提供让浏览器和服务器只需进行一次握手,两者之间就可以建立起持久性的、双向的、没有延时的数据传输连接状态。在系统中通过创建WebSocket服务,对用户端发送的数据进行监听,验证握手状态结果,其原理流程如下图所示。
了解到这里,我们顺道了解一下WebSocket的优势在哪里吧,这样你就可以看得出我们为什么要选择使用WebSocket了。
-
减少数据内存:Web Socket进行连接后,服务端和客户端之间进行数据交流所使用到的数据内存很小,一般在2-10字节。
-
实时性更优:基于全双工的特性下,服务端可以做到随时主动的向客户端发送数据,相较于HTTP请求(需要等待客户端发起请求后,客户端才响应),延时效果变得更少。
-
保存连接状态:Web Socket相比于HTTP不同的是,WebSocket只需要先创建一个数据连接,就可以让服务端和客户端之间保存一种有状态的协议。而HTTP请求可能在没一个请求之间都会有携带式的信息请求状态,比如登录界面的登录请求。
二、API接口
因为使用WebSocket连接服务端和客户端,所以者之间WebSocket就是起到了连接的作用了,而API接口简单理解起来就是桥梁。在WebSocket连接过程中起到不可替代的作用。API接口(Application Programming lnterface),一种应用程序的编程式接口,是一种提供于系统开发与软硬件之间桥梁作用的作用,API接口封装简单、具有模块化、使用方便无需进行访问即可进行调用的特点。在农业管理系统中,下图所示为API提供数据信息下流动过程。

在该功能里面,摄像头的API参数:

三、后台服务器
在这一个功能中,我们要获取到的数据请求发送到服务器上,我这里使用的是Nginx服务器,这个服务器非常的人性化,是一款面向性能设计的http协议的服务器,对于后台数据设计处理的工作原理是Nginx服务器通过接收到客户端的请求,将该请求进行不同的分类,如接收到的数据请求是静态数据时,将直接返回客户端静态数据;如接收到的数据为动态请求,就将数据转到uWSGI(Web实现WSGI协议的服务器),再通过连接Django(Python的Web应用框架)进行数据处理。

Nginx服务器运行结构图
四、实例
Web Socket可以在客户端和服务端之间打开交互式的通信会话,因此使用API,可以向服务器发送信息并且接收信息的驱动的响应模式,而不需要通过一轮一次的方式得到响应,因此要想建立一个Web Socket连接、再使得连接成功触发时间、最后在对消息进行监听事件。创建Web Socket连接Const socket = new Web Socket('ws://locahost:8080);然后是的连接成功触发{Socket.send(')发送信息函数;在触发onMessage()将数据进行传输;最后onclose()关闭数据连接。
WebSocket.js
const Ws = require('ws')

;( (Ws) => {

    const serve = new Ws.Serve({port:8000})
    const init = () => {
        bindEvent()
    }
    function bindEvent () {
         serve.on('open',handleOpen)
         serve.on('close',handleClose)
         serve.on('error',handleError)
         Serve.on('connection',handleConnection)
    }
    function handleOpen() {
        console.log('BE:Websocket open');
    }
    function handleClose() {
        console.log('BE:Websocket close');
    }
    function handleError() {
        console.log('BE:Websocket error');
    }
    function handleConnection() {
        console.log('BE:Websocket connection')
    }
    init()
})(Ws)
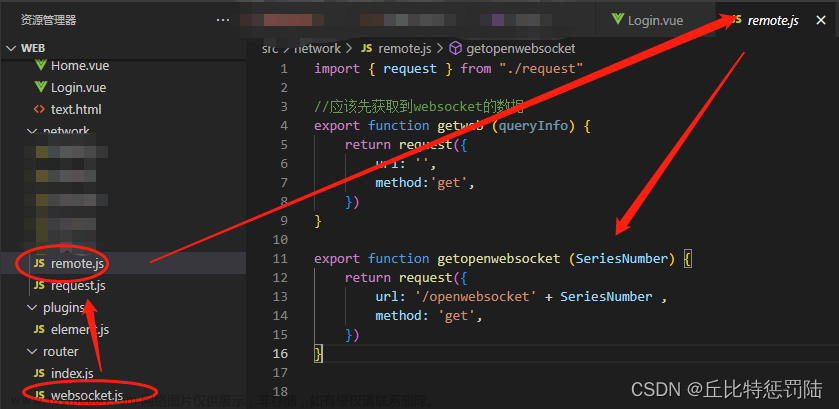
千万别忘记在摄像头这个功能模块上把获取到这个WebSocket的数据信息的功能加上去了,这里我们把摄像头的模块起一个专业点的名字,remote(远程):
视频流框
为什么要提及到这个呢,因为我们制作的这个建议的摄像头,你拿到了它的API地址,然后又建立起了服务端和客户端(你的电脑端)的连接,但是我们要怎么把它的效果展示出来呢,这时候,我们就可以通过使用一个画布canvas,建立起一个画布工具,将摄像头拍到的画面通过这个“画布”展示出其效果。
接下来,就是我们“画布”的制作过程:
1、可以通过编写一个video的视频流框架延样式
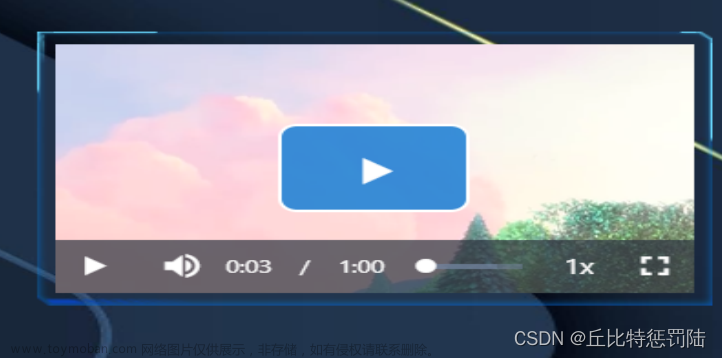
import 'video.js/dist/video-js.css'2、 编写视频流的script部分:
      // 视频流
      playerOptions: {
        playbackRates: [0.7, 1.0, 1.5, 2.0], // 播放速度
        autoplay: false, // 如果true,浏览器准备好时开始回放。
        controls: true, // 控制条
        preload: 'auto', // 视频预加载
        muted: false, // 默认情况下将会消除任何音频。
        loop: false, // 导致视频一结束就重新开始。
        language: 'zh-CN', // 语言为中文
        aspectRatio: '16:9', // 将播放器置于流畅模式,并在计算播放器的动态大小时使用该值。值应该代表一个比例 - 用冒号分隔的两个数字(例如"16:9"或"4:3")
        fluid: true, // 当true时,Video.js player将拥有流体大小。换句话说,它将按比例缩放以适应其容器。
        sources: [{
          type: 'video/mp4',
          src: 'http://clips.vorwaerts-gmbh.de/big_buck_bunny.mp4'// 你所放置的视频的地址,最好是放在服务器上
        }],
        poster: 'http://192.168.1.2:8081/', // 你的封面地址(覆盖在视频上面的图片)
        // width: document.documentElement.clientWidth,
        notSupportedMessage: '尚未可以播放' // 允许覆盖Video.js无法播放媒体源时显示的默认信息。
      },
3、“画布”样式style:
.player-container {
  width: 350px;
  margin-left: 40%;
  margin-top: -260px;
   border:1px solid #96c2f1;
  border-image: url() 30 27 27 27 / 9px / 9px;
}
视频流
类“遥控器”模块控制视频画面
当我们完成视频展示之后,我们还要制作一个类似遥控器的模块来进行对视频流画面的上下作呕进行操作控制,在这里说明一下,我们的canvas画布里面嵌套了一个小的div,这个小的div,看到的画面才是我们看到的画面,我们只要通过“遥控器”上的上下左右按钮改变div的画面,这样就可以完成了我们所谓的简易的摄像头的功能。
<!--调整摄像头方向-->
<div class="change_camera_direction" v-show="camera"><!--摄像头的按钮显示-->
<div class="camera_title">摄像头方向控制</div>
<!--控制摄像头的部件-->
<el-button type="primary" icon="el-icon-top" size=mini circle></el-button>
<el-button type="primary" icon="el-icon-bottom" size=mini circle></el-button>
<el-button type="primary" icon="el-icon-top" size=mini circle></el-button>
<el-button type="primary" icon="el-icon-right" size=mini circle></el-button>
<el-button type="primary" icon="el-icon-video-play" size=mini circle></el-button>
<el-button type="primary" icon="el-icon-video-pause" size=mini circle></el-button>
</div>
</div>
.box {
width: 100%;
height: 30vh;
display: flex;
margin: 0 auto;
// flex-wrap: wrap;
margin-top: 10%;
}
.image {
width: 150px;
height: 150px;
border:1px solid #96c2f1;
border-image: url ) 27 10 27 27 / 5px / 5px;
}
.control-wrapper {
position: absolute;
right: 0;
bottom: 0;
width: 25vw;
height: 25vw;
max-width: 150px;
max-height: 150px;
// margin: 0 auto;
margin-right: 120px;
margin-bottom: 50px;
border-radius: 100%;
}
.control-btn {
display: flex;
justify-content: center;
position: absolute;
width: 44%;
height: 44%;
border-radius: 5px;
border: 1px solid #78aee4;
box-sizing: border-box;
transition: all .3s linear;
border:1px solid #96c2f1;
border-image: url
 ) 30 27 27 27 / 9px / 9px;
}
.control-btn i {
font-size: 20px;
// color: #78aee4;
display: flex;
justify-content: center;
align-items: center;
border:1px solid #96c2f1;
border-image: url
 ) 30 27 27 27 / 9px / 9px;
}
.control-round
{position: absolute;
top: 21%; left: 21%;
width: 58%;
height: 58%;
background: #fff;
border-radius: 100%;
}
.control-round-inner {
position: absolute;
left: 15%; top: 15%;
display: flex;
justify-content: center;
align-items: center;
width: 70%;
height: 70%;
font-size: 40px;
color: #78aee4;
border: 1px solid #78aee4;
border-radius: 100%;
transition: all .3s linear;
}
.control-inner-btn {
position: absolute;
width: 60%;
height: 60%;
background: #fafafa;
border:1px solid #96c2f1;
border-image: url
 ) 30 27 27 27 / 9px / 9px;}
最后的按钮结果是:

遥控器
五、完整功能展示(视频不懂上传,泪目)

六、完整代码
<template>
<div>
<!-- 控制包装盒 -->
<!-- PS就是喷杀的意思 -->
<div class="control-wrapper" v-show="PS">
<!-- 控制按钮 上部分 -->
<div class="control-btn control-top">
<!-- 顶部图标 -->
<el-button v-on:click="Turnahead" >
<!--单击点击事件车子前进-->
<!-- <i class="fa fa-chevron-left"><h1></h1></i> -->
<i class="el-icon-caret-top"></i>
</el-button>
</div>
<!-- 控制按钮 左边 -->
<div class="control-btn control-left" >
<!-- 左部图标 -->
<el-button v-on:click="Turnleft" >
<!-- <i class="fa fa-chevron-left"><h1></h1></i> -->
<i class="el-icon-caret-left"></i>
</el-button>
</div>
<!-- 底部按钮 -->
<div class="control-btn control-bottom">
<!-- 底部图标 -->
<el-button v-on:click="Turnbuttom" >
<!-- <i class="fa fa-chevron-left"><h1></h1></i> -->
<i class="el-icon-caret-bottom"></i>
</el-button>
</div>
<!-- 右边按钮 -->
<div class="control-btn control-right">
<!-- 右边图标 -->
<el-button v-on:click="Turnright" >
<!-- <i class="fa fa-chevron-left"><h1></h1></i> -->
<i class="el-icon-caret-right"></i>
</el-button>
</div>
<!-- 控件弧形 -->
<div class="control-round">
<!-- 内部弧形 -->
<div class="control-round-inner">
<!-- 暂停键 -->
<el-button v-on:click="Turnpause" circle >
<!-- <i class="fa fa-chevron-left"><h1></h1></i> -->
<i class="el-icon-video-pause"></i>
</el-button>
</div>
<!-- 按钮部分 -->
<div style="width:100px" class="buttons">
<div><el-button style="width:90px;margin-top:-15px" type="primary" @click="PsIsShow">喷杀</el-button></div>
<div><el-button style="width:90px;margin-top:5px" type="primary" @click="cameraisshow">摄像头</el-button></div>
<div><el-button style="width:90px;margin-top:5px" type="primary">设备驾驶</el-button></div>
</div>
<el-row style="margin-top:10%">
<el-button style="width:100px;margin-top:5px" type="primary" round>远程管理</el-button>
</el-row>
</div>
<!-- 第二个盒子 -->
<!--调整摄像头方向-->
<div class="change_camera_direction" v-show="camera"><!--摄像头的按钮显示-->
<div class="camera_title">摄像头方向控制</div>
<!--控制摄像头的部件-->
<el-button type="primary" icon="el-icon-top" size=mini circle></el-button>
<el-button type="primary" icon="el-icon-bottom" size=mini circle></el-button>
<el-button type="primary" icon="el-icon-top" size=mini circle></el-button>
<el-button type="primary" icon="el-icon-right" size=mini circle></el-button>
<el-button type="primary" icon="el-icon-video-play" size=mini circle></el-button>
<el-button type="primary" icon="el-icon-video-pause" size=mini circle></el-button>
</div>
</div>
</div>
<!-- 地图区域下面,设置可以保存路径的保存按钮 -->
<el-row :gutter="3" style="margin-top:35px">
<el-col :span="1.5"
><el-button type="primary" size="mini">保存</el-button></el-col
>
<el-col :span="4"
><el-input placeholder="请输入要保存的路径" size="mini"> </el-input
></el-col></el-row>
<!-- 视频流 -->
<div class="player-container">
<video-player class="vjs-custom-skin" :options="playerOptions"></video-player>
</div>
<!-- 图片 -->
<div class="box">
<div class="image"></div>
<div class="image"></div>
<div class="image"></div>
<div class="image"></div>
<div class="image"><img src="" alt="" style="width:100%;height:100%"></div>
</div>
<!-- 卡片试图一 -->
<el-card class="box-card" style="height:250px;width:300px;margin-left:74%;margin-top:-45%">
<div slot="header" class="clearfix">
<span>最新病虫害信息:</span>
</div>
<div v-for="o in 5" :key="o" class="text item">
{{'图 ' + o }}
</div>
</el-card>
</div>
</template>
<script>
// 引入video样式
import 'video.js/dist/video-js.css'
import 'vue-video-player/src/custom-theme.css'
export default {
data () {
const self = this
return {
//喷杀部分的显示与隐藏
PS:true,
// 摄像头部分的显示与隐藏
camera:false,
// 视频流
playerOptions: {
playbackRates: [0.7, 1.0, 1.5, 2.0], // 播放速度
autoplay: false, // 如果true,浏览器准备好时开始回放。
controls: true, // 控制条
preload: 'auto', // 视频预加载
muted: false, // 默认情况下将会消除任何音频。
loop: false, // 导致视频一结束就重新开始。
language: 'zh-CN', // 语言为中文
aspectRatio: '16:9', // 将播放器置于流畅模式,并在计算播放器的动态大小时使用该值。值应该代表一个比例 - 用冒号分隔的两个数字(例如"16:9"或"4:3")
fluid: true, // 当true时,Video.js player将拥有流体大小。换句话说,它将按比例缩放以适应其容器。
sources: [{
type: 'video/mp4',
src: 'http://clips.vorwaerts-gmbh.de/big_buck_bunny.mp4'// 你所放置的视频的地址,最好是放在服务器上
}],
poster: 'http://192.168.1.2:8081/', // 你的封面地址(覆盖在视频上面的图片)
// width: document.documentElement.clientWidth,
notSupportedMessage: '尚未可以播放' // 允许覆盖Video.js无法播放媒体源时显示的默认信息。
},
input: '',
// 地图部分代码
center: [121.59996, 31.197646],
lng: 0,
lat: 0,
loaded: false,
plugin: [
{
enableHighAccuracy: true,
timeout: 100,
maximumAge: 0,
convert: true,
showButton: true,
buttonPosition: 'RB',
showMarker: true,
showCircle: true,
panToLocation: true,
zoomToAccuracy: true,
extensions: 'all',
pName: 'Geolocation',
events: {
init (o) {
// o 是高德地图定位插件实例
o.getCurrentPosition((status, result) => {
console.log(result)
if (result && result.position) {
self.lng = result.position.lng
self.lat = result.position.lat
self.center = [self.lng, self.lat]
self.loaded = true
self.$nextTick()
}
})
}
}
}
]
}
},
// 喷杀的显示与否的方法
methods:{
PsIsShow(){
this.PS = true
},
// 操作面板中的单击点击事件(点击向前的事件)
Turnahead() {
},
// 相机的显示与否的方法
cameraisshow(){
this.camera = !this.camera
}
}
}
</script>
<style lang="less" scoped>
.buttons {
justify-content: center;
margin-left: 130px;
}
.player-container {
width: 350px;
margin-left: 40%;
margin-top: -260px;
border:1px solid #96c2f1;
border-image: url ) 30 27 27 27 / 9px / 9px;
}
.amap-demo {
height: 250px;
width: 400px;
border:1px solid #96c2f1;
border-image: url
 ) 27 27 27 / 9px / 9px;
}
.box {
width: 100%;
height: 30vh;
display: flex;
margin: 0 auto;
// flex-wrap: wrap;
margin-top: 10%;
}
.image {
width: 150px;
height: 150px;
border:1px solid #96c2f1;
border-image: url
 ) 27 10 27 27 / 5px / 5px;
}
.control-wrapper {
position: absolute;
right: 0;
bottom: 0;
width: 25vw;
height: 25vw;
max-width: 150px;
max-height: 150px;
// margin: 0 auto;
margin-right: 120px;
margin-bottom: 50px;
border-radius: 100%;
}
.control-btn {
display: flex;
justify-content: center;
position: absolute;
width: 44%;
height: 44%;
border-radius: 5px;
border: 1px solid #78aee4;
box-sizing: border-box;
transition: all .3s linear;
border:1px solid #96c2f1;
border-image: url
 ) 30 27 27 27 / 9px / 9px;
}
.control-btn i {
font-size: 20px;
// color: #78aee4;
display: flex;
justify-content: center;
align-items: center;
border:1px solid #96c2f1;
border-image: url
 ) 30 27 27 27 / 9px / 9px;
}
.control-round
{position: absolute;
top: 21%; left: 21%;
width: 58%;
height: 58%;
background: #fff;
border-radius: 100%;
}
.control-round-inner {
position: absolute;
left: 15%; top: 15%;
display: flex;
justify-content: center;
align-items: center;
width: 70%;
height: 70%;
font-size: 40px;
color: #78aee4;
border: 1px solid #78aee4;
border-radius: 100%;
transition: all .3s linear;
}
.control-inner-btn {
position: absolute;
width: 60%;
height: 60%;
background: #fafafa;
border:1px solid #96c2f1;
border-image: url
 ) 30 27 27 27 / 9px / 9px;}
.control-top {
top: -8%;
left: 27%;
transform: rotate(-45deg);
border-radius: 5px 100% 5px 0;
}
.control-top .control-inner {
left: -1px;
bottom: 0;
border-top: 1px solid #78aee4;
border-right: 1px solid #78aee4;
border-radius: 0 100% 0 0;
border:1px solid #96c2f1;
border-image: url
 ) 30 27 27 27 / 9px / 9px;}
.control-top .fa {
transform: rotate(45deg) translateY(-7px); }
.control-left {
top: 27%; left: -8%;
transform: rotate(45deg);
border-radius: 5px 0 5px 100%;}
.control-left .control-inner {
right: -1px;
top: -1px;
border-bottom: 1px solid #78aee4;
border-left: 1px solid #78aee4;
border-radius: 0 0 0 100%;}
.control-left .fa {
transform: rotate(-45deg) translateX(-7px);}
.control-right {
top: 27%;
right: -8%;
transform: rotate(45deg);
border-radius: 5px 100% 5px 0; }
.control-right .control-inner {
left: -1px;
bottom: -1px;
border-top: 1px solid #78aee4;
border-right: 1px solid #78aee4;
border-radius: 0 100% 0 0 ;}
.control-right .fa {
transform: rotate(-45deg) translateX(7px);}
.control-bottom {
left: 27%;
bottom: -8%;
transform: rotate(45deg);
border-radius: 0 5px 100% 5px; }
.control-bottom .control-inner {
top: -1px;
left: -1px;
border-bottom: 1px solid #78aee4;
border-right: 1px solid #78aee4;
border-radius: 0 0 100% 0 ;}
.control-bottom .fa { transform: rotate(-45deg) translateY(7px); }
// 第二个盒子样式
/*摄像头方向控制*/
.change_camera_direction{
// background-color: rgb(77, 203, 235);
text-align: center;
position: absolute;
top: -100%;
right:180%;
width: 240px;
height: 80px;
border:1px solid #96c2f1;
border-image: url
 ) 30 27 27 27 / 9px / 9px;
}
.change_camera_direction .camera_title{
color: white;
font-size: 15px;
margin: 5% auto;
}
.direction_content{
width: 100%;
height: 70%;
position: relative;
}
.direction_div{
position:relative;
width: 30px;
height: 30px;
}
/*left*/
.left_direction {
top: 5%;
left: 20%;
}
/*bottom*/
.bottom_direction{
top:5%;
left: 40%;
}
/*right*/
.right_direction{
top: -47%;
left: 61%;
}
/*top*/
.top_direction{
top: 2%;
left: 40%;
}
</style>
总结
看完了给个一键三连,看视频的私聊私发。文章来源:https://www.toymoban.com/news/detail-401361.html
到了这里,关于VUE+websocket编写实现PC web端控制摄像头的文章就介绍完了。如果您还想了解更多内容,请在右上角搜索TOY模板网以前的文章或继续浏览下面的相关文章,希望大家以后多多支持TOY模板网!


