前言
前端vue 有个功能是鼠标移动到指定item上显示出来一个编辑和删除的图标
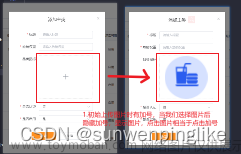
鼠标悬停在列表那么需要有悬浮显示的列表编辑和删除icon
文字不好描述,因为是web端录屏也比较麻烦 这里用截图说明
图片说明

功能实现
之前没做过这种效果,问了一下我的组长-豪哥
他告诉我很简单,利用vue的@mouseenter 和 @mouseleave事件就可以完美解决
本着这个思路,我去寻求答案,找了很多有关知识,自己也慢慢摸索 完成了该效果
下面说下实现 附代码
因为是在列表中完成的某个item的图标隐藏与显示
这个时候我们需要合index绑定 并且和改条目的id绑定(用来互斥)
这里需要注意一点
@mouseenter和@mouseleave方法必须放到父类的div中 才能起效果
我们需要
在js中把id绑定 把index设置值,默认为false 既不显示
下面js代码中做了id绑定和给数组的标记赋值的关系
/**
 *左边图表控制隐藏与显示
 */
const leftIcon = reactive({
    inputAry: [] as boolean[]
})
const leftIconId = ref()

const mouseenter = (index: number, item: SymptomList) => {
    leftIcon.inputAry[index] = true
    leftIconId.value = item.id
    console.log('mouseenter')
}

const mouseleave = (index: number, item: SymptomList) => {
    leftIcon.inputAry[index] = false
    leftIconId.value = item.id;
    console.log('mouseleave')
}
我们在
html中把@mouseenter 和 @mouseleave事件添加
然后再指定的div标签内 做隐藏与显示的判断 还是根据id和当前点击的标记位
<div v-for="(item, index) in symptomList" class="item">
            <div class="left">
            	 <!--  @mouseenter="mouseenter(index,item)"
            	 在这里绑定index和item数据类(这里有我们要的数据id)-->
                <div class="left-div" @mouseenter="mouseenter(index,item)"
                 @mouseleave="mouseleave(index,item)">
                    <div v-if="editShow.inputAry[index] == true && item.id == diseaseId ">
                        <a-input class="input" v-model:value="inputContent"
                        autofocus="autofocus" :max-length="10"
                            @change="changeInput()" />
                        <a-button class="commit" @click="handleInputCommit(item,index)">
                            <template #icon>
                                <check-outlined style="color: #ffffff" />
                            </template>
                        </a-button>
                        <a-button class="cancel" @click="handleInputCancel(index)">
                            <template #icon>
                                <close-outlined />
                            </template>
                        </a-button>
                    </div>
                    <div v-else style="display: flex;">
                        <div>{{ item.name }}</div>
                        <div class="right-icon"
                          <!-- 这里是item尾部的2个图标 编辑和删除图标 我们做了2个判断
                          第一是==true时,我们才把图标显示出来
                          第二:将当前点击的id记录 -->
                        v-if="leftIcon.inputAry[index] == true && item.id == leftIconId">
                            <a-button style="color:#676E7C; width: 13.7px ; height: 13.7px;"
                                @click="handleClickEdit(item,index)" type="link">
                                <template #icon>
                                    <edit-outlined />
                                </template>
                            </a-button>

                            <a-button style="margin-left: 5px;
                            color:#676E7C; width: 13.7px ; height:13.7px;"
                                @click="handleClickDel(item,index)" type="link">
                                <template #icon>
                                    <delete-outlined />
                                </template>
                            </a-button>
                        </div>
                    </div>
                </div>
            </div>
mouseover 和 mouseenter 的区别
mouseover:当鼠标移入元素或其子元素都会触发事件,有一个重复触发,事件叠加过程。对应的移除事件是 mouseout
mouseenter:当鼠标移入元素本身(不包含元素的子元素)会触发事件,事件不会叠加。对应的移除事件是 mouseleave
hover 事件调用顺序:
mouseover -> mouseenter -> mousemove(hover进去之后移动会触发) -> mouseout -> mouseleave
用div来演示所有事件方法文章来源:https://www.toymoban.com/news/detail-403056.html
 <div
     <!-- 1、进入元素 事件会叠加 -->
    @mouseover="mouseover"
     <!-- 2、进入元素 事件不叠加 -->
    @mouseenter="mouseenter"
     <!-- 3、移动 -->
    @mousemove="mousemove"
     <!-- 4、离开元素 事件会叠加-->
    @mouseout="mouseout"
     <!-- 5、离开元素 事件不叠加 -->
    @mouseleave="mouseleave"
     <!-- 6、鼠标在元素上 按下 -->
    @mousedown="mousedown"
    <!-- 7、鼠标在元素上 抬起 -->
    @mouseup="mouseup"
  >
  </div>
总结
学习之路 永无止步
记录当下,保持一颗向上的心态~!文章来源地址https://www.toymoban.com/news/detail-403056.html
到了这里,关于Vue实现鼠标悬浮隐藏与显示图片效果 @mouseenter 和 @mouseleave事件的文章就介绍完了。如果您还想了解更多内容,请在右上角搜索TOY模板网以前的文章或继续浏览下面的相关文章,希望大家以后多多支持TOY模板网!


