SOME/IP开源库vsomeip系列分析
1. 代码拉取
vsomeip相关代码可以直接从github上获取,如下:
git clone https://github.com/COVESA/vsomeip.git

2. 源码编译及测试例运行
vsomeip工程源码编译方法,参考源码中的README文档,内容如下:
### vsomeip

##### Copyright
Copyright (C) 2015-2017, Bayerische Motoren Werke Aktiengesellschaft (BMW AG)

##### License

This Source Code Form is subject to the terms of the Mozilla Public
License, v. 2.0. If a copy of the MPL was not distributed with this
file, You can obtain one at http://mozilla.org/MPL/2.0/.

##### vsomeip Overview
----------------
The vsomeip stack implements the http://some-ip.com/ (Scalable service-Oriented
MiddlewarE over IP (SOME/IP)) protocol. The stack consists out of:

* a shared library for SOME/IP (`libvsomeip3.so`)
* a second shared library for SOME/IP's service discovery (`libvsomeip3-sd.so`)
  which is loaded during runtime if the service discovery is enabled.

##### Build Instructions for Linux

###### Dependencies

- A C++11 enabled compiler like gcc >= 4.8 is needed.
- vsomeip uses CMake as buildsystem.
- vsomeip uses Boost >= 1.55:

Ubuntu 14.04:

`sudo apt-get install libboost-system1.55-dev libboost-thread1.55-dev libboost-log1.55-dev`

Ubuntu 12.04: a PPA is necessary to use version 1.54 of Boost:
-- URL: https://launchpad.net/~boost-latest/+archive/ubuntu/ppa
--`sudo add-apt-repository ppa:boost-latest/ppa`
--`sudo apt-get install libboost-system1.55-dev libboost-thread1.55-dev
    libboost-log1.55-dev`

For the tests Google's test framework https://code.google.com/p/googletest/[gtest] in version 1.7.0 is needed.
-- URL: https://googletest.googlecode.com/files/gtest-1.7.0.zip

To build the documentation asciidoc, source-highlight, doxygen and graphviz is needed:
--`sudo apt-get install asciidoc source-highlight doxygen graphviz`

###### Compilation

For compilation call:

```bash
mkdir build
cd build
cmake ..
make
```

To specify a installation directory (like `--prefix=` if you're used to autotools) call cmake like:
```bash
cmake -DCMAKE_INSTALL_PREFIX:PATH=$YOUR_PATH ..
make
make install
```

###### Compilation with predefined unicast and/or diagnosis address
To predefine the unicast address, call cmake like:
```bash
cmake -DUNICAST_ADDRESS=<YOUR IP ADDRESS> ..
```

To predefine the diagnosis address, call cmake like:
```bash
cmake -DDIAGNOSIS_ADDRESS=<YOUR DIAGNOSIS ADDRESS> ..
```
The diagnosis address is a single byte value.

###### Compilation with custom default configuration folder
To change the default configuration folder, call cmake like:
```bash
cmake -DDEFAULT_CONFIGURATION_FOLDER=<DEFAULT CONFIGURATION FOLDER> ..
```
The default configuration folder is /etc/vsomeip.

###### Compilation with custom default configuration file
To change the default configuration file, call cmake like:
```bash
cmake -DDEFAULT_CONFIGURATION_FILE=<DEFAULT CONFIGURATION FILE> ..
```
The default configuration file is /etc/vsomeip.json.

###### Compilation with signal handling

To compile vsomeip with signal handling (SIGINT/SIGTERM) enabled, call cmake like:
```bash
cmake -DENABLE_SIGNAL_HANDLING=1 ..
```
In the default setting, the application has to take care of shutting down vsomeip in case these signals are received.


##### Build Instructions for Android

###### Dependencies

- vsomeip uses Boost >= 1.55. The boost libraries (system, thread and log) must be included in the Android source tree and integrated into the build process with an appropriate Android.bp file.

###### Compilation

In general for building the Android source tree the instructions found on the pages from the Android Open Source Project (AOSP) apply (https://source.android.com/setup/build/requirements).

To integrate the vsomeip library into the build process, the source code together with the Android.bp file has to be inserted into the Android source tree (by simply copying or by fetching with a custom platform manifest).
When building the Android source tree, the Android.bp file is automatically found and considered by the build system.

In order that the vsomeip library is also included in the Android image, the library has to be added to the PRODUCT_PACKAGES variable in one of a device/target specific makefile:

```
PRODUCT_PACKAGES += \
    libvsomeip \
    libvsomeip_cfg \
    libvsomeip_sd
```
2.1.安装依赖
由于我的ubuntu版本是18.04,官方文档上的对应boost包的版本过低,因此这里不需要指定对应的boost包版本号
sudo apt-get install libboost-system-dev libboost-thread-dev libboost-log-dev
sudo apt-get install asciidoc source-highlight doxygen graphviz
若上述安装遇到报错,一般是有对应的编译工具没有安装导致的。通常只需要安装对应的编译工具即可解决,如下:
sudo apt-get install gcc g++ make2.2 编译vsomeip
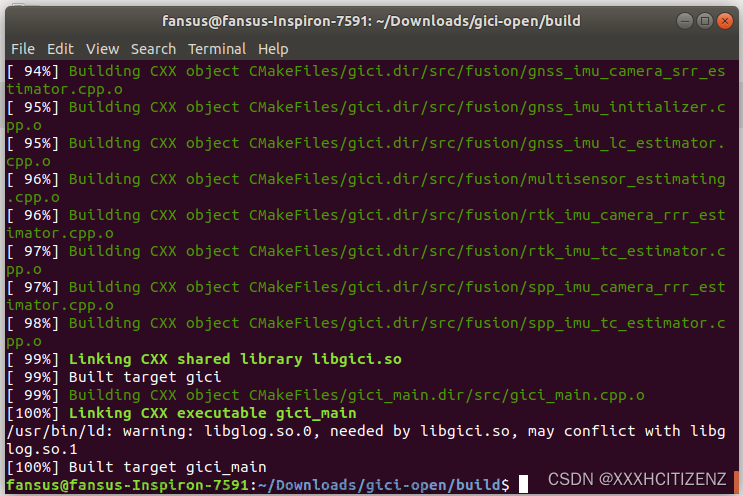
进入下载的工程源码根目录,因为vsomeip是通过cmake对工程进行管理的,则新建build目录,进行如下操作:
mkdir build
cd build
cmake ..
make
make之后工程结构:

出现如上工程结构,则说明已经成功编译了源码,相关的库文件如上截图所示。
2.3编译源码自带的测试例——hello_world
分析从也是从源码自带的hello_world程序开始,因此先编译对应的helloworld程序。
hello_world程序的编译方法可以查看其自带的readme文件 ,内容如下:
# Copyright (C) 2015-2017 Bayerische Motoren Werke Aktiengesellschaft (BMW AG)
# This Source Code Form is subject to the terms of the Mozilla Public
# License, v. 2.0. If a copy of the MPL was not distributed with this
# file, You can obtain one at http://mozilla.org/MPL/2.0/.

Build instructions for Hello World example
------------------------------------------

1. Build whole project at first:
________________________________
cd <root directory of vSomeIP-Lib>$:

mkdir build
cd build
cmake ..
make
sudo make install

2. Build hello_world target
___________________________
cmake --build . --target hello_world
cd ./examples/hello_world/
make

Running Hello World Example
---------------------------

The Hello World Example should be run on the same host.
The network addresses within the configuration files need to be adapted to match
the devices addresses.

To start the hello world client and service from their build-directory do:

HOST1:
VSOMEIP_CONFIGURATION=../helloworld-local.json \
VSOMEIP_APPLICATION_NAME=hello_world_service \
./hello_world_service

HOST1:
VSOMEIP_CONFIGURATION=../helloworld-local.json \
VSOMEIP_APPLICATION_NAME=hello_world_client \
./hello_world_client

Expected output service
-----------------------
2015-04-01 11:31:13.248437 [info] Using configuration file: ../helloworld-local.json
2015-04-01 11:31:13.248766 [debug] Routing endpoint at /tmp/vsomeip-0
2015-04-01 11:31:13.248913 [info] Service Discovery disabled. Using static routing information.
2015-04-01 11:31:13.248979 [debug] Application(hello_world_service, 4444) is initialized.
2015-04-01 11:31:22.705010 [debug] Application/Client 5555 got registered!

Expected output client
----------------------
2015-04-01 11:31:22.704166 [info] Using configuration file: ../helloworld-local.json
2015-04-01 11:31:22.704417 [debug] Connecting to [0] at /tmp/vsomeip-0
2015-04-01 11:31:22.704630 [debug] Listening at /tmp/vsomeip-5555
2015-04-01 11:31:22.704680 [debug] Application(hello_world_client, 5555) is initialized.
Sending: World
Received: Hello World
相关的编译命令如下:
cmake --build . --target hello_world
cd ./examples/hello_world/
make
3. 测试例运行前准备
通过readme可知,运行程序需要加载指定的配置文件helloworld-local.json, 当前目录下没有该配置文件,需要手动拷贝到当前目录的上一级目录,以当下测试为例:
- 可执行程序所在目录:/home/nvidia/data/xw/vsomeip/build/examples/hello_world

- helloworld-local.json配置文件需要拷贝到可执行程序的上一级目录位置:/home/nvidia/data/xw/vsomeip/build/examples

注意:helloworld-local.json配置文件在工程目录:/home/nvidia/data/xw/vsomeip/examples/hello_world位置处可找到,如下:

4. 运行测试:
//server 端
//测试命令,复制如下全部命令,粘贴到终端,按下enter键运行:
VSOMEIP_CONFIGURATION=../helloworld-local.json \
VSOMEIP_APPLICATION_NAME=hello_world_service \
./hello_world_service
//运行结果如下:
nvidia@nvidia-master:~/data/xw/vsomeip/build/examples/hello_world$ VSOMEIP_CONFIGURATION=../helloworld-local.json \
> VSOMEIP_APPLICATION_NAME=hello_world_service \
> ./hello_world_service
2022-05-15 14:19:57.214866 [info] Parsed vsomeip configuration in 1ms
2022-05-15 14:19:57.217071 [info] Using configuration file: "../helloworld-local.json".
2022-05-15 14:19:57.217994 [info] Configuration module loaded.
2022-05-15 14:19:57.218612 [info] Initializing vsomeip application "hello_world_service".
2022-05-15 14:19:57.220857 [info] Instantiating routing manager [Host].
2022-05-15 14:19:57.221919 [info] create_local_server Routing endpoint at /tmp/vsomeip-0
2022-05-15 14:19:57.224044 [info] Application(hello_world_service, 4444) is initialized (11, 100).
2022-05-15 14:19:57.224674 [info] Starting vsomeip application "hello_world_service" (4444) using 2 threads I/O nice 255
2022-05-15 14:19:57.227687 [info] main dispatch thread id from application: 4444 (hello_world_service) is: 7f8eda11d0 TID: 1348
2022-05-15 14:19:57.228521 [info] shutdown thread id from application: 4444 (hello_world_service) is: 7f8e5a01d0 TID: 1349
2022-05-15 14:19:57.232458 [info] Watchdog is disabled!
2022-05-15 14:19:57.238391 [info] OFFER(4444): [1111.2222:0.0] (true)
2022-05-15 14:19:57.238942 [info] io thread id from application: 4444 (hello_world_service) is: 7f8fc90010 TID: 1346
2022-05-15 14:19:57.242660 [info] vSomeIP 3.1.20.3 | (default)
2022-05-15 14:19:57.239282 [info] io thread id from application: 4444 (hello_world_service) is: 7f8d59e1d0 TID: 1351
2022-05-15 14:19:57.243613 [info] Listening at /tmp/vsomeip-4444
2022-05-15 14:19:58.484243 [info] Application/Client 5555 is registering.
2022-05-15 14:19:58.489425 [info] Client [4444] is connecting to [5555] at /tmp/vsomeip-5555
2022-05-15 14:19:58.497555 [info] REGISTERED_ACK(5555)
2022-05-15 14:19:58.601259 [info] REQUEST(5555): [1111.2222:255.4294967295]
2022-05-15 14:19:58.620860 [info] RELEASE(5555): [1111.2222]
2022-05-15 14:19:58.624073 [info] Application/Client 5555 is deregistering.
2022-05-15 14:19:58.729081 [info] Client [4444] is closing connection to [5555]
2022-05-15 14:20:03.618335 [info] STOP OFFER(4444): [1111.2222:0.0] (true)
2022-05-15 14:20:03.623931 [info] Stopping vsomeip application "hello_world_service" (4444).
//截图如下

//client 端
//测试命令,复制如下全部命令,enter运行
VSOMEIP_CONFIGURATION=../helloworld-local.json \
VSOMEIP_APPLICATION_NAME=hello_world_client \
./hello_world_client
//运行结果如下:
nvidia@nvidia-master:~/data/xw/vsomeip/build/examples/hello_world$ VSOMEIP_CONFIGURATION=../helloworld-local.json \
> VSOMEIP_APPLICATION_NAME=hello_world_client \
> ./hello_world_client
2022-05-15 14:19:58.453265 [info] Parsed vsomeip configuration in 1ms
2022-05-15 14:19:58.455301 [info] Using configuration file: "../helloworld-local.json".
2022-05-15 14:19:58.456176 [info] Configuration module loaded.
2022-05-15 14:19:58.456714 [info] Initializing vsomeip application "hello_world_client".
2022-05-15 14:19:58.457180 [info] Instantiating routing manager [Proxy].
2022-05-15 14:19:58.457835 [info] Client [5555] is connecting to [0] at /tmp/vsomeip-0
2022-05-15 14:19:58.458461 [info] Application(hello_world_client, 5555) is initialized (11, 100).
2022-05-15 14:19:58.459481 [info] Starting vsomeip application "hello_world_client" (5555) using 2 threads I/O nice 255
2022-05-15 14:19:58.463607 [info] main dispatch thread id from application: 5555 (hello_world_client) is: 7f8693b1d0 TID: 1353
2022-05-15 14:19:58.463384 [info] shutdown thread id from application: 5555 (hello_world_client) is: 7f8613a1d0 TID: 1354
2022-05-15 14:19:58.474254 [info] io thread id from application: 5555 (hello_world_client) is: 7f87029010 TID: 1352
2022-05-15 14:19:58.474509 [info] io thread id from application: 5555 (hello_world_client) is: 7f7ffff1d0 TID: 1355
2022-05-15 14:19:58.482142 [info] Listening at /tmp/vsomeip-5555
2022-05-15 14:19:58.483037 [info] Client 5555 (hello_world_client) successfully connected to routing  ~> registering..
2022-05-15 14:19:58.495687 [info] Application/Client 5555 (hello_world_client) is registered.
2022-05-15 14:19:58.604220 [info] ON_AVAILABLE(5555): [1111.2222:0.0]
Sending: World
2022-05-15 14:19:58.607258 [info] Client [5555] is connecting to [4444] at /tmp/vsomeip-4444
Received: Hello World
2022-05-15 14:19:58.620268 [info] Stopping vsomeip application "hello_world_client" (5555).
2022-05-15 14:19:58.626685 [info] Application/Client 5555 (hello_world_client) is deregistered.
2022-05-15 14:19:58.631236 [info] Client [5555] is closing connection to [4444]
//运行截图

过程中遇到的问题记录:
nvidia@nvidia-master:~/data/xw/vsomeip/build/examples$ ./notify-sample
Configuration module could not be loaded!
解决方法:
nvidia@nvidia-master:~/data/xw/vsomeip/build$ sudo make install
nvidia@nvidia-master:~/data/xw/vsomeip/build/examples$ sudo ldconfig
顺利运行:文章来源:https://www.toymoban.com/news/detail-405434.html
 文章来源地址https://www.toymoban.com/news/detail-405434.html
到了这里,关于vsomeip环境搭建及helloworld测试例跑通的文章就介绍完了。如果您还想了解更多内容,请在右上角搜索TOY模板网以前的文章或继续浏览下面的相关文章,希望大家以后多多支持TOY模板网!