STM32基于HAL工程硬件I2C读取AT24C02数据
- ✨申明:本文章仅发表在CSDN网站,任何其他网站,未注明来源,见此内容均为盗链和爬取,请多多尊重和支持原创!
- 🍁对于文中所提供的相关资源链接将作不定期更换。
- 相关篇针对AT24C32及以上容量《STM32基于STM32-HAL工程硬件I2C读取AT24Cxx数据》
- 🎯本工程使用STM32F103VE+AT24C02实物验证没有问题。由于手上只有AT24C02,没有对低于AT24C32型号下的其它容量型号进行测试。
- ✨说明:本库文件仅支持容量大于4095Bytes(AT24C32)以下型号的读取。
- 📖型号和容量参照:
#define AT24C01		127
#define AT24C02		255
#define AT24C04		511
#define AT24C08		1023
#define AT24C16		2047
#define AT24C32		4095
#define AT24C64	    8191
#define AT24C128	16383
#define AT24C256	32767
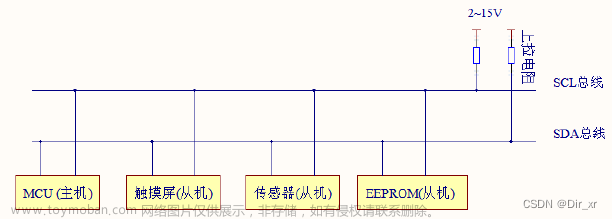
📑AT24C02/C4/C8/C16地址说明
- 🧲AT24C02/C4/C8/C16的I2C地址取决于引脚A0、A1和A2的电平设置,可以有8个不同的地址。以下是每个地址对应的引脚配置:
0b1010000:A0 = 0,A1 = 0,A2 = 0
0b1010001:A0 = 1,A1 = 0,A2 = 0
0b1010010:A0 = 0,A1 = 1,A2 = 0
0b1010011:A0 = 1,A1 = 1,A2 = 0
0b1010100:A0 = 0,A1 = 0,A2 = 1
0b1010101:A0 = 1,A1 = 0,A2 = 1
0b1010110:A0 = 0,A1 = 1,A2 = 1
0b1010111:A0 = 1,A1 = 1,A2 = 1
- 🔖如果引脚A0-A1-A2都接地,则AT24Cxx的I2C地址为
0b1010000(或0x50)。
⛳AT24C02/C4/C8/C16读写说明
- 🌿AT24C02是一种2 Kb(256 × 8)串行电子可擦可编程只读存储器(EEPROM)芯片,支持标准I2C总线通信协议。AT24C02的编程操作是以页为单位完成的,每次最多可编程8个连续字节。
具体来说,AT24C02的一页大小为8个字节,每次写入数据时,需要确保写入的数据不跨页。因此,如果要在AT24C02中写入10个字节的数据,需要先将前8个字节写入一个页,再将后两个字节写入另一个页。
- 🌿AT24C08是一种8 Kb(1024 × 8)串行电子可擦可编程只读存储器(EEPROM)芯片,支持标准I2C总线通信协议。AT24C08的编程操作是以页为单位完成的,每次最多可编程8个连续字节。
具体来说,AT24C08的一页大小为8个字节,每次写入数据时,需要确保写入的数据不跨页。因此,如果要在AT24C08中写入10个字节的数据,需要先将前8个字节写入一个页,再将后两个字节写入另一个页。
- 🌿在AT24C16中,每个页大小为16Bytes,因此一次最多可以进行编程16个字节。
具体来说,AT24C016的一页大小为16个字节,每次写入数据时,需要确保写入的数据不跨页。因此,如果要在AT24C16中写入20个字节的数据,需要先将前16个字节写入一个页,再将后4个字节写入另一个页。
🚩使用注意事项
- 🌿将需要存储的字符串或数组长度不要超过16个字符。
- 🌿如果需要存储超过16个字节长度的数据最好截断,分段存储。
- 🌿读取AT24Cxx的数据,如果使用数组接收,不要直接使用
printf–>%s来输出,因为%s输出结尾是以\0为结束符,直接使用%s输出可能会导致输出的数据重复输出。以如下方式输出:
				for(int i=0;i< BufferSize1;i++)
					{
						HAL_UART_Transmit(&huart1 , &Read_Buffer[i] , 1 , 1000);
					}
🛠STM32CubeMX工程配置
- 🔨使能一个I2C接口。(如果选择I2C2,需要在
at24_hal_i2c.c,修改相关函数的形参。)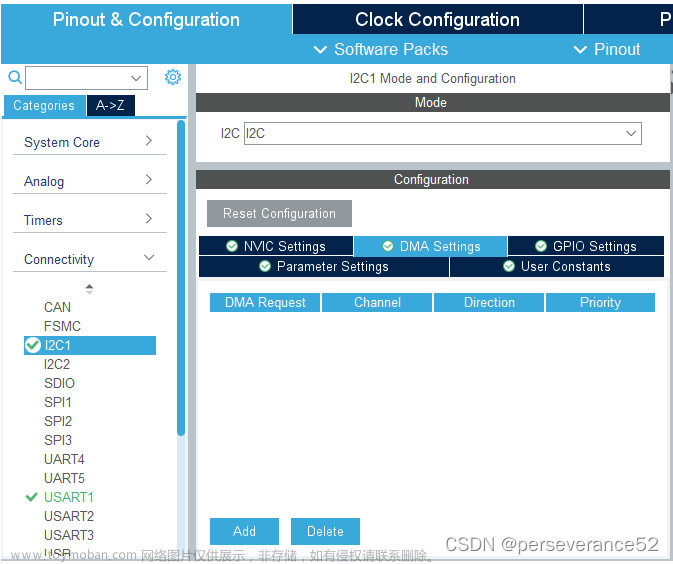
- 🔧使能一个串口,用于调试信息输出。
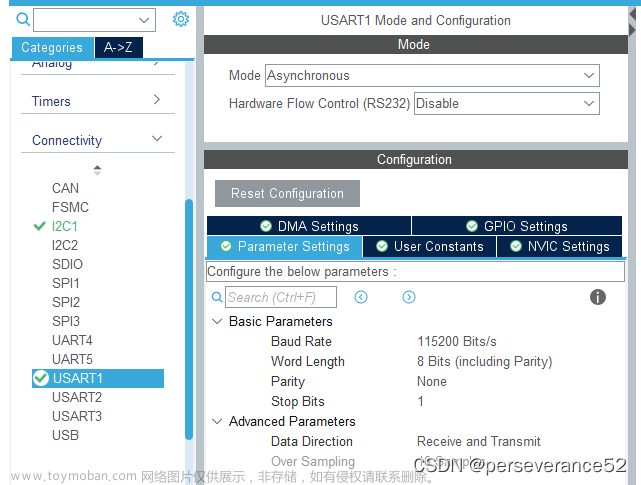
🔖时钟源根据个人具体的STM32型号自己配置。文章来源:https://www.toymoban.com/news/detail-410525.html
📋AT24C02/04/08驱动代码
-🌿 at24_hal_i2c.c文件文章来源地址https://www.toymoban.com/news/detail-410525.html
/* Includes ------------------------------------------------------------------*/
#include "stm32f1xx_hal.h"
#include "stm32f1xx_hal_i2c.h"
#include <string.h>
#include <stdio.h>
#include "at24_hal_i2c.h"


/**
  * @brief               : This function handles Writing Array of Bytes on the specific Address .
  *                        This program have this feature that don't force you to use absolute 16 bytes
  *                        you can use more than 16 bytes buffer.
  * @param  hi2c         : Pointer to a I2C_HandleTypeDef structure that contains
  *                        the configuration information for the specified I2C.
  * @param  DevAddress   : specifies the slave address to be programmed(EEPROM ADDRESS).
  * @param  MemAddress   : Internal memory address (WHERE YOU WANNA WRITE TO)
  * @param  pData        : Pointer to data buffer
  * @param  TxBufferSize : Amount of data you wanna Write
  * @retval
  */
int at24_HAL_WriteBytes(I2C_HandleTypeDef *hi2c, uint16_t DevAddress, uint16_t MemAddress, uint8_t *pData, uint16_t TxBufferSize)
{
    /*
     * program just get the DevAddress of the Slave (not master) and for the next step
     * You know that the most of the EEprom address start with 0xA0
     * give MemAddress for the location you want to write to
     * give Data buffer so it can write Data on this location
     */
    //Note that this function works properly to 31 bytes
    if (MemAddress + TxBufferSize > 16)
    {
        //Write to 16bytes
        while (HAL_I2C_Mem_Write(hi2c, (uint16_t)DevAddress, (uint16_t)MemAddress, I2C_MEMADD_SIZE_8BIT, pData, (uint16_t)16 - MemAddress, 1000) != HAL_OK);
        //write remaining bytes
        *pData = *pData + (16 - MemAddress);
        while (HAL_I2C_Mem_Write(hi2c, (uint16_t)DevAddress, (uint16_t)16, I2C_MEMADD_SIZE_8BIT, pData, (uint16_t)((MemAddress + TxBufferSize) - 16), 1000) != HAL_OK);

    }
    else
    {
        while ((TxBufferSize - 16) > 0)
        {
            //if your data is more than 16 bytes,you are here
            while (HAL_I2C_Mem_Write(hi2c, (uint16_t)DevAddress, (uint16_t)MemAddress, I2C_MEMADD_SIZE_8BIT, pData, (uint16_t)16, 1000) != HAL_OK);
            TxBufferSize -= 16;
            pData += 16;
            MemAddress += 16;
        }
        //remaining data
        while (HAL_I2C_Mem_Write(hi2c, (uint16_t)DevAddress, (uint16_t)MemAddress, I2C_MEMADD_SIZE_8BIT, pData, (uint16_t)TxBufferSize, 1000) != HAL_OK);
    }
    return 1;
}


int at24_HAL_ReadBytes(I2C_HandleTypeDef *hi2c, uint16_t DevAddress, uint16_t MemAddress, uint8_t *pData, uint16_t RxBufferSize)
{
    int TimeOut;
    /*
     * program just get the DevAddress of the Slave (not master) and for the next step
     * You know that the most of the EEprom address start with 0xA0
     * get the MemAddress for the location you want to write data on it
     * get the Data buffer so it can write Data on this location
     */
    //Note that this function works properly to 31bytes

    while ((RxBufferSize - 16) > 0)
    {
        //if your data is more than 16 bytes,you are here
        TimeOut = 0;
        while (HAL_I2C_Mem_Read(hi2c, (uint16_t)DevAddress, (uint16_t)MemAddress, I2C_MEMADD_SIZE_8BIT, pData, (uint16_t)16, 1000) != HAL_OK && TimeOut < 10)
        {
            TimeOut++;
        }

        RxBufferSize   -= 16;
        pData  += 16;
        MemAddress += 16;
    }
//          //remaining data
    TimeOut = 0;
    while (HAL_I2C_Mem_Read(hi2c, (uint16_t)DevAddress, (uint16_t)MemAddress, I2C_MEMADD_SIZE_8BIT, pData, (uint16_t)RxBufferSize, 1000) != HAL_OK && TimeOut < 10)
    {
        TimeOut++;
    }

    return 1;
}

/*
 * @brief               : This function handles Reading Array of Bytes from the specific Address .
 *                        This program have this feature that don't force you to use absolute 16 bytes
 *                        you can use more than 16 bytes buffer.
 * @param  hi2c         : Pointer to a I2C_HandleTypeDef structure that contains
 *                        the configuration information for the specified I2C.
 * @param  DevAddress   : specifies the slave address to be programmed(EEPROM ADDRESS).
 * @param  MemAddress   : Internal memory address (WHERE YOU WANNA READ FROM)
 * @param  pData        : Pointer to data buffer
 * @param  TxBufferSize : Amount of data to be Read
 * @retval
 */
int at24_HAL_SequentialRead(I2C_HandleTypeDef *hi2c , uint8_t DevAddress, uint16_t MemAddress, uint8_t *pData, uint16_t RxBufferSize)
{
    /*
     * just like WriteByte but get what it want
     * but maybe you should know that the Data is location you want to save data
     * for future use
     */
    while ((RxBufferSize - 16) > 0)
    {
        while (HAL_I2C_Mem_Read(hi2c, (uint16_t)DevAddress, (uint16_t)MemAddress, I2C_MEMADD_SIZE_8BIT, pData, (uint16_t)16, (uint32_t)1000) != HAL_OK);
        RxBufferSize -= 16;
        pData += 16;
        MemAddress += 16;
    }
    while (HAL_I2C_Mem_Read(hi2c, (uint16_t)DevAddress, (uint16_t)MemAddress, I2C_MEMADD_SIZE_8BIT, pData, (uint16_t)RxBufferSize, (uint32_t)1000) != HAL_OK) {}
    /*
     * if DataRecive  is 0xFF or 255 ,this means that block was empty
     */
    return 1;
}

/*
 * @brief               : This function handles Erase Full chip.
 * @param  hi2c         : Pointer to a I2C_HandleTypeDef structure that contains
 *                        the configuration information for the specified I2C.
 * @retval
 */

int at24_HAL_EraseMemFull(I2C_HandleTypeDef *hi2c)
{
    /*
     * this may take will don't panic
     */
    uint8_t EraseBuf[16] = {0xff, 0xff, 0xff, 0xff, 0xff, 0xff, 0xff, 0xff, 0xff, 0xff, 0xff, 0xff, 0xff, 0xff, 0xff, 0xff};
    int i;
    for (i = 0 ; i < 1024 ; i += 16)
    {
        /*
         * if you know,0xFF means that block is empty
         */
//      sdI2C_WriteBytes(&hi2c,0xA0,(uint16_t )i,EraseBuf,16);
        at24_HAL_WriteBytes(hi2c, 0xA0, (uint16_t)i, EraseBuf, 16);
    }
    return 1;
}

/**
  * @brief               : This function handles Writing String on the specific Address .
  *                        This program have this feature that don't force you to use absolute 16 bytes
  *                        you can use more than 16 bytes buffer.
  * @param  hi2c         : Pointer to a I2C_HandleTypeDef structure that contains
  *                        the configuration information for the specified I2C.
  * @param  DevAddress   : specifies the slave address to be programmed(EEPROM ADDRESS).
  * @param  MemAddress   : Internal memory address (WHERE YOU WANNA Write)
  * @param  pString      : Pointer to data buffer(CHAR DATA)
  * @param  length       : Amount of buffer you wanna Write from
  * @retval
  */

int at24_HAL_WriteString(I2C_HandleTypeDef *hi2c, char *pString , uint16_t MemAddress , uint8_t length)
{
    uint8_t pData[length];
    int i = 0;
    while (*pString)
        (pData[i++]) = (uint8_t)(*pString++);
//  sdI2C_WriteBytes(&hi2c,0xA0,MemAddress,pData,length);
    at24_HAL_WriteBytes(hi2c, 0xA0, MemAddress, pData, length);
    return 1;
}

/**
  * @brief               : This function handles Reading String on the specific Address .
  *                        This program have this feature that don't force you to use absolute 16 bytes
  *                        you can use more than 16 bytes buffer.
  * @param  hi2c         : Pointer to a I2C_HandleTypeDef structure that contains
  *                        the configuration information for the specified I2C.
  * @param  MemAddress   : Internal memory address (WHERE YOU WANNA READ)
  * @param  pString      : Pointer to data buffer(CHAR DATA)
  * @param  length       : Amount of buffer you wanna Read from
  * @retval
  */

int at24_HAL_ReadString(I2C_HandleTypeDef *hi2c, char *pString, uint16_t MemAddress, uint8_t length)
{
    uint8_t pData[length];
    int i = 0;
//  sdI2C_RandomRead(0xA0,MemAddress,pData,length);
    at24_HAL_ReadBytes(hi2c, 0xA0, MemAddress, pData, length);


    while (pData[i])
        (*pString++) = (char)pData[i++];
    return 1;
}
- 🌿at24_hal_i2c.h文件
#ifndef _AT24_HAL_I2C_H_
#define _AT24_HAL_I2C_H_

#include "stm32f1xx_hal.h"
#include "stm32f1xx_hal_i2c.h"


int at24_HAL_WriteBytes(I2C_HandleTypeDef *hi2c,uint16_t DevAddress,uint16_t MemAddress, uint8_t *pData,uint16_t TxBufferSize);
int at24_HAL_ReadBytes(I2C_HandleTypeDef *hi2c,uint16_t DevAddress,uint16_t MemAddress, uint8_t *pData,uint16_t RxBufferSize);

int at24_HAL_SequentialRead(I2C_HandleTypeDef *hi2c ,uint8_t DevAddress,uint16_t MemAddress,uint8_t *pData,uint16_t RxBufferSize);
int at24_HAL_EraseMemFull(I2C_HandleTypeDef *hi2c);
int at24_HAL_WriteString(I2C_HandleTypeDef *hi2c,char *pString ,uint16_t MemAddress ,uint8_t length);
int at24_HAL_ReadString(I2C_HandleTypeDef *hi2c,char *pString,uint16_t MemAddress,uint8_t length);


#endif /* DRIVERS_MYLIB_AT24_HAL_I2C_H_ */
📝main主程序代码
/* USER CODE BEGIN Header */
/**
  ******************************************************************************
  * @file           : main.c
  * @brief          : Main program body
  ******************************************************************************
  * @attention
  *
  * Copyright (c) 2023 STMicroelectronics.
  * All rights reserved.
  *
  * This software is licensed under terms that can be found in the LICENSE file
  * in the root directory of this software component.
  * If no LICENSE file comes with this software, it is provided AS-IS.
  *
  ******************************************************************************
  */
/* USER CODE END Header */
/* Includes ------------------------------------------------------------------*/
#include "main.h"
#include "i2c.h"
#include "usart.h"
#include "gpio.h"

/* Private includes ----------------------------------------------------------*/
/* USER CODE BEGIN Includes */
//#include "stdio.h"//printf函数启用
#include <string.h>
#include "at24_hal_i2c.h"
/* USER CODE END Includes */

/* Private typedef -----------------------------------------------------------*/
/* USER CODE BEGIN PTD */
#define AT24Cxx_ADDRESS ((uint16_t)0xA0)
#define  MemAddress  ((uint16_t)0x00)
/* USER CODE END PTD */

/* Private define ------------------------------------------------------------*/
/* USER CODE BEGIN PD */
/* USER CODE END PD */

/* Private macro -------------------------------------------------------------*/
/* USER CODE BEGIN PM */

/* USER CODE END PM */

/* Private variables ---------------------------------------------------------*/

/* USER CODE BEGIN PV */
uint8_t Buffer[] = "Perseverance";//Hi!STM32F103VE Hello World Perseverance
#define countof(a) (sizeof(a) / sizeof(*(a)))
#define BufferSize1     (countof(Buffer)-1)
uint8_t Read_Buffer[BufferSize1];
/* USER CODE END PV */

/* Private function prototypes -----------------------------------------------*/
void SystemClock_Config(void);
/* USER CODE BEGIN PFP */

/* USER CODE END PFP */

/* Private user code ---------------------------------------------------------*/
/* USER CODE BEGIN 0 */

/* USER CODE END 0 */

/**
  * @brief  The application entry point.
  * @retval int
  */
int main(void)
{
    /* USER CODE BEGIN 1 */

    /* USER CODE END 1 */

    /* MCU Configuration--------------------------------------------------------*/

    /* Reset of all peripherals, Initializes the Flash interface and the Systick. */
    HAL_Init();

    /* USER CODE BEGIN Init */

    /* USER CODE END Init */

    /* Configure the system clock */
    SystemClock_Config();

    /* USER CODE BEGIN SysInit */

    /* USER CODE END SysInit */

    /* Initialize all configured peripherals */
    MX_GPIO_Init();
    MX_I2C1_Init();
    MX_USART1_UART_Init();
    /* USER CODE BEGIN 2 */
    uint32_t TimerUART = HAL_GetTick();
		at24_HAL_WriteBytes(&hi2c1, AT24Cxx_ADDRESS, MemAddress, Buffer, BufferSize1);
//    if (BufferSize1 < 9)
//    {
//        printf("BufferSize=%d \r\n", BufferSize1);
//        at24_HAL_WriteBytes(&hi2c1, AT24Cxx_ADDRESS, MemAddress, Buffer, BufferSize1);
//    }
//    else
//    {
//        printf("注意:AT24C02一次不能超过8字节 \r\n");
//    }

    /* USER CODE END 2 */

    /* Infinite loop */
    /* USER CODE BEGIN WHILE */
    while (1)
    {
        /* USER CODE END WHILE */

        /* USER CODE BEGIN 3 */
        if ((HAL_GetTick() - TimerUART) > 2500)
        {

    at24_HAL_SequentialRead(&hi2c1,AT24Cxx_ADDRESS,MemAddress, Read_Buffer, BufferSize1);//连续读16字节数据
//            at24_HAL_ReadBytes(&hi2c1, AT24Cxx_ADDRESS, MemAddress, Read_Buffer, BufferSize1);
				for(int i=0;i< BufferSize1;i++)
					{
						HAL_UART_Transmit(&huart1 , &Read_Buffer[i] , 1 , 1000);
					}
//           printf("Read_Date=%s \r\n", Read_Buffer);//数组不要使用printf->%s输出
            TimerUART = HAL_GetTick();
            HAL_GPIO_TogglePin(GPIOE, LED_Pin);
        }
    }
    /* USER CODE END 3 */
}

/**
  * @brief System Clock Configuration
  * @retval None
  */
void SystemClock_Config(void)
{
    RCC_OscInitTypeDef RCC_OscInitStruct = {0};
    RCC_ClkInitTypeDef RCC_ClkInitStruct = {0};

    /** Initializes the RCC Oscillators according to the specified parameters
    * in the RCC_OscInitTypeDef structure.
    */
    RCC_OscInitStruct.OscillatorType = RCC_OSCILLATORTYPE_HSE;
    RCC_OscInitStruct.HSEState = RCC_HSE_ON;
    RCC_OscInitStruct.HSEPredivValue = RCC_HSE_PREDIV_DIV1;
    RCC_OscInitStruct.HSIState = RCC_HSI_ON;
    RCC_OscInitStruct.PLL.PLLState = RCC_PLL_ON;
    RCC_OscInitStruct.PLL.PLLSource = RCC_PLLSOURCE_HSE;
    RCC_OscInitStruct.PLL.PLLMUL = RCC_PLL_MUL9;
    if (HAL_RCC_OscConfig(&RCC_OscInitStruct) != HAL_OK)
    {
        Error_Handler();
    }

    /** Initializes the CPU, AHB and APB buses clocks
    */
    RCC_ClkInitStruct.ClockType = RCC_CLOCKTYPE_HCLK | RCC_CLOCKTYPE_SYSCLK
                                  | RCC_CLOCKTYPE_PCLK1 | RCC_CLOCKTYPE_PCLK2;
    RCC_ClkInitStruct.SYSCLKSource = RCC_SYSCLKSOURCE_PLLCLK;
    RCC_ClkInitStruct.AHBCLKDivider = RCC_SYSCLK_DIV1;
    RCC_ClkInitStruct.APB1CLKDivider = RCC_HCLK_DIV2;
    RCC_ClkInitStruct.APB2CLKDivider = RCC_HCLK_DIV1;

    if (HAL_RCC_ClockConfig(&RCC_ClkInitStruct, FLASH_LATENCY_2) != HAL_OK)
    {
        Error_Handler();
    }
}

/* USER CODE BEGIN 4 */

/* USER CODE END 4 */

/**
  * @brief  This function is executed in case of error occurrence.
  * @retval None
  */
void Error_Handler(void)
{
    /* USER CODE BEGIN Error_Handler_Debug */
    /* User can add his own implementation to report the HAL error return state */
    __disable_irq();
    while (1)
    {
    }
    /* USER CODE END Error_Handler_Debug */
}

#ifdef  USE_FULL_ASSERT
/**
  * @brief  Reports the name of the source file and the source line number
  *         where the assert_param error has occurred.
  * @param  file: pointer to the source file name
  * @param  line: assert_param error line source number
  * @retval None
  */
void assert_failed(uint8_t *file, uint32_t line)
{
    /* USER CODE BEGIN 6 */
    /* User can add his own implementation to report the file name and line number,
       ex: printf("Wrong parameters value: file %s on line %d\r\n", file, line) */
    /* USER CODE END 6 */
}
#endif /* USE_FULL_ASSERT */
📚工程源码
- ✨申明:本文章仅发表在CSDN网站,任何其他网站,未注明来源,见此内容均为盗链和爬取,请多多尊重和支持原创!
- 🍁对于文中所提供的相关资源链接将作不定期更换。
链接: https://pan.baidu.com/s/1dxbnFDVQ3yJPxMlpESfSzA
提取码: fc33
到了这里,关于STM32基于HAL工程硬件I2C读写AT24C02/04/08数据的文章就介绍完了。如果您还想了解更多内容,请在右上角搜索TOY模板网以前的文章或继续浏览下面的相关文章,希望大家以后多多支持TOY模板网!