TFT 一般指薄膜晶体管。 薄膜晶体管(Thin Film Transistor,简称TFT)是一种器件。
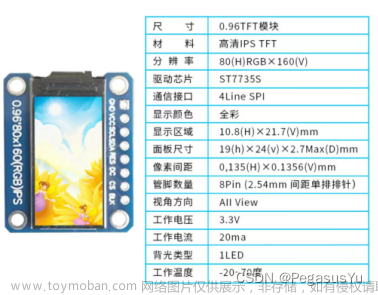
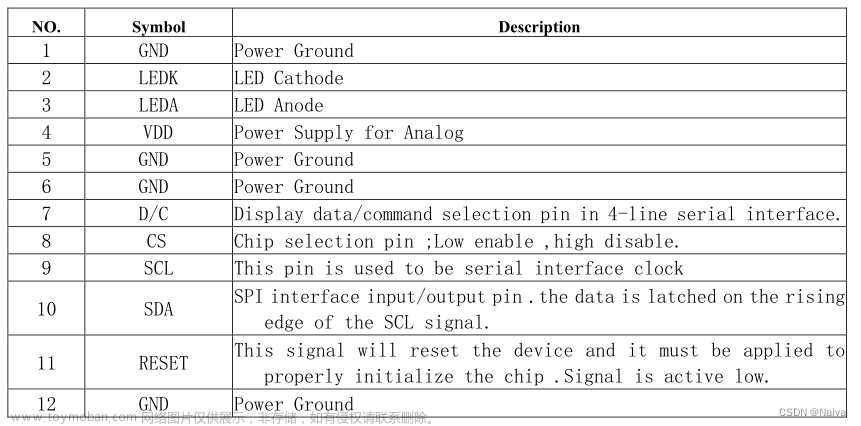
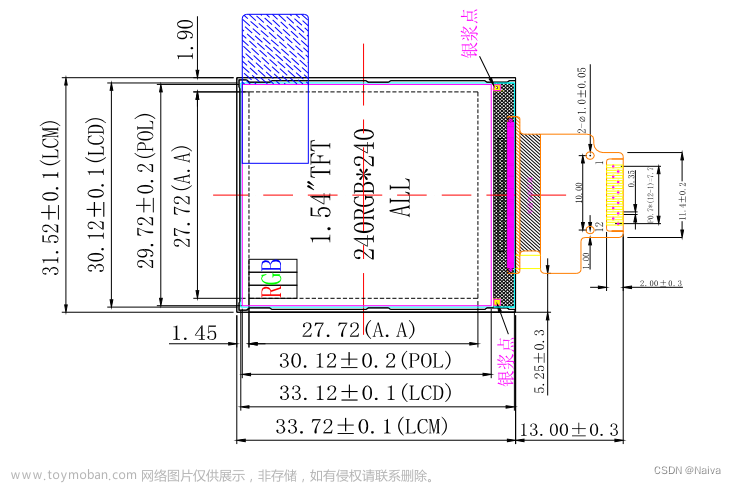
1.屏幕规格
ZJY154T-PG04厚.pdf
ST7789VW芯片手册.pdf
(见资料下载处)
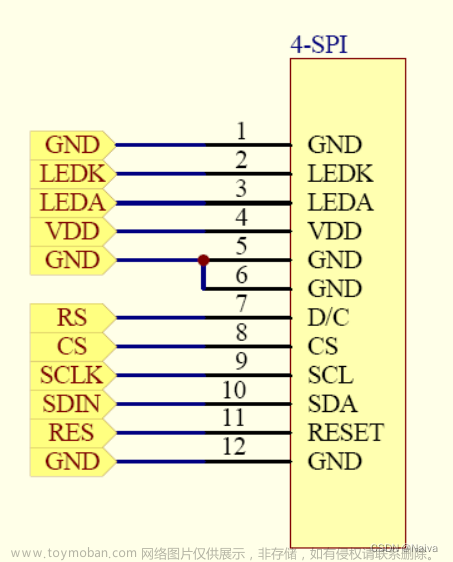
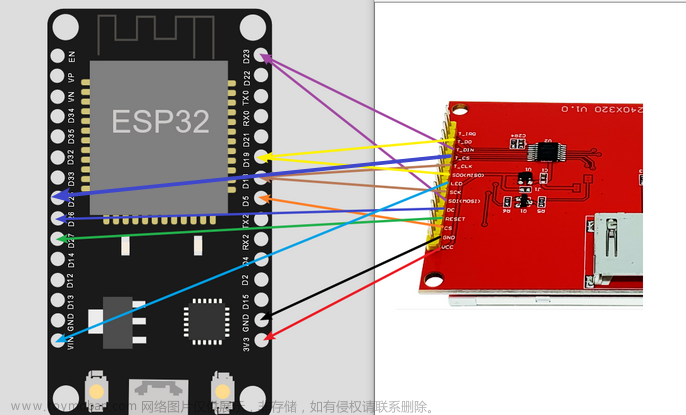
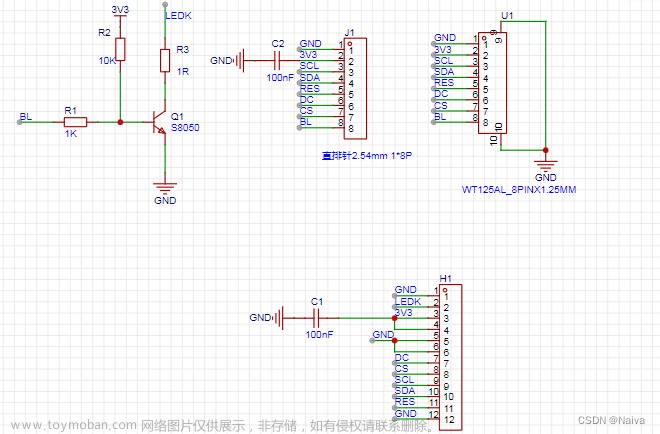
2.原理图
ST7789屏幕驱动电路图


3.程序实现
3.1引脚定义
参考:ESP32 入门笔记01:乐鑫ESP32-DevKitC开发板信息、开发环境搭建以及学资料准备

3.2Adafruit_GFX / Arduino_ST7789版
/***************************************************
  1.3TFT  ST7789 IPS SPI display.
  接线
 TFT_DC    15
 TFT_RST   17
 TFT_SDA   23
 TFT_SCL   18
 GND
 VCC   5V/3.3V 都行
 BLK   不用接
 ****************************************************/

#include <Adafruit_GFX.h>    // Core graphics library by Adafruit
#include <Arduino_ST7789.h> // Hardware-specific library for ST7789 (with or without CS pin)
#include <SPI.h>

#define TFT_DC    15
#define TFT_RST   17
#define TFT_CS    4   // only for displays with CS pin
#define TFT_MOSI  23   // for hardware SPI data pin (all of available pins)
#define TFT_SCLK  18   // for hardware SPI sclk pin (all of available pins)

//You can use different type of hardware initialization
//using hardware SPI (11, 13 on UNO; 51, 52 on MEGA; ICSP-4, ICSP-3 on DUE and etc)
//Arduino_ST7789 tft = Arduino_ST7789(TFT_DC, TFT_RST); //for display without CS pin
//Arduino_ST7789 tft = Arduino_ST7789(TFT_DC, TFT_RST, TFT_CS); //for display with CS pin
//or you can use software SPI on all available pins (slow)
Arduino_ST7789 tft = Arduino_ST7789(TFT_DC, TFT_RST, TFT_MOSI, TFT_SCLK); //for display without CS pin
//Arduino_ST7789 tft = Arduino_ST7789(TFT_DC, TFT_RST, TFT_MOSI, TFT_SCLK, TFT_CS); //for display with CS pin

float p = 3.1415926;

void setup(void) {
  Serial.begin(9600);
  Serial.print("Hello! ST7789 TFT Test");

  tft.init(240, 240);   // initialize a ST7789 chip, 240x240 pixels

  Serial.println("Initialized");

  /*9uint16_t time = millis();
  tft.fillScreen(BLACK);
  time = millis() - time;

  /*Serial.println(time, DEC);
  delay(500);

  // large block of text
  tft.fillScreen(BLACK);
  testdrawtext("Lorem ipsum dolor sit amet, consectetur adipiscing elit. Curabitur adipiscing ante sed nibh tincidunt feugiat. Maecenas enim massa, fringilla sed malesuada et, malesuada sit amet turpis. Sed porttitor neque ut ante pretium vitae malesuada nunc bibendum. Nullam aliquet ultrices massa eu hendrerit. Ut sed nisi lorem. In vestibulum purus a tortor imperdiet posuere. ", WHITE);
  delay(1000);

  // tft print function
  tftPrintTest();
  delay(4000);

  // a single pixel
  tft.drawPixel(tft.width()/2, tft.height()/2, GREEN);
  delay(500);

  // line draw test
  testlines(YELLOW);
  delay(500);

  // optimized lines
  testfastlines(RED, BLUE);
  delay(500);

  testdrawrects(GREEN);
  delay(500);

  testfillrects(YELLOW, MAGENTA);
  delay(500);

  tft.fillScreen(BLACK);
  testfillcircles(10, BLUE);
  testdrawcircles(10, WHITE);
  delay(500);

  testroundrects();
  delay(500);

  testtriangles();
  delay(500);*/

  /*mediabuttons();
  delay(500);

  Serial.println("done");
  delay(1000);*/
}

void loop() {

  //tft.fillScreen(BLACK);
  testfillcircles(10, BLUE);
  testdrawcircles(10, WHITE);
  testfillrects(YELLOW, MAGENTA);
  delay(500);
  tft.invertDisplay(true);
  delay(500);
  tft.invertDisplay(false);
  delay(500);
  tftPrintTest();
  delay(500);
  mediabuttons();
  delay(500);
}

void testlines(uint16_t color) {
  tft.fillScreen(BLACK);
  for (int16_t x=0; x < tft.width(); x+=6) {
    tft.drawLine(0, 0, x, tft.height()-1, color);
  }
  for (int16_t y=0; y < tft.height(); y+=6) {
    tft.drawLine(0, 0, tft.width()-1, y, color);
  }

  tft.fillScreen(BLACK);
  for (int16_t x=0; x < tft.width(); x+=6) {
    tft.drawLine(tft.width()-1, 0, x, tft.height()-1, color);
  }
  for (int16_t y=0; y < tft.height(); y+=6) {
    tft.drawLine(tft.width()-1, 0, 0, y, color);
  }

  tft.fillScreen(BLACK);
  for (int16_t x=0; x < tft.width(); x+=6) {
    tft.drawLine(0, tft.height()-1, x, 0, color);
  }
  for (int16_t y=0; y < tft.height(); y+=6) {
    tft.drawLine(0, tft.height()-1, tft.width()-1, y, color);
  }

  tft.fillScreen(BLACK);
  for (int16_t x=0; x < tft.width(); x+=6) {
    tft.drawLine(tft.width()-1, tft.height()-1, x, 0, color);
  }
  for (int16_t y=0; y < tft.height(); y+=6) {
    tft.drawLine(tft.width()-1, tft.height()-1, 0, y, color);
  }
}

void testdrawtext(char *text, uint16_t color) {
  tft.setCursor(0, 0);
  tft.setTextColor(color);
  tft.setTextWrap(true);
  tft.print(text);
}

void testfastlines(uint16_t color1, uint16_t color2) {
  tft.fillScreen(BLACK);
  for (int16_t y=0; y < tft.height(); y+=5) {
    tft.drawFastHLine(0, y, tft.width(), color1);
  }
  for (int16_t x=0; x < tft.width(); x+=5) {
    tft.drawFastVLine(x, 0, tft.height(), color2);
  }
}

void testdrawrects(uint16_t color) {
  tft.fillScreen(BLACK);
  for (int16_t x=0; x < tft.width(); x+=6) {
    tft.drawRect(tft.width()/2 -x/2, tft.height()/2 -x/2 , x, x, color);
  }
}

void testfillrects(uint16_t color1, uint16_t color2) {
  tft.fillScreen(BLACK);
  for (int16_t x=tft.width()-1; x > 6; x-=6) {
    tft.fillRect(tft.width()/2 -x/2, tft.height()/2 -x/2 , x, x, color1);
    tft.drawRect(tft.width()/2 -x/2, tft.height()/2 -x/2 , x, x, color2);
  }
}

void testfillcircles(uint8_t radius, uint16_t color) {
  for (int16_t x=radius; x < tft.width(); x+=radius*2) {
    for (int16_t y=radius; y < tft.height(); y+=radius*2) {
      tft.fillCircle(x, y, radius, color);
    }
  }
}

void testdrawcircles(uint8_t radius, uint16_t color) {
  for (int16_t x=0; x < tft.width()+radius; x+=radius*2) {
    for (int16_t y=0; y < tft.height()+radius; y+=radius*2) {
      tft.drawCircle(x, y, radius, color);
    }
  }
}

void testtriangles() {
  tft.fillScreen(BLACK);
  int color = 0xF800;
  int t;
  int w = tft.width()/2;
  int x = tft.height()-1;
  int y = 0;
  int z = tft.width();
  for(t = 0 ; t <= 15; t++) {
    tft.drawTriangle(w, y, y, x, z, x, color);
    x-=4;
    y+=4;
    z-=4;
    color+=100;
  }
}

void testroundrects() {
  tft.fillScreen(BLACK);
  int color = 100;
  int i;
  int t;
  for(t = 0 ; t <= 4; t+=1) {
    int x = 0;
    int y = 0;
    int w = tft.width()-2;
    int h = tft.height()-2;
    for(i = 0 ; i <= 16; i+=1) {
      tft.drawRoundRect(x, y, w, h, 5, color);
      x+=2;
      y+=3;
      w-=4;
      h-=6;
      color+=1100;
    }
    color+=100;
  }
}

void tftPrintTest() {
  tft.setTextWrap(false);
  tft.fillScreen(BLACK);
  tft.setCursor(0, 30);
  tft.setTextColor(RED);
  tft.setTextSize(1);
  tft.println("Hello World!");
  tft.setTextColor(YELLOW);
  tft.setTextSize(2);
  tft.println("Hello World!");
  tft.setTextColor(GREEN);
  tft.setTextSize(3);
  tft.println("Hello World!");
  tft.setTextColor(BLUE);
  tft.setTextSize(4);
  tft.print(1234.567);
  delay(1500);
  tft.setCursor(0, 0);
  tft.fillScreen(BLACK);
  tft.setTextColor(WHITE);
  tft.setTextSize(0);
  tft.println("Hello World!");
  tft.setTextSize(1);
  tft.setTextColor(GREEN);
  tft.print(p, 6);
  tft.println(" Want pi?");
  tft.println(" ");
  tft.print(8675309, HEX); // print 8,675,309 out in HEX!
  tft.println(" Print HEX!");
  tft.println(" ");
  tft.setTextColor(WHITE);
  tft.println("Sketch has been");
  tft.println("running for: ");
  tft.setTextColor(MAGENTA);
  tft.print(millis() / 1000);
  tft.setTextColor(WHITE);
  tft.print(" seconds.");
}

void mediabuttons() {
  // play
  tft.fillScreen(BLACK);
  tft.fillRoundRect(25, 10, 78, 60, 8, WHITE);
  tft.fillTriangle(42, 20, 42, 60, 90, 40, RED);
  delay(500);
  // pause
  tft.fillRoundRect(25, 90, 78, 60, 8, WHITE);
  tft.fillRoundRect(39, 98, 20, 45, 5, GREEN);
  tft.fillRoundRect(69, 98, 20, 45, 5, GREEN);
  delay(500);
  // play color
  tft.fillTriangle(42, 20, 42, 60, 90, 40, BLUE);
  delay(50);
  // pause color
  tft.fillRoundRect(39, 98, 20, 45, 5, RED);
  tft.fillRoundRect(69, 98, 20, 45, 5, RED);
  // play color
  tft.fillTriangle(42, 20, 42, 60, 90, 40, GREEN);
}
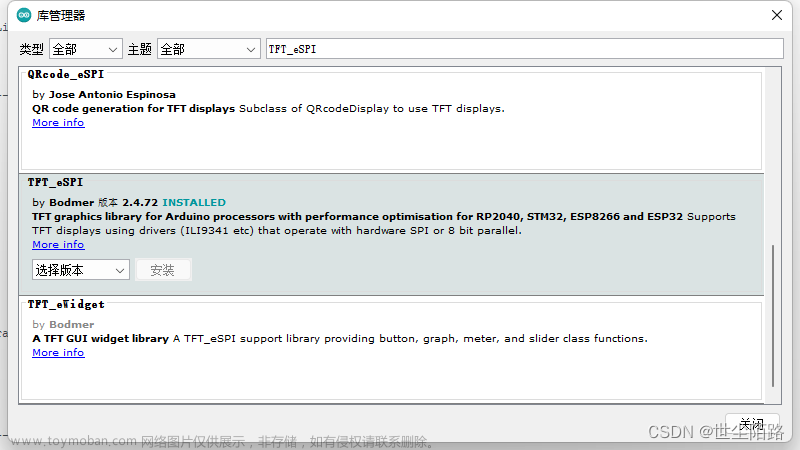
3.3TFT_eSPI库版
参考:使用DOIT ESP32 DEVKIT V1驱动屏幕ST7789
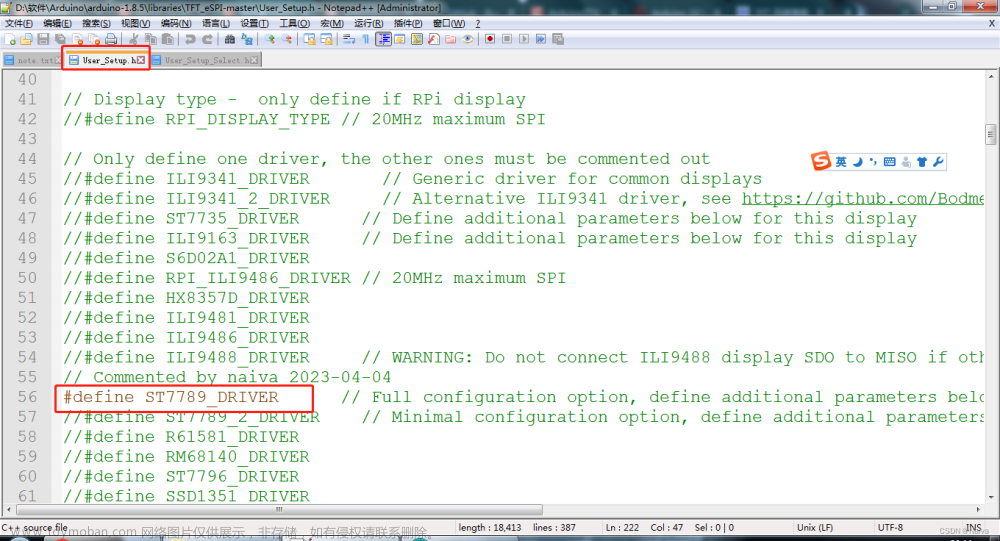
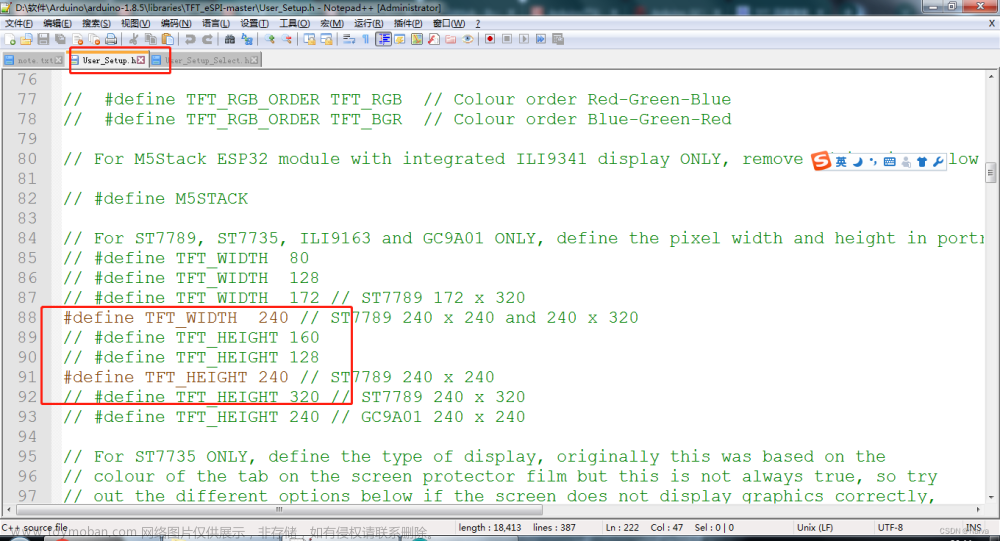
3.3.1配置TFT_eSPI
配置TFT_eSPI,作者分了4个部分。
a.选择屏幕的驱动和尺寸
b.定义引脚
非常重要,之前一直没有点亮屏幕而改用Adafruit库,就是因为引脚定义的问题。
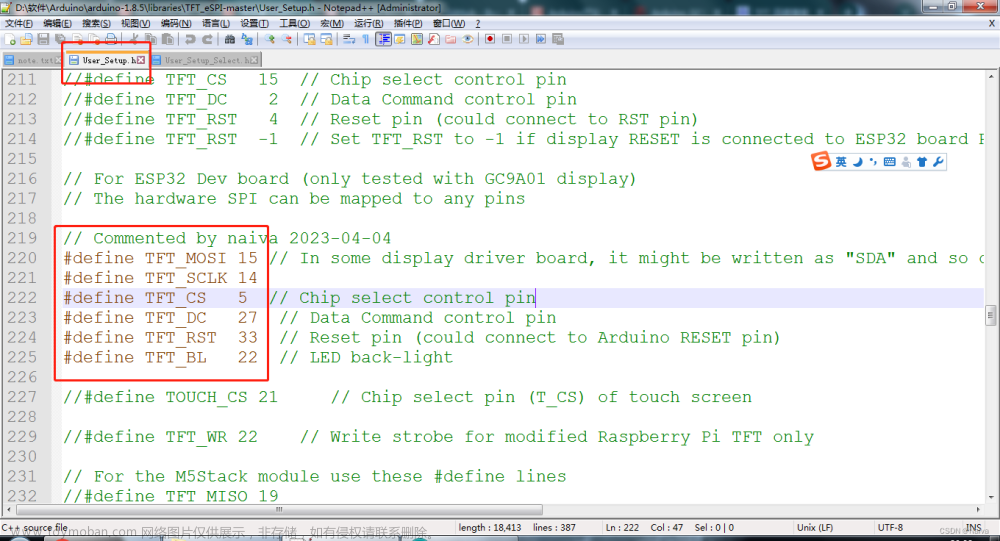
// TFT官方配置
#define TFT_MOSI 15 // In some display driver board, it might be written as "SDA" and so on.
#define TFT_SCLK 14
#define TFT_CS   5  // Chip select control pin
#define TFT_DC   27  // Data Command control pin
#define TFT_RST  33  // Reset pin (could connect to Arduino RESET pin)
#define TFT_BL   22  // LED back-light

//配置1,完全按照引脚图来配置
#define TFT_MOSI 21
#define TFT_SCLK 22
#define TFT_DC   4
#define TFT_RST  23
//#define TFT_CS   34  // 没有CS引脚
//#define TFT_BL   35  // 背光不需要设置

//配置2,根据官方使用修改而来
#define TFT_MOSI 5   //官方使用15,对应HSPI CS0引脚,这里用VSPI CS0,其中V指virtual
#define TFT_SCLK 18  //官方使用14,对应HSPI CLK,这里用VSPI CLK
#define TFT_DC   4
#define TFT_RST  22
//#define TFT_CS   34  // 没有CS引脚
//#define TFT_BL   35  // 背光不需要设置
c.定义启用的字体
没特别的需求就别动配置,关掉某些字体可以节省存储空间。
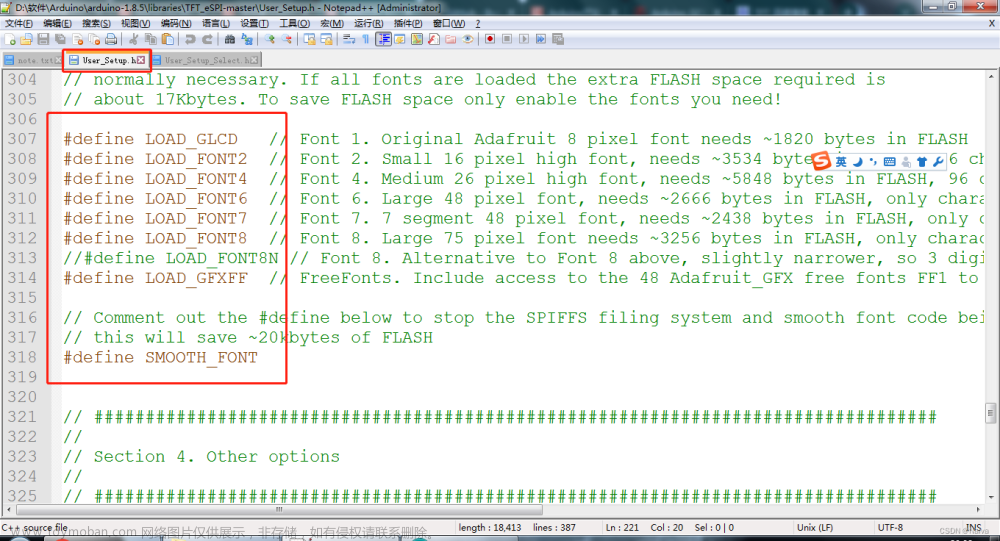
d. 其他选项
主要是控制SPI协议的频率,没事别动

3.3.2TFT_eSPI 显示图片
参考资料:
-
【CSDN】ESP32 Arduino 学习篇(五)TFT_eSPI库
-
【CSDN@慕容流年】《Arduino》开发 之 TFT_eSPI 库 显示一张彩色图片
main.c
#include <TFT_eSPI.h>
#include <SPI.h>
#include <Wire.h>
#include "bmp.h"

#ifndef TFT_DISPOFF
#define TFT_DISPOFF 0x28
#endif

#ifndef TFT_SLPIN
#define TFT_SLPIN   0x10
#endif

TFT_eSPI tft = TFT_eSPI(240, 240); // Invoke custom library

void showImage(int32_t x, int32_t y, int32_t w, int32_t h, const uint16_t *data);

void setup()
{
    Serial.begin(9600);
    Serial.println("Start");
    tft.init();
  // 设置屏幕显示的旋转角度,参数为:0, 1, 2, 3
    tft.setRotation(2); // 分别代表 0°、90°、180°、270°
    tft.fillScreen(TFT_BLACK);// //屏幕填充颜色,如果没有设置,没有显示的区域会发现花屏
    tft.setTextSize(2);
    tft.setTextColor(TFT_MAGENTA);
    tft.setCursor(0, 0);
    tft.setTextDatum(MC_DATUM);
    tft.setTextSize(1);

    if (TFT_BL > 0) { // TFT_BL has been set in the TFT_eSPI library in the User Setup file TTGO_T_Display.h
         //显示屏背光
      ledcSetup(10, 5000/*freq*/, 10 /*resolution*/);//信号频率 5000 Hz  占空比分辨率 10位
      ledcAttachPin(TFT_BL, 10);// LEDC_CHANNEL_10
      analogReadResolution(10);
      ledcWrite(10,1023); // //  1023 = 2 ^ 10 - 1
    }
}

void loop()
{
//    tft.fillScreen(TFT_WHITE);
//    tft.setSwapBytes(true);
    showImage(0, 0,  240, 160, bmp1);
//    delay(1000);
}

#define PI_BUF_SIZE 128
void showImage(int32_t x, int32_t y, int32_t w, int32_t h, const uint16_t *data){
  int32_t dx = 0;
  int32_t dy = 0;
  int32_t dw = w;
  int32_t dh = h*2;

  if (x < 0) { dw += x; dx = -x; x = 0; }
  if (y < 0) { dh += y; dy = -y; y = 0; }

  if (dw < 1 || dh < 1) return;

  CS_L;

  data += dx + dy * w;

  uint16_t  buffer[PI_BUF_SIZE];
  uint16_t* pix_buffer = buffer;
  uint16_t  high,low;

  tft.setWindow(x, y, x + dw - 1, y + dh - 1);

  // Work out the number whole buffers to send
  uint16_t nb = (dw * dh) / (2 * PI_BUF_SIZE);

  // Fill and send "nb" buffers to TFT
  for (int32_t i = 0; i < nb; i++) {
    for (int32_t j = 0; j < PI_BUF_SIZE; j++) {
      high = pgm_read_word(&data[(i * 2 * PI_BUF_SIZE) + 2 * j + 1]);
      low = pgm_read_word(&data[(i * 2 * PI_BUF_SIZE) + 2 * j ]);
      pix_buffer[j] = (high<<8)+low;
    }
    tft.pushPixels(pix_buffer, PI_BUF_SIZE);
  }

  // Work out number of pixels not yet sent
  uint16_t np = (dw * dh) % (2 * PI_BUF_SIZE);

  // Send any partial buffer left over
  if (np) {
    for (int32_t i = 0; i < np; i++)
    {
      high = pgm_read_word(&data[(nb * 2 * PI_BUF_SIZE) + 2 * i + 1]);
      low = pgm_read_word(&data[(nb * 2 * PI_BUF_SIZE) + 2 * i ]);
      pix_buffer[i] = (high<<8)+low;
    }
    tft.pushPixels(pix_buffer, np);
  }

  CS_H;
}
LCD全彩图片时取模软件 Image2Lcd 2.9(破解版)。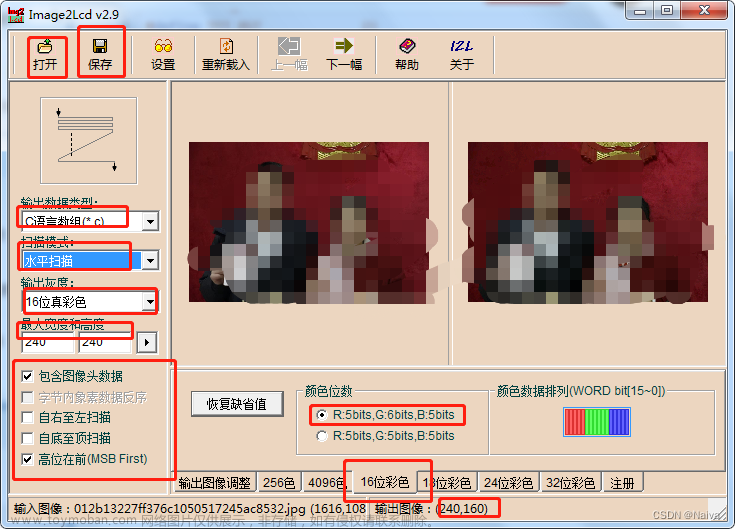
bmp.h
const unsigned short bmp1[] PROGMEM = { 0X10,0X10,0X00,0XF0,0X00,0XA0,0X01,0X1B,};

4.成果展示
在【文件】-【示例】-【TFT_eSPI】-【320x240】中找一个示例程序演示。 文章来源:https://www.toymoban.com/news/detail-411167.html
ESP32 驱动ST7789液晶屏效果展示文章来源地址https://www.toymoban.com/news/detail-411167.html
资料下载
- 【CSDN】1.54寸(240240)彩色TFT 显示高清IPS LCD 屏幕 SPI接口ST7789驱动 资料汇总
参考资料
- [1] 【YouTube】ESP32 + 1.3 inch 240x240 IPS LCD (ST7789 SPI interface), using TFT_eSPI library
- [2] https://arduino-er.blogspot.com/2020/07/esp32-13-inch-240x240-ips-lcd-st7789.html
- [3] 【GitHub】TFT_eSPI库
- [4] 【CSDN@LoveArduinos
】Arduino开发-TFT_eSPI库学习
[5] 【简书】 使用DOIT ESP32 DEVKIT V1驱动屏幕ST7789的踩坑之旅
到了这里,关于ESP32 入门笔记08:1.54寸(240*240)彩色TFT 显示高清IPS LCD 屏幕 SPI接口的文章就介绍完了。如果您还想了解更多内容,请在右上角搜索TOY模板网以前的文章或继续浏览下面的相关文章,希望大家以后多多支持TOY模板网!