🍓 简介:java系列技术分享(👉持续更新中…🔥)
🍓 初衷:一起学习、一起进步、坚持不懈
🍓 如果文章内容有误与您的想法不一致,欢迎大家在评论区指正🙏
🍓 希望这篇文章对你有所帮助,欢迎点赞 👍 收藏 ⭐留言 📝🍓 更多文章请点击
单元测试junit各版本使用介绍

一、 简介
官网:http://www.junit.org
单元测试就是针对最小的功能单元编写测试代码,Java程序最小的功能单元是方法,所以单元测试就是针对Java方法的测试,进而检查方法的正确性。
好处:
1. 可以书写一系列的测试方法,对项目所有的接口或者方法进行单元测试。
2. 启动后,自动化测试,并判断执行结果, 不需要人为的干预。
3. 只需要查看最后结果,就知道整个项目的方法接口是否通畅。
4. 每个单元测试用例相对独立,由Junit 启动,自动调用。不需要添加额外的调用语句。
二、Junit5介绍
JUnit5在2017年就发布了,你还在用junit4吗?
Spring Boot 2.2.0 版本开始引入 JUnit 5 作为单元测试默认库各个版本使用情况下文中会指明
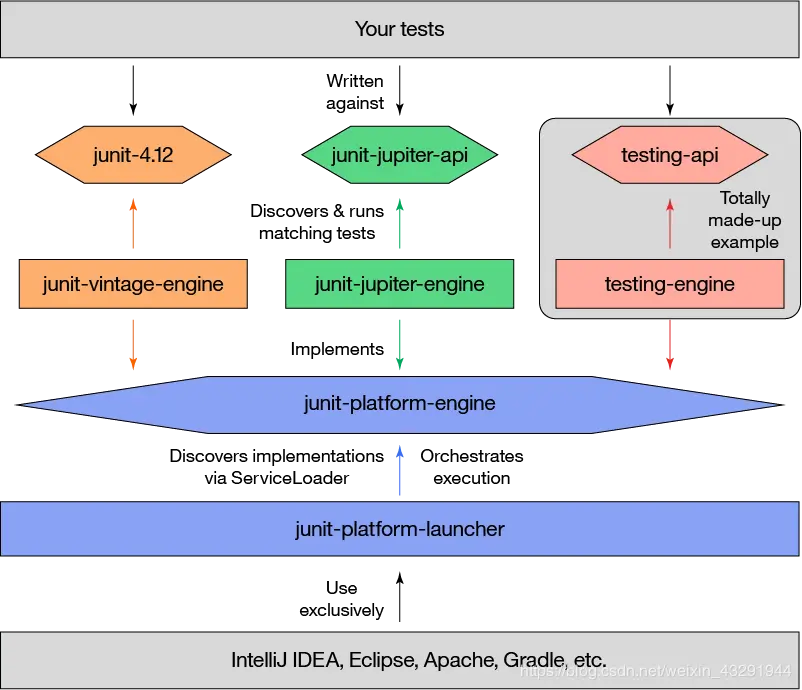
作为最新版本的JUnit框架,JUnit5与之前版本的Junit框架有很大的不同。由三个不同子项目的几个不同模块组成。

JUnit Platform: Junit Platform是在JVM上启动测试框架的基础,不仅支持Junit自制的测试引擎,其他测试引擎也都可以接入。JUnit Jupiter: JUnit Jupiter提供了JUnit5的新的编程模型,是JUnit5新特性的核心。内部 包含了一个测试引擎,用于在Junit Platform上运行。JUnit Vintage: 由于JUint已经发展多年,为了照顾老的项目,JUnit Vintage提供了兼容JUnit4.x,Junit3.x的测试引擎。
1.JUnit5常用注解
- @Test :表示方法是测试方法。但是与JUnit4的@Test不同,他的职责非常单一不能声明任何属性,拓展的测试将会由Jupiter提供额外测试
- @ParameterizedTest :表示方法是参数化测试,下方会有详细介绍
- @RepeatedTest :表示方法可重复执行,下方会有详细介绍
- @DisplayName :为测试类或者测试方法设置展示名称
- @BeforeEach :表示在每个单元测试之前执行
- @AfterEach :表示在每个单元测试之后执行
- @BeforeAll :表示在所有单元测试之前执行
- @AfterAll :表示在所有单元测试之后执行
- @Tag :表示单元测试类别,类似于JUnit4中的@Categories
- @Disabled :表示测试类或测试方法不执行,类似于JUnit4中的@Ignore
- @Timeout :表示测试方法运行如果超过了指定时间将会返回错误
- @ExtendWith :为测试类或测试方法提供扩展类引用
2.断言(assertions)
断言(assertions)是测试方法中的核心部分,用来对测试需要满足的条件进行验证。这些断言方法都是 org.junit.jupiter.api.Assertions 的静态方法。JUnit 5 内置的断言可以分成如下几个类别:检查业务逻辑返回的数据是否合理。所有的测试运行结束以后,会有一个详细的测试报告;
用来对单个值进行简单的验证。如:
3.新特性
很多这里简单介绍一个显示名称
import org.junit.jupiter.api.DisplayName;
import org.junit.jupiter.api.Test;

@DisplayName("显示名称测试")
class DisplayNameDemo {

    @Test
    @DisplayName("我的 第一个 测试")
    void testWithDisplayNameContainingSpaces() {
    }

    @Test
    @DisplayName("我的 第一个 测试")
    void testWithDisplayNameContainingSpecialCharacters() {
    }

    @Test
    @DisplayName("😱")
    void testWithDisplayNameContainingEmoji() {
    }
}
结果名称已显示
优点:通过这种方式,可以在方法名是英文特别长或者很难用英文描述清楚的场景下,增加中文解释
三、各版本使用介绍
本文使用Maven(Java包管理工具)导入所需要的jar包
1.原始版本Junit4
1.1引入Pom依赖
<dependency>
    <groupId>junit</groupId>
    <artifactId>junit</artifactId>
    <version>4.13.2</version>
</dependency>
1.2示例
注意事项测试方法必须是公共的无参数无返回值的非静态方法
在测试方法上使用@Test注解标注该方法是一个测试方法
| 注解 | 含义 |
|---|---|
| @Test | 表示测试方法 |
| @Before | 在测试方法前运行 |
| @After | 在测试方法后运行 |
import org.junit.Assert;
import org.junit.Test;


public class JunitTest {
    //定义测试方法
    @Test
    public void testSum() {
        int sum = SumTest.sum(4, 5, 1);
        Assert.assertEquals(10, sum);
//        Assert.assertEquals(0,sum);
    }
}
class SumTest {
    public static int sum(int... nums) {
        // 可变参数可以当作数组使用
        Integer sum = 0;
        for (int i = 0; i < nums.length; i++) {
            sum += nums[i];
        }
        return sum;
    }

}
1.3 JUnit 断言
Junit所有的断言都包含在 Assert 类中。
这个类提供了很多有用的断言方法来编写测试用例。只有失败的断言才会被记录。Assert 类中的一些有用的方法列式如下:
1.void assertEquals(boolean expected, boolean actual):检查两个变量或者等式是否平衡
2. void assertTrue(boolean expected, boolean actual):检查条件为真
3. void assertFalse(boolean condition):检查条件为假
4. void assertNotNull(Object object):检查对象不为空
5. void assertNull(Object object):检查对象为空
6. void assertSame(boolean condition)·:assertSame() 方法检查两个相关对象是否指向同一个对象
7. void assertNotSame(boolean condition):assertNotSame() 方法检查两个相关对象是否不指向同一个对象
8. void assertArrayEquals(expectedArray, resultArray):assertArrayEquals()方法检查两个数组是否相等
1.4运行结果
通过:绿条
不通过:红条

2. Spring 环境下单元测试
2.1引入Pom依赖
<dependency>
 <groupId>org.springframework</groupId>
 <artifactId>spring-test</artifactId>
 <version>5.2.10.RELEASE</version>
</dependency>
2.2示例
@RunWith(SpringJUnit4ClassRunner.class)
@ContextConfiguration(classes = SpringConfiguration.class)
public class BookServiceTest {

    @Autowired
    private BookService bookService;

    @Test
    public void testSave(){
        bookService.save();
    }
}
3.SpringBoot环境下单元测试:
以前:
- @SpringBootTest + @RunWith(SpringTest.class)
SpringBoot整合Junit以后。
- 编写测试方法:@Test标注(注意需要使用junit5版本的注解)
- Junit类具有Spring的功能,@Autowired、比如 @Transactional 标注测试方法,测试完成后自动回滚
统一引入
        <dependency>
            <groupId>org.springframework.boot</groupId>
            <artifactId>spring-boot-starter-test</artifactId>
        </dependency>
3.1 SpringBoot2.4.0之后
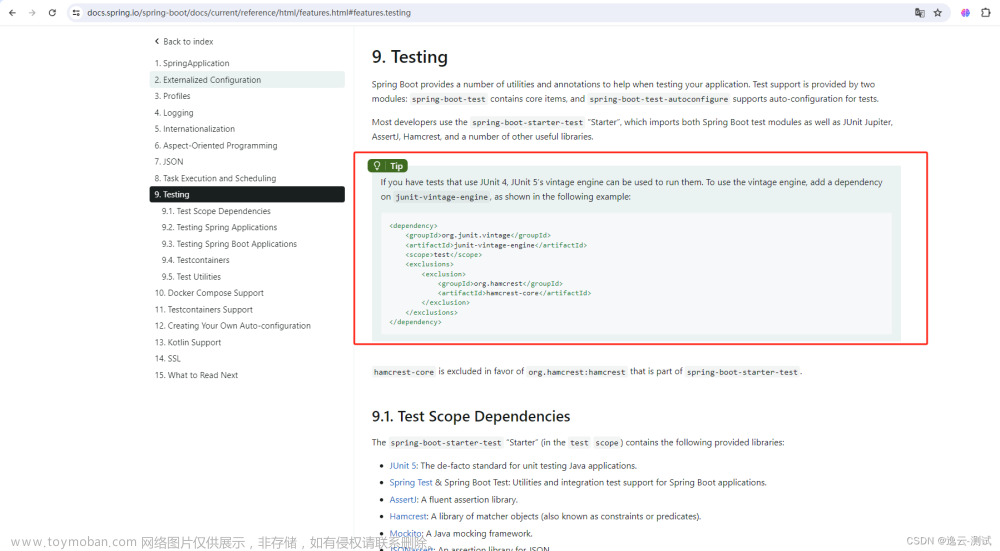
SpringBoot2.4.0之后,spring-boot-starter-test默认仅支持
JUnit5,去掉了兼容JUnit4引擎:org.junit.vintage:junit-vintage-engine,无需添加@RunWith(SpringRunner.class)
@SpringBootTest
class BookServiceTest {

    @Autowired
    private BookService bookService;

    @Test
    void save() {
        bookService.save();
    }
}
3.2 版本在2.2.0 =< SpringBoot < 2.4
2.2.0 < SpringBoot < 2.4.0,spring-boot-starter-test默认使用JUnit5,
同时也兼容支持JUnit4,无需添加@RunWith(SpringRunner.class)
@SpringBootTest
class BookServiceTest {

      @Autowired
      private BookService bookService;

      @Test
      void save() {
          bookService.save();
      }
}
如果想只用Junit5,可以排除junit-vintage-engine,排除Junit4的干扰,JUnit4中使用的测试引擎是junit-vintage-engine,JUnit5中使用的测试引擎是junit-jupiter-engine
<dependency>
    <groupId>org.springframework.boot</groupId>
    <artifactId>spring-boot-starter-test</artifactId>
    <scope>test</scope>
        <exclusions>
            <exclusion>
                <groupId>org.junit.vintage</groupId>
                <artifactId>junit-vintage-engine</artifactId>
            </exclusion>
        </exclusions>
</dependency>
3.3 SpringBoot2.2.0之前
SpringBoot2.2.0
之前,spring-boot-starter-test引入的是JUnit4,使用的测试引擎是junit-vintage-engine文章来源:https://www.toymoban.com/news/detail-414960.html
3.1不想加@RunWith,直接导入junit-jupiter坐标
<dependency>
    <groupId>org.junit.jupiter</groupId>
    <artifactId>junit-jupiter</artifactId>
    <version>5.9.1</version>
</dependency>
import org.junit.jupiter.api.Test;
import org.springframework.boot.test.context.SpringBootTest;

@SpringBootTest
public class JunitTest {

    @Test
    void testExample() {

    }

}
3.2添加注解@RunWith(SpringRunner.class) (无需引入多余依赖)
import org.junit.Test;
import org.junit.runner.RunWith;
import org.springframework.boot.test.context.SpringBootTest;
import org.springframework.test.context.junit4.SpringRunner;

@RunWith(SpringRunner.class)
@SpringBootTest
public class TestConnection {

    @Test
    public void testExample() {

    }
}

 文章来源地址https://www.toymoban.com/news/detail-414960.html
到了这里,关于单元测试junit(原始版本、Spring Boot各版本、junit5)使用介绍的文章就介绍完了。如果您还想了解更多内容,请在右上角搜索TOY模板网以前的文章或继续浏览下面的相关文章,希望大家以后多多支持TOY模板网!


