Ubuntu Server20.04.5 LTS
【参考资料】
Ubuntu官方地址:https://www.ubuntu.com/
Ubuntu论坛地址:https://ubuntuforums.org/
Ubuntu Wiki地址:https://wiki.ubuntu.com/
Ubuntu帮助地址:https://help.ubuntu.com/
Ubuntu邮件列表地址:https://discourse.ubuntu.com/t/mailing-lists/https://ubuntu.com/server/docs)
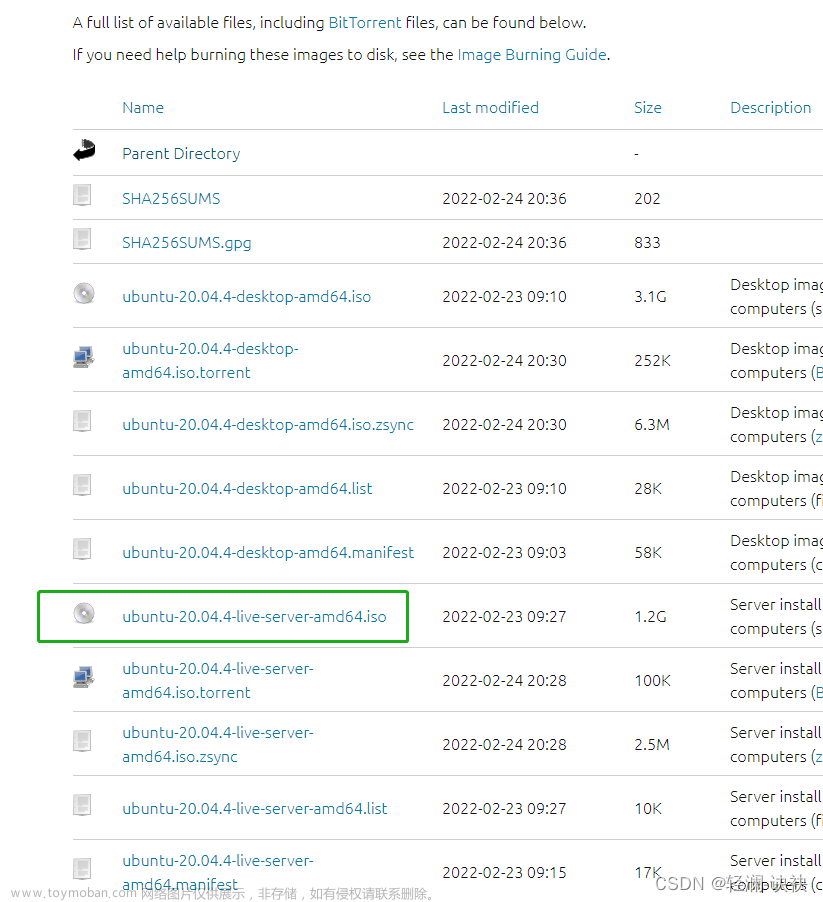
1.下载Ubuntu镜像
官网下载:https://releases.ubuntu.com/
国内镜像下载:
华为镜像:https://repo.huaweicloud.com/ubuntu-releases/
阿里镜像:http://old-releases.ubuntu.com/releases/
2.安装
官网安装教程:https://ubuntu.com/server/docs/install/step-by-step
博客:
http://t.csdn.cn/aDPUu
2.1 网络配置(静态IP配置)
-
静态IP设置方法,点击ens33 然后选择ipv4、
-
点击Manual 手动添加ip地址
- subnet:192.168.x.xxx/24 (子网掩码)
- address:192.168.x.xxx(静态IP地址)
- Geteway:192.168.x.1(网关)
- Name servers:(DNS服务器地址:)
- search domains:
华为云DNS    122.112.208.1	139.9.23.90
			114.115.192.11	116.205.5.1
			116.205.5.30	122.112.208.175
2.2 设置镜像源地址
国内镜像地址:
华为源:https://mirrors.huaweicloud.com/ubuntu/
阿里源 http://mirrors.aliyun.com/ubuntu/
网易163 http://mirrors.163.com/ubuntu/
2.3 磁盘分区
/boot:这里存放的是启动 Linux 时使用的一些核心文件,包括一些连接文件以及镜像文件。
/home:用户的主目录
/srv:该目录存放一些服务启动之后需要提取的数据。
/usr:应用程序

/boot 	2G
/		其他
/bin:
bin 是 Binaries (二进制文件) 的缩写, 这个目录存放着最经常使用的命令。

/boot:
这里存放的是启动 Linux 时使用的一些核心文件,包括一些连接文件以及镜像文件。

/dev :
dev 是 Device(设备) 的缩写, 该目录下存放的是 Linux 的外部设备,在 Linux 中访问设备的方式和访问文件的方式是相同的。

/etc:
etc 是 Etcetera(等等) 的缩写,这个目录用来存放所有的系统管理所需要的配置文件和子目录。

/home:
用户的主目录,在 Linux 中,每个用户都有一个自己的目录,一般该目录名是以用户的账号命名的,如上图中的 alice、bob 和 eve。

/lib:
lib 是 Library(库) 的缩写这个目录里存放着系统最基本的动态连接共享库,其作用类似于 Windows 里的 DLL 文件。几乎所有的应用程序都需要用到这些共享库。

/lost+found:
这个目录一般情况下是空的,当系统非法关机后,这里就存放了一些文件。

/media:
linux 系统会自动识别一些设备,例如U盘、光驱等等,当识别后,Linux 会把识别的设备挂载到这个目录下。

/mnt:
系统提供该目录是为了让用户临时挂载别的文件系统的,我们可以将光驱挂载在 /mnt/ 上,然后进入该目录就可以查看光驱里的内容了。

/opt:
opt 是 optional(可选) 的缩写,这是给主机额外安装软件所摆放的目录。比如你安装一个ORACLE数据库则就可以放到这个目录下。默认是空的。

/proc:
proc 是 Processes(进程) 的缩写,/proc 是一种伪文件系统(也即虚拟文件系统),存储的是当前内核运行状态的一系列特殊文件,这个目录是一个虚拟的目录,它是系统内存的映射,我们可以通过直接访问这个目录来获取系统信息。
这个目录的内容不在硬盘上而是在内存里,我们也可以直接修改里面的某些文件,比如可以通过下面的命令来屏蔽主机的ping命令,使别人无法ping你的机器:

echo 1 > /proc/sys/net/ipv4/icmp_echo_ignore_all
/root:
该目录为系统管理员,也称作超级权限者的用户主目录。

/sbin:
s 就是 Super User 的意思,是 Superuser Binaries (超级用户的二进制文件) 的缩写,这里存放的是系统管理员使用的系统管理程序。

/selinux:
 这个目录是 Redhat/CentOS 所特有的目录,Selinux 是一个安全机制,类似于 windows 的防火墙,但是这套机制比较复杂,这个目录就是存放selinux相关的文件的。

/srv:
 该目录存放一些服务启动之后需要提取的数据。

/sys:

这是 Linux2.6 内核的一个很大的变化。该目录下安装了 2.6 内核中新出现的一个文件系统 sysfs 。

sysfs 文件系统集成了下面3种文件系统的信息:针对进程信息的 proc 文件系统、针对设备的 devfs 文件系统以及针对伪终端的 devpts 文件系统。

该文件系统是内核设备树的一个直观反映。

当一个内核对象被创建的时候,对应的文件和目录也在内核对象子系统中被创建。

/tmp:
tmp 是 temporary(临时) 的缩写这个目录是用来存放一些临时文件的。

/usr:
 usr 是 unix shared resources(共享资源) 的缩写,这是一个非常重要的目录,用户的很多应用程序和文件都放在这个目录下,类似于 windows 下的 program files 目录。

/usr/bin:
系统用户使用的应用程序。

/usr/sbin:
超级用户使用的比较高级的管理程序和系统守护程序。

/usr/src:
内核源代码默认的放置目录。

/var:
var 是 variable(变量) 的缩写,这个目录中存放着在不断扩充着的东西,我们习惯将那些经常被修改的目录放在这个目录下。包括各种日志文件。

/run:
是一个临时文件系统,存储系统启动以来的信息。当系统重启时,这个目录下的文件应该被删掉或清除。如果你的系统上有 /var/run 目录,应该让它指向 run。
2.4 设置主机用户名与密码及服务器名称
2.5 安装 SSH服务
2.6 选择预置服务安装
mkdir /disk# 设置root密码
sudo passwd

# 添加用户
adduser -m 【用户名】
# 设置密码
passwd 【用户名】
#修改用户
usermod [参数] 【用户名】
#创建用户组
groupadd【参数】【用户组名】
#修改组
groupmod【参数】【用户组名】
# 删除用户组
groupdel 【用户组名】

#硬盘挂载
# 显示硬盘及所属分区情况
sudo fdisk -l
# 查看分区信息
df -h

sudo apt install net-tools

mkdir /disk
sudo fdisk /dev/sdb

Welcome to fdisk (util-linux 2.34).
Changes will remain in memory only, until you decide to write them.
Be careful before using the write command.

Device does not contain a recognized partition table.
Created a new DOS disklabel with disk identifier 0xd3891d8e.

Command (m for help): m

Help:

  DOS (MBR)
   a   toggle a bootable flag
   b   edit nested BSD disklabel
   c   toggle the dos compatibility flag

  Generic
   d   delete a partition
   F   list free unpartitioned space
   l   list known partition types
   n   add a new partition
   p   print the partition table
   t   change a partition type
   v   verify the partition table
   i   print information about a partition

  Misc
   m   print this menu
   u   change display/entry units
   x   extra functionality (experts only)

  Script
   I   load disk layout from sfdisk script file
   O   dump disk layout to sfdisk script file

  Save & Exit
   w   write table to disk and exit
   q   quit without saving changes

  Create a new label
   g   create a new empty GPT partition table
   G   create a new empty SGI (IRIX) partition table
   o   create a new empty DOS partition table
   s   create a new empty Sun partition table


Command (m for help):
# 分区
Command (m for help): n
Partition type
   p   primary (0 primary, 0 extended, 4 free)
   e   extended (container for logical partitions)
# 扩展分区
Select (default p): e
Partition number (1-4, default 1):
First sector (2048-1953525167, default 2048):
Last sector, +/-sectors or +/-size{K,M,G,T,P} (2048-1953525167, default 1953525167):

Created a new partition 1 of type 'Extended' and of size 931.5 GiB.
#保存
Command (m for help): w
The partition table has been altered.
Calling ioctl() to re-read partition table.
Syncing disks.

#重新加载硬盘信息
partprobe

root@yuximing:/# fdisk -l
Disk /dev/loop0: 61.98 MiB, 64966656 bytes, 126888 sectors
Units: sectors of 1 * 512 = 512 bytes
Sector size (logical/physical): 512 bytes / 512 bytes
I/O size (minimum/optimal): 512 bytes / 512 bytes


Disk /dev/loop1: 46.98 MiB, 49242112 bytes, 96176 sectors
Units: sectors of 1 * 512 = 512 bytes
Sector size (logical/physical): 512 bytes / 512 bytes
I/O size (minimum/optimal): 512 bytes / 512 bytes


Disk /dev/loop2: 67.83 MiB, 71106560 bytes, 138880 sectors
Units: sectors of 1 * 512 = 512 bytes
Sector size (logical/physical): 512 bytes / 512 bytes
I/O size (minimum/optimal): 512 bytes / 512 bytes


Disk /dev/loop3: 55.63 MiB, 58314752 bytes, 113896 sectors
Units: sectors of 1 * 512 = 512 bytes
Sector size (logical/physical): 512 bytes / 512 bytes
I/O size (minimum/optimal): 512 bytes / 512 bytes


Disk /dev/loop4: 139.43 MiB, 146194432 bytes, 285536 sectors
Units: sectors of 1 * 512 = 512 bytes
Sector size (logical/physical): 512 bytes / 512 bytes
I/O size (minimum/optimal): 512 bytes / 512 bytes


Disk /dev/sda: 238.49 GiB, 256060514304 bytes, 500118192 sectors
Disk model: Phison SATA SSD
Units: sectors of 1 * 512 = 512 bytes
Sector size (logical/physical): 512 bytes / 512 bytes
I/O size (minimum/optimal): 512 bytes / 512 bytes
Disklabel type: gpt
Disk identifier: 6A4DC71F-0A25-485A-BFD2-20EA5848FB5B

Device       Start       End   Sectors   Size Type
/dev/sda1     2048   2203647   2201600   1.1G EFI System
/dev/sda2  2203648   6397951   4194304     2G Linux filesystem
/dev/sda3  6397952 500115455 493717504 235.4G Linux filesystem


Disk /dev/sdb: 931.53 GiB, 1000204886016 bytes, 1953525168 sectors
Disk model: ST1000LM035-1RK1
Units: sectors of 1 * 512 = 512 bytes
Sector size (logical/physical): 512 bytes / 4096 bytes
I/O size (minimum/optimal): 4096 bytes / 4096 bytes
Disklabel type: dos
Disk identifier: 0xd3891d8e

Device     Boot Start        End    Sectors   Size Id Type
/dev/sdb1        2048 1953525167 1953523120 931.5G  5 Extended

# 硬盘格式化
root@yuximing:/# sudo mkfs -t ext4 /dev/sdb
mke2fs 1.45.5 (07-Jan-2020)
Found a dos partition table in /dev/sdb
Proceed anyway? (y,N) y
Creating filesystem with 244190646 4k blocks and 61054976 inodes
Filesystem UUID: efaddfd7-3605-4cff-aa74-90afa84e6093
Superblock backups stored on blocks:
	32768, 98304, 163840, 229376, 294912, 819200, 884736, 1605632, 2654208,
	4096000, 7962624, 11239424, 20480000, 23887872, 71663616, 78675968,
	102400000, 214990848

Allocating group tables: done
Writing inode tables: done
# 挂载硬盘分区 | Mount hard disk partition
# 显示硬盘挂载情况
root@yuximing:/# df -l
Filesystem     1K-blocks    Used Available Use% Mounted on
udev             3948852       0   3948852   0% /dev
tmpfs             798996    1700    797296   1% /run
/dev/sda3      241873372 6904184 222609868   4% /
tmpfs            3994964       0   3994964   0% /dev/shm
tmpfs               5120       0      5120   0% /run/lock
tmpfs            3994964       0   3994964   0% /sys/fs/cgroup
/dev/loop0         63488   63488         0 100% /snap/core20/1611
/dev/sda2        1992552  111124   1760188   6% /boot
/dev/sda1        1098632    6216   1092416   1% /boot/efi
/dev/loop2         69504   69504         0 100% /snap/lxd/22753
/dev/loop1         48128   48128         0 100% /snap/snapd/16292
tmpfs             798992       0    798992   0% /run/user/1000
/dev/loop3         56960   56960         0 100% /snap/core18/2721
/dev/loop4        142848  142848         0 100% /snap/docker/2746

root@yuximing:/# mount /dev/sdb /disk/disk1/
root@yuximing:/# df -l
Filesystem     1K-blocks    Used Available Use% Mounted on
udev             3948852       0   3948852   0% /dev
tmpfs             798996    1700    797296   1% /run
/dev/sda3      241873372 6904184 222609868   4% /
tmpfs            3994964       0   3994964   0% /dev/shm
tmpfs               5120       0      5120   0% /run/lock
tmpfs            3994964       0   3994964   0% /sys/fs/cgroup
/dev/loop0         63488   63488         0 100% /snap/core20/1611
/dev/sda2        1992552  111124   1760188   6% /boot
/dev/sda1        1098632    6216   1092416   1% /boot/efi
/dev/loop2         69504   69504         0 100% /snap/lxd/22753
/dev/loop1         48128   48128         0 100% /snap/snapd/16292
tmpfs             798992       0    798992   0% /run/user/1000
/dev/loop3         56960   56960         0 100% /snap/core18/2721
/dev/loop4        142848  142848         0 100% /snap/docker/2746
/dev/sdb       960303848      28 911449308   1% /disk/disk1

root@yuximing:/# blkid /dev/sdb
/dev/sdb: UUID="efaddfd7-3605-4cff-aa74-90afa84e6093" TYPE="ext4"
# 配置硬盘在系统启动自动挂载
root@yuximing:/# vim /etc/fstab
	UUID="efaddfd7-3605-4cff-aa74-90afa84e6093"  /disk/disk1 ext4 defaults 1 1

mount -a
# 查看分区情况
root@yuximing:/# lsblk -f
NAME   FSTYPE   LABEL UUID                                 FSAVAIL FSUSE% MOUNTPOINT
loop0  squashfs                                                  0   100% /snap/core20/1611
loop1  squashfs                                                  0   100% /snap/snapd/16292
loop2  squashfs                                                  0   100% /snap/lxd/22753
loop3  squashfs                                                  0   100% /snap/core18/2721
loop4  squashfs                                                  0   100% /snap/docker/2746
sda
├─sda1 vfat           70C6-61A1                                 1G     1% /boot/efi
├─sda2 ext4           c26bb1bf-6abc-44bc-bb85-50cbb6caaa09    1.7G     6% /boot
└─sda3 ext4           0c2d162a-6c59-46d6-9143-2bf2e3d9979d  212.3G     3% /
sdb    ext4           efaddfd7-3605-4cff-aa74-90afa84e6093  869.2G     0% /disk/disk1
3.webmin
【官网】https://webmin.com/
https://blog.csdn.net/weixin_52802362/article/details/117112557
apt-get install webmin
# 访问github困难,下载通过xftp上传安装
wget https://github.com/webmin/webmin/releases/download/2.021/webmin_2.021_all.deb
dpkg --install webmin_2.021_all.deb
root@yuximing:/home/vector# dpkg --install webmin_2.021_all.deb
Selecting previously unselected package webmin.
(Reading database ... 72234 files and directories currently installed.)
Preparing to unpack webmin_2.021_all.deb ...
Unpacking webmin (2.021) ...
dpkg: dependency problems prevent configuration of webmin:
 webmin depends on libnet-ssleay-perl; however:
  Package libnet-ssleay-perl is not installed.
 webmin depends on libauthen-pam-perl; however:
  Package libauthen-pam-perl is not installed.
 webmin depends on libio-pty-perl; however:
  Package libio-pty-perl is not installed.
 webmin depends on unzip; however:
  Package unzip is not installed.

dpkg: error processing package webmin (--install):
 dependency problems - leaving unconfigured
Errors were encountered while processing:
 webmin

[依赖安装]
apt install perl libnet-ssleay-perl openssl libauthen-pam-perl libpam-runtime libio-pty-perl apt-show-versions python

apt --fix-broken install -y

dpkg --install webmin_2.021_all.deb

root@yuximing:/home/vector# sudo ufw allow 10000/tcp
Rule added
Rule added (v6)
root@yuximing:/home/vector# ufw status verbose
Status: active
Logging: on (low)
Default: deny (incoming), allow (outgoing), deny (routed)
New profiles: skip

To                         Action      From
--                         ------      ----
22/tcp (OpenSSH)           ALLOW IN    Anywhere
10000/tcp                  ALLOW IN    Anywhere
22/tcp (OpenSSH (v6))      ALLOW IN    Anywhere (v6)
10000/tcp (v6)             ALLOW IN    Anywhere (v6)

Webmin默认安装到/usr/share/webmin
访问地址:ip:10000

配置:
4.ufw
https://blog.csdn.net/fd214333890/article/details/115410168
# 列举出你系统上所有的应用配置
sudo ufw app list

# 在启用 UFW 防火墙之前,你必须显式允许进来的 SSH 连接。否则,你将永远都无法连接到机器上
sudo ufw allow OpenSSH
#开启关闭ufw服务
systemctl start ufw
systemctl stop ufw
#禁用 启用ufw服务
systemctl disable ufw
systemctl enable ufw
# 开启关闭ufw
ufw enable
ufw disable

# 默认禁止
ufw default deny
# 默认允许
ufw default allow

# 状态
ufw status verbose

# 开端口
ufw allow port_number/protocol
5.samba
sudo apt-get update
sudo apt-get install samba
# 配置防火墙
sudo ufw allow Samba
# 创建用户 用配置密码, 密码用专门的smbpasswd命令进行设置
sudo useradd sbuser
sudo smbpasswd -a sbuser
#创建要共享的文件夹
$ sudo mkdir /disk
# 修改文件夹的所有者与上面新建的用户一致, 否则会导致没有权限进行访问
$ sudo chown sbuser /disk
# 配置samba
$ sudo vim /etc/samba/smb.conf

[home] #共享名,该共享标签,可随意取,该名字为在其他电脑上看到的共享名
    comment = home directories #该共享描述
    path = /disk  #共享路径
    public = yes   #指定该共享是否允许guest账户访问
    writable = yes #writable用来指定该共享路径是否可写
	valid users = 用户名   #设置访问用户
	valid users = @组名   #设置访问组
	read only = no       #读写
	browseable = yes #可以被所有用户浏览到资源名称,

# 重启samba服务
sudo systemctl restart smbd
# 查看samba服务状态
sudo systemctl status smbd

reboot
6.docker
https://hub.docker.com/
7.aria2
https://hub.docker.com/r/p3terx/aria2-pro
https://zhuanlan.zhihu.com/p/466573640
https://p3terx.com/archives/docker-aria2-pro.html
对以上映射的目录进行用户权限设置,aria2c 核心进程会以所设定的用户运行。当使用非 root 用户进行管理时非常重要,这关乎到安全性和文件是否能正常访问。你不应该错过这个细节,否则可能导致不必要的麻烦。
-
-e PUID=$UID- 用户映射。设置文件管理账户的UID(用户 ID)。忽略则默认为nobady用户,并权限最大化。 -
-e PGID=$GID- 用户组映射。设置文件管理账户的GID(用户组 ID)。忽略则默认为nogroup用户组,并权限最大化。
科普: 在常规的 Linux 发行版中
$UID与$GID这两个环境变量分别为当前登录账户的UID与GID值,所以通过 CLI 启动容器可以直接使用这两个变量。但需要注意可能有部分系统$GID没有被定义。
docker pull p3terx/aria2-pro

# 替换<TOKEN>字段(RPC密钥) VECTOR
docker run -d \
    --name aria2-pro \
    --restart unless-stopped \
    --log-opt max-size=1m \
    --network host \
    -e PUID=$UID \
    -e PGID=$GID \
    -e RPC_SECRET=VECTOR \
    -e RPC_PORT=6800 \
    -e LISTEN_PORT=6888 \
    -v /disk/disk1/aria2-config:/config \
    -v /disk/disk1/aria2-downloads:/downloads \
    p3terx/aria2-pro


docker run -d \
    --name ariang \
    --log-opt max-size=1m \
    --restart unless-stopped \
    -p 6880:6880 \
    p3terx/ariang
8.plex
https://ubunlog.com/zh-CN/plex介质服务器安装ubuntu-20-04/
https://linuxize.com/post/how-to-install-plex-media-server-on-ubuntu-20-04/
https://www.plex.tv/media-server-downloads/#plex-media-server

#[方式1] 使用.deb文件
# 下载
wget https://downloads.plex.tv/plex-media-s erver-new/1.32.0.6918-6f393eda1/debian/plexmediaserver_1.32.0.6918-6f393eda1_amd64.deb?_gl=1*16kkgdv*_ga*MTAyNzU4MzUzNi4xNjgxNTgxNTI5*_ga_G6FQWNSENB*MTY4MTU5MTA5OC4zLjEuMTY4MTU5MjMzMi4wLjAuMA..
# 安装
sudo dpkg -i
# 检查程序状态
sudo systemctl status plexmediaserver.service

# 卸载
sudo apt remove plemediaserver

#[方式2]使用Plex存储库
# 从存储库导入GPG密钥
curl https://downloads.plex.tv/plex-keys/PlexSign.key | sudo apt-key add -
# 将存储库添加到系统
echo deb https://downloads.plex.tv/repo/deb public main | sudo tee /etc/apt/sources.list.d/plexmediaserver.list

sudo apt update

sudo apt install plexmediaserver

sudo systemctl status plexmediaserver.service


sudo apt remove plexmediaserver

# 开放端口
sudo ufw allow proto tcp from any to any port 32400,3005,8324,32469 comment 'Plex Media Server TCP'

sudo ufw allow proto udp from any to any port 1900,5353,32410:32414 comment 'Plex Media Server UDP'

sudo ufw status
sudo ufw reload
# 访问地址
http://direccion-ip:32400/web
9.emby
10.NextCloud
11.Kodi
官网:http://www.kodiplayer.cn/
11.1 Android电视安装Kodi
adb

打开电视的adb调试开关
  进入设置 > 系统 > 系统信息,遥控器依次按下“上”、“下”、“左”、“右”,即可看到页面中跳出adb开关,将ADB设为开启状态.

adb devices

adb connect ip:5555

adb shell

# 打开第三方应用安装权限
setprop persist.tcl.debug.installapk 1
setprop persist.tcl.installapk.enable 1

exit退出

adb install xxx.apk
11.2 Kodi安装Plex插件
安装Plex插件:http://www.kodiplayer.cn/plugins/2918.html
12.FFMpeg
https://blog.csdn.net/annjeff/article/details/105748428
报错问chatGPT
sudo aptitude install llibvpx-dev

./configure --prefix=/home/vector/FFmpeg --enable-shared --enable-gpl --enable-version3 --enable-sdl2 --enable-fontconfig --enable-gnutls --enable-iconv --enable-libass --enable-libbluray --enable-libmp3lame --enable-libopencore-amrnb --enable-libopencore-amrwb --enable-libopus --enable-libshine --enable-libsnappy --enable-libsoxr --enable-libtheora --enable-libtwolame --enable-libvpx --enable-libwebp --enable-libx264 --enable-libx265 --enable-libxml2 --enable-lzma --enable-zlib --enable-gmp --enable-libvorbis --enable-libvo-amrwbenc --enable-libspeex --enable-libxvid --enable-libaom --enable-avisynth --enable-libopenmpt --enable-libfdk-aac --enable-nonfree
12.1ubuntu20.04安装avisynth
To install Avisynth on Ubuntu 20.04, you can follow these steps:

Open a terminal window by pressing "Ctrl + Alt + T".

Update the package list and upgrade the system packages:

sql
Copy code
sudo apt update
sudo apt upgrade
Install the required dependencies for Avisynth:

Copy code
sudo apt install autoconf automake libtool libavformat-dev libavcodec-dev libswscale-dev libjpeg-dev libpng-dev libtiff-dev libz-dev libbz2-dev liblzo2-dev liblzma-dev libfontconfig1-dev libfreetype6-dev libxml2-dev yasm nasm
Download the latest version of Avisynth from its official website: http://avisynth.nl/index.php/Main_Page

Extract the downloaded archive:

Copy code
tar -xf avisynth-x.y.z.tar.gz
Replace "x.y.z" with the actual version number of Avisynth.

Navigate to the extracted directory:

bash
Copy code
cd avisynth-x.y.z
Configure the build:

bash
Copy code
./autogen.sh
./configure
Compile and install Avisynth:

go
Copy code
make
sudo make install
Verify that Avisynth has been installed successfully:

css
Copy code
avs2yuv --version
This command should display the version number of Avisynth.

That's it! You have now installed Avisynth on Ubuntu 20.04.
ERROR: gnutls not found using pkg-config
This error message suggests that the GnuTLS library is not installed on your system or the pkg-config tool is unable to find it.
To fix this error, you can try the following steps:
-
Install the GnuTLS library and its development headers. You can do this by running the following command:
arduinoCopy code sudo apt-get install libgnutls28-dev -
After installing the GnuTLS library, run the following command to update the pkg-config database:
Copy code sudo ldconfig -
If the above steps do not work, you can try setting the PKG_CONFIG_PATH environment variable to the directory containing the GnuTLS .pc file. For example, if the file is located in the "/usr/local/lib/pkgconfig" directory, you can set the PKG_CONFIG_PATH variable as follows:
javascriptCopy code
export PKG_CONFIG_PATH=/usr/local/lib/pkgconfig
Alternatively, you can add the above line to your ~/.bashrc file so that the variable is set automatically every time you open a new terminal.
-
After setting the PKG_CONFIG_PATH variable, try running the command again. If the error still persists, you can try reinstalling the GnuTLS library and its development headers.
I hope this helps you to resolve the error.
error
ffmpeg: error while loading shared libraries: libavdevice.so.60: cannot open shared object file: No such file or directory
This error message suggests that the ffmpeg program is unable to find the libavdevice.so.60 shared library file. This can happen if the library is missing or not installed on your system, or if the library path is not included in the library search path.
To fix this error, you can try the following steps:
-
Check if the libavdevice.so.60 library is installed on your system. You can do this by running the following command:
Copy code
sudo updatedb && locate libavdevice.so.60
If the library is not found, you may need to install it by installing the ffmpeg package or building ffmpeg from source.
-
If the library is found, you can try adding its path to the library search path. You can do this by running the following command:
bashCopy code
export LD_LIBRARY_PATH=/path/to/lib:$LD_LIBRARY_PATH
Replace "/path/to/lib" with the directory containing the libavdevice.so.60 library file.
Alternatively, you can add the above line to your ~/.bashrc file so that the variable is set automatically every time you open a new terminal.
-
After setting the LD_LIBRARY_PATH variable, try running the ffmpeg command again. If the error still persists, you may need to check if the library path is correct or try reinstalling the ffmpeg package or rebuilding ffmpeg from source.
I hope this helps you to resolve the error.
sudo: updatedb: command not found
The "updatedb" command is a part of the "mlocate" package, which may not be installed on your system. You can install it using the following command:
arduinoCopy code
sudo apt-get install mlocate
After installing the package, you should be able to use the "updatedb" command.
更新/etc/profile配置
To update the /etc/profile configuration file, you can follow these steps:
-
Open a terminal window and log in as the root user by running the following command:
Copy code
sudo su
Enter your password if prompted.
-
Open the /etc/profile file in a text editor. You can use any text editor of your choice, for example, nano or vim. Here, we will use nano:
bashCopy code nano /etc/profile -
Make the necessary changes to the file. For example, you can add environment variables or update the system-wide PATH variable.
-
Save the changes and exit the text editor. In nano, you can do this by pressing "Ctrl + X", then "Y", and then "Enter".
-
To make the changes take effect, either log out and log back in, or run the following command:
bashCopy code
source /etc/profile
This will reload the /etc/profile file and apply the changes.
That's it! You have now updated the /etc/profile configuration file.文章来源:https://www.toymoban.com/news/detail-415452.html
13.jellyfin
可道云文章来源地址https://www.toymoban.com/news/detail-415452.html
更换镜像源
Ubuntu Server20.04
sudo vi /etc/apt/sources.list

deb https://mirrors.aliyun.com/ubuntu/ focal main restricted universe multiverse
deb-src https://mirrors.aliyun.com/ubuntu/ focal main restricted universe multiverse

deb https://mirrors.aliyun.com/ubuntu/ focal-security main restricted universe multiverse
deb-src https://mirrors.aliyun.com/ubuntu/ focal-security main restricted universe multiverse

deb https://mirrors.aliyun.com/ubuntu/ focal-updates main restricted universe multiverse
deb-src https://mirrors.aliyun.com/ubuntu/ focal-updates main restricted universe multiverse

# deb https://mirrors.aliyun.com/ubuntu/ focal-proposed main restricted universe multiverse
# deb-src https://mirrors.aliyun.com/ubuntu/ focal-proposed main restricted universe multiverse

deb https://mirrors.aliyun.com/ubuntu/ focal-backports main restricted universe multiverse
deb-src https://mirrors.aliyun.com/ubuntu/ focal-backports main restricted universe multiverse

sudo apt update

sudo apt-get upgrade
到了这里,关于Ubuntu Server搭建个人服务器的文章就介绍完了。如果您还想了解更多内容,请在右上角搜索TOY模板网以前的文章或继续浏览下面的相关文章,希望大家以后多多支持TOY模板网!