Selenium
常用包的导入
import re ,time ,json,os,random

from selenium import webdriver  # 导入 webdriver
from selenium.webdriver.common.keys import Keys  # 要想调用键盘按键操作需要引入keys包 比如 回车和ctrl键
from selenium.webdriver.chrome.options import Options
from selenium.webdriver.common.by import By
from selenium.webdriver.support.ui import WebDriverWait  # WebDriverWait 库,负责循环等待
from selenium.webdriver.support import expected_conditions as EC  # expected_conditions 类,负责条件出发

# 下面是解析和sql存储用的工具
from lxml import etree
from pymysql import *
初始化配置 和 特征隐藏
chrome_options = Options()
# chrome_options.add_argument("--headless")  # 设置为无头浏览器
chrome_options.add_argument("log-level=3") # 禁止掉浏览器调试的提示信息 有些网站console.log太多了
chrome_options.add_argument("disable-blink-features=AutomationControlled")  # 这一行告诉chrome去掉机器人痕迹
# 下面两行也可以手动去一部分
chrome_options.add_experimental_option('excludeSwitches', ['enable-automation'])
chrome_options.add_experimental_option('useAutomationExtension', False)
# executable_path 后值为驱动所在位置
driver = webdriver.Chrome(executable_path="chromedriver.exe",options=chrome_options)
start_url = "https://bot.sannysoft.com/"
# 打开并访问网页
driver.get(start_url)
机器人特征检验
访问网址可以看到直观结果
https://bot.sannysoft.com/
显(隐)式等待
# 隐式等待
WebDriverWait(driver, 8).until(
        EC.presence_of_element_located(
            (By.XPATH, "//div[@class='job-list']//ul//li"))  # 通过XPATH查找
    )

# 显式等待
driver.implicitly_wait(0.2)
页面操作
获取页面dom
page_source = driver.page_source
页面元素获取
# 单一样式搜索
page_content = etree.HTML(driver.page_source)
content_now_page = page_content.xpath("//div[@class='job-list']//ul//li")
next_url =  response.xpath("(//div[@class='page_al']//a)[last()-1]/@href").get()

# 多样式选择搜索  div[contains(@class,'job-limit')]
# 使用括号包裹可以控制优先级 看情况使用
yao_qiu = page_content.xpath("(.//div[contains(@class,'job-limit')])//text()")
元素点击
element_next.click()
frame跳转
driver.switch_to.frame('editormd-image-iframe')
获取cookie
cookie = driver.get_cookies()
 # print("这是请求到的原始cookie",cookie)
cookies_list = []
for cookie_dict in cookie:
    cookie = cookie_dict['name'] + '=' + cookie_dict['value']
    cookies_list.append(cookie)
# print("拼接后的cookir",cookies_list)
cookies = ';'.join(cookies_list)
给请求添加cookie
driver.add_cookie({"name":"_identity","value":"d192e16b"})
事件操作
点击
driver.find_element(By.CLASS_NAME,'add-img').click()
上传文件
driver.find_element(By.NAME,'editormd-image-file').send_keys(r"D:\img2.png")
退出页面
driver.quit()
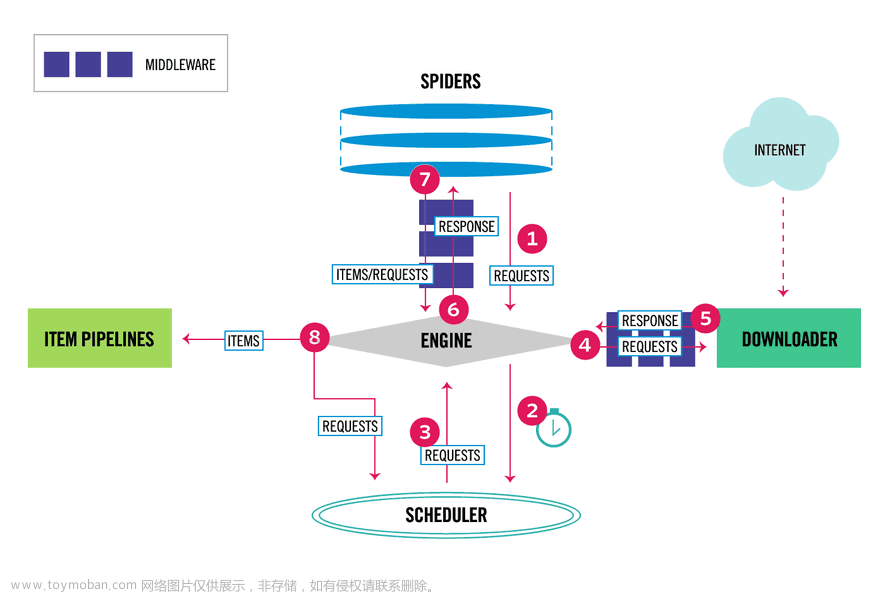
Scrapy
多摘自之前文档
https://blog.csdn.net/weixin_43521165/article/details/111905800
初始创建命令
创建项目
scrapy startproject 爬虫项目名字 # 例如 scrapy startproject fang_spider
scrapy genspider 爬虫名字 ‘域名’ #例如 scrapy genspider fang ‘fang.com’
# 设置启动文件 在项目目录下建立就行 写入以下代码以后直接运行则可以启动爬虫
# 这里第二行的 fang 是你创建的爬虫的名字
from scrapy import cmdline
cmdline.execute("scrapy crawl fang".split())
常用请求头
需要更多可以点击去这里复制http://www.useragentstring.com
user_agent = [
        "Mozilla/5.0 (Windows NT 10.0; WOW64) AppleWebKit/537.36 (KHTML, like Gecko) Chrome/69.0.3497.100 Safari/537.36",
        "Mozilla/5.0 (Windows NT 10.0; Win64; x64) AppleWebKit/537.36 (KHTML, like Gecko) Chrome/70.0.3538.77 Safari/537.36",
        "Mozilla/5.0 (X11; Ubuntu; Linux x86_64) AppleWebKit/537.36 (KHTML, like Gecko) Chrome/55.0.2919.83 Safari/537.36",
        "Mozilla/5.0 (Macintosh; Intel Mac OS X 10_9_2) AppleWebKit/537.36 (KHTML, like Gecko) Chrome/52.0.2762.73 Safari/537.36",
        "ozilla/5.0 (X11; Ubuntu; Linux i686 on x86_64) AppleWebKit/537.36 (KHTML, like Gecko) Chrome/53.0.2820.59 Safari/537.36"
        ]
Parse解析
手动去重过滤
scrapy本身有链接去重功能,同样的链接不会重复访问。但是有些网站是在你请求A的时候重定向到B,重定向到B的时候又给你重定向回A,然后才让你顺利访问,此时scrapy由于默认去重,这样会导致拒绝访问A而不能进行后续操作.
解决方式:
在yield访问新链接时,加上 dont_filter=True 参数,不让它自动过滤文章来源:https://www.toymoban.com/news/detail-419367.html
yield scrapy.Request(url=response.urljoin(next_url),callback=self.esf_parse,dont_filter=True)
meta传参
 yield scrapy.Request(url=response.urljoin(next_url),headers=cooki,callback=self.esf_parse,
 					meta={'info':("123456", city), 'cooki':cooki})
获取请求或者响应的cookie
# 获取请求的cookie
Cookie = response.request.headers.getlist('Cookie')  # 请求
# 获取相应的cookie
Cookie2 = response.headers.getlist('Set-Cookie')  # 响应
print(Cookie,'111cookoooo222:',Cookie2)
piplines.py 异步入库
只需要更改数据库的配置 item元素的获取 和 sql语句即可文章来源地址https://www.toymoban.com/news/detail-419367.html
# Define your item pipelines here
#
# Don't forget to add your pipeline to the ITEM_PIPELINES setting
# See: https://docs.scrapy.org/en/latest/topics/item-pipeline.html


# useful for handling different item types with a single interface
from twisted.enterprise import adbapi
from pymysql import cursors

class newFangSpiderPipeline:
    x = 0
    def __init__(self):
        dbparams = {
            'host': '127.0.0.1',
            'port': 3306,
            'user': 'root',
            'password': 'password',
            'database': 'fangtianxia',
            'charset': 'utf8',
            'cursorclass': cursors.DictCursor
        }
        self.dbpool = adbapi.ConnectionPool('pymysql', **dbparams)
        self._sql = None

    @property
    def sql(self):
        self.x += 1
        print('*-*' * 10, '第{}条数据进来了++++++'.format(self.x))
        if not self._sql:
            self._sql = """
            insert into newhouse(id,name ,province,city,price,areas,state ,style, address,ori_url) values
             (null,%s,%s,%s,%s,%s,%s,%s,%s,%s)
            """
            return self._sql
        return self._sql

    def process_item(self, item, spider):
        defer = self.dbpool.runInteraction(self.insert_item, item)
        defer.addErrback(self.handle_error, item, spider)

    def insert_item(self, cursor, item):
        cursor.execute(self.sql, (
        item['name'], item['province'], item['city'], item['price'], item['areas'], item['state'],
        item['style'],item['address'],item['ori_url']))
        # self.conn.commit()

    def handle_error(self, error, item, spider):
        print('=^=' * 5, 'error_start:')
        print(error)
        print('=^=' * 5, 'error_end')
middlewares中间件使用selenium替代访问并获取cookie
# 可以写在一个新的中间件中并设置优先级
class CookieSpiderDownloaderMiddleware:
    # Not all methods need to be defined. If a method is not defined,
    # scrapy acts as if the downloader middleware does not modify the
    # passed objects.
    # def __init__(self):

       def process_request(self, request, spider):
        # Called for each request that goes through the downloader
        # middleware.

        # Must either:
        # - return None: continue processing this request
        # - or return a Response object
        # - or return a Request object
        # - or raise IgnoreRequest: process_exception() methods of
        #   installed downloader middleware will be called

        # 打开并访问网页
        print("request.url:--",request.url)
        driver.get(request.url)
        # 隐式等待
        a = WebDriverWait(driver, 8).until(
            EC.presence_of_element_located(
                (By.XPATH, '//h3[contains(@class,"bili-video-card__info--tit")]')))  # 通过XPATH查找
        if a:
            print("等到了a",a)
            source = driver.page_source
            # print("获取到的类型为",type(source))
            response = HtmlResponse(url=driver.current_url, body=source, request=request, encoding='utf8')
            return response
        else:
            return None
SQl
coon = connect(host='localhost', port=3306, db='boss_zhi_pin',
             user='root', passwd='password', charset='utf8')
cur = coon.cursor()

sql_order = """insert into boss_position_4 (search_word,city_name,position_name ,company_name,areas,street,company_style,scale,
               xue_li,work_experience,financing_situation, benefits,salary,salary_month,
              salary_min,salary_max,average_salary) values(%s,%s,%s,%s,%s,%s,%s,%s,%s,%s,%s,%s,%s,%s,%s,%s,%s)"""
params1 = ['岗位', '城市', '岗位具体名称', '公司名称', '所在区域', '所在街道', '公司类型', '公司规模', '学历要求', '工作经验', '融资情况', '福利待遇', '薪资(K)',
        '发放月数', '最低薪资', '最高薪资', '平均薪资']
cur.execute(sql_order, params1)  # 这里第一次执行是建立字段名(可不写)
coon.commit()

# 关闭连接
cur.close()
coon.close()
ip池子
ip_source = [{"ip": "27.9.47.216", "port": 4220}, {"ip": "183.166.135.43", "port": 4226},
                 {"ip": "101.74.181.221", "port": 4245}, {"ip": "175.147.100.112", "port": 4260},
                 {"ip": "115.205.77.140", "port": 4286}, {"ip": "113.237.4.211", "port": 4256},
                 {"ip": "116.115.209.201", "port": 4245}, {"ip": "175.174.190.95", "port": 4251},
                 {"ip": "106.112.124.153", "port": 4278}, {"ip": "125.79.200.156", "port": 4281}]
到了这里,关于python爬虫selenium+scrapy常用功能笔记的文章就介绍完了。如果您还想了解更多内容,请在右上角搜索TOY模板网以前的文章或继续浏览下面的相关文章,希望大家以后多多支持TOY模板网!