使用开源项目JustAuth完成第三方登录
JustAuth项目源码地址:https://github.com/justauth/JustAuth
JustAuth文档地址:https://justauth.wiki/guide/quickstart/oauth/
此demo的项目地址:xfeng520/JustAuthDemo (gitee.com)
本文相关名词
-
开发者指使用JustAuth的开发者 -
第三方指开发者对接的第三方网站,比如:QQ平台、微信平台、微博平台 -
用户指最终服务的真实用户
JustAuth中的关键词
以下内容了解后,将会使你更容易地上手JustAuth。
-
clientId客户端身份标识符(应用id),一般在申请完Oauth应用后,由第三方平台颁发,唯一 -
clientSecret客户端密钥,一般在申请完Oauth应用后,由第三方平台颁发 -
redirectUri开发者项目中的有效api地址。用户在确认第三方平台授权(登录)后,第三方平台会重定向到该地址,并携带code等参数 -
state用来保持授权会话流程完整性,防止CSRF攻击的安全的随机的参数,由开发者生成
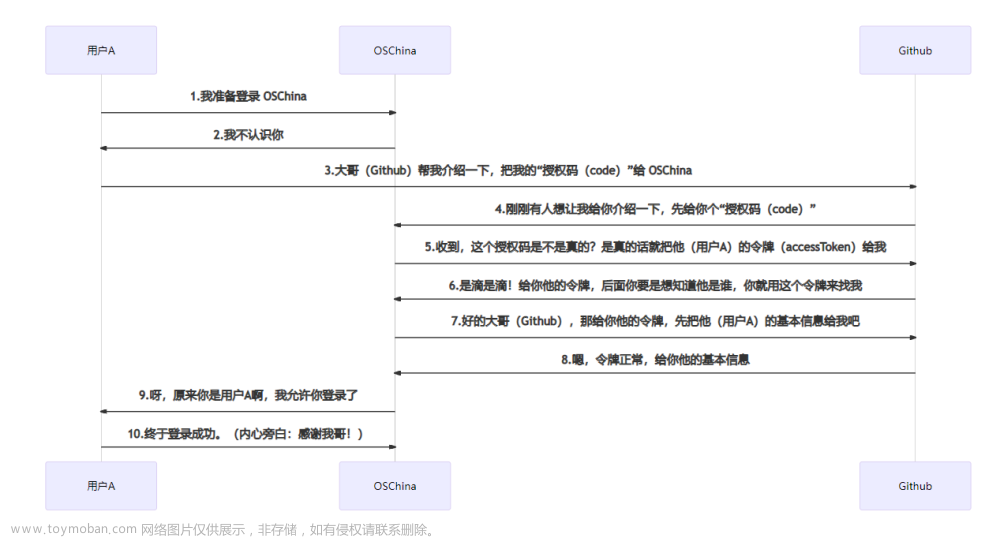
JustAuth流程图
开搞
1.新建SpringBoot项目,配置随意,最终的pom.xml文件如下
<?xml version="1.0" encoding="UTF-8"?>
<project xmlns="http://maven.apache.org/POM/4.0.0" xmlns:xsi="http://www.w3.org/2001/XMLSchema-instance"
         xsi:schemaLocation="http://maven.apache.org/POM/4.0.0 https://maven.apache.org/xsd/maven-4.0.0.xsd">
    <modelVersion>4.0.0</modelVersion>
    <parent>
        <groupId>org.springframework.boot</groupId>
        <artifactId>spring-boot-starter-parent</artifactId>
        <version>2.7.3</version>
        <relativePath/> <!-- lookup parent from repository -->
    </parent>
    <groupId>com.xiongfeng</groupId>
    <artifactId>JustAuthTest</artifactId>
    <version>0.0.1-SNAPSHOT</version>
    <name>JustAuthTest</name>
    <description>JustAuthTest</description>
    <properties>
        <java.version>1.8</java.version>
    </properties>
    <dependencies>
        <dependency>
            <groupId>org.springframework.boot</groupId>
            <artifactId>spring-boot-starter</artifactId>
        </dependency>
        <dependency>
            <groupId>org.springframework.boot</groupId>
            <artifactId>spring-boot-starter-web</artifactId>
        </dependency>
        <dependency>
            <groupId>org.springframework.boot</groupId>
            <artifactId>spring-boot-starter-test</artifactId>
            <scope>test</scope>
        </dependency>
        <!--        JustAuth包-->
        <dependency>
            <groupId>me.zhyd.oauth</groupId>
            <artifactId>JustAuth</artifactId>
            <version>1.16.5</version>
        </dependency>
        <!--        JustAuth所需要的hutool-http包-->
        <dependency>
            <groupId>cn.hutool</groupId>
            <artifactId>hutool-http</artifactId>
            <version>5.3.9</version>
        </dependency>
    </dependencies>

    <build>
        <plugins>
            <plugin>
                <groupId>org.springframework.boot</groupId>
                <artifactId>spring-boot-maven-plugin</artifactId>
            </plugin>
        </plugins>
    </build>

</project>
2.新建controller包,新建JustAuthController.java文件,具体的代码及流程见注释
注意,以下代码中,我们的请求链接中是通过动态参数{source}去取的,这样可以方便的让我们集成任意平台,比如集成gitee时, 我们的请求地址就是:http://localhost:8080/oauth/render/gitee, 而回调地址就是http://localhost:8080/oauth/callback/gitee。
package com.xiongfeng.justauthtest.controller;

import me.zhyd.oauth.config.AuthConfig;
import me.zhyd.oauth.model.AuthCallback;
import me.zhyd.oauth.request.AuthGiteeRequest;
import me.zhyd.oauth.request.AuthRequest;
import me.zhyd.oauth.utils.AuthStateUtils;
import org.springframework.web.bind.annotation.RequestMapping;
import org.springframework.web.bind.annotation.RestController;
import javax.servlet.http.HttpServletResponse;
import java.io.IOException;

/**
 * @program: JustAuthTest
 * @description: 使用JustAuth实现第三方登录
 * @author: xiongfeng
 * @create: 2022-09-17 00:03
 **/
@RestController()
@RequestMapping("/oauth")
public class JustAuthController {
    /**
     * 通过JustAuth的AuthRequest拿到第三方的授权链接,并跳转到该链接页面
     *
     * @param response
     * @throws IOException
     */
    @RequestMapping("/render/{source}")
    public void renderAuth(HttpServletResponse response) throws IOException {
        AuthRequest authRequest = getAuthRequest();
        String authorizeUrl = authRequest.authorize(AuthStateUtils.createState());
        response.sendRedirect(authorizeUrl);
    }

    /**
     * 用户在确认第三方平台授权(登录)后, 第三方平台会重定向到该地址,并携带code、state等参数
     * authRequest.login通过code向第三方请求用户数据
     *
     * @param callback 第三方回调时的入参
     * @return 第三方平台的用户信息
     */
    @RequestMapping("/callback/{source}")
    public Object login(AuthCallback callback) {
        AuthRequest authRequest = getAuthRequest();
        return authRequest.login(callback);
    }

    /**
     * 创建授权request
     *
     * @return AuthRequest
     */
    private AuthRequest getAuthRequest() {
        return new AuthGiteeRequest(AuthConfig.builder()
                .clientId("19528e9e6505ce7028817f601b1a3a531776a1bf89020e9e35a5fdbe520c6085")
                .clientSecret("cadf7241b4a829b4e07d3dc1e60f74f2e5225b568e067294b5a76d28beaff03e")
                .redirectUri("http://localhost:8080/oauth/callback/gitee")
                .build());
    }
}
3.创建第三方应用
**1).**登录gitee,点击右上角用户头像,点击设置,点击第三方应用,点击创建应用

**2).**我们按照提示填入我们的应用信息即可。
应用名称: 一般填写自己的网站名称即可
应用描述: 一般填写自己的应用描述即可
应用主页: 填写自己的网站首页地址
应用回调地址: 重点,该地址为用户授权后需要跳转到的自己网站的地址,默认携带一个code参数 这里的回调地址应该为JustAuthController中的/callback/{source}接口
权限: 根据页面提示操作,默认勾选第一个就行,因为我们只需要获取用户信息即可
**3).**以上信息输入完成后,点击确定按钮创建应用。创建完成后,点击进入应用详情页,可以看到应用的密钥等信息

4).复制以下三个信息:Client ID、Client Secret和应用回调地址。到JustAuthController中的getAuthRequest()方法中
private AuthRequest getAuthRequest() {
        return new AuthGiteeRequest(AuthConfig.builder()
                .clientId("19528e9e6505ce7028817f601b1a3a531776a1bf89020e9e35a5fdbe520c6085")
                .clientSecret("cadf7241b4a829b4e07d3dc1e60f74f2e5225b568e067294b5a76d28beaff03e")
                .redirectUri("http://localhost:8080/oauth/callback/gitee")
                .build());
    }
以上工作完成后,我们直接启动项目,然后在浏览器中访问http://localhost:8080/oauth/render/gitee
可以debug查看具体流程。文章来源:https://www.toymoban.com/news/detail-421080.html
.redirectUri(“http://localhost:8080/oauth/callback/gitee”)
.build());
}
以上工作完成后,我们直接启动项目,然后在浏览器中访问http://localhost:8080/oauth/render/gitee
可以debug查看具体流程。
原博客地址:https://cloud.tencent.com/developer/article/1624287文章来源地址https://www.toymoban.com/news/detail-421080.html
到了这里,关于使用开源项目JustAuth完成第三方登录的文章就介绍完了。如果您还想了解更多内容,请在右上角搜索TOY模板网以前的文章或继续浏览下面的相关文章,希望大家以后多多支持TOY模板网!


