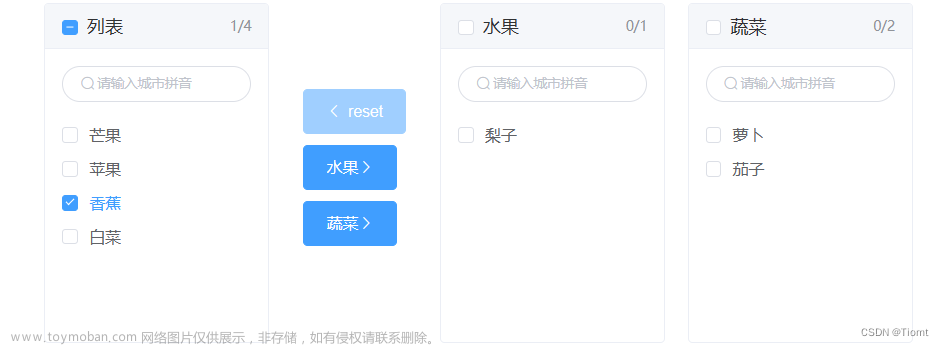
vue2+element-ui,el-aside侧边栏容器收缩与展开

这篇具有很好参考价值的文章主要介绍了vue2+element-ui,el-aside侧边栏容器收缩与展开。希望对大家有所帮助。如果存在错误或未考虑完全的地方,请大家不吝赐教,您也可以点击"举报违法"按钮提交疑问。

一、概览

实现效果如下:

vue2+element-ui,el-aside侧边栏容器收缩与展开

二、项目环境

1、nodejs版本

node -v
v16.16.0

2、npm版本

npm -v
npm WARN config global `--global`, `--local` are deprecated. Use `--location=global` instead.
8.15.0

3、vue脚手架版本

vue -V
@vue/cli 5.0.8

三、创建vue项目

1、创建名为vuetest的项目

vue create vuetest

选择Default([Vue2] babel,eslint) 

vue2+element-ui,el-aside侧边栏容器收缩与展开

 vue2+element-ui,el-aside侧边栏容器收缩与展开

2、切换到项目目录,启动项目

cd vuetest
npm run serve

 vue2+element-ui,el-aside侧边栏容器收缩与展开

3、使用浏览器预览 

http://localhost:8080/

vue2+element-ui,el-aside侧边栏容器收缩与展开

四、使用Visual Studio Code打开项目

1、查看源码

vue2+element-ui,el-aside侧边栏容器收缩与展开

2、安装element-ui

官网https://element.eleme.cn/ 

npm安装

npm i element-ui -S

vue2+element-ui,el-aside侧边栏容器收缩与展开

3、在main.js中引用安装好的element-ui

vue2+element-ui,el-aside侧边栏容器收缩与展开

4、查看element-ui官网,使用Container 布局容器方便快速搭建页面的基本结构

 vue2+element-ui,el-aside侧边栏容器收缩与展开

选择常见页面结构样式 :

<el-container>
  <el-header>Header</el-header>
  <el-container>
    <el-aside width="200px">Aside</el-aside>
    <el-container>
      <el-main>Main</el-main>
      <el-footer>Footer</el-footer>
    </el-container>
  </el-container>
</el-container>

修改App.vue文件:

<template>
  <div id="app">
    <el-container>
      <el-header>Header</el-header>
      <el-container>
        <el-aside width="200px">Aside</el-aside>
        <el-container>
          <el-main>Main</el-main>
          <el-footer>Footer</el-footer>
        </el-container>
      </el-container>
  </el-container>
  </div>
</template>

<script>
// import HelloWorld from './components/HelloWorld.vue'

export default {
  name: 'App',
  components: {
    // HelloWorld
  }
}
</script>

<style>
.el-header, .el-footer {
    background-color: #B3C0D1;
    color: #333;
    text-align: center;
    line-height: 60px;
  }
  
  .el-aside {
    background-color: #D3DCE6;
    color: #333;
    text-align: center;
    line-height: 200px;
  }
  
  .el-main {
    background-color: #E9EEF3;
    color: #333;
    text-align: center;
    line-height: 160px;
  }
</style>

启动项目,预览效果:

npm run serve

vue2+element-ui,el-aside侧边栏容器收缩与展开

vue2+element-ui,el-aside侧边栏容器收缩与展开

访问http://localhost:8080/此时发现结构并没有撑满,在assets中新建一个css文件夹,新建global.css文件,并在main.js中引用

html,
body,
#app{
    margin: 0;
    padding: 0;
    height: 100%;
    width: 100%;
}

vue2+element-ui,el-aside侧边栏容器收缩与展开

vue2+element-ui,el-aside侧边栏容器收缩与展开

在App.vue文件中外层el-container中添加class="container"并设置高度为100% 

vue2+element-ui,el-aside侧边栏容器收缩与展开

此时页面显示正常了!

vue2+element-ui,el-aside侧边栏容器收缩与展开

五、实现el-aside侧边栏收缩与展开效果

1、修改App.vue文件

<template>
  <div id="app">
    <el-container class="container">
      <el-header>Header</el-header>
      <el-container>
        <el-aside class="aside_main" :class="{aside_main_show:!asideStatus}">Aside</el-aside>
        <el-container>
          <el-main class="main_cont">
            <!-- aside侧边栏按钮 -->
            <div class="aside_open_close" @click="asidechange">
              <i class="el-icon-arrow-left" v-if="aside_open_close"></i>
              <i class="el-icon-arrow-right" v-else></i>
            </div>
          </el-main>
          <el-footer>Footer</el-footer>
        </el-container>
      </el-container>
  </el-container>
  </div>
</template>

2、添加按钮点击事件 

export default {
  name: 'App',
  components: {
    // HelloWorld
  },
  data(){
    return{
      asideStatus:false,
      aside_open_close:false,

    }
  },
  methods:{
    // 侧边栏收缩与展开
    asidechange(){
      this.asideStatus = !this.asideStatus
      
      if(this.asideStatus){
        setTimeout(()=>{
          this.aside_open_close =true
        },500)
      }else{
        setTimeout(()=>{
          this.aside_open_close =false
        },500)
      }
    }
  }
}

3、修改样式 

<style>
.container{
  height: 100%;
}
.el-header, .el-footer {
    background-color: #B3C0D1;
    color: #333;
    text-align: center;
    line-height: 60px;
  }
  
  /* .el-aside {
    background-color: #D3DCE6;
    color: #333;
    text-align: center;
    line-height: 200px;
  } */

  /* 侧边栏样式 */
  .aside_main{
    width: 200px !important;
    transition: width 0.5s;
  }
  .aside_main_show{
    width: 0px !important;
  }
  /* .el-main {
    background-color: #E9EEF3;
    color: #333;
    text-align: center;
    line-height: 160px;
  } */
  .main_cont{
    position: relative;
    margin: 0;
    padding: 0;
    background-color: #E9EEF3;

  }
  /* 侧边栏按钮样式 */
  .aside_open_close{
    position: absolute;
    left: 0;
    top: 50%;
    width: 16px;
    height: 60px;
    line-height: 60px;
    color: #fff;
    background-color: #2A333A;
    border-radius: 0 6px 6px 0;
    font-size: 20px;
    z-index: 1000;
    cursor: pointer;
  }
  .aside_open_close:hover{
    background-color: #FF8E2B;
    color: #fff;
  }
</style>

4、预览效果

vue2+element-ui,el-aside侧边栏容器收缩与展开

完结!!!

源码下载:https://download.csdn.net/download/im_api/87457462文章来源地址https://www.toymoban.com/news/detail-421608.html

到了这里,关于vue2+element-ui,el-aside侧边栏容器收缩与展开的文章就介绍完了。如果您还想了解更多内容,请在右上角搜索TOY模板网以前的文章或继续浏览下面的相关文章,希望大家以后多多支持TOY模板网!

本文来自互联网用户投稿,该文观点仅代表作者本人,不代表本站立场。本站仅提供信息存储空间服务,不拥有所有权,不承担相关法律责任。如若转载,请注明出处: 如若内容造成侵权/违法违规/事实不符,请点击违法举报进行投诉反馈,一经查实,立即删除!

领支付宝红包 赞助服务器费用

相关文章

  • vue2+element-ui el-tree树形控件封装

    1.封装 根据官网配置项封装了下el-tree 方便维护和复用,有用的话点赞收藏叭~ 2.使用 如若要对不同的一级二级节点设置不同的样式可以参考这样:

    2024年02月12日
    浏览(40)
  • Vue2+Element-UI的el-steps封装与修改样式


    2024年02月14日
    浏览(34)
  • 【vue2】element-ui el-transfer扩展 实现多列效果一对多

    vue2 el-transfer 穿梭框实现多类别 template 复制Transfer源码中的template,并拓展我们需要的列表2和button script 这里重写了Transfer的addToLeft方法,按着element-ui的逻辑写出第二个列表的逻辑即可。源码就不做解释了,这个组件比较简单,感兴趣的朋友可以去看看 style GitHub地址

    2024年02月08日
    浏览(44)
  • Vue2.0+Element-ui(2.15.13)出现el-table不显示问题解决方案

    遇到的问题: Element-ui中的 el-table组件 无法正常显示; 1.安装的Vue是2.0版本; 2.安装的Element-ui是2.15.13版本 原因: 1.一个项目调用了element-ui和vant两个ui库,有冲突; 2.Element-ui是2.15.13版本依赖比较高;   解决方案: 1.npm uninstall element-ui;下载Element-ui 2.npm install element-ui@2.8.3

    2024年02月11日
    浏览(43)
  • Element UI Container 布局容器 布满全屏, 头部和侧边栏固定 el-main可滚动

    一、Element UI Container 布局容器 布满全屏: 1、需要给包裹的div一个height:100% 2、给#app,html,body,.el-container一个height:100% 3、给el-container设置direction=\\\"vertical\\\",因为包含main和footer 二、头部和侧边栏固定 el-main可滚动 给内容区域的container加样式 **  height: calc(100vh - 头部的高度);

    2024年02月11日
    浏览(29)
  • Vue2.0安装Element-ui

    1.在项目终端输入 如果想知道是否安装成功   2.随后在main.js里引入element组件 然后去使用element   就这样成功了  

    2024年02月16日
    浏览(32)
  • Vue2 - 引入Element-UI组件样式

    官方文档 https://element.eleme.cn/#/zh-CN/component/installation 推荐使用 npm 的方式安装 ,它能更好地和 webpack 打包工具配合使用。 在终端cd到项目文件夹下安装 也可以通过CDN(不推荐) 目前可以通过 unpkg.com/element-ui 获取到最新版本的资源,在页面上引入 js 和 css 文件即可开始使用。

    2024年02月06日
    浏览(50)
  • Vue2 +Element-ui实现前端页面

    以一个简单的前端页面为例。主要是利用vue和element-ui实现。 里面涉及的主要包括:新建vue项目、一行多个输入框、页面实现等。   ①首先安装nodejs,这部分在此就不讲啦。 ②然后安装vue-cli: 查看是否安装成功: 安装成功之后就输出vue的版本 ③在cmd窗口新建一个vue2脚手架

    2024年02月16日
    浏览(35)
  • vue2+element-ui 实现国际化

    在src目录下创建一个lang文件夹,同时创建zh.js(中文),en.js(英文),ja.js(日文),fr.js(法文)四个语言包js文件,并创建一个index.js文件,用来整合语言包 对于一个项目来说,一个语言包需要包含所有页面以及组件;在语言包以页面为单位,创建一个对象;对公共的title或者按钮名

    2024年02月02日
    浏览(41)
  • VUE2+Element-ui+封装Echarts图表

    封装Echarts图表,如下效果图 Home组件代码块,使用的mock.js模拟数据封装 Echarts图表组件 安装所需依赖 cnpm i axios -S 安装axios接口请求 cnpm i mockjs 或 yarn add mockjs 安装mockjs生成模拟随机数据 cnpm i echarts 或 yarn add echarts 安装echarts图表 cnpm i element-ui -S 安装element-ui组件库 安装less c

    2024年02月08日
    浏览(37)

觉得文章有用就打赏一下文章作者

支付宝扫一扫打赏

博客赞助

微信扫一扫打赏

请作者喝杯咖啡吧~博客赞助

支付宝扫一扫领取红包,优惠每天领

二维码1

领取红包

二维码2

领红包