合宙ESP32-C3+OLED天气预报
一、搭建开发框架

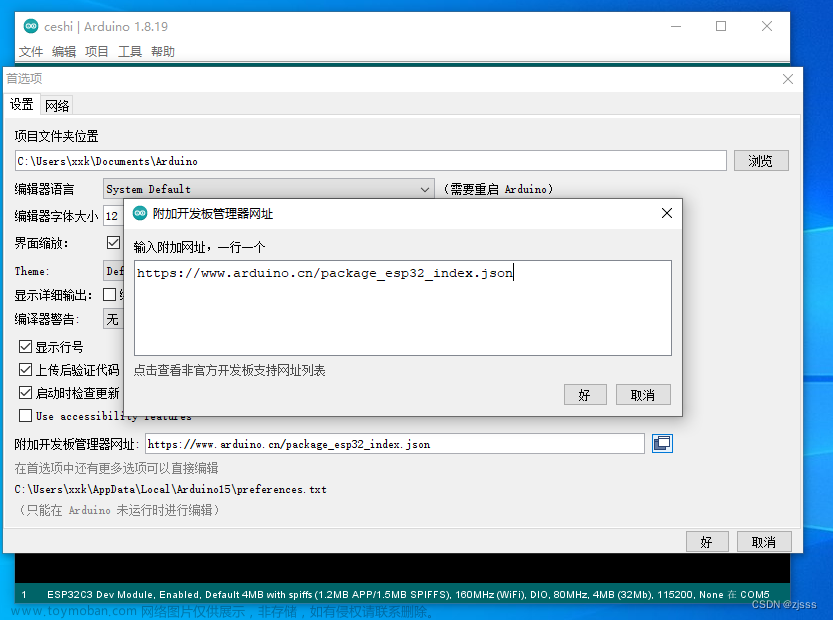
使用VScode platformio开发
1.oled显示
#include <Arduino.h>
#include <SSD1306Wire.h>
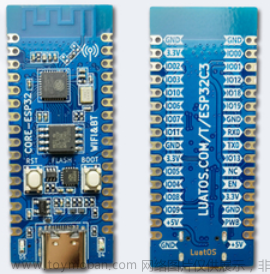
const int SDA_PIN = 4; //引脚连接,ESP32
const int SCL_PIN = 5; //
SSD1306Wire display(0x3c, SDA_PIN, SCL_PIN);
void setup() {
display.init();
display.clear();
display.flipScreenVertically();
display.setFont(ArialMT_Plain_10);
}
void loop() {
display.drawString(0, 24,"This is a 0.96' oled!");
display.display();
delay(1000);
display.clear();
}
2.配置WIFI
#include <Arduino.h>
#include <SSD1306Wire.h>//thingpulse/ESP8266 and ESP32 OLED driver for SSD1306 displays@^4.3.0
#include <WiFi.h>//自带
#include <HTTPClient.h>//自带

const int SDA_PIN = 4;  //引脚连接,ESP32
const int SCL_PIN = 5;  //
SSD1306Wire display(0x3c, SDA_PIN, SCL_PIN);

const char* ssid     = "***"; //填写你的wifi名字
const char* password = "***"; //填写你的wifi密码

void setup() {
  display.init();
  display.clear();
  display.flipScreenVertically();
  display.setFont(ArialMT_Plain_10);

  display.drawString(0, 24,"Connecting...");
  display.display();

  WiFi.begin(ssid, password); //连接wifi
  delay(1000);
  while (WiFi.status()!=WL_CONNECTED)
  {
    delay(500);
  };
  display.clear();
  display.drawString(0, 24,"Connected!");
  display.display();
  delay(1000);
}


void loop() {
  display.clear();
  display.drawString(0, 24,"This is a 0.96' oled!");
  display.display();
  delay(1000);

}
3.得到B站粉丝数
#include <Arduino.h>
#include <SSD1306Wire.h>//thingpulse/ESP8266 and ESP32 OLED driver for SSD1306 displays@^4.3.0
#include <WiFi.h>//自带
#include <HTTPClient.h>//自带

const int SDA_PIN = 4;  //引脚连接,ESP32
const int SCL_PIN = 5;  //
SSD1306Wire display(0x3c, SDA_PIN, SCL_PIN);

const char* ssid     = "***"; //填写你的wifi名字
const char* password = "***"; //填写你的wifi密码


void getfans(){
  HTTPClient http;
  String url = "https://api.bilibili.com/x/relation/stat?vmid=473938416";
  http.begin(url);
  int httpCode=http.GET();
  if(httpCode>0){
    if(httpCode==HTTP_CODE_OK){
      String payload = http.getString();
      Serial.print(payload);
    }
  }
  else{
    Serial.print("[HTTPS] GET... failed");
  }
}

void setup() {
  Serial.begin(115200);
  display.init();
  display.clear();
  display.flipScreenVertically();
  display.setFont(ArialMT_Plain_10);

  display.drawString(0, 24,"Connecting...");
  display.display();

  WiFi.begin(ssid, password); //连接wifi
  delay(1000);
  while (WiFi.status()!=WL_CONNECTED)
  {
    delay(500);
  };
  display.clear();
  display.drawString(0, 24,"Connected!");
  display.display();
  delay(1000);
}


void loop() {
  getfans();
  delay(2000);
}
4.使用json解析获得的粉丝数,显示到OLED
#include <Arduino.h>
#include <SSD1306Wire.h>//thingpulse/ESP8266 and ESP32 OLED driver for SSD1306 displays@^4.3.0
#include <WiFi.h>//自带
#include <HTTPClient.h>//自带
#include <ArduinoJson.h>

const int SDA_PIN = 4;  //引脚连接,ESP32
const int SCL_PIN = 5;  //
SSD1306Wire display(0x3c, SDA_PIN, SCL_PIN);

const char* ssid     = "***"; //填写你的wifi名字
const char* password = "***"; //填写你的wifi密码


void getfans(){
  HTTPClient http;
  String url = "https://api.bilibili.com/x/relation/stat?vmid=473938416";
  http.begin(url);
  int httpCode=http.GET();
  if(httpCode>0){
    if(httpCode==HTTP_CODE_OK){
      String payload = http.getString();
      Serial.print(payload);

      DynamicJsonDocument  jsonBuffer(2048);
      deserializeJson(jsonBuffer, payload);
      JsonObject root = jsonBuffer.as<JsonObject>();


      String follower = root["data"]["following"];
      display.clear();
      display.drawString(64, 24,follower);
      display.display();
    }
  }
  else{
    Serial.print("[HTTPS] GET... failed");
  }
}

void setup() {
  Serial.begin(115200);
  display.init();
  display.clear();
  display.flipScreenVertically();
  display.setFont(ArialMT_Plain_10);

  display.drawString(0, 24,"Connecting...");
  display.display();

  WiFi.begin(ssid, password); //连接wifi
  delay(1000);
  while (WiFi.status()!=WL_CONNECTED)
  {
    delay(500);
  };
  display.clear();
  display.drawString(0, 24,"Connected!");
  display.display();
  delay(1000);
}


void loop() {
  getfans();
  delay(2000);
}
二、基本知识
结构体
- 定义结构体
typedef struct WeatherData {
    String temp;        /*温度:'19'*/
    String humidity;    /*湿度:'91'*/
}WeatherData;
- 实例化结构体
WeatherData todaymsg;//实例化
- WeatherData *data可以理解为 int *data,而*data则是指针,指针就是地址
void getweather(WeatherData *data){
    String tmp = root["now"]["temp"];
    data->temp=tmp;
    String hum = root["now"]["humidity"];
    data->humidity=hum;
- &todaymsg取出存放的数据,todaymsg相当于地址(指针),数据就存在这个地址中,通过&进行读取
*和&必须成对出现
void loop() {
  getweather(&todaymsg,HEFENG_KEY,HEFENG_LOCATION);
  display.drawString(64, 24,todaymsg.humidity);
}
三、和风天气
1.访问URL
"https://devapi.qweather.com/v7/weather/now?&gzip=n&location="+ location + "&key=" + key;
应当注意&gzip=n,即返回的json数据为非压缩包的形式,否则无法读取。
2.返回JSON数据
{"code":0,"message":"0","ttl":1,"data":{"mid":473938416,"following":11,"whisper":0,"black":0,"follower":0}}
{"code":"200","updateTime":"2022-10-06T10:22+08:00","fxLink":"http://hfx.link/3ef1","now":{"obsTime":"2022-10-06T10:12+08:00","temp":"12","feelsLike":"8","icon":"104","text":"阴","wind360":"315","windDir":"西北风","windScale":"4","windSpeed":"21","humidity":"85","precip":"0.0","pressure":"1022","vis":"21","cloud":"91","dew":"8"},"refer":{"sources":["QWeather","NMC","ECMWF"],"license":["no commercial use"]}}
3.解析JSON,并存放到结构体
  String payload = http.getString();

  DynamicJsonDocument  jsonBuffer(2048);
  deserializeJson(jsonBuffer, payload);
  JsonObject root = jsonBuffer.as<JsonObject>();

  String hum = root["now"]["humidity"];
  data->humidity=hum;
4.和风天气结构体
- 当前天气
typedef struct WeatherData {
    String obsTime;     /*时间:'2022-10-04T20:46+08:00'*/
    String temp;        /*温度:'19'*/
    String feelsLike;   /*体感温度:'19'*/
    String icon;        /*图标:'104'*/
    String text;        /*天气文本:'阴'*/
    String wind360;     /*风向:'8'*/
    String windDir;     /*风向文本:'北风'*/
    String windScale;   /*风力等级:'1'*/
    String windSpeed;   /*风速:'4'*/
    String humidity;    /*湿度:'91'*/
    String precip;      /*降水概率:'0.0'*/
    String pressure;    /*气压:'976'*/
    String meteoconIcon;
}WeatherData;
- 预报天气
typedef struct WeatherForcastData {
    String fxDate;          /*日期:'2022-10-04'*/
    String sunrise;         /*日出时间:'06:13'*/
    String sunset;          /*日落时间:'17:53'*/
    String moonrise;        /*月出时间:'15:02'*/
    String moonset;         /*月落时间:'00:20'*/
    String moonPhase;       /*月相:'盈凸月'*/
    String moonPhaseIcon;   /*月相图标:'803'*/
    String tempMax;         /*最高温度:'16'*/
    String tempMin;         /*最低温度:'4'*/
    String iconDay;         /*白天天气图标:'100'*/
    String textDay;         /*白天天气文本:'晴'*/
    String iconNight;       /*夜间天气图标:'150'*/
    String textNight;       /*夜间天气文本:'晴'*/
    String wind360Day;      /*白天风向:'353'*/
    String windDirDay;      /*白天风向文本:'北风'*/
    String windScaleDay;    /*白天风力等级:'3-4'*/
    String windSpeedDay;    /*白天风速:'15'*/
    String wind360Night;    /*夜间风向:'270'*/
    String windDirNight;    /*夜间风向文本:'西风'*/
    String windScaleNight;  /*夜间风力等级:'1-2'*/
    String windSpeedNight;  /*夜间风速:'3'*/
    String humidity;        /*湿度:'27'*/
    String precip;          /*降水概率:'0.0'*/
    String pressure;        /*气压:'1024'*/
}WeatherForcastData;
5.和风天气图标
- 获取String icon
返回值为字符串型的,如"100" / “101”
- 根据获取的icon值,返回图标在Meteocons_Plain_36字体中对应的值
如"100",则返回"B",具体各返回值是什么,需要进行尝试文章来源:https://www.toymoban.com/news/detail-423583.html
String dec2ascii[]  = {//"("代表40,")"代表41...
   "(",")","*","+",",","-",".","/","0","1","2",
   "3","4","5","6","7","8","9",":",";","<","=",
   ">","?","@","A","B","C","D","E","F","G","H",
   "I","J","K","L","M","N","O","P","Q","R","S",
   "T","U","V","W","X","Y","Z",
};
display.setFont(Meteocons_Plain_36);
for(int i=40;i<90;i++){
  String s=dec2ascii[i-40];
  display.drawString(0, 0,s);
}
- 根据返回的Meteocons_Plain_36字体中对应的值,进行显示
display.setFont(Meteocons_Plain_36);
display.drawString(0, 0,todaymsg.meteoconIcon);
 文章来源地址https://www.toymoban.com/news/detail-423583.html
到了这里,关于003.0.96‘OLED+合宙ESP32C3+和风天气预报的文章就介绍完了。如果您还想了解更多内容,请在右上角搜索TOY模板网以前的文章或继续浏览下面的相关文章,希望大家以后多多支持TOY模板网!