1.环境配置
Arduino下载TFT_eSPI和JPEGDecoder库
步骤:项目->加载库->管理库

修改User_Setup.h
驱动
#define ST7789_DRIVER
屏尺寸(我的是240*240)
#define TFT_WIDTH 240
#define TFT_HEIGHT 240
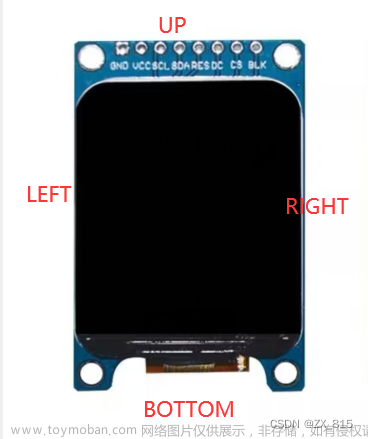
连接引脚
#define TFT_CS PIN_D8 // Chip select control pin D8
#define TFT_DC PIN_D3 // Data Command control pin
#define TFT_RST PIN_D4 // Reset pin (could connect to NodeMCU RST, see next line)
#define TFT_BL PIN_D1 // LED back-light (only for ST7789 with backlight control pin)


2.示例显示图片
选择示例:
文件->TFT_eSPI->160×128->TFT_flas_jpg
其中jpeg1.h,jpeg2.h,jpeg3.h,jpeg4.h几个头文件里存的是图片的数据信息。
3.显示自己的图片
首先要注意一下自己图片的格式,我用的是png格式的(图片大小不要太大)。在线调整图像像素。
图片信息获取工具:https://notisrac.github.io/FileToCArray/
点击Copy to clipboard,复制框内的图片数据,粘贴到之前jpeg1.h中。
3.1 修改示例代码
删除jpeg2.h,jpeg3.h,jpeg4.h三个头文件,如果想多显示几张可以增加到后几个头文件中

其他的我没有修改,需要其他功能的再百度吧,俺还不会。
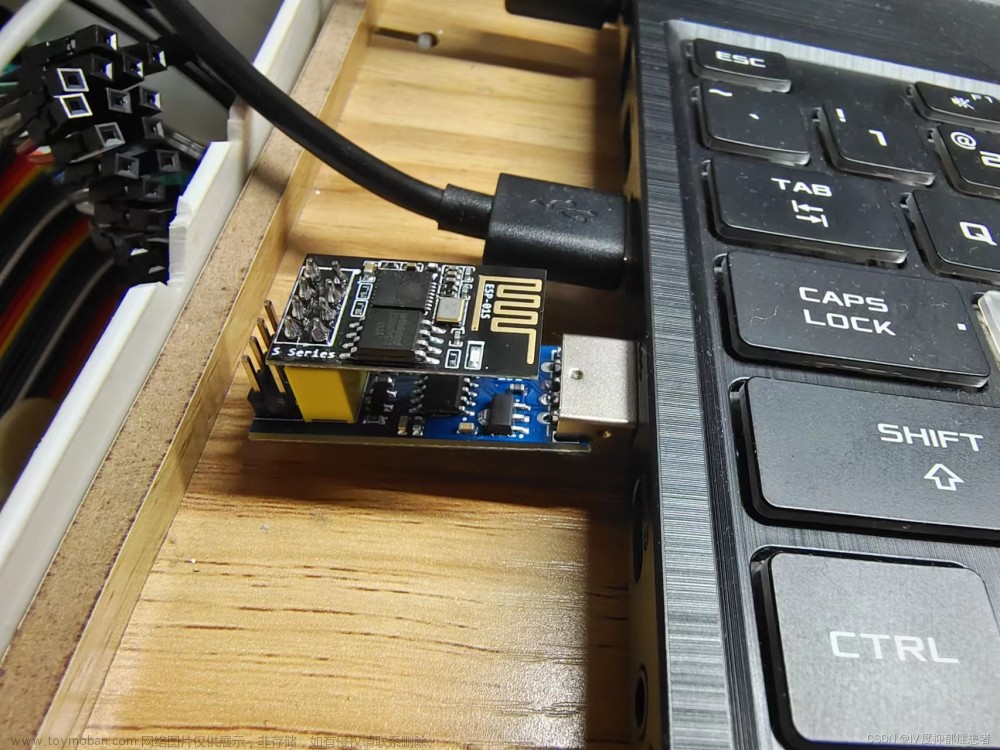
3.2 引脚连接
引脚连接
实物图展示
3.3 编译下载
工具设置
下载程序: 文章来源:https://www.toymoban.com/news/detail-424586.html
3.4 代码
这里不提供给jpeg1.h的代码啦,反正你们也能自己生成,对吧文章来源地址https://www.toymoban.com/news/detail-424586.html
#include <SPI.h>
#include <TFT_eSPI.h>

TFT_eSPI tft = TFT_eSPI();


// JPEG decoder library
#include <JPEGDecoder.h>

// Return the minimum of two values a and b
#define minimum(a,b)     (((a) < (b)) ? (a) : (b))

// Include the sketch header file that contains the image stored as an array of bytes
// More than one image array could be stored in each header file.
#include "jpeg1.h"

// Count how many times the image is drawn for test purposes
uint32_t icount = 0;
//----------------------------------------------------------------------------------------------------


//####################################################################################################
// Setup
//####################################################################################################
void setup() {
  Serial.begin(115200);
  tft.begin();
}

//####################################################################################################
// Main loop
//####################################################################################################
void loop() {
  drawArrayJpeg(_1661000196384, sizeof(_1661000196384), 0, 0); // Draw a jpeg image stored in memory at x,y
  delay(2000);
}

//####################################################################################################
// Draw a JPEG on the TFT pulled from a program memory array
//####################################################################################################
void drawArrayJpeg(const uint8_t arrayname[], uint32_t array_size, int xpos, int ypos) {

  int x = xpos;
  int y = ypos;

  JpegDec.decodeArray(arrayname, array_size);

  jpegInfo(); // Print information from the JPEG file (could comment this line out)

  renderJPEG(x, y);

  Serial.println("#########################");
}

//####################################################################################################
// Draw a JPEG on the TFT, images will be cropped on the right/bottom sides if they do not fit
//####################################################################################################
// This function assumes xpos,ypos is a valid screen coordinate. For convenience images that do not
// fit totally on the screen are cropped to the nearest MCU size and may leave right/bottom borders.
void renderJPEG(int xpos, int ypos) {

  // retrieve infomration about the image
  uint16_t *pImg;
  uint16_t mcu_w = JpegDec.MCUWidth;
  uint16_t mcu_h = JpegDec.MCUHeight;
  uint32_t max_x = JpegDec.width;
  uint32_t max_y = JpegDec.height;

  // Jpeg images are draw as a set of image block (tiles) called Minimum Coding Units (MCUs)
  // Typically these MCUs are 16x16 pixel blocks
  // Determine the width and height of the right and bottom edge image blocks
  uint32_t min_w = minimum(mcu_w, max_x % mcu_w);
  uint32_t min_h = minimum(mcu_h, max_y % mcu_h);

  // save the current image block size
  uint32_t win_w = mcu_w;
  uint32_t win_h = mcu_h;

  // record the current time so we can measure how long it takes to draw an image
  uint32_t drawTime = millis();

  // save the coordinate of the right and bottom edges to assist image cropping
  // to the screen size
  max_x += xpos;
  max_y += ypos;

  // read each MCU block until there are no more
  while (JpegDec.readSwappedBytes()) {

    // save a pointer to the image block
    pImg = JpegDec.pImage ;

    // calculate where the image block should be drawn on the screen
    int mcu_x = JpegDec.MCUx * mcu_w + xpos;  // Calculate coordinates of top left corner of current MCU
    int mcu_y = JpegDec.MCUy * mcu_h + ypos;

    // check if the image block size needs to be changed for the right edge
    if (mcu_x + mcu_w <= max_x) win_w = mcu_w;
    else win_w = min_w;

    // check if the image block size needs to be changed for the bottom edge
    if (mcu_y + mcu_h <= max_y) win_h = mcu_h;
    else win_h = min_h;

    // copy pixels into a contiguous block
    if (win_w != mcu_w)
    {
      uint16_t *cImg;
      int p = 0;
      cImg = pImg + win_w;
      for (int h = 1; h < win_h; h++)
      {
        p += mcu_w;
        for (int w = 0; w < win_w; w++)
        {
          *cImg = *(pImg + w + p);
          cImg++;
        }
      }
    }

    // draw image MCU block only if it will fit on the screen
    if (( mcu_x + win_w ) <= tft.width() && ( mcu_y + win_h ) <= tft.height())
    {
      tft.pushRect(mcu_x, mcu_y, win_w, win_h, pImg);
    }
    else if ( (mcu_y + win_h) >= tft.height()) JpegDec.abort(); // Image has run off bottom of screen so abort decoding
  }

  // calculate how long it took to draw the image
  drawTime = millis() - drawTime;

  // print the results to the serial port
  Serial.print(F(  "Total render time was    : ")); Serial.print(drawTime); Serial.println(F(" ms"));
  Serial.println(F(""));
}

//####################################################################################################
// Print image information to the serial port (optional)
//####################################################################################################
void jpegInfo() {
  Serial.println(F("==============="));
  Serial.println(F("JPEG image info"));
  Serial.println(F("==============="));
  Serial.print(F(  "Width      :")); Serial.println(JpegDec.width);
  Serial.print(F(  "Height     :")); Serial.println(JpegDec.height);
  Serial.print(F(  "Components :")); Serial.println(JpegDec.comps);
  Serial.print(F(  "MCU / row  :")); Serial.println(JpegDec.MCUSPerRow);
  Serial.print(F(  "MCU / col  :")); Serial.println(JpegDec.MCUSPerCol);
  Serial.print(F(  "Scan type  :")); Serial.println(JpegDec.scanType);
  Serial.print(F(  "MCU width  :")); Serial.println(JpegDec.MCUWidth);
  Serial.print(F(  "MCU height :")); Serial.println(JpegDec.MCUHeight);
  Serial.println(F("==============="));
}

//####################################################################################################
// Show the execution time (optional)
//####################################################################################################
// WARNING: for UNO/AVR legacy reasons printing text to the screen with the Mega might not work for
// sketch sizes greater than ~70KBytes because 16 bit address pointers are used in some libraries.

// The Due will work fine with the HX8357_Due library.

void showTime(uint32_t msTime) {
  //tft.setCursor(0, 0);
  //tft.setTextFont(1);
  //tft.setTextSize(2);
  //tft.setTextColor(TFT_WHITE, TFT_BLACK);
  //tft.print(F(" JPEG drawn in "));
  //tft.print(msTime);
  //tft.println(F(" ms "));
  Serial.print(F(" JPEG drawn in "));
  Serial.print(msTime);
  Serial.println(F(" ms "));
}
到了这里,关于Arduino+esp8266+1.3寸TFT屏(st7789驱动)显示图片教程的文章就介绍完了。如果您还想了解更多内容,请在右上角搜索TOY模板网以前的文章或继续浏览下面的相关文章,希望大家以后多多支持TOY模板网!