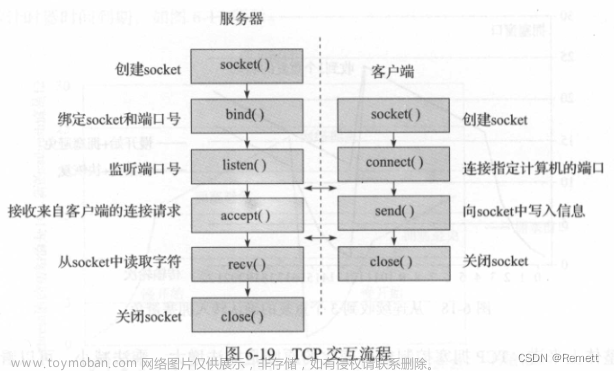
最近需要用到TCP/IP通讯,这边就先找个简单的例程学习一下。Qt的TCP通讯编程可以使用QtNetwork模块,QtNetwork模块提供的类能够创建基于TCP/IP的客户端与服务端应用程序,一般会使用QTcpSocket、QTcpServer类
TCP和UDP通讯
网络通信方式主要有两种:TCP与UDP。以下拷贝网络上总结两者之间的区别:
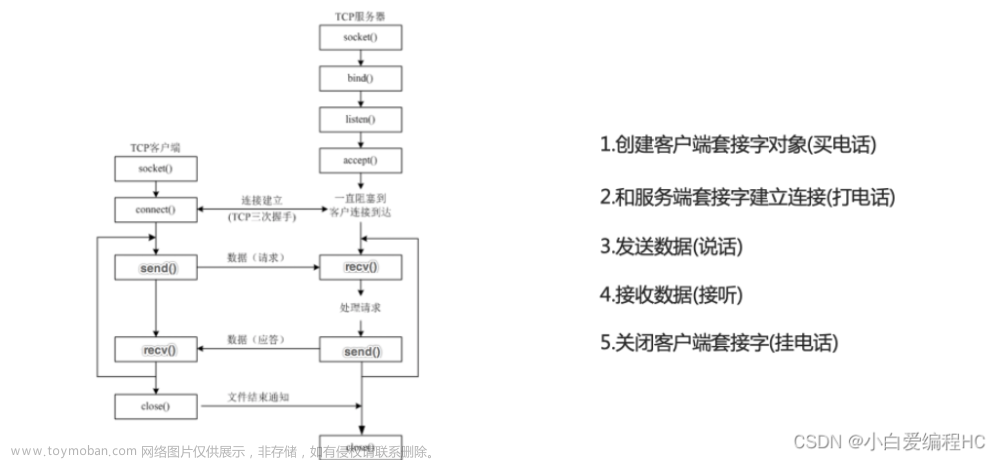
1、TCP面向连接(如打电话要先拨号建立连接);UDP是无连接的,即发送数据之前不需要建立连接
2、TCP提供可靠的服务。也就是说,通过TCP连接传送的数据,无差错,不丢失,不重复,且按序到达;UDP尽最大努力交付,即不保证可靠交付
3、TCP面向字节流,实际上是TCP把数据看成一连串无结构的字节流;UDP是面向报文的。
UDP没有拥塞控制,因此网络出现拥塞不会使源主机的发送速率降低(对实时应用很有用,如IP电话,实时视频会议等)
4、每一条TCP连接只能是点到点的;UDP支持一对一,一对多,多对一和多对多的交互通信
5、TCP首部开销20字节;UDP的首部开销小,只有8个字节
6、TCP的逻辑通信信道是全双工的可靠信道,UDP则是不可靠信道。
另外在编程时TCP通讯可能涉及到粘包/拆包。UDP是基于报文传输的,发送几次Write(),接收端就会用几次Read(),每次读取一个报文,报文间不合并,多于缓冲区的报文会丢弃。TCP是基于数据流传输的,Write()和Read()的次数不固定,报文间会以随机的方式合并,这就需要在接收时进行粘包/拆包处理,这里暂不涉及。
服务器
TCP服务器流程一般包括:
1.创建QTcpServer对象
2.启动服务器(监听)调用成员方法listen
3.当有客户端链接时候会发送newConnection信号,触发槽函数接受连接
4.QTcpsocket发送数据用成员方法write
5.当客户端有数据进来,QTcpSocket对象就会发送readyRead信号,关联槽函数读取数据,使用read或readall方法
找了一个博文,见引用,写得很详细,这边几乎也是全搬过来。
源码
源码如下
#include "widget.h"
#include "ui_widget.h"
#include <QtNetwork>

Widget::Widget(QWidget *parent)
    : QWidget(parent)
    , ui(new Ui::Widget)
{
    ui->setupUi(this);

    /*读取本机网卡信息...*/
    QString localHostName = QHostInfo::localHostName();
    QHostInfo info = QHostInfo::fromName(localHostName);

    /*将本机所有的IPV4地址添加到comBox_hostIP下.*/
    foreach(QHostAddress ipAddress, info.addresses())
    {
        if(ipAddress.protocol() == QAbstractSocket::IPv4Protocol)
        {
            qDebug() << ipAddress.toString();
            ui->comBox_hostIP->addItem(ipAddress.toString());
        }
    }
    ui->comBox_hostIP->addItem("127.0.0.1");
    ui->comBox_hostIP->setCurrentIndex(ui->comBox_hostIP->count()-1);
    ui->lineEdit_Port->setText("12345");

    server = new QTcpServer(this);
    connect(server, &QTcpServer::newConnection, this,&Widget::on_newConnection);

}

Widget::~Widget()
{
    delete ui;
}


void Widget::on_pushBtn_listen_clicked()
{
    /*监听本地IP加端口号.*/
      if(server->listen(QHostAddress(ui->comBox_hostIP->currentText()), ui->lineEdit_Port->text().toInt()) == false)
      {
          /*监听失败,打印信息.*/
          qDebug()<<"listen false";
      }
      else
      {
          /*监听成功,则将一些控件锁死.*/
          ui->pushBtn_listen->setDisabled(true);
          ui->lineEdit_Port->setDisabled(true);
          ui->comBox_hostIP->setDisabled(true);
          qDebug()<<"listen successfully";
          /*激活关闭按钮*/
          ui->pushBtn_close->setEnabled(true);
      }

}

void Widget::on_newConnection()
{
    /*获取新连接客户端的socket*/
    QTcpSocket *socket = server->nextPendingConnection();

    /*将这个socket添加到List容器中...*/
    sockList.append(socket);

    /*获取客户端的IP地址和端口号信息,并转换为字符串.*/
    QString info = socket->peerAddress().toString() \
                   + ':' + QString::number(socket->peerPort());

    /*将信息打印到文本框.*/
    ui->textEdit_rcv->append("Connected:"+info);

    /*将客户端的信息添加到comBox_clientIP下.*/
    ui->comBox_clientIP->addItem(info);

    /*将新连接的socket对象的可以读取信号连接到接收槽函数.*/
    connect(socket, &QTcpSocket::readyRead, this, &Widget::on_recv);
    /*将新连接的socket对象的断开连接信号连接到断开槽函数.*/
    connect(socket, &QTcpSocket::disconnected, this, &Widget::on_disconnect);

    if(ui->comBox_clientIP->count()==2)
        ui->comBox_clientIP->insertItem(0,"All");

}

void Widget::on_recv()
{
    /*找到触发信号的那个socket对象.*/
    QTcpSocket *sock = qobject_cast<QTcpSocket *>(sender());

    /*读取信息并转化为字符串.*/
    QString info = "From " + sock->peerAddress().toString() \
            + ':' + QString::number(sock->peerPort());
    /*将客户端的信息打印到文本框.*/
    ui->textEdit_rcv->append(info);
    /*将接收到的数据也打印到文本框.*/
    ui->textEdit_rcv->append(sock->readAll());


}

void Widget::on_disconnect()
{
    /*找到触发信号的那个socket对象.*/
    QTcpSocket *sock = qobject_cast<QTcpSocket *>(sender());
    sockList.removeOne(sock);

    /*读取信息并转化为字符串.*/
    QString clientinfo = sock->peerAddress().toString() \
            + ':' + QString::number(sock->peerPort());

    /*将客户端的信息打印到文本框.*/
    ui->textEdit_rcv->append(clientinfo+"   Disconneted!");

     /*根据字符串找到comBox_clientIP中的对应元素的索引号*/
     int index = ui->comBox_clientIP->findText(clientinfo);
     /*删除那个元素.*/
     ui->comBox_clientIP->removeItem(index);

    /*将接收到的数据也打印到文本框.*/
//    ui->textEdit_rcv->append(sock->readAll());
     if(ui->comBox_clientIP->count()<=2)
         ui->comBox_clientIP->removeItem(0);

    /*将新连接的socket对象的可以读取信号与接收槽函数断开.*/
    disconnect(sock, &QTcpSocket::readyRead, this, &Widget::on_recv);
    /*将新连接的socket对象的断开连接信号与断开槽函数断开.*/
    disconnect(sock, &QTcpSocket::disconnected, this, &Widget::on_disconnect);
}


void Widget::on_pushBtn_clear_clicked()
{
    ui->textEdit_rcv->clear();
}


void Widget::on_pushBtn_send_clicked()
{
    if(currSock == NULL)
    {
        foreach(QTcpSocket *sock, sockList)
        {
            sock->write(ui->textEdit_tx->toPlainText().toUtf8());
        }
    }
    else
    {
        /*如果选择的是一个特定的客户端,则只向它发送.*/
        currSock->write(ui->textEdit_tx->toPlainText().toUtf8());
    }

}


void Widget::on_comBox_clientIP_currentTextChanged(const QString &arg1)
{
    if(arg1 == "All")
      {
          currSock = NULL;
          return;
      }

      if (sockList.empty())
          return;

      /*不然就读取选中的信息,将其拆分为IP地址和端口号.*/
      QStringList info = arg1.split(':');
      QString ip = info[0];
      int port = info[1].toInt();

      /*遍历容器,找到对应的那个socket.*/
      foreach(QTcpSocket *sock, sockList)
      {
          if(sock->peerAddress().toString() == ip && sock->peerPort() == port)
          {
              /*当前sock指针指向找到的那个socket.*/
              currSock = sock;
              break;
          }
      }

}


void Widget::on_pushBtn_kickoff_clicked()
{
    if(currSock == NULL)
    {
        foreach(QTcpSocket *sock, sockList)
        {
            sock->close();
        }
    }
    else
    {
        currSock->close();

    }

}


void Widget::on_pushBtn_close_clicked()
{
    currSock = NULL;
    /*关闭监听.*/
    server->close();
    /*将一些控件恢复.*/
    ui->pushBtn_close->setDisabled(true);
    ui->pushBtn_listen->setEnabled(true);
    ui->lineEdit_Port->setEnabled(true);
    ui->comBox_hostIP->setEnabled(true);
    /*遍历之前全部连接的socket,并一一断开.*/
    foreach(QTcpSocket *sock, sockList)
    {
        sock->close();
    }

}
客户端
客户端更简单些,基本流程如下:
1.创建QTcpSocket对象
2.链接服务器connectToHost
3.QTcpsocket发送数据用成员方法write
4.当对方有数据来,QTcpSocket对象就会发送readyRead信号,关联槽函数读取数据
参考了另一篇博文,代码也是几乎照抄。
源码
#include "tcpclient.h"
#include "ui_tcpclient.h"

TcpClient::TcpClient(QWidget *parent)
    : QWidget(parent)
    , ui(new Ui::TcpClient)
{
    ui->setupUi(this);
    m_socket = new QTcpSocket();
    ui->lEdit_serverIP->setText("127.0.0.1");
    ui->lEdit_serverPort->setText("12345");
    ui->Btn_connect->setEnabled(true);
    ui->Btn_Send->setEnabled(false);
}

TcpClient::~TcpClient()
{
    delete this->m_socket;
    delete ui;
}


void TcpClient::on_Btn_connect_clicked()
{
    if(ui->Btn_connect->text() == tr("Connect"))
    {
        QString IP;
        int port;

        //获取IP地址
        IP = ui->lEdit_serverIP->text();
        //获取端口号
        port = ui->lEdit_serverPort->text().toInt();

        //取消已有的连接
        m_socket->abort();
        //连接服务器
        m_socket->connectToHost(IP, port);

        //等待连接成功
        if(!m_socket->waitForConnected(30000))
        {
            qDebug() << "Connection failed!";
            ui->textEdit_recv->append("Connection failed!");
            return;
        }
        qDebug() << "Connect successfully!";

        //发送按键使能
        ui->Btn_Send->setEnabled(true);
        //修改按键文字
        ui->Btn_connect->setText("Disconnect");
        ui->textEdit_recv->append("Connect successfully!");
        connect(m_socket,&QTcpSocket::readyRead, this,&TcpClient::socket_readData);
        connect(m_socket,&QTcpSocket::disconnected, this,&TcpClient::socket_disconnect);

    }
    else
    {
        //断开连接
        m_socket->disconnectFromHost();
        //修改按键文字
        ui->Btn_connect->setText("Connect");
        ui->Btn_Send->setEnabled(false);

        disconnect(m_socket,&QTcpSocket::readyRead, this,&TcpClient::socket_readData);
        disconnect(m_socket,&QTcpSocket::disconnected, this,&TcpClient::socket_disconnect);
    }

}


void TcpClient::on_Btn_Send_clicked()
{
    qDebug() << "Send: " << ui->textEdit_tx->toPlainText();
     //获取文本框内容并以ASCII码形式发送
    m_socket->write(ui->textEdit_tx->toPlainText().toLatin1());
    m_socket->flush();

}

void TcpClient::socket_readData()
{
    QByteArray buffer;
    //读取缓冲区数据
    buffer = m_socket->readAll();
    if(!buffer.isEmpty())
    {
//        QString str = ui->textEdit_recv->toPlainText();
//        str+=tr(buffer)+"\n";
        //刷新显示
         ui->textEdit_recv->append("From server: " +tr(buffer) );
//        ui->textEdit_recv->setText(str);
    }

}

void TcpClient::socket_disconnect(){

    //发送按键失能
    ui->Btn_Send->setEnabled(false);
    //修改按键文字
    ui->Btn_connect->setText("Connect");
    qDebug() << "Disconnected...";
    ui->textEdit_recv->append("Disconnected!");
    disconnect(m_socket,&QTcpSocket::readyRead, this,&TcpClient::socket_readData);
    disconnect(m_socket,&QTcpSocket::disconnected, this,&TcpClient::socket_disconnect);
}


void TcpClient::on_Btn_clear_clicked()
{
    ui->textEdit_recv->clear();
}
结果
 基本功能都有,程序运行正确无误哈😀文章来源:https://www.toymoban.com/news/detail-426186.html
引用
Qt学习记录之简单的TCP服务器
Qt 实现简单的TCP通信
QT之TCP通信
TCP粘包产生的原因、解决方法及Qt项目代码实现文章来源地址https://www.toymoban.com/news/detail-426186.html
到了这里,关于Qt 服务器/客户端TCP通讯的文章就介绍完了。如果您还想了解更多内容,请在右上角搜索TOY模板网以前的文章或继续浏览下面的相关文章,希望大家以后多多支持TOY模板网!

