Spring Boot简单实现自定义注解
1.实现自定义入参打印和方法执行时间统计(AOP实现)
- 定义一个注解类
@Documented 如果一个注解@B,被@Documented标注,那么被@B修饰的类,生成文档时,会显示@B。如果@B没有被@Documented标准,最终生成的文档中就不会显示@B。
@Retention(RetentionPolicy.RUNTIME)
@Target(ElementType.METHOD)
public @interface LogPrint {
    String value() default "";
}

@Target表示注解可以使用到哪些地方,可以是类,方法,或者是属性上,定义在ElementType枚举中:
public enum ElementType {
    TYPE,				/* 类、接口(包括注释类型)或枚举声明  */
    FIELD,				/* 字段声明(包括枚举常量)  */
    METHOD,				/* 方法声明  */
    PARAMETER,	 		/* 形式参数声明  */
    CONSTRUCTOR,		/* 构造方法声明  */
    LOCAL_VARIABLE,		/* 局部变量声明  */
    ANNOTATION_TYPE,	/* 注释类型声明  */
    PACKAGE,			/* 包声明  */
    TYPE_PARAMETER,		/* 类型参数声明 @since 1.8*/
    TYPE_USE			/* 任何类型声明 @since 1.8*/
}
@Retention作用是定义被它所注解的注解保留多久,一共有三种策略,定义在RetentionPolicy枚举中:
package java.lang.annotation;

public enum RetentionPolicy {

    SOURCE,	/* 注释将被编译器丢弃。*/

    CLASS,	/* 注释由编译器记录在类文件中,但不需要在运行时由VM保留。默认。*/

    RUNTIME	/*注释将由编译器记录在类文件中,并在运行时由VM保留,因此可以反射性地读取它们。*/
}
- 使用AOP对注解进行解析,需要定义一个切面类,包括自定义的切点方法normalPointCut(),以及连接点的处理方法normalPointAround()。连接点中的ProceedingJoinPoint可以获取被代理类的方法属性等。
@Aspect
@Component
public class LogPrintInterceptor {
@Pointcut("@annotation([注解所在的位置如:cyh.zhujie.LogPrint])") // @annotation(注解类型):匹配被调用的方法上有指定的注解。
public void logPrint() { //
}
@Around("logPrint()")
public Object beforeMethod(ProceedingJoinPoint joinPoint) throws Throwable {
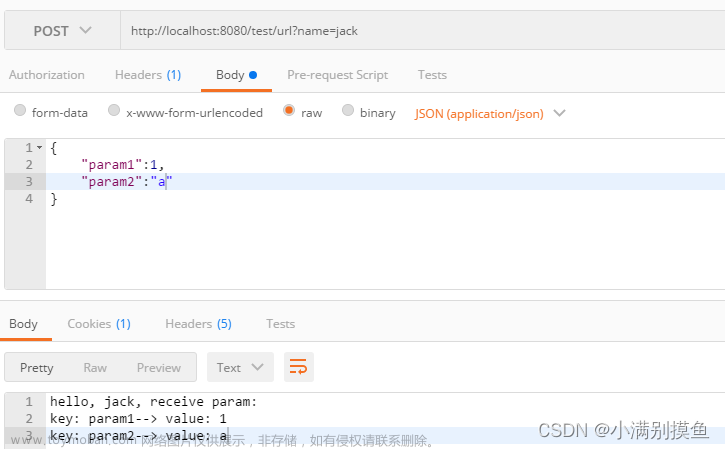
log.info("{}方法{}传入参数为:{}", joinPoint.getSignature().getDeclaringTypeName(), joinPoint.getSignature().getName(), joinPoint.getArgs());
LocalTime start = LocalTime.now();
log.info("{}方法{}开始执行时间{}:", joinPoint.getSignature().getDeclaringTypeName(), joinPoint.getSignature().getName(), start);
StopWatch stopWatch = new StopWatch();
stopWatch.start();
Object object = joinPoint.proceed(joinPoint.getArgs());
stopWatch.stop();
LocalTime end = LocalTime.now();
log.info("{}方法{}结束执行时间{}:", joinPoint.getSignature().getDeclaringTypeName(), joinPoint.getSignature().getName(), end);
log.info("{}方法{}共用时{}毫秒:", joinPoint.getSignature().getDeclaringTypeName(), joinPoint.getSignature().getName(), stopWatch.getTotalTimeMillis());
return object;
}
}
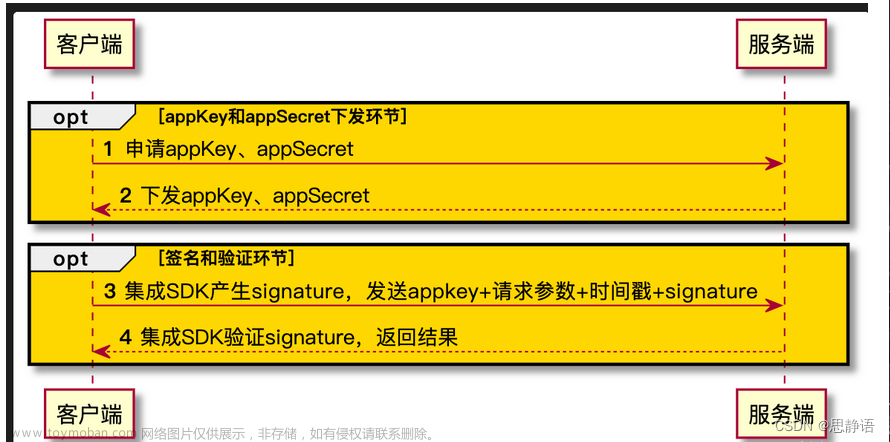
2.使用参数解释器对注解进行登录校验处理并返回登录信息
2.1 定义注解
@Target(ElementType.PARAMETER) // 形式参数声明
@Retention(RetentionPolicy.RUNTIME)
@Documented
public @interface checkLogin {
}
2.2 实现参数解释器
@Slf4j
public class CheckInfoResolver implements HandlerMethodArgumentResolver {

    private LoginUserService loginUserService;

    public CheckInfoResolver(LOginUserService loginUserService){
        this.loginUserService = loginUserService;
    }

	// 方法supportsParameter很好理解,返回值是boolean类型,它的作用是判断Controller层中的参数,是否满足条件,满足条件则执行resolveArgument方法,不满足则跳过。
    //而resolveArgument方法呢,它只有在supportsParameter方法返回true的情况下才会被调用。用于处理一些业务,将返回值赋值给Controller层中的这个参数。

//因此呢,我们可以将HandlerMethodArgumentResolver理解为是一个参数解析器,我们可以通过写一个类实现HandlerMethodArgumentResolver接口来实现对Controller层中方法参数的修改。
    @Override
    public boolean supportsParameter(MethodParameter methodParameter) {
        return methodParameter.hasParameterAnnotation(checkLogin.class)
                && methodParameter.getParameterType().equals(LoginUser.class);
    }

    @Override
    public Object resolveArgument(MethodParameter methodParameter,
                                  ModelAndViewContainer modelAndViewContainer,
                                  NativeWebRequest nativeWebRequest,
                                  WebDataBinderFactory webDataBinderFactory) throws Exception {
        HttpServletRequest request = nativeWebRequest.getNativeRequest(HttpServletRequest.class);
        assert request != null;
        String token = request.getHeader("token");
        if (StrUtil.isEmpty(authorization)) {
            log.error("Token 为空,请检查请求头");
            throw new BaseException(500, "请登录后再操作");
        }
		LoginUser user = LoginUserService.checkLogin(token);// 校验,如果通过返回登录用户信息
        log.info(" 校验用户信息:{}", user);
        if (objectUtil.isNotNull(user)) {
            return user;
        }
            throw new BaseException(500, "token失效,请重新登录!");
    }

}
3. 使用注解校验权限
3.1 创建注解
@Documented
@Retention(RetentionPolicy.RUNTIME)
@Target({ElementType.METHOD, ElementType.TYPE})
public @interface CheckPermission {
    /**
     * 是否需要登录 默认为true 设置未false只在方法上有效 比如在类上设置为true
     * 类下方法都需要登录 此时在某个方法下设置为false 则这个方法任然不需要登录
     *
     * @return
     */
    boolean value() default true;

}
3.2 继承HandlerInterceptorAdapter类
@Slf4j
public class UserPermissionInterceptor extends HandlerInterceptorAdapter {

    @Autowired
    private LoginUserService userService;

    //过滤未登录用户
    @Override
    public boolean preHandle(HttpServletRequest request, HttpServletResponse response, Object handler) throws Exception {
        this.hasPermission(handler, request, response);
        return true;
    }
    //判断是否登录
    private boolean isLogin(HttpServletRequest request, HttpServletResponse response) {

        String authorization = request.getHeader("token");

        if (!StrUtil.isEmpty(token)) {

           LoginUser user = LoginUserService.checkLogin(token);// 校验,如果通过返回登录用户信息

            if (ObjectUtil.isNotNull(user)) {
            		return true;
            } else {
                throw new BaseException(500, "没有登录");
            }
        }
			throw new BaseException(500, "没有登录");
    }


    /**
     * 是否有权限
     */
    private boolean hasPermission(Object handler, HttpServletRequest request, HttpServletResponse response) {
        boolean bool = true;
        if (handler instanceof HandlerMethod) {
            HandlerMethod handlerMethod = (HandlerMethod) handler;
            //获取类上的注解
            CheckPermission loginClass = handlerMethod.getMethod().getDeclaringClass().getAnnotation(CheckPermission.class);
            // 获取方法上的注解
            CheckPermission loginMethod = handlerMethod.getMethod().getAnnotation(CheckPermission.class);
            //如果类上加了注解进行拦截
            if (null != loginClass) {
                //如果这个方法有注解 且 设置了为不登录则通过 否则检验
                if (null != loginMethod && !loginMethod.value()) {
                    bool = true;
                } else {
                    bool = this.isLogin(request, response);
                }
            } else if (null != loginClass) {
                //如果类上没注册则检查方法
                if (null != loginMethod && loginMethod.value()) {
                    bool = this.isLogin(request, response);
                } else {
                    bool = true;
                }
            } else {
                bool = this.isLogin(request, response);
            }
        }

        if (!bool) {
            throw new BaseException(HttpStatus.HTTP_BAD_METHOD, "没有权限,请检查!");
        }

        return bool;
    }
}
4. 参数解释器和拦截器配置
@Slf4j
@Configuration
public class DefaultWebMvcConfig implements WebMvcConfigurer {

    @Value("yml文件获取")
    private String[] excludeList;


    @Lazy
    @Autowired
    private LoginUserService userService;


    // 注册权限拦截器
    @Bean
    public UserPermissionInterceptor userPermissionInterceptor() {
        return new UserPermissionInterceptor();
    }

    // 添加参数解释器
    @Override
    public void addArgumentResolvers(List<HandlerMethodArgumentResolver> resolvers) {
        resolvers.add(new CheckInfoResolver(userService));
    }

    @Override
    public void addInterceptors(InterceptorRegistry registry) {
        List<String> pathList = new ArrayList<>();
        pathList.add("/**");

        // 接口权限功能
   registry.addInterceptor(userPermissionInterceptor()).addPathPatterns(pathList).excludePathPatterns(excludeList);
    }
}
5. 自定义注解简单实时接口请求限制
5.1 定义注解
/**
 * @author cyh
 * DATE 2023/4/26
 **/
@Documented
@Target(ElementType.METHOD)
@Retention(RetentionPolicy.RUNTIME)
public @interface LimitRequest {

    /**
     * 默认请求次数
     *
     * @return
     */
    int num() default 10;

    /**
     * 默认时间 秒为单位 默认60秒内不能超过10次
     *
     * @return
     */
    long time() default 60L;

    /**
     * 限制时间 超过请求次数限制60秒 (以秒为单位)
     *
     * @return
     */
    long limitTime() default 60L;
}
5.2 实现HandlerInterceptor接口进行注解处理
/**
 * @author cyh
 * DATE 2023/4/26
 **/
@Slf4j
public class LimitRequestInterceptor implements HandlerInterceptor {

    @Resource
    RedisUtil redisUtil;

    /**
     * @param request
     * @param response
     * @param handler
     * @return
     * @throws Exception
     */
    @Override
    public boolean preHandle(HttpServletRequest request, HttpServletResponse response, Object handler) throws Exception {
        checkLimitNum(request, response, handler);
        return true;
    }

    private void checkLimitNum(HttpServletRequest request, HttpServletResponse response, Object handler) {
        String ip = ServletUtil.getClientIP(request);
        log.info("现在进行接口防刷次数判断:{}", ip);

        if (StrUtil.isNotBlank(ip)) {
            log.info("{}", ip);
            if (handler instanceof HandlerMethod) {

                HandlerMethod methodHandle = (HandlerMethod) handler;
                // 获取方法上的注解
                LimitRequest annotation = methodHandle.getMethod().getAnnotation(LimitRequest.class);
                // 如果获取到注解
                if (ObjUtil.isNotNull(annotation)) {
                    // 获取限制次数, 规定时间, 现在时间
                    int num = annotation.num();
                    long time = annotation.time();
                    long limitTime = annotation.limitTime();
                    // 获取该ip是否已经被锁住
                    Object lock = redisUtil.get("limitRequestLock:" + ip);
                    // 被锁住 返回抛出异常
                    if (ObjUtil.isNotNull(lock)) {
                        long expire = redisUtil.getExpire("limitRequestLock:" + ip);
                        throw new BaseException(500, "访问次数限制,请" + expire + "秒后重试");
                    }
                    // 无 则获取已经访问次数
                    Object ipRequestNum = redisUtil.get("ipRequestNum:" + ip);
                    // 访问次数为空 第一次访问
                    if (ObjUtil.isNull(ipRequestNum)) {
                        // 添加redis 访问次数,设置过期时间
                        redisUtil.set("ipRequestNum:" + ip, 1, time);
                        return;
                    } else {
                        int ipNum = Integer.parseInt(ipRequestNum.toString());
                        // 如果访问次数超过限制次数 锁住,返回
                        if (ipNum >= num) {
                            redisUtil.set("limitRequestLock:" + ip, "lock", limitTime);
                            throw new BaseException(500, "访问太频繁了,请稍后重试");
                        }
                        // 否则访问次数+1
                        redisUtil.incrByNumber("ipRequestNum:" + ip, 1d);
                        return;
                    }
                }
            }

        }

        throw new BaseException(500, "访问ip为空");
    }
}
记得实现WebMvcConfigurer 接口配置LimitRequestInterceptor
@Bean
public LimitRequestInterceptor getLimitRequestInterceptor() {
return new LimitRequestInterceptor();
}@Override
public void addInterceptors(InterceptorRegistry registry) { // 接口权限功能
registry.addInterceptor(getLimitRequestInterceptor());
}文章来源:https://www.toymoban.com/news/detail-426387.html
6.总结
在Spring Boot中,自定义注解通常用于将某些特定的行为或操作与注解相关联。这些行为可以在运行时通过反射进行动态处理。AOP和拦截器是Spring Boot中用于处理这种类型特定行为或操作的两种常见技术。 当需要在方法执行前或执行后执行某些通用的或共享的操作时,可以使用AOP技术。 比如,记录所有方法的执行时间、对方法的输入参数进行安全控制等。使用AOP,您可以轻松地将这些通用操作与所有带有特定注解的方法相关联。AOP可以结合使用自定义注解和AspectJ语法来编写切面。 当需要拦截和处理所有请求时,如验证用户身份、监控请求、记录日志等,可以使用拦截器技术。拦截器可以拦截并处理进入应用程序和离开应用程序的HTTP请求和响应。在Spring Boot中,拦截器通常用于处理Web请求。使用自定义注解时,可以拦截并处理带有特定注解的请求。 总之,AOP和拦截器都是处理自定义注解的有效技术。使用AOP处理注解时,注重方法的处理,而使用拦截器处理注解时,注重整个请求的处理。因此,具体使用哪种技术,取决于您想要实现的功能和需要处理的场景。文章来源地址https://www.toymoban.com/news/detail-426387.html
到了这里,关于Spring boot自定义注解的文章就介绍完了。如果您还想了解更多内容,请在右上角搜索TOY模板网以前的文章或继续浏览下面的相关文章,希望大家以后多多支持TOY模板网!