一、自动化运维工具—Ansible
1、运维工具特点
Ansible 与 Saltstack 均是基于 Python 语言开发,Ansible 只需要在一台普通的服务器上运行即可,不需要在客户端服务器上安装客户端。因为 Ansible 是基于 SSH 远程管理,而Linux服务器大都离不开SSH,所以Ansible不需要为配置工作添加额外的支持。
Ansible 安装使用非常简单,而且基于上千个插件和模块实现各种软件、平台、版本的管理,支持虚拟容器多层级的部署。很多读者在使用 Ansible 工具时,认为 Ansible比 Saltstatck 执行效率慢,其实不是软件本身慢,是由于 SSH 服务慢,可以优化 SSH 连接速度及使用 Ansible 加速模块,满足企业上万台服务器的维护和管理。
2、Ansible运维工具原理
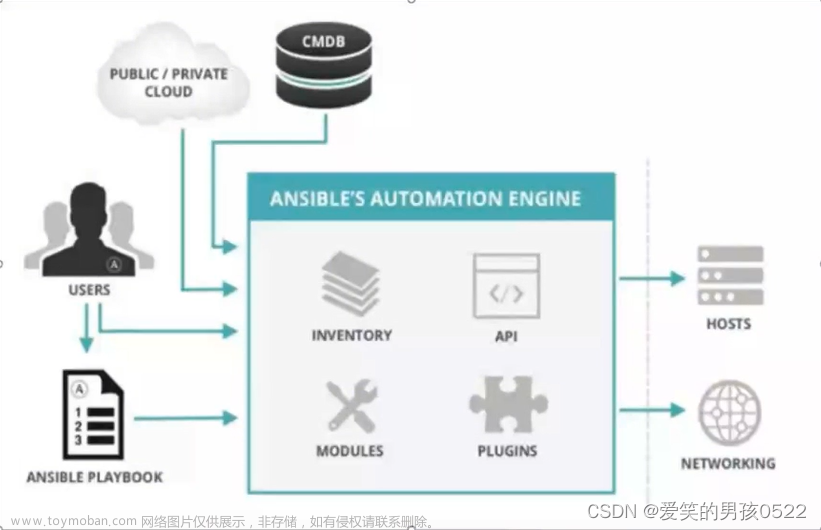
Ansible分为控制端和被控制端,主要是基于SSH协议去管理客户端,被控制端是不需要安装agent插件的Ansible会读取控制端的host文件 ,根据文件中定义的IP列表信息,调取本地的各个模块对被控端机器实现批量、并发的配置管理和维护,如果任务比较复杂可以写成PlayBook剧本进行分发管理。
自动运维管理工具优点
- 轻量级,更新时,只需要在操作机上进行一次更新即可;
- 采用 SSH 协议;
- 不需要去客户端安装 agent;
- 批量任务执行可以写成脚本,而且不用分发到远程就可以执行;
- 使用 python 编写的,维护更简单;
- 支持 sudo 普通用户命令;
- 去中心化管理。
3、Ansible自动化运维工具流程

(1)加载自己的配置文件,默认/etc/ansible/ansible.cfg
(2)查找对应的主机配置文件,找到要执行的主机或组
(3)加载自己对应的模块文件,如command yum ping
(4)通过ansible将模块命令生成对应临时py文件(pyhton),并将该文件传输至远程服务器上
(5)对应执行用户的家目录的.ansible/tmp/xxx/xxxx.py文件
(6)给文件+执行权限
(7)执行并返回结果,删除临时文件,sleep 0 退出
二、安装Ansible
管理端Ansible:192.168.10.135
被管理端:192.168.10.136
被管理端:192.168.10.137
1、安装准备
[root@localhost ~]#setenforce 0
[root@localhost ~]#systemctl stop firewalld  #关闭防火墙
2、Ansible控制端安装epel扩展源
安装ansible自动化管理工具
[root@localhost ~]#yum install epel-release.noarch -y
[root@localhost ~]#yum install  ansible -y
[root@localhost ~]#tree /etc/ansible/   #目录结构
/etc/ansible/
├── ansible.cfg   #ansible的配置文件,一般无需修改
├── hosts         #ansible的主机清单,用于存储需要管理的远程主机的相关信息
└── roles         #公共角色目录


3、配置主机清单
[root@localhost ~]#vim /etc/ansible/hosts

[webservers]
192.168.10.136
[dbservers]
192.168.10.137
#保存退出

4、配置密钥对验证
[root@Ansible ~]#ssh-keygen -t rsa  #一路回车就OK
[root@Ansible ~]#sshpass -p '123123' ssh-copy-id root@192.168.10.136
[root@Ansible ~]#sshpass -p '123123' ssh-copy-id root@192.168.10.137
##验证
[root@Ansible ~]#ssh 192.168.10.136
[root@Ansible ~]#ssh 192.168.10.137


5、查询webserver组中主机的日期
[root@Ansible ~]#ansible dbservers -m command -a 'date'
192.168.10.137 | CHANGED | rc=0 >>
2023年 04月 27日 星期四 15:10:25 CST
[root@Ansible ~]#ansible webservers -m command -a 'date'
192.168.10.136 | CHANGED | rc=0 >>
2023年 04月 27日 星期四 15:10:31 CST

三、Ansible命令模块
1、command模块
在远程主机执行命令,不支持管道 重定向shell等
[root@Ansible ~]#ansible-doc -l  #列出所有已安装的模块,按q退出
[root@Ansible ~]#ansible all -m command -a 'date'
#所有主机执行date命令,其中all可以换成IP或者分类名称
192.168.10.136 | CHANGED | rc=0 >>
2023年 04月 27日 星期四 15:15:04 CST
192.168.10.137 | CHANGED | rc=0 >>
2023年 04月 27日 星期四 15:15:04 CST

[root@Ansible ~]#ansible all -a 'date'
#不加-m模块,则默认使用command模块
192.168.10.137 | CHANGED | rc=0 >>
2023年 04月 27日 星期四 15:15:14 CST
192.168.10.136 | CHANGED | rc=0 >>
2023年 04月 27日 星期四 15:15:14 CST

2、cron模块
在远程主机定时计划任务两种状态(state):present表示添加(可以省略),absent表示移除
[root@Ansible ~]#ansible-doc -s cron
[root@Ansible ~]#ansible webservers -m cron -a 'minute="*/1" job="/usr/bin/echo hello" name="test"'
#webserver:分类  -m指定模块 -a输出模块内的指令  分钟:每分钟,工作:输出hello,工作名称:test
[root@Ansible ~]#ansible 192.168.10.136 -a 'crontab -l'
#查看计划任务命令
[root@Ansible ~]#ansible 192.168.10.136 -m cron -a 'name=test state=absent'
#移除计划任务


3、user模块
用户管理模块user模块是请求三条指令,useradd,userdel,usermod
[root@Ansible ~]#ansible all -m user -a 'name=lisi'   #为所有主机创建一个用户
[root@Ansible ~]#ansible all -m command -a 'tail -1 /etc/passwd'  #查看是否创建成功
[root@Ansible ~]#ansible all -m user -a 'user=lisi state=absent'  #移除用户


4、group模块
用户组管理的模块group模块请求的是groupadd、groupdel、groupmod模块
[root@Ansible ~]#ansible-doc -s group   #查看模块信息
[root@Ansible ~]#ansible dbservers -m  group -a 'name=lisi system=yes'  #system=yes创建系统组
[root@Ansible ~]#ansible dbservers -a 'tail -1 /etc/group'  #查看组账号信息
[root@Ansible ~]#ansible dbservers -m user -a 'name=wangwu  uid=1221 group=lisi system=yes'

[root@Ansible ~]#ansible dbservers -a 'id wangwu'


5、copy模块
用于复制指定主机文件到远程主机文件
[root@Ansible ~]#ansible dbservers -m copy -a 'src=/etc/fstab dest=/opt/fstab.bak'
[root@Ansible ~]#ansible dbservers -a 'cat /opt/fstab.bak'
[root@Ansible ~]#ansible dbservers -m copy -a 'content="zz is good student" dest=/opt/zz.txt'
[root@Ansible ~]#ansible dbservers -a 'cat /opt/zz.txt'


6、file模块
设置文件属性
[root@Ansible ~]#ansible dbservers -m user -a 'name=dbservers system=yes'
[root@Ansible ~]#ansible dbservers -m file -a 'owner=dbservers group=dbservers mode=600 path=/opt/zz.txt'
[root@Ansible ~]#ansible dbservers -a 'ls -l /opt/zz.txt'
[root@Ansible ~]#ansible dbservers -m file -a 'src=/opt/zz.txt path=/opt/zz.txt.link state=link'
[root@Ansible ~]#ansible dbservers -a 'ls -l /opt'


7、ping模块
检测远程主机的连通性
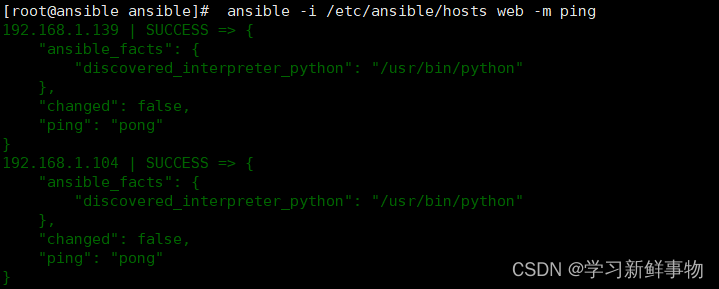
[root@Ansible ~]#ansible all -m ping

8、service/systemd模块
用于管理远程主机上的管理服务的运行状态
在192.168.10.137安装httpd
[root@Client2 ~]#yum install -y httpd

[root@Ansible ~]#ansible dbservers -a 'systemctl status httpd'
[root@Ansible ~]#ansible dbservers -m service -a 'enabled=true name=httpd state=started'


#回到dbservers主机验证
[root@Client2 ~]#systemctl status  httpd
[root@Client2 ~]#systemctl is-enabled httpd
enabled

9、Shell模块
在远程主机执行命令,相当于调用远程主机的shell进程,然后再该shell下打开一个子shell运行命令
[root@Ansible ~]#ansible dbservers -m user -a 'name=wangwu'
[root@Ansible ~]#ansible dbservers -m shell -a 'echo 123123 | passwd --stdin wangwu'


10、script模块
实现远程批量运行本地shell脚本
[root@Ansible ~]#vim test.sh
[root@Ansible ~]#chmod  +x test.sh
[root@Ansible ~]#ansible all -m script -a 'test.sh'
[root@Ansible ~]#ansible all -a 'cat /opt/script.txt'


11、yum模块
在远程主机上安装与卸载软件包
[root@Ansible ~]#ansible dbservers -m yum -a 'name=httpd'
[root@Ansible ~]#ansible dbservers -a 'rpm -q httpd'
[root@Ansible ~]#ansible dbservers -m yum -a 'name=httpd state=absent'
[root@Ansible ~]#ansible dbservers -a 'rpm -q httpd'


12、Setup模块
facts是用来收集被管理节点的信息,使用setup可以获取这些信息Ansible facts 是远程系统的信息,主要包含IP地址,操作系统,以太网设备,mac 地址,时间/日期相关数据,硬件信息等信息。
[root@Ansible ~]#ansible dbservers -m setup

13、hostname模块
用于管理远程主机上的主机名
[root@Ansible ~]#ansible dbservers -m hostname -a "name=mysql01"


四、inventory主机清单
1、inventory介绍
hosts配置文件位置:/etc/ansible/hosts
Inventory支持对主机进行分组,每个组内可以定义多个主机,每个主机都可以定义在任何一个或多个主机组内。
2、inventory中的变量
- ansible_host ansible连接节点是的IP地址。
- ansible_port 连接对方的端口号,ssh连接时默认为22。
- ansible_user 连接对方主机时使用的主机名,将使用执行ansible或ansible-playbook命令的用户。
- nsible_password 连接时的用户的ssh密码,仅在未使用密钥对验证的情况下有效。
- ansible_ssh_private_key_file 指定密钥认证ssh连接时的私钥文件。
- ansible_ssh_common_args 提供给ssh sftp scp命令的额外参数。
- ansible_become 允许进行权限提升。
- ansible_become_method 指定提升权限的方式,例如可使用/sudo/su/runas等方式。
- ansible_become_user 提升为哪个用户的权限,默认提升为root。
- ansible_becom_password 提升为指定用户权限时的密码。
3、主机变量
[webservers]
192.168.10.136 ansible_port=22  ansible_user=root  ansible_password=abs123
4、组变量
[webservers:vars]  #表示为webservers组内所有主机自定义变量
ansible_user=root
ansible_password=abc123

[all:vars]          #表示为所有组内的所有主机自定义变量
ansible_port=22
5、嵌套组
[nginx]
192.168.10.135
192.168.10.136
192.168.10.137

[apahce]
192.168.10.3[0:3]

[webs:children]  #表示为webs主机组中包含了nginx和apache组内所有主机
apache
nginx
总结
(1)Ansible其中一个比较鲜明的特性Agentless,即无Agent的存在,只需在某个作为控制节点的主机上安装一次Ansible即可,通常它基于ssh连接来控制远程主机,远程主机上不需要安装Ansible或其它额外的服务。文章来源:https://www.toymoban.com/news/detail-429624.html
(2)Ansible的另一个比较鲜明的特性是它的绝大多数模块都具备幂等性(idempotence)。所谓幂等性,指的是多次操作或多次执行对系统资源的影响是一致的。文章来源地址https://www.toymoban.com/news/detail-429624.html
到了这里,关于Ansible自动化部署工具的文章就介绍完了。如果您还想了解更多内容,请在右上角搜索TOY模板网以前的文章或继续浏览下面的相关文章,希望大家以后多多支持TOY模板网!


