一、Eureka服务注册与发现
1.1 概念
-
Eureka 是 Netflix 公司开源的一个服务注册与发现的组件 。
-
Eureka 和其他 Netflix 公司的服务组件(例如负载均衡、熔断器、网关等) 一起,被 Spring Cloud 社区整合为Spring-Cloud-Netflix 模块。
-
Eureka 包含两个组件:Eureka Server (注册中心) 和 Eureka Client (服务提供者、服务消费者)
1.2 操作

1.3 搭建 Eureka Server 服务
(1)创建 eureka-server 模块
(2) 引入 SpringCloud 和 euraka-server 相关依赖
(3)完成 Eureka Server 相关配置
(4)启动该模块
父工程 pom
<?xml version="1.0" encoding="UTF-8"?>
<project xmlns="http://maven.apache.org/POM/4.0.0"
         xmlns:xsi="http://www.w3.org/2001/XMLSchema-instance"
         xsi:schemaLocation="http://maven.apache.org/POM/4.0.0 http://maven.apache.org/xsd/maven-4.0.0.xsd">
    <modelVersion>4.0.0</modelVersion>

    <groupId>com.liming</groupId>
    <artifactId>spring-cloud-parent</artifactId>
    <packaging>pom</packaging>
    <version>1.0-SNAPSHOT</version>
    <modules>
        <module>eureka-provider</module>
        <module>eureka-consumer</module>
        <module>eureka-server</module>
    </modules>


    <!--spring boot 环境 -->
    <parent>
        <groupId>org.springframework.boot</groupId>
        <artifactId>spring-boot-starter-parent</artifactId>
        <version>2.1.0.RELEASE</version>
        <relativePath/>
    </parent>


    <properties>
        <project.build.sourceEncoding>UTF-8</project.build.sourceEncoding>
        <project.reporting.outputEncoding>UTF-8</project.reporting.outputEncoding>
        <java.version>1.8</java.version>
        <!--spring cloud 版本-->
        <spring-cloud.version>Hoxton.SR12</spring-cloud.version>
    </properties>

    <!--引入Spring Cloud 依赖-->
    <dependencyManagement>
        <dependencies>
            <dependency>
                <groupId>org.springframework.cloud</groupId>
                <artifactId>spring-cloud-dependencies</artifactId>
                <version>${spring-cloud.version}</version>
                <type>pom</type>
                <scope>import</scope>
            </dependency>
        </dependencies>
    </dependencyManagement>

</project>
eureka-server工程
pom
<?xml version="1.0" encoding="UTF-8"?>
<project xmlns="http://maven.apache.org/POM/4.0.0"
         xmlns:xsi="http://www.w3.org/2001/XMLSchema-instance"
         xsi:schemaLocation="http://maven.apache.org/POM/4.0.0 http://maven.apache.org/xsd/maven-4.0.0.xsd">
    <parent>
        <artifactId>spring-cloud-parent</artifactId>
        <groupId>com.liming</groupId>
        <version>1.0-SNAPSHOT</version>
    </parent>
    <modelVersion>4.0.0</modelVersion>

    <artifactId>eureka-server</artifactId>

    <dependencies>
        <dependency>
            <groupId>org.springframework.boot</groupId>
            <artifactId>spring-boot-starter-web</artifactId>
        </dependency>

        <!-- eureka-server -->
        <dependency>
            <groupId>org.springframework.cloud</groupId>
            <artifactId>spring-cloud-starter-netflix-eureka-server</artifactId>
        </dependency>
    </dependencies>
</project>
EurekaApp
package com.liming.eureka;

import org.springframework.boot.SpringApplication;
import org.springframework.boot.autoconfigure.SpringBootApplication;
import org.springframework.cloud.netflix.eureka.server.EnableEurekaServer;

@SpringBootApplication
// 启用EurekaServer
@EnableEurekaServer
public class EurekaApp {

    public static void main(String[] args) {
        SpringApplication.run(EurekaApp.class,args);
    }
}
application.yml
server:
  port: 8761

# eureka 配置
# eureka 一共有4部分 配置
# 1. dashboard:eureka的web控制台配置
# 2. server:eureka的服务端配置
# 3. client:eureka的客户端配置
# 4. instance:eureka的实例配置


eureka:
  instance:
    hostname: localhost # 主机名
  client:
    service-url:
      defaultZone: http://${eureka.instance.hostname}:${server.port}/eureka # eureka服务端地址,将来客户端使用该地址和eureka进行通信

    register-with-eureka: false # 是否将自己的路径 注册到eureka上。eureka server 不需要的,eureka provider client 需要
    fetch-registry: false # 是否需要从eureka中抓取路径。eureka server 不需要的,eureka consumer client 需要
测试: 访问 localhost:8761

1.4 改造 Provider 和 Consumer 成为 Eureka Client
① 引入 eureka-client 相关依赖
② 完成 eureka client 相关配置
③ 启动 测试
Provider工程
pom
<!-- eureka-client -->
<dependency>
    <groupId>org.springframework.cloud</groupId>
    <artifactId>spring-cloud-starter-netflix-eureka-client</artifactId>
</dependency>
ProviderApp
@EnableEurekaClient
application.yml
server:
  port: 8001


eureka:
  instance:
    hostname: localhost # 主机名
  client:
    service-url:
      defaultZone: http://localhost:8761/eureka # eureka服务端地址,将来客户端使用该地址和eureka进行通信
spring:
  application:
    name: eureka-provider # 设置当前应用的名称。将来会在eureka中Application显示。将来需要使用该名称来获取路径
Consumer
pom
<!-- eureka-client -->
<dependency>
    <groupId>org.springframework.cloud</groupId>
    <artifactId>spring-cloud-starter-netflix-eureka-client</artifactId>
</dependency>
ConsumerApp
@EnableEurekaClient
@SpringBootApplication
public class ConsumerApp {
    public static void main(String[] args) {
        SpringApplication.run(ConsumerApp.class,args);
    }
}
application.yml
server:
  port: 9000

eureka:
  instance:
    hostname: localhost # 主机名
  client:
    service-url:
      defaultZone: http://localhost:8761/eureka # eureka服务端地址,将来客户端使用该地址和eureka进行通信
spring:
  application:
    name: eureka-consumer # 设置当前应用的名称。将来会在eureka中Application显示。将来需要使用该名称来获取路径
1.5 Consumer 服务 通过从 Eureka Server 中抓取 Provider 地址,完成远程调用
Consumer
OrderController
package com.liming.consumer.controller;

import com.liming.consumer.domain.Goods;
import org.springframework.beans.factory.annotation.Autowired;
import org.springframework.cloud.client.ServiceInstance;
import org.springframework.cloud.client.discovery.DiscoveryClient;
import org.springframework.web.bind.annotation.GetMapping;
import org.springframework.web.bind.annotation.PathVariable;
import org.springframework.web.bind.annotation.RequestMapping;
import org.springframework.web.bind.annotation.RestController;
import org.springframework.web.client.RestTemplate;

import java.util.List;

@RestController
@RequestMapping("/order")
public class OrderController {
    @Autowired
    RestTemplate restTemplate;

    @Autowired
    private DiscoveryClient discoveryClient;

    @GetMapping("/add/{id}")
    public Goods add(@PathVariable("id") Integer id){
        //String url="http://localhost:8000/goods/findById/"+id;
        //Goods goods = restTemplate.getForObject(url, Goods.class);

        //服务发现
        List<ServiceInstance> instances = discoveryClient.getInstances("EUREKA-PROVIDER");
        if(instances==null||instances.size()<=0){
            return null;
        }
        //通过某个策略拿到一个实例
        ServiceInstance serviceInstance = instances.get(0);
        String host = serviceInstance.getHost();
        int port = serviceInstance.getPort();
        System.out.println(host);
        System.out.println(port);

        String url="http://"+host+":"+port+"/goods/findById/"+id;
        Goods goods = restTemplate.getForObject(url, Goods.class);

        return goods;
    }
}
1.6 Euraka配置详解
Eureka包含四个部分的配置
-
instance:当前Eureka Instance实例信息配置 -
client:Eureka Client客户端特性配置 -
server:Eureka Server注册中心特性配置 -
dashboard:Eureka Server注册中心仪表盘配置
1、实例信息配置
eureka:
    instance:
        hostname: localhost # 主机名
        prefer-ip-address: # 是否将自己的ip注册到eureka中,默认false 注册 主机名
        ip-address: # 设置当前实例ip
        instance-id: # 修改instance-id显示
        lease-renewal-interval-in-seconds: 30 # 每一次eureka client 向 eureka server发送心跳的时间间隔
        lease-expiration-duration-in-seconds: 90 # 如果90秒内eureka server没有收到eureka client的心跳包,则剔除该服务
Eureka Instance的配置信息全部保存在org.springframework.cloud.netflix.eureka.EurekaInstanceConfigBean配置类里,实际上它是com.netflix.appinfo.EurekaInstanceConfig的实现类,替代了netflix的com.netflix.appinfo.CloudInstanceConfig的默认实现。
Eureka Instance的配置信息全部以
eureka.instance.xxx的格式配置。
2、客户端特性配置
eureka:
    client:
        service-url:
       		 # eureka服务端地址,将来客户端使用该地址和eureka进行通信
        	defaultZone:
        register-with-eureka: # 是否将自己的路径 注册到eureka上。
        fetch-registry: # 是否需要从eureka中抓取数据。
1、Eureka Client客户端特性配置是对作为Eureka客户端的特性配置,包括Eureka注册中心,本身也是一个Eureka Client。
2、Eureka Client特性配置全部在org.springframework.cloud.netflix.eureka.EurekaClientConfigBean中,实际上它是com.netflix.discovery.EurekaClientConfig的实现类,替代了netxflix的默认实现。
3、Eureka Client客户端特性配置全部以eureka.client.xxx的格式配置。
3、注册中心端配置
eureka:
    server: #是否开启自我保护机制,默认true
        enable-self-preservation:
        eviction-interval-timer-in-ms: 120 2月#清理间隔(单位毫秒,默认是60*1000)
	instance:
        lease-renewal-interval-in-seconds: 30 # 每一次eureka client 向 eureka server发送心跳的时间间隔
        lease-expiration-duration-in-seconds: 90 # 如果90秒内eureka server没有收到eureka client的心跳包,则剔除该服务
1、Eureka Server注册中心端的配置是对注册中心的特性配置。Eureka Server的配置全部在org.springframework.cloud.netflix.eureka.server.EurekaServerConfigBean里,实际上它是com.netflix.eureka.EurekaServerConfig的实现类,替代了netflix的默认实现。
2、Eureka Server的配置全部以eureka.server.xxx的格式进行配置。
4、仪表盘配置
eureka:
    dashboard:
        enabled: true # 是否启用eureka web控制台
        path: / # 设置eureka web控制台默认访问路径
注册中心仪表盘的配置主要是控制注册中心的可视化展示。以
eureka.dashboard.xxx的格式配置。
1.7 改造yml配置文件
改造 provider
server:
  port: 8001


eureka:
  instance:
    hostname: localhost # 主机名
    prefer-ip-address: true # 将当前实例的ip注册到eureka server 中。默认是false 注册主机名
    ip-address: 127.0.0.1 # 设置当前实例的ip
    instance-id: ${eureka.instance.ip-address}:${spring.application.name}:${server.port} # 设置web控制台显示的 实例id
    lease-renewal-interval-in-seconds: 3 # 每隔3 秒发一次心跳包
    lease-expiration-duration-in-seconds: 9 # 如果9秒没有发心跳包,服务器呀,你把我干掉吧~
  client:
    service-url:
      defaultZone: http://localhost:8761/eureka # eureka服务端地址,将来客户端使用该地址和eureka进行通信
spring:
  application:
    name: eureka-provider # 设置当前应用的名称。将来会在eureka中Application显示。将来需要使用该名称来获取路径
consumer
server:
  port: 9000


eureka:
  instance:
    hostname: localhost # 主机名
  client:
    service-url:
      defaultZone: http://localhost:8761/eureka # eureka服务端地址,将来客户端使用该地址和eureka进行通信
spring:
  application:
    name: eureka-consumer # 设置当前应用的名称。将来会在eureka中Application显示。将来需要使用该名称来获取路径
server
server:
  port: 8761

# eureka 配置
# eureka 一共有4部分 配置
# 1. dashboard:eureka的web控制台配置
# 2. server:eureka的服务端配置
# 3. client:eureka的客户端配置
# 4. instance:eureka的实例配置


eureka:
  instance:
    hostname: localhost # 主机名
  client:
    service-url:
      defaultZone: http://${eureka.instance.hostname}:${server.port}/eureka # eureka服务端地址,将来客户端使用该地址和eureka进行通信
    register-with-eureka: false # 是否将自己的路径 注册到eureka上。eureka server 不需要的,eureka provider client 需要
    fetch-registry: false # 是否需要从eureka中抓取路径。eureka server 不需要的,eureka consumer client 需要
  server:
    enable-self-preservation: false # 关闭自我保护机制
    eviction-interval-timer-in-ms: 3000 # 检查服务的时间间隔
eureka不更新了,所以淘汰了
二、Zookeeper服务注册与发现

有的老项目以前是dubbo,升级到微服务,使用zookeeper做注册中心。
zookeeper是一个分布式协调工具,可以实现注册中心功能。
实质:注册中心换成Zookeeper
2.1 下载
Zookeeper下载地址

zoo.cfg
# The number of milliseconds of each tick
tickTime=2000
# The number of ticks that the initial
# synchronization phase can take
initLimit=10
# The number of ticks that can pass between
# sending a request and getting an acknowledgement
syncLimit=5
# the directory where the snapshot is stored.
# do not use /tmp for storage, /tmp here is just
# example sakes.
dataDir=F:/apache-zookeeper-3.5.6-bin/data
# the port at which the clients will connect
clientPort=2181
# the maximum number of client connections.
# increase this if you need to handle more clients
#maxClientCnxns=60
#
# Be sure to read the maintenance section of the
# administrator guide before turning on autopurge.
#
# http://zookeeper.apache.org/doc/current/zookeeperAdmin.html#sc_maintenance
#
# The number of snapshots to retain in dataDir
#autopurge.snapRetainCount=3
# Purge task interval in hours
# Set to "0" to disable auto purge feature
#autopurge.purgeInterval=1
启动 bin目录下
zkServer.cmd

zookeeper-provider
pom
<artifactId>zookeeper-provider</artifactId>

<dependencies>
    <!--springcloud 整合 zookeeper 组件-->
    <dependency>
        <groupId>org.springframework.cloud</groupId>
        <!--zk发现-->
        <artifactId>spring-cloud-starter-zookeeper-discovery</artifactId>
        <exclusions>
            <exclusion>
                <groupId>org.apache.zookeeper</groupId>
                <artifactId>zookeeper</artifactId>
            </exclusion>
        </exclusions>
    </dependency>
    <dependency>
        <groupId>org.apache.zookeeper</groupId>
        <artifactId>zookeeper</artifactId>
        <version>3.4.9</version>
        <exclusions>
            <exclusion>
                <groupId>org.slf4j</groupId>
                <artifactId>slf4j-log4j12</artifactId>
            </exclusion>
        </exclusions>
    </dependency>

    <dependency>
        <groupId>org.springframework.boot</groupId>
        <artifactId>spring-boot-starter-web</artifactId>
    </dependency>

</dependencies>
yml
server:
  port: 8004

spring:
  application:
    name: zookeeper-provider
  cloud:
    zookeeper:
      connect-string: 127.0.0.1:2181 # zk地址
主启动类
package com.liming.zk;

import org.springframework.boot.SpringApplication;
import org.springframework.boot.autoconfigure.SpringBootApplication;
import org.springframework.cloud.client.discovery.EnableDiscoveryClient;

@SpringBootApplication
@EnableDiscoveryClient //开启发现客户端
public class ProviderApp {
    public static void main(String[] args) {
        SpringApplication.run(ProviderApp.class,args);
    }
}
业务逻辑代码直接复制粘贴过来
zookeeper-consumer
pom
   <artifactId>zookeeper-consumer</artifactId>

    <properties>
        <maven.compiler.source>8</maven.compiler.source>
        <maven.compiler.target>8</maven.compiler.target>
    </properties>

    <dependencies>
        <!--springcloud 整合 zookeeper 组件-->
        <dependency>
            <groupId>org.springframework.cloud</groupId>
            <!--zk发现-->
            <artifactId>spring-cloud-starter-zookeeper-discovery</artifactId>
            <exclusions>
                <exclusion>
                    <groupId>org.apache.zookeeper</groupId>
                    <artifactId>zookeeper</artifactId>
                </exclusion>
            </exclusions>
        </dependency>
        <dependency>
            <groupId>org.apache.zookeeper</groupId>
            <artifactId>zookeeper</artifactId>
            <version>3.5.6</version>
            <exclusions>
                <exclusion>
                    <groupId>org.slf4j</groupId>
                    <artifactId>slf4j-log4j12</artifactId>
                </exclusion>
            </exclusions>
        </dependency>

        <dependency>
            <groupId>org.springframework.boot</groupId>
            <artifactId>spring-boot-starter-web</artifactId>
        </dependency>
    </dependencies>
yml
server:
  port: 8005

spring:
  application:
    name: zookeeper-consumer
  cloud:
    zookeeper:
      connect-string: 127.0.0.1:2181 # zk地址
启动类
package com.liming.zk;

import org.springframework.boot.SpringApplication;
import org.springframework.boot.autoconfigure.SpringBootApplication;
import org.springframework.cloud.client.discovery.EnableDiscoveryClient;


@SpringBootApplication
@EnableDiscoveryClient
public class ConsumerApp {
    public static void main(String[] args) {
        SpringApplication.run(ConsumerApp.class,args);
    }
}
业务逻辑代码直接复制粘贴过来
controller只改一个
List<ServiceInstance> instances = discoveryClient.getInstances("zookeeper-provider");
测试:http://localhost:8005/order/add/5

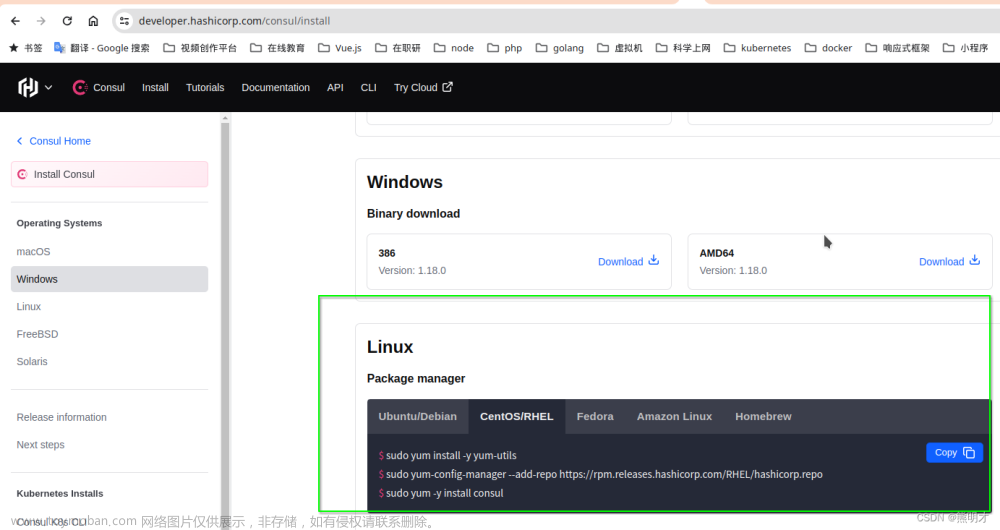
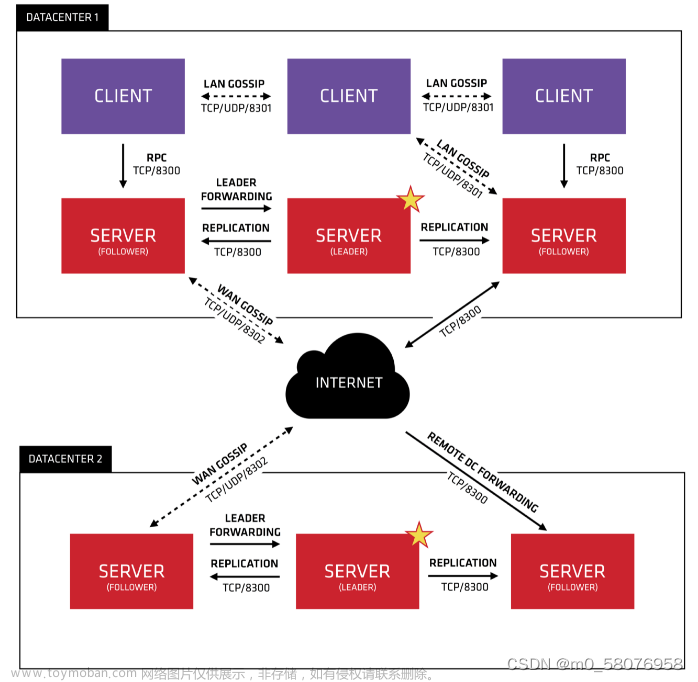
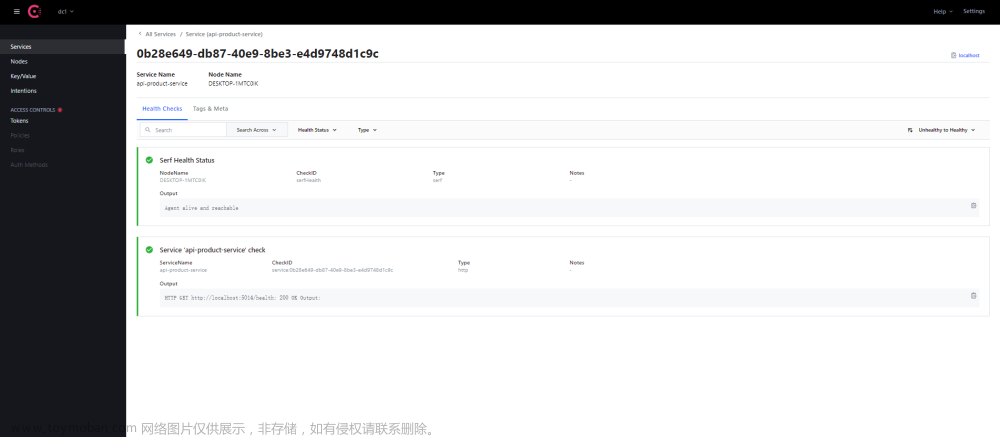
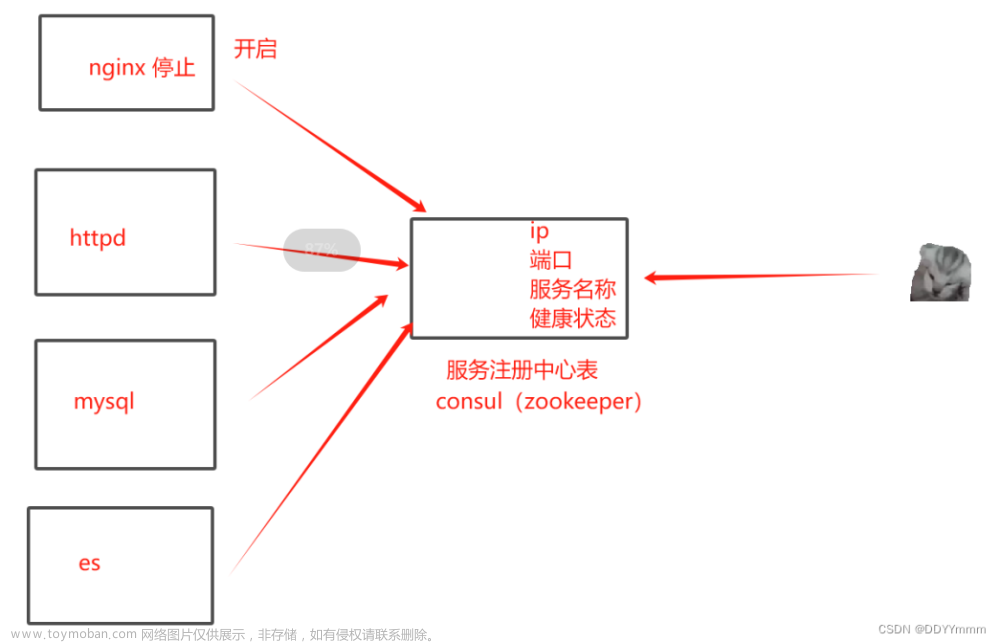
三、Consul服务注册与发现

3.1 是什么
- Consul 是由 HashiCorp 基于 GoLanguage 语言开发的,支持多数据中心,分布式高可用的服务发布和注册服务软件。
- 用于实现分布式系统的服务发现与配置。
- 使用起来也较 为简单。具有天然可移植性(支持Linux、windows和Mac OS X);安装包仅包含一个可执行文件,方便部署 。
- Consul官网:https://www.consul.io/ Consul中文文档:https://www.springcloud.cc/spring-cloud-consul.html
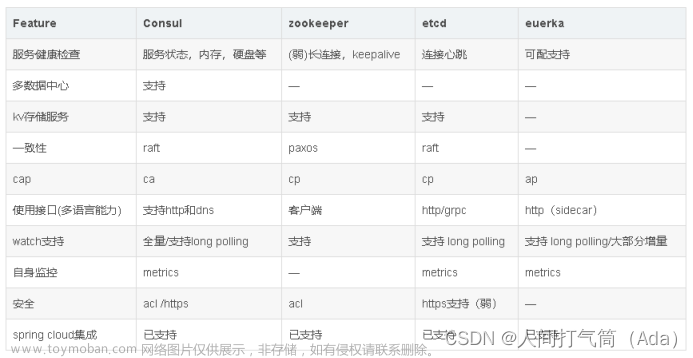
四、三个注册中心的异同
| 组件 | 语言 | cap | 健康检查 | 暴露接口 | cloud集成 |
|---|---|---|---|---|---|
| eureka | java | ap | 支持 | http | 已经集成 |
| zookeeper | java | cp | 支持 | tcp | 已经集成 |
| consul | go | cp | 支持 | http | 已经集成 |
cap
-
c:consustency 强一致性
-
a:avalibility 可用性文章来源:https://www.toymoban.com/news/detail-433982.html
-
p:partition tolerance 分区容忍性文章来源地址https://www.toymoban.com/news/detail-433982.html
到了这里,关于Eureka、Zookeeper、Consul服务注册与发现的文章就介绍完了。如果您还想了解更多内容,请在右上角搜索TOY模板网以前的文章或继续浏览下面的相关文章,希望大家以后多多支持TOY模板网!