部分引用:深入理解Java并发之synchronized实现原理
前言
在java中,我们常用String来创建和操作字符串,从下面两幅图中可以看到,String是使用char数组来存储数据,并且是使用final修饰的,所以String的值一经定义是不可变的。
JDK8及之前:

JDK9及之后:
我们每次对String的操作都会在内存中产生一个新的String对象,这样不仅效率低而且占用内存空间。
为了解决这个为题,java为我们提供了StringBuffer,在JDK5之后又提供了StringBuilder
1、StringBuilder
1.1、介绍

查看StringBuilder的介绍中的得知
1、StringBuilder是一个可变的字符序列
2、不保证线程同步
3、在单线程中用作StringBuffer的替代品,因为StringBuilder比StringBuilder要快
4、常用方法有append方法和insert方法
5、每个字符串生成器都有容量。只要字符串构建器中包含的字符序列的长度不超过容量,就不需要分配新的内部缓冲区。如果内部缓冲区溢出,它会自动变大。
6、除非另有说明,否则将 null 参数传递给此类中的构造函数或方法将导致抛出 NullPointerException。
1.2、StringBuilder的继承关系

1.3、StringBuilder的构造方法

从图中可以看出,在new StringBuilder时如果没有传参,则调用父类方法构造一个其中没有字符且初始容量为 16 个字符的字符串构建器。但最终都是调用父类中的方法。

在父类中,使用char数组来存储数据,与String不同的是,没有使用final修饰。
1.4、StringBuilder中的方法
1.4.1、append方法
(部分方法截图)
append 方法将这些字符添加到字符串的末尾
举例
public class demo {
    public static void main(String[] args) {
        StringBuilder str = new StringBuilder();
        str.append("abc");
        str.append("123");
        System.out.println(str);
    }
}

1.4.1、insert方法
(部分方法截图)
insert 方法在指定点添加字符。
而且此处有特殊说明,抛出StringIndexOutOfBoundsException异常
举例
public class demo {
    public static void main(String[] args) {
        StringBuilder str = new StringBuilder();
        str.append("abc");
        str.insert(1, "123");
        System.out.println(str);
    }
}

2、StringBuffer
2.1、介绍

查看StringBuffer的介绍中的得知
1、StringBuffer是一个可变字符序列
2、线程安全
3、StringBuffer上的主要操作是append和insert方法
4、每个字符串缓冲区都有一个容量。只要字符串缓冲区包含的字符序列的长度不超过容量,就不需要分配新的内部缓冲区数组。如果内部缓冲区溢出,它会自动变大。
5、除非另有说明,否则将 null 参数传递给此类中的构造函数或方法将导致抛出 NullPointerException。
6、从 JDK 5 开始,该类已经补充了一个为单线程使用而设计的等效类 StringBuilder。
7、通常应优先使用StringBuilder类,因为它支持所有相同的操作,但速度更快,因为它不执行同步。
2.2、StringBuffer的继承关系

2.3、StringBuffer的构造方法

与StringBuilder相同,都是带哦用父类中的方法。
2.4、StringBuffer中的方法
2.4.1、append方法
(部分方法截图)
append 方法将这些字符添加到字符串的末尾
举例
public class demo {
    public static void main(String[] args) {
        StringBuffer str = new StringBuffer();
        str.append("abc");
        str.append("123");
        System.out.println(str);
    }
}

2.4.2、insert方法
(部分方法截图)
insert 方法在指定点添加字符。
而且此处有特殊说明,抛出StringIndexOutOfBoundsException异常
举例
public class demo {
    public static void main(String[] args) {
        StringBuffer str = new StringBuffer();
        str.append("abc");
        str.insert(1, "123");
        System.out.println(str);
    }
}

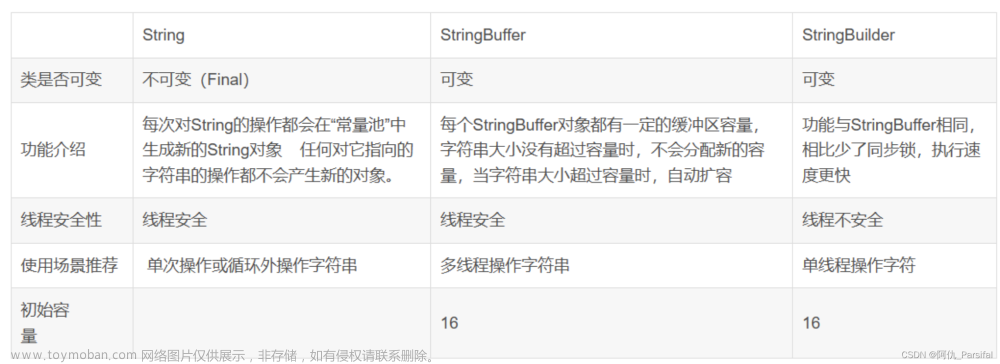
3、StringBuilder和StringBuffer区别
| String | StringBuilder | StringBuffer |
|---|---|---|
| 不可变字符串 | 可变字符串 | 可变字符串 |
| 效率高 | 效率低 | |
| 线程不安全 | 线程安全 |
4、StringBuffer线程安全的原因
从上面方法截图中可以看出,StringBuilder与StringBuffer不同的是,StringBuffer的方法使用了synchronized修饰保证线程安全
5、synchronized的实现原理
5.1、同步代码块
编写一个测试类,定义一个synchronized修饰的同步代码块,对其进行反编译
public class demo {
    public void fun1() {
        synchronized (this) {
            System.out.println("1111111111111");
        }
    }
}
Classfile /H:/javaspace22/java22/Exercise/src/demo.class
  Last modified 2022-7-19; size 502 bytes
  MD5 checksum 9d3c66436b135f89528f276310c85039
  Compiled from "demo.java"
public class demo
  minor version: 0
  major version: 52
  flags: ACC_PUBLIC, ACC_SUPER
Constant pool:
   #1 = Methodref          #6.#18         // java/lang/Object."<init>":()V
   #2 = Fieldref           #19.#20        // java/lang/System.out:Ljava/io/PrintStream;
   #3 = String             #21            // 1111111111111
   #4 = Methodref          #22.#23        // java/io/PrintStream.println:(Ljava/lang/String;)V
   #5 = Class              #24            // demo
   #6 = Class              #25            // java/lang/Object
   #7 = Utf8               <init>
   #8 = Utf8               ()V
   #9 = Utf8               Code
  #10 = Utf8               LineNumberTable
  #11 = Utf8               fun1
  #12 = Utf8               StackMapTable
  #13 = Class              #24            // demo
  #14 = Class              #25            // java/lang/Object
  #15 = Class              #26            // java/lang/Throwable
  #16 = Utf8               SourceFile
  #17 = Utf8               demo.java
  #18 = NameAndType        #7:#8          // "<init>":()V
  #19 = Class              #27            // java/lang/System
  #20 = NameAndType        #28:#29        // out:Ljava/io/PrintStream;
  #21 = Utf8               1111111111111
  #22 = Class              #30            // java/io/PrintStream
  #23 = NameAndType        #31:#32        // println:(Ljava/lang/String;)V
  #24 = Utf8               demo
  #25 = Utf8               java/lang/Object
  #26 = Utf8               java/lang/Throwable
  #27 = Utf8               java/lang/System
  #28 = Utf8               out
  #29 = Utf8               Ljava/io/PrintStream;
  #30 = Utf8               java/io/PrintStream
  #31 = Utf8               println
  #32 = Utf8               (Ljava/lang/String;)V
{
  public demo();
    descriptor: ()V
    flags: ACC_PUBLIC
    Code:
      stack=1, locals=1, args_size=1
         0: aload_0
         1: invokespecial #1                  // Method java/lang/Object."<init>":()V
         4: return
      LineNumberTable:
        line 13: 0

  public void fun1();
    descriptor: ()V
    flags: ACC_PUBLIC
    Code:
      stack=2, locals=3, args_size=1
         0: aload_0
         1: dup
         2: astore_1
         3: monitorenter
         4: getstatic     #2                  // Field java/lang/System.out:Ljava/io/PrintStream;
         7: ldc           #3                  // String 1111111111111
         9: invokevirtual #4                  // Method java/io/PrintStream.println:(Ljava/lang/String;)V
        12: aload_1
        13: monitorexit
        14: goto          22
        17: astore_2
        18: aload_1
        19: monitorexit
        20: aload_2
        21: athrow
        22: return
      Exception table:
         from    to  target type
             4    14    17   any
            17    20    17   any
      LineNumberTable:
        line 15: 0
        line 16: 4
        line 17: 12
        line 18: 22
      StackMapTable: number_of_entries = 2
        frame_type = 255 /* full_frame */
          offset_delta = 17
          locals = [ class demo, class java/lang/Object ]
          stack = [ class java/lang/Throwable ]
        frame_type = 250 /* chop */
          offset_delta = 4
}
SourceFile: "demo.java"
我们重点关注这里
从字节码文件中得知,同步语句块是通过monitorenter和monitorexit实现的。
其中monitorenter指令指向同步代码块的开始位置,monitorexit指令则指明同步代码块的结束位置
5.2、monitorenter和monitorexit
5.2.1、monitorenter
Description
The objectref must be of type reference.
Each object is associated with a monitor. A monitor is locked if and only if it has an owner. The thread that executes monitorenter attempts to gain ownership of the monitor associated with objectref, as follows:
If the entry count of the monitor associated with objectref is zero, the thread enters the monitor and sets its entry count to one. The thread is then the owner of the monitor.
If the thread already owns the monitor associated with objectref, it reenters the monitor, incrementing its entry count.
If another thread already owns the monitor associated with objectref, the thread blocks until the monitor’s entry count is zero, then tries again to gain ownership.
在jvm规范中可以得到信息:
每一个对象都会有一个 monitor(监视器),当且仅当 monitor 具有所有者时,它才会被锁定。 执行 monitorenter 指令的线程尝试获取与 objectref 关联的 monitor 的所有权。
- 如果 objectref 的 monitor 的进入数为 0 时,那么线程就可以进入 monitor, 并将进入数的值设置为 1,然后线程成为了 monitor 的所有者。
- 如果当前线程已经拥有与 objectref 关联的 monitor,它会重新进入monitor,并给进入数的值加上 1。
- 如果另一个线程已经拥有与 objectref 关联的 monitor,则当前线程会阻塞,直到另一个线程执行完毕,monitorexit 指令被执行,直至monitor 的进入数为 0,然后当前线程会再次尝试获得所有权。
值得注意的是编译器将会确保无论方法通过何种方式完成,方法中调用过的每条 monitorenter 指令都有执行其对应 monitorexit 指令,而无论这个方法是正常结束还是异常结束。
为了保证在方法异常完成时 monitorenter 和 monitorexit 指令依然可以正确配对执行,编译器会自动产生一个异常处理器,这个异常处理器声明可处理所有的异常,它的目的就是用来执行 monitorexit 指令。
从字节码中也可以看出多了一个monitorexit指令,它就是异常结束时被执行的释放monitor 的指令。
5.2.1、monitorexit
The objectref must be of type reference.
The thread that executes monitorexit must be the owner of the monitor associated with the instance referenced by objectref.
The thread decrements the entry count of the monitor associated with objectref. If as a result the value of the entry count is zero, the thread exits the monitor and is no longer its owner. Other threads that are blocking to enter the monitor are allowed to attempt to do so.
- 执行 monitorexit 的线程必须是与 objectref 引用的实例关联的 monitor 的所有者。即执行 monitorexit 的线程必须是执行 monitorenter 的线程。
- 该线程减少与 objectref 关联的 monitor 的进入计数器的值。指令执行时,monitor 的进入数减 1, 如果进入进入数的值为 0,则线程退出 monitor 并且不再是它的所有者。 其他被阻塞的线程可以尝试去进入 monitor 获取所有权。
5.2、同步方法
编写一个测试类,定义一个synchronized修饰的同步方法,对其进行反编译
public class demo {
    public void fun1() {
        synchronized (this) {
            System.out.println("1111111111111");
        }
    }

    public synchronized void fun2() {
        System.out.println("22222222222222");
    }

    public synchronized static void fun3() {
        System.out.println("33333333333333");
    }
}

从字节码中可以看出,synchronized 修饰的方法并没有 monitorenter 指令和monitorexit 指令,取得代之的是 ACC_SYNCHRONIZED 标识,该标识指明了该方法是一个同步方法。
当方法调用时,调用指令将会检查方法的 ACC_SYNCHRONIZED 访问标志是否被设置,如果设置了,执行线程将先持有monitor, 然后再执行方法,最后再方法完成(正常完成或非正常完成)时释放 monitor。在方法执行期间,执行线程持有了 monitor,其他任何线程都无法再获得此 monitor。文章来源:https://www.toymoban.com/news/detail-434785.html
如果一个同步方法执行期间抛出了异常,并且在方法内部无法处理此异常,那这个同步方法所持有的monitor将在异常抛到同步方法之外时自动释放。文章来源地址https://www.toymoban.com/news/detail-434785.html
到了这里,关于StringBuilder和StringBuffer的区别的文章就介绍完了。如果您还想了解更多内容,请在右上角搜索TOY模板网以前的文章或继续浏览下面的相关文章,希望大家以后多多支持TOY模板网!


