uni-app中常用功能记录
1、加载动画 显示消息提示框
自带api功能
https://uniapp.dcloud.io/api/ui/prompt?id=showloading
uni.showLoading({       //开启动画
    title: '加载中'      //动画提示文字
});

setTimeout( () =>{
    uni.hideLoading();    //动画关闭
}, 2000);

// 显示消息提示框。
uni.showToast({
	title: '标题',
	duration: 2000
});
2、宫格布局
组件宫格布局
https://uniapp.dcloud.io/component/uniui/uni-grid
修改shadow内的item即可修改宫格每一项的样式
.uni-grid-item {
	 //修改该样式的高度可设置宫格内部的样式
	height: 80px !important;
}
3、页面下拉加载和上拉刷新
来自页面周期函数
用户上拉到顶部以上,执行周期函数,进行刷新操作
需要在 pages.json 里,找到的需要下拉刷新页面的pages节点,并在 style 选项中开启 enablePullDownRefresh
在页面page的style中添加
"enablePullDownRefresh":true

在页面page的mounted 同级别中添加周期函数

onPullDownRefresh(){

	// 代码块

}

---------------------------------------------------------------------------------------------------------------

用户下拉到底部,执行周期函数,加载操作
在页面中添加周期函数

onReachBottom(){

    代码块

}
4、点击弹出模态确认框
来自uni.showModal方法
https://uniapp.dcloud.io/api/ui/prompt?id=showmodal
方法一:
直接在点击事件中添加
uni.showModal({
title: ‘是否确认清空所有收藏’, //模态框标题
content: ‘清空收藏后无法恢复’, //提示文字
success: (res) => {
if (res.confirm) {
console.log(‘用户点击确认’);
} else if (res.cancel) {
console.log(‘用户点击取消’);
}
}
});
方法二:
来自uni-popup弹出层组件,需要下载插件
https://uniapp.dcloud.io/component/uniui/uni-popup
//在html中添加标签,自带弹出输入框,可设置 文本格式框 mode='base'(提示对话框)/ 输入框 mode='input'(可输入对话框)
1
<button @click=“open”>打开弹窗
<uni-popup-dialog ref="popup" mode=“input” message=“成功消息” :duration=“2000” :before-close=“true” @close=“close” @confirm=“confirm”>
//在js中添加标签
close() {
// TODO 做一些其他的事情,before-close 为true的情况下,手动执行 close 才会关闭对话框
this.refs.popup.open()
},
confirm() {
this.refs.popup.close()
}
5、小程序下方导航栏
框架组件tabBar
https://uniapp.dcloud.io/collocation/pages?id=tabbar
//在pages.json中添加 至少为2个项,不然会发送报错
"tabBar": {
    "color": "#7A7E83",    //文字颜色
    "selectedColor": "#3cc51f",      //选中文字颜色
    "borderStyle": "black",   //边框颜色
    "backgroundColor": "#ffffff",   //背景颜色
    "list": [{
        "pagePath": "pages/component/index",    //跳转页面的路径
        "iconPath": "static/image/icon_component.png",    //默认图片
        "selectedIconPath": "static/image/icon_component_HL.png",    //激活切换的图片
        "text": "组件"    //跳转页面标题
    }, {
        "pagePath": "pages/API/index",
        "iconPath": "static/image/icon_API.png",
        "selectedIconPath": "static/image/icon_API_HL.png",
        "text": "接口"
    }]
}
6、轮播图/走马灯/swiper
https://uniapp.dcloud.io/component/swiper?id=swiper
html中
<view class="uni-padding-wrap">
           <view class="page-section swiper">
               <view class="page-section-spacing">
                   <swiper class="swiper" :indicator-dots="indicatorDots" :autoplay="autoplay" :interval="interval" :duration="duration">
                       <swiper-item>
                           <view class="swiper-item uni-bg-red">A</view>
                       </swiper-item>
                       <swiper-item>
                           <view class="swiper-item uni-bg-green">B</view>
                       </swiper-item>
                       <swiper-item>
                           <view class="swiper-item uni-bg-blue">C</view>
                       </swiper-item>
                   </swiper>
               </view>
           </view>
       </view>

       data中添加
         background: ['color1', 'color2', 'color3'],
           indicatorDots: true,
           autoplay: true,
           interval: 2000,
           duration: 500
7、拨打电话
https://uniapp.dcloud.io/api/system/phone?id=makephonecall
// 直接在js中添加电话
uni.makePhoneCall({
    phoneNumber: '114' //拨打电话号码功能
});
8、扫码功能
来自uni.scanCode功能
https://uniapp.dcloud.io/api/system/barcode?id=scancode
//添加到js中
// 允许从相机和相册扫码
uni.scanCode({
    success:  (res) =>{
        console.log('条码类型:' + res.scanType);
        console.log('条码内容:' + res.result);
    }
});

// 只允许通过相机扫码
uni.scanCode({
    onlyFromCamera: true,
    success: (res)=> {
        console.log('条码类型:' + res.scanType);
        console.log('条码内容:' + res.result);
    }
});

// 调起条码扫描
uni.scanCode({
    scanType: ['barCode'],
    success:  (res) =>{
        console.log('条码类型:' + res.scanType);
        console.log('条码内容:' + res.result);
    }
});
9、按钮
https://uniapp.dcloud.io/component/button?id=button
uni-app封装了button type的值有3个 primary(绿色)/default(白色)/warn(红色)
<navigator url="/pages/about/about"><button type="default">通过navigator组件跳转到about页面</button></navigator>
10、路由跳转
1、uni.navigateTo( )
保留当前页面,跳转到应用内的某个页面,使用uni.navigateBack可以返回到原页面。
https://uniapp.dcloud.io/api/router?id=navigateto
//在起始页面跳转到test.vue页面并传递参数
uni.navigateTo({
    url: 'test?id=1&name=uniapp'
});
// 在test.vue页面接受参数
export default {
    onLoad: function (option) { //option为object类型,会序列化上个页面传递的参数
        console.log(option.id); //打印出上个页面传递的参数。
        console.log(option.name); //打印出上个页面传递的参数。
    }
}
2、uni.redirectTo()
关闭当前页面,跳转到应用内的某个页面
https://uniapp.dcloud.io/api/router?id=redirectto
uni.redirectTo({
    url: 'test?id=1'
});
3、uni.switchTab()
跳转到 tabBar 页面,并关闭其他所有非 tabBar 页面。
注意: 如果调用了 uni.preloadPage(OBJECT) 不会关闭,仅触发生命周期 onHide
https://uniapp.dcloud.io/api/router?id=switchtab
uni.switchTab({
    url: '/pages/index/index'
});
4、uni.navigateBack()
https://uniapp.dcloud.io/api/router?id=navigateback
关闭当前页面,返回上一页面或多级页面。可通过 getCurrentPages() 获取当前的页面栈,决定需要返回几层。

// 注意:调用 navigateTo 跳转时,调用该方法的页面会被加入堆栈,而 redirectTo 方法则不会。见下方示例代码

// 此处是A页面
uni.navigateTo({
    url: 'B?id=1'
});

// 此处是B页面
uni.navigateTo({
    url: 'C?id=1'
});

// 在C页面内 navigateBack,将返回A页面
uni.navigateBack({
    delta: 2
});
5、标签跳转
在标签外面嵌套
作用类似于a标签 url表示跳转的地址
https://uniapp.dcloud.io/component/navigator?id=navigator
<navigator url="/pages/about/about">   //url表示跳转地址,注意地址前面比pages.json中多一个”/“
内容
</navigator >
11、本地存储
1、数据储存到本地
注意1:异步存取和读取不会阻断代码执行,可能会导致页面白屏
注意2:同步存取和读取会阻断代码执行,不会导致白屏,但是可能会导致后面的代码无法执行
一、存数据
1、uni.setStorage()
https://uniapp.dcloud.io/api/storage/storage?id=setstorage
将数据存储在本地缓存中指定的 key 中,会覆盖掉原来该 key 对应的内容,这是一个异步接口。
uni.setStorage({
    key: 'storage_key',
    data: 'hello',
    success: function () {
        console.log('success');
    }
});
2、uni.setStorageSync()
https://uniapp.dcloud.io/api/storage/storage?id=setstoragesync
将 data 存储在本地缓存中指定的 key 中,会覆盖掉原来该 key 对应的内容,这是一个同步接口。
try {
    uni.setStorageSync('storage_key', 'hello');
} catch (e) {
    // error
}
二、取数据
1、uni.getStorage()
https://uniapp.dcloud.io/api/storage/storage?id=getstorage
从本地缓存中异步获取指定 key 对应的内容。
uni.getStorage({
    key: 'storage_key',
    success: function (res) {
        console.log(res.data);
    }
});
2、uni.getStorageSync()
https://uniapp.dcloud.io/api/storage/storage?id=getstoragesync
从本地缓存中同步获取指定 key 对应的内容。
try {
    const value = uni.getStorageSync('storage_key');//获取数据
    if (value) {
        console.log(value);
    }
} catch (e) {
    // error
}
三、删除数据
1、uni.removeStorage()
https://uniapp.dcloud.io/api/storage/storage?id=removestorage
从本地缓存中异步移除指定 key。
uni.removeStorage({
    key: 'storage_key',
    success: function (res) {
        console.log('success');
    }
});
2、uni.removeStorageSync()
https://uniapp.dcloud.io/api/storage/storage?id=removestoragesync
从本地缓存中同步移除指定 key。
try {
    uni.removeStorageSync('storage_key');
} catch (e) {
    // error
}
四、清空数据
https://uniapp.dcloud.io/api/storage/storage?id=clearstorage
异步清除本地缓存
1、uni.clearStorage()
uni.clearStorage();
1
2、uni.clearStorageSync()
try {
    uni.clearStorageSync();
} catch (e) {
    // error
}
12、自定义分享
自带api方法
小程序中用户点击分享后,在 js 中定义 onShareAppMessage 处理函数(和 onLoad 等生命周期函数同级),设置该页面的分享信息。
注意:不能在app.vue中配置,只能在当前页面配置
onShareAppMessage()
https://uniapp.dcloud.io/api/plugins/share?id=onshareappmessage
 onShareAppMessage(res) {
    if (res.from === 'button') {// 如果页面中有分享按钮   配置该项    来自页面内分享按钮
      console.log(res.target)
    }
    return {
      title: '自定义分享标题',   //分享页面的标题
      path: '/pages/test/test?id=123'    //完整的pages.json的地址    /+地址   参数按需传递
    }
  }
13、上传图片
uni.chooseImage 上传图片
上传图片思路
微信小程序会把图片编译成微信小程序的临时地址
然后将图片上传到服务器上去,服务器会返回服务器处理过后的图片地址
https://uniapp.dcloud.io/api/media/image?id=chooseimage
uni.chooseImage({
    count: 6, //默认9,最多上传的数量
    sizeType: ['original', 'compressed'], //可以指定是原图还是压缩图,默认二者都有
    sourceType: ['album'], //从相册选择
    success: function (res) {               //注意箭头函数
        console.log(JSON.stringify(res.tempFilePaths));      //res.tempFilePaths   该参数为图片的微信虚拟路径数组
        uni.uploadFile({
                url: 'https://www.example.com/upload', //图片上传服务器地址
                filePath: tempFilePaths[0],  //上传的图片路径
                name: 'file',
                success: (uploadFileRes) => {
                    console.log(uploadFileRes.data);  //返回的数据
                }
            });
    }
});
14、表单控件
https://uniapp.dcloud.io/component/button
此处请参考官方文档
15、下载功能
下载文件,需要后端提供接口
https://uniapp.dcloud.io/api/request/network-file?id=downloadfile
uni.downloadFile({
    url: 'https://www.example.com/file/test', //仅为示例,并非真实的资源
    success: (res) => {
        if (res.statusCode === 200) {
            console.log('下载成功');
        }
    }
});
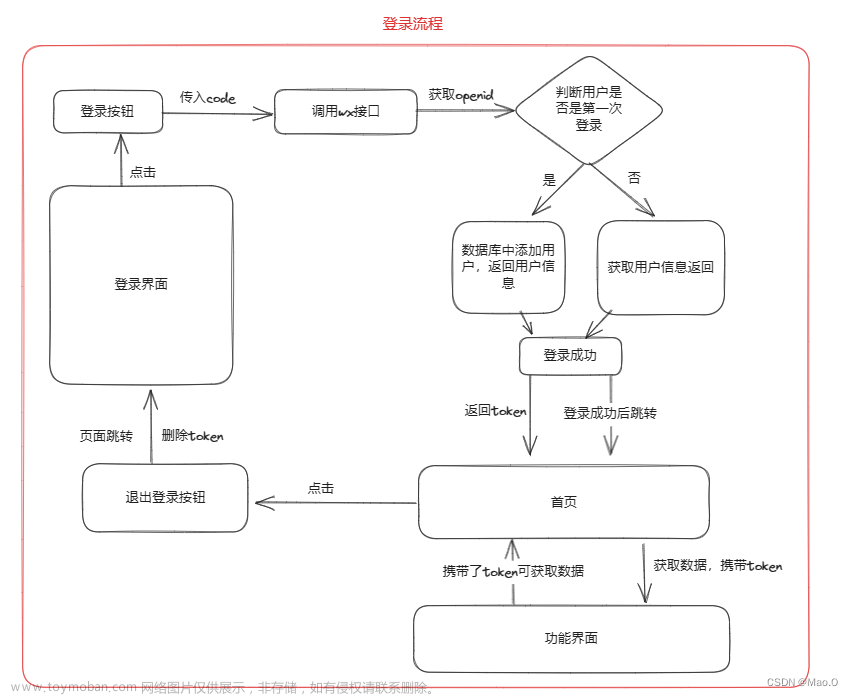
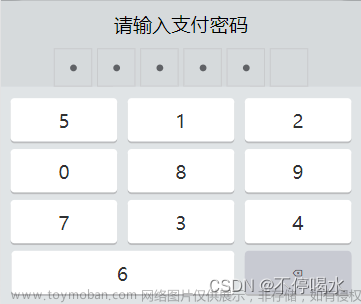
16、微信支付
https://uniapp.dcloud.io/api/plugins/payment?id=requestpayment
实现逻辑:
前端+后端+微信官方
前端做的事:
前端向微信官方获取用户的信息==> 获得用户信息传输给后端 ==>拿到后端返回的用户唯一标识id,发送商品信息和唯一标识id给后端 ==> 拿到后端返回的订单信息 ==>发送请求给后端拿到订单处理信息
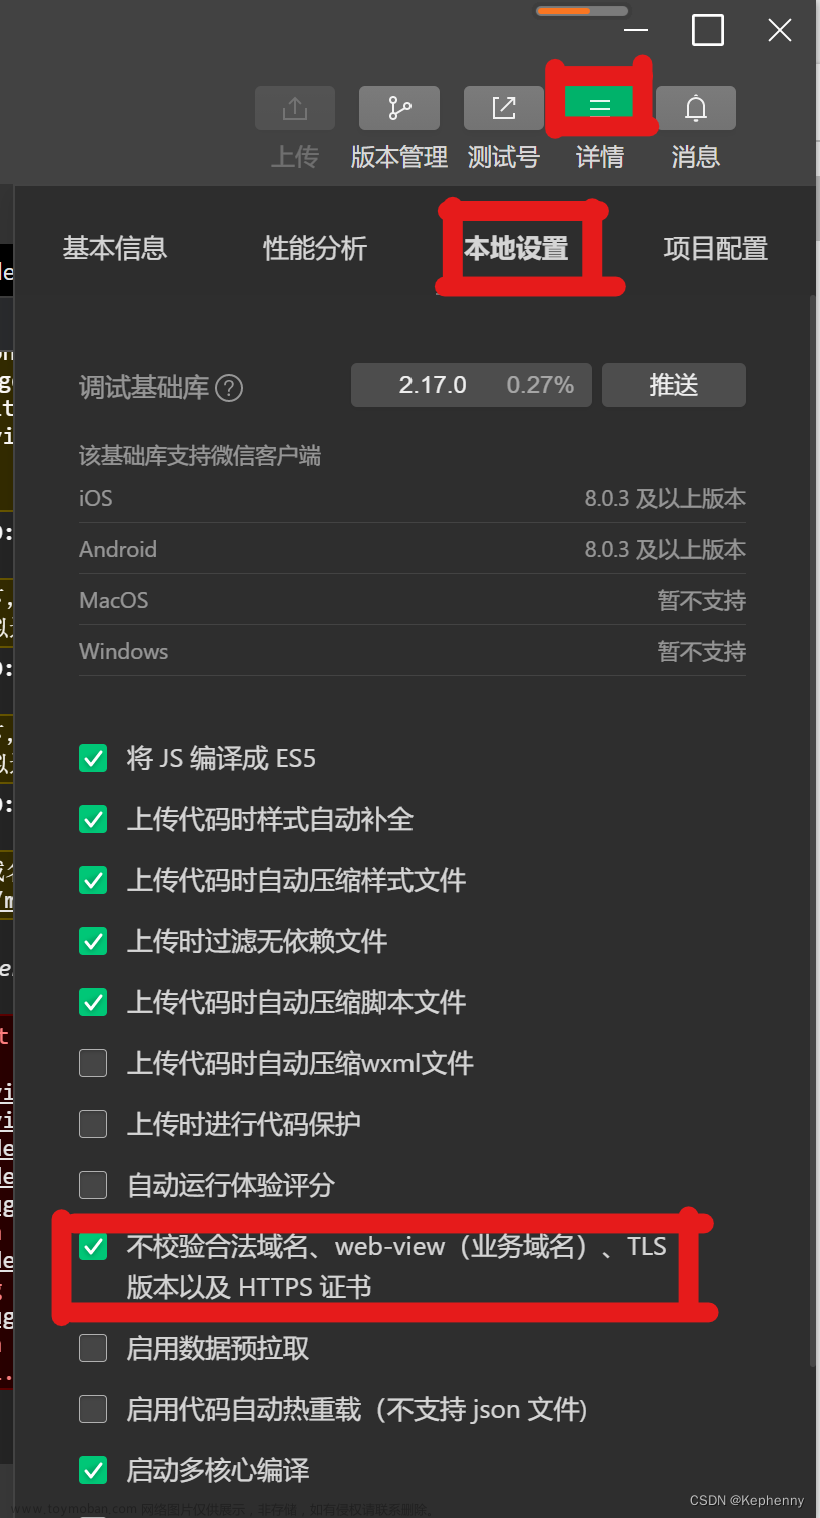
//一般在授权登陆时做这个操作
⚠️!!! 记得勾选uni-app中的Payment功能⚠️
//获取用户的codeID
uni.login({
    succes:function(loginRes){
    console.log(loginRes.code)    	 //获取用户的codeID

    //调后台接口,将codeID传递过去,后端会返回一个openID
            uni.request({
                url: 'https://www.example.com/request', 	//获取openID的地址
                data: {
                    code: 'uni.request'
                },
                success: (res) => {
                	const openid=res.data.openid
                    console.log(res.data.openid);        //拿到数据中的openID
                            uni.setStorage({           //将openID存在本地存储中
                                key: 'openid',
                                data: openid,
                                success: function () {
                                           uni.switchTab({    	//跳转到首页
                                                url: '/pages/index/index'
                                            })
                                }
                            });

                }
            });
    }
})
//在需要请求支付的页面的代码
uni.request({
    url: 'https://www.example.com/request', //后端商品接口地址
    data: {
       数据                      //后端接口需要传递的数据,参考后端文档
    },
    success: (res) => {
    	//一般返回的res中包含
    	timeStamp:时间戳,
    	nonceStr:随机字符串,
    	package:'prepay_id='+预支付id,
    	signType:签名算法
    	paySign:签名

            uni.requestPayment({   //传入5个关键参数

                timeStamp:时间戳,
                nonceStr:随机字符串,
                package:'prepay_id='+预支付id,
                signType:签名算法,
                paySign:签名,
              success:(res)=>{  //返回支付成功后的结果和提示
             	 console.log(res)
              },
              fail:(err)=>{   //返回支付失败的结果和提示
                  console.log(err)
              }
              })
    }
});
17、实现二级联动
scroll-view
https://uniapp.dcloud.io/component/scroll-view
详细配置查询官方文档
来自官方的注意点
APP-vue和小程序中,请勿在 scroll-view 中使用 map、video 等原生组件。小程序中 scroll-view 中也不要使用 canvas、textarea 原生组件。更新:微信基础库2.4.4起支持了原生组件在 scroll-view、swiper、movable-view 中的使用。app-nvue无此限制。
scroll-view 不适合放长列表,有性能问题。长列表滚动和下拉刷新,应该使用原生导航栏搭配页面级的滚动和下拉刷新实现。包括在app-nvue页面,长列表应该使用list而不是scroll-view。
scroll-into-view 的优先级高于 scroll-top。
scroll-view是区域滚动,不会触发页面滚动,无法触发pages.json配置的下拉刷新、页面触底onReachBottomDistance、titleNView的transparent透明渐变。
若要使用下拉刷新,建议使用页面的滚动,而不是 scroll-view 。插件市场有前端模拟的基于scroll-view的下拉刷新,但性能不佳。如必需使用前端下拉刷新,推荐使用基于wxs的下拉刷新,性能会比基于js监听方式更高。
如果遇到scroll-top、scroll-left、refresher-triggered属性设置不生效的问题参考:组件属性设置不生效解决办法
scroll-view的滚动条设置,可通过css的-webkit-scrollbar自定义,包括隐藏滚动条。(app-nvue无此css)
//原生uni-app不支持左右联动
//仅 发送请求修改数据列表和渲染的数据就可实现效果,格式请自行编写
<template>
	<view class="list_box">
		<!-- 菜单左边 -->
		<view class="left">
			<scroll-view scroll-y="true" :style="{ 'height':scrollHeight }">
				<view class="item" v-for="(item,index) in leftArray" :key="index" :class="{ 'active':index==leftIndex }"
				 :data-index="index" @tap="leftTap">{{item.id}}</view>
			</scroll-view>
		</view>
		<view class="main">
			<scroll-view scroll-y="true" :style="{ 'height':scrollHeight }" @scroll="mainScroll" :scroll-into-view="scrollInto"
			 scroll-with-animation="true" @touchstart="mainTouch" id="scroll-el">
				<block v-for="(item,index) in mainArray" :key="index">
					<view class="item" :id="'item-'+index">
						<view class="title">
							<view>{{item.title}}</view>
						</view>
						<view class="goods" v-for="(item2,index2) in item.list" :key="index2">
							<image src="/static/logo.png" mode=""></image>
							<view>
								<view>第{{index2+1}}个商品标题</view>
								<view class="describe">第{{index2+1}}个商品的描述内容</view>
								<view class="money">第{{index2+1}}个商品的价格</view>
							</view>
						</view>
					</view>
				</block>

			</scroll-view>
		</view>
	</view>
</template>

<script>
	export default {
		data() {
			return {
				scrollHeight: '500px',
				leftArray: [{
						id: 1
					},
					{
						id: 2
					},
					{
						id: 3
					},
					{
						id: 4
					},
					{
						id: 5
					},
					{
						id: 6
					},
					{
						id: 7
					},
					{
						id: 8
					}
				],
				mainArray: [],
				topArr: [],
				leftIndex: 0,
				isMainScroll: false,
				scrollInto: '',
				tipsTop: '0px'
			}
		},
		onLoad() {
			uni.getSystemInfo({
				success: (res) => {
					/* 设置当前滚动容器的高,若非窗口的告诉,请自行修改 */
					this.scrollHeight = `${res.windowHeight}px`;
					console.log('gaodu', res.windowHeight)
				}
			});
		},
		computed: {

		},
		mounted() {
			this.getListData();

		},
		methods: {
			/* 获取列表数据 */
			getListData() {
				/* 因无真实数据,当前方法模拟数据 */
				let [left, main] = [
					[],
					[]
				];

				for (let i = 0; i < 8; i++) {
					left.push(`${i+1}类商品`);

					let list = [];
					for (let j = 0; j < (i + 1); j++) {
						list.push(j);
					}
					main.push({
						title: `第${i+1}类商品标题`,
						list
					})
				}
				this.mainArray = main;

				this.$nextTick(() => {
					this.getElementTop();
				});
			},
			//获取距离顶部的高度
			getScrollTop(selector) {
				return new Promise((resolve, reject) => {
					let query = uni.createSelectorQuery().in(this);
					query.select(selector + '').boundingClientRect(data => {
						resolve(data.top)
					}).exec();
				})
			},
			/* 获取元素顶部信息 */
			async getElementTop() {
				/* Promise 对象数组 */
				let p_arr = [];

				/* 遍历数据,创建相应的 Promise 数组数据 */
				for (let i = 0; i < this.mainArray.length; i++) {
					const resu = await this.getScrollTop(`#item-${i}`)
					p_arr.push(resu)
				}

				// console.log('p_arr', p_arr)

				/* 主区域滚动容器的顶部距离 */
				this.getScrollTop("#scroll-el").then((res) => {

					let top = res;
					// #ifdef H5
					top += 43; //因固定提示块的需求,H5的默认标题栏是44px
					// #endif

					/* 所有节点信息返回后调用该方法 */
					Promise.all(p_arr).then((data) => {
						console.log('滚动', data)
						this.tipsTop = `${data}px`;
						this.topArr = data;
					});
				})
			},

			/* 主区域滚动监听 */
			mainScroll(e) {
				if (!this.isMainScroll) {
					return;
				}
				let top = e.detail.scrollTop;
				let index = -1;

				if (top >= this.topArr[this.topArr.length - 1]) {
					index = this.topArr.length - 1;
				} else {
					index = this.topArr.findIndex((item, index) => {
						return this.topArr[index + 1] >= top;
					});
				}
				this.leftIndex = (index < 0 ? 0 : index);
			},
			/* 主区域触摸 */
			mainTouch() {
				this.isMainScroll = true;
			},
			/* 左侧导航点击 */
			leftTap(e) {
				let index = e.currentTarget.dataset.index;
				this.isMainScroll = false;
				this.leftIndex = Number(index);
				this.scrollInto = `item-${index}`;
			}
		}
	}
</script>

<style lang="scss">
	.list_box {
		display: flex;
		flex-direction: row;
		flex-wrap: nowrap;
		justify-content: flex-start;
		align-items: flex-start;
		align-content: flex-start;
		font-size: 28rpx;

		.left {
			width: 200rpx;
			background-color: #f6f6f6;
			line-height: 80rpx;
			box-sizing: border-box;
			font-size: 32rpx;

			.item {
				padding-left: 20rpx;
				position: relative;

				&:not(:first-child) {
					margin-top: 1px;

					&::after {
						content: '';
						display: block;
						height: 0;
						border-top: #d6d6d6 solid 1px;
						width: 620upx;
						position: absolute;
						top: -1px;
						right: 0;
						transform: scaleY(0.5);
						/* 1px像素 */
					}
				}

				&.active,
				&:active {
					color: #42b983;
					background-color: #fff;
				}
			}
		}

		.main {
			background-color: #fff;
			padding-left: 20rpx;
			width: 0;
			flex-grow: 1;
			box-sizing: border-box;

			.tips {
				line-height: 64rpx;
				font-size: 24rpx;
				font-weight: bold;
				color: #666;
				height: 64rpx;
				position: fixed;
				top: 44px;
				right: 0;
				width: 530rpx;
				z-index: 10;
				background-color: #fff;
				padding-left: 10rpx;
			}

			.title {
				line-height: 64rpx;
				position: relative;
				font-size: 24rpx;
				font-weight: bold;
				color: #666;
				height: 64rpx;
			}

			.item {
				margin-bottom: 20rpx;
			}

			.goods {
				display: flex;
				flex-direction: row;
				flex-wrap: nowrap;
				justify-content: flex-start;
				align-items: center;
				align-content: center;
				margin-bottom: 10rpx;

				&>image {
					width: 120rpx;
					height: 120rpx;
					margin-right: 16rpx;
				}

				.describe {
					font-size: 24rpx;
					color: #999;
				}

				.money {
					font-size: 24rpx;
					color: #efba21;
				}
			}
		}
	}
</style>
主要属性
//scroll-into-view : 值应为某子元素id(id不能以数字开头)。设置哪个方向可滚动,则在哪个方向滚动到该元素
//scroll-with-animation : 在设置滚动条位置时使用动画过渡文章来源:https://www.toymoban.com/news/detail-435011.html
18、获取节点文章来源地址https://www.toymoban.com/news/detail-435011.html
//在函数中封装方法

const query = uni.createSelectorQuery().in(this);
query.select('#id').boundingClientRect(data => {  //选择一个标签,类似于document.queryselector()方法
  console.log("得到布局位置信息" + JSON.stringify(data));
  console.log("节点离页面顶部的距离为" + data.top);
}).exec();
query.selectAll('.')
到了这里,关于uni-app的常用 使用指南的文章就介绍完了。如果您还想了解更多内容,请在右上角搜索TOY模板网以前的文章或继续浏览下面的相关文章,希望大家以后多多支持TOY模板网!