一、背景说明
openeuler 22.03 默认安装的openssh 版本为8.8p1,经绿盟扫描,存在高危漏洞,需要升级到最新。
官网只提供编译安装包,而openeuler 22.03 为rpm方式安装。
为了方便升级,先通过编译安装包,制作rpm包,并进行升级
如下为做好的rpm升级包,可直接下载使用:
openssh 9.3p1 for bclinux euler& openeuler22.03版本,及升级指引
https://download.csdn.net/download/qyq88888/87767381https://download.csdn.net/download/qyq88888/87767381
1.1 系统版本查看 cat /etc/os-release
[root@localhost ~]# cat /etc/os-release
NAME="openEuler"
VERSION="22.03 LTS"
ID="openEuler"
VERSION_ID="22.03"
PRETTY_NAME="openEuler 22.03 LTS"
ANSI_COLOR="0;31"

[root@localhost ~]#
二、rpm包制作
2.1、安装制作的工具
配置yum源
[root@localhost ~]# cat /etc/yum.repos.d/iso.repo
[iso]
name=iso
baseurl=file:///iso
enabled=1
gpgcheck=0
[root@localhost ~]#
安装依赖包
yum install rpm-build zlib-devel openssl-devel gcc perl-devel pam-devel libXt-devel gtk2-devel make perl -y
下载并安装imake
下载imake包
wget https://mirror.nju.edu.cn/openeuler/openEuler-22.03-LTS/everything/x86_64/Packages/imake-1.0.7-17.oe2203.x86_64.rpm


[root@localhost iso]# ls
imake-1.0.7-17.oe2203.x86_64.rpm  openEuler-22.03-LTS-SP1-x86_64-dvd.iso
[root@localhost iso]# yum localinstall -y imake-1.0.7-17.oe2203.x86_64.rpm
Last metadata expiration check: 0:13:48 ago on 2023年05月09日 星期二 14时40分01秒.
Dependencies resolved.
===================================================================================================================================================================================================================
 Package                                       Architecture                                   Version                                                   Repository                                            Size
===================================================================================================================================================================================================================
Installing:
 imake                                         x86_64                                         1.0.7-17.oe2203                                           @commandline                                         240 k

Transaction Summary
===================================================================================================================================================================================================================
Install  1 Package

Total size: 240 k
Installed size: 1.2 M
Downloading Packages:
Running transaction check
Transaction check succeeded.
Running transaction test
Transaction test succeeded.
Running transaction
  Preparing        :                                                                                                                                                                                           1/1
  Installing       : imake-1.0.7-17.oe2203.x86_64                                                                                                                                                              1/1
  Verifying        : imake-1.0.7-17.oe2203.x86_64                                                                                                                                                              1/1

Installed:
  imake-1.0.7-17.oe2203.x86_64

Complete!
[root@localhost iso]#
yum install imake
验证imake是否安装成功
[root@localhost iso]# rpm -qa|grep imake
imake-1.0.7-17.oe2203.x86_64
[root@localhost iso]#
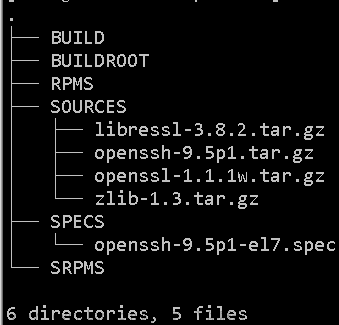
mkdir -p /root/rpmbuild/
cd /root/rpmbuild
mkdir BUILD BUILDROOT RPMS SOURCES SPECS SRPMS
2.3 下载openssh9.3p1和x11-ssh-askpass-1.2.4.1.tar.gz
#将下载的文件放入SOURCES文件夹下
cd /root/rpmbuild/SOURCES/
#下载openssh9.3p1
wget  https://ftp.openbsd.org/pub/OpenBSD/OpenSSH/portable/openssh-9.3p1.tar.gz

#下载x11-ssh-askpass-1.2.4.1.tar.gz
wget https://src.fedoraproject.org/repo/pkgs/openssh/x11-ssh-askpass-1.2.4.1.tar.gz

重新制作openssh压缩包
因为下载的包缺一个sshd.pam.old,需要将现在系统的/etc/pam.d/sshd,拷到编译的目录中。如果没有改文件,后续编译会报错。
tar -xvzf openssh-9.3p1.tar.gz
cd /root/rpmbuild/SOURCES/openssh-9.3p1
cp /etc/pam.d/sshd /root/rpmbuild/SOURCES/openssh-9.3p1/contrib/redhat/sshd.pam.old
#回到SOURCE目录,重新tar包
cd ..
tar -zcpf openssh-9.3p1.tar.gz openssh-9.3p1
2.4 修改openssh.spec配置
 #将openssh.spec配置文件拷贝到,编译目录下
 cp /root/rpmbuild/SOURCES/openssh-9.3p1/contrib/redhat/openssh.spec /root/rpmbuild/SPECS/
 cd /root/rpmbuild/SPECS

 #修改openssh.spec配置
 #1.不生成askpass包
 cat /root/rpmbuild/SPECS/openssh.spec | grep no_gnome_askpass
 cat /root/rpmbuild/SPECS/openssh.spec | grep no_x11_askpass

sed -i -e "s/%global no_gnome_askpass 0/%global no_gnome_askpass 1/g" openssh.spec
sed -i -e "s/%global no_x11_askpass 0/%global no_x11_askpass 1/g" openssh.spec

#2.解决openssl-devel < 1.1报错
cat /root/rpmbuild/SPECS/openssh.spec | grep openssl-devel
sed -i '/openssl-devel < 1.1/s/^/#/' openssh.spec

#3.解决PreReq报错
cat /root/rpmbuild/SPECS/openssh.spec | grep PreReq
sed -i '/PreReq/s/^/#/' openssh.spec

#4.解决Obsoletes报错
cat /root/rpmbuild/SPECS/openssh.spec | grep Obsoletes
sed -i '/Obsoletes:/s/^/#/' openssh.spec
2.5 编译源码包,制作成rpm包
cd /root/rpmbuild/SPECS/
rpmbuild -ba openssh.spec
提示
......
处理文件:openssh-debugsource-9.3p1-1.x86_64
Provides: openssh-debugsource = 9.3p1-1 openssh-debugsource(x86-64) = 9.3p1-1
Requires(rpmlib): rpmlib(CompressedFileNames) <= 3.0.4-1 rpmlib(FileDigests) <= 4.6.0-1 rpmlib(PayloadFilesHavePrefix) <= 4.0-1
检查未打包文件:/usr/lib/rpm/check-files /root/rpmbuild/BUILDROOT/openssh-9.3p1-1.x86_64
已写至:/root/rpmbuild/SRPMS/openssh-9.3p1-1.src.rpm
已写至:/root/rpmbuild/RPMS/x86_64/openssh-clients-9.3p1-1.x86_64.rpm
已写至:/root/rpmbuild/RPMS/x86_64/openssh-9.3p1-1.x86_64.rpm
已写至:/root/rpmbuild/RPMS/x86_64/openssh-debugsource-9.3p1-1.x86_64.rpm
已写至:/root/rpmbuild/RPMS/x86_64/openssh-server-9.3p1-1.x86_64.rpm
已写至:/root/rpmbuild/RPMS/x86_64/openssh-debuginfo-9.3p1-1.x86_64.rpm
正在执行(%clean):/bin/sh -e /var/tmp/rpm-tmp.buozEu
+ umask 022
+ cd /root/rpmbuild/BUILD
+ cd openssh-9.3p1
+ rm -rf /root/rpmbuild/BUILDROOT/openssh-9.3p1-1.x86_64
+ RPM_EC=0
++ jobs -p
+ exit 0
[root@localhost SPECS]#
[root@localhost SPECS]#
#编译完成后的软件在,debug的包不用下载安装
[root@localhost SPECS]# ls -lrth /root/rpmbuild/RPMS/x86_64/
总用量 5.8M
-rw-r--r-- 1 root root 622K  5月  9 15:53 openssh-clients-9.3p1-1.x86_64.rpm
-rw-r--r-- 1 root root 620K  5月  9 15:53 openssh-9.3p1-1.x86_64.rpm
-rw-r--r-- 1 root root 715K  5月  9 15:53 openssh-debugsource-9.3p1-1.x86_64.rpm
-rw-r--r-- 1 root root 448K  5月  9 15:53 openssh-server-9.3p1-1.x86_64.rpm
-rw-r--r-- 1 root root 3.4M  5月  9 15:53 openssh-debuginfo-9.3p1-1.x86_64.rpm
[root@localhost SPECS]#
三、升级openssh
下载制作好的rpm后,上传到其他主机升级openssh。
3.1 升级前检查
[root@localhost SPECS]# rpm -qa|grep openssh
openssh-clients-8.8p1-2.oe2203.x86_64
openssh-8.8p1-2.oe2203.x86_64
openssh-server-8.8p1-2.oe2203.x86_64
[root@localhost SPECS]#
只用了3个rpm包
3.2 备份openssh配置文件
cp /etc/ssh/sshd_config /etc/ssh/sshd_config.202305093.3 升级openssh
yum localinstall -y openssh-clients-9.3p1-1.x86_64.rpm openssh-9.3p1-1.x86_64.rpm openssh-server-9.3p1-1.x86_64.rpm3.4 检查sshd的配置文件是否正常。
[root@localhost x86_64]# sshd -t
/etc/ssh/sshd_config line 142: Deprecated option RSAAuthentication
/etc/ssh/sshd_config line 144: Deprecated option RhostsRSAAuthentication
/etc/ssh/sshd_config: line 159: Bad configuration option: GSSAPIKexAlgorithms
/etc/ssh/sshd_config: terminating, 1 bad configuration options
[root@localhost x86_64]#
报错159行有问题,将/etc/ssh/sshd_config第159行配置注释掉。
[root@localhost x86_64]# cat -n /etc/ssh/sshd_config|grep GSSAPIKexAlgorithms
   159  #GSSAPIKexAlgorithms gss-group14-sha256-,gss-group16-sha512-,gss-curve25519-sha256-
[root@localhost x86_64]#
3.5 重启sshd服务。
systemctl restart sshd文章来源:https://www.toymoban.com/news/detail-437738.html
测试ssh测试登陆是否正常。文章来源地址https://www.toymoban.com/news/detail-437738.html
[root@localhost x86_64]# sshd -t
/etc/ssh/sshd_config line 142: Deprecated option RSAAuthentication
/etc/ssh/sshd_config line 144: Deprecated option RhostsRSAAuthentication
[root@localhost x86_64]# systemctl status sshd
● sshd.service - SYSV: OpenSSH server daemon
     Loaded: loaded (/etc/rc.d/init.d/sshd; generated)
     Active: active (running) since Tue 2023-05-09 16:09:35 CST; 13s ago
       Docs: man:systemd-sysv-generator(8)
    Process: 2753559 ExecStart=/etc/rc.d/init.d/sshd start (code=exited, status=0/SUCCESS)
   Main PID: 2753588 (sshd)
      Tasks: 53 (limit: 47386)
     Memory: 4.4G
     CGroup: /system.slice/sshd.service
             ├─ 977240 "nginx: master process ./nginx"
             ├─ 977241 "nginx: worker process"
             ├─2309235 "sshd: sudoroot [priv]"
             ├─2309237 "sshd: sudoroot@pts/0"
             ├─2309238 -bash
             ├─2309296 sudo -i
             ├─2309297 -bash
             ├─2310076 "sshd: sudoroot [priv]"
             ├─2310090 "sshd: sudoroot@pts/1"
             ├─2310091 -bash
             ├─2310149 sudo -i
             ├─2310150 -bash
             ├─2311240 "sshd: sudoroot [priv]"
             ├─2311242 "sshd: sudoroot@pts/2,pts/3"
             ├─2311243 -bash
             ├─2311336 sudo -i
             ├─2311337 -bash
             ├─2311786 /usr/libexec/openssh/sftp-server -l INFO -f AUTH
             ├─2312598 -bash
             ├─2312656 sudo -i
             ├─2312657 -bash
             ├─2313421 "sshd: gms [priv]" "" "" "" ""
             ├─2313706 "sshd: gms@notty" "" "" "" "" ""
             ├─2313719 /usr/libexec/openssh/sftp-server -l INFO -f AUTH
             ├─2313779 /usr/libexec/openssh/sftp-server -l INFO -f AUTH
             ├─2313834 /usr/libexec/openssh/sftp-server -l INFO -f AUTH
             ├─2313889 /usr/libexec/openssh/sftp-server -l INFO -f AUTH
             ├─2313969 /usr/libexec/openssh/sftp-server -l INFO -f AUTH
             ├─2314077 /usr/libexec/openssh/sftp-server -l INFO -f AUTH
             ├─2748096 iostat 1
             ├─2753588 "sshd: /usr/sbin/sshd [listener] 0 of 10-100 startups"
             ├─2753651 systemctl status sshd
             ├─2753652 less
             ├─2830851 "./bin/redis-server 10.1.4.239:7001 [cluster]"
             ├─2830853 "./bin/redis-server 10.1.4.239:7002 [cluster]"
             ├─2830855 "./bin/redis-server 10.1.4.239:7004 [cluster]"
             ├─2830856 "./bin/redis-server 10.1.4.239:7005 [cluster]"
             └─2830857 "./bin/redis-server 10.1.4.239:7006 [cluster]"

5月 09 16:09:34 localhost.localdomain systemd[1]: sshd.service: Found left-over process 2830857 (redis-server) in control group while starting unit. Ignoring.
5月 09 16:09:34 localhost.localdomain systemd[1]: This usually indicates unclean termination of a previous run, or service implementation deficiencies.
5月 09 16:09:34 localhost.localdomain systemd[1]: Starting SYSV: OpenSSH server daemon...
5月 09 16:09:35 localhost.localdomain sshd[2753559]: Starting sshd:
5月 09 16:09:35 localhost.localdomain sshd[2753581]: /etc/ssh/sshd_config line 142: Deprecated option RSAAuthentication
5月 09 16:09:35 localhost.localdomain sshd[2753581]: /etc/ssh/sshd_config line 144: Deprecated option RhostsRSAAuthentication
5月 09 16:09:35 localhost.localdomain sshd[2753588]: Server listening on 0.0.0.0 port 22.
5月 09 16:09:35 localhost.localdomain sshd[2753588]: Server listening on :: port 22.
5月 09 16:09:35 localhost.localdomain sshd[2753559]: [  确定  ]
5月 09 16:09:35 localhost.localdomain systemd[1]: Started SYSV: OpenSSH server daemon.
[root@localhost x86_64]#
到了这里,关于openeuler 22.03 制作openssh9.3p1 rpm升级包和升级实战的文章就介绍完了。如果您还想了解更多内容,请在右上角搜索TOY模板网以前的文章或继续浏览下面的相关文章,希望大家以后多多支持TOY模板网!


