前言
最近公司业务需求,需要实现微信小程序订阅消息推送;因为之前也没接触过,所以也花费了一些时间才完成,所以
在这里我会详细叙述每个步骤,尽量把我所踩的坑体现出来;
其实我做完总结了一下主要就是以下几个步骤,如果不出意外按照下面的步骤就可以实现小程序的订阅消息推送。
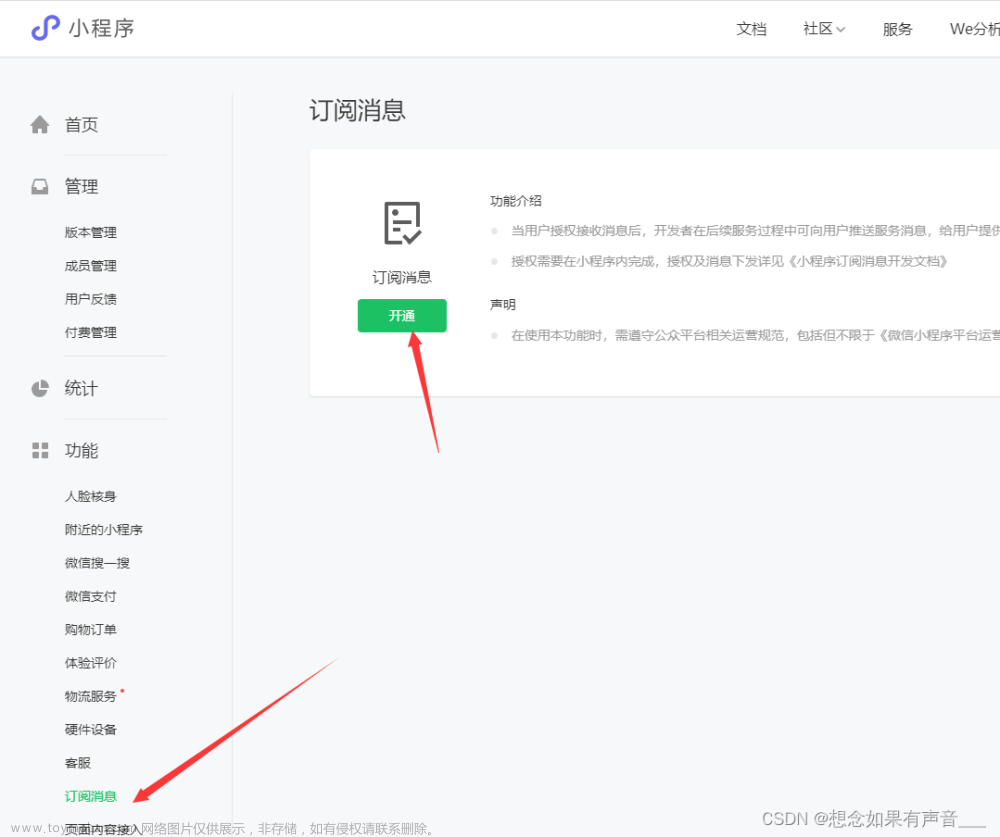
一、创建小程序订阅消息模板
消息模板就是我们发送微信服务通知的消息模板,就像下图这个,这个需要我们自己去选择;

微信公众平台官网:https://mp.weixin.qq.com/
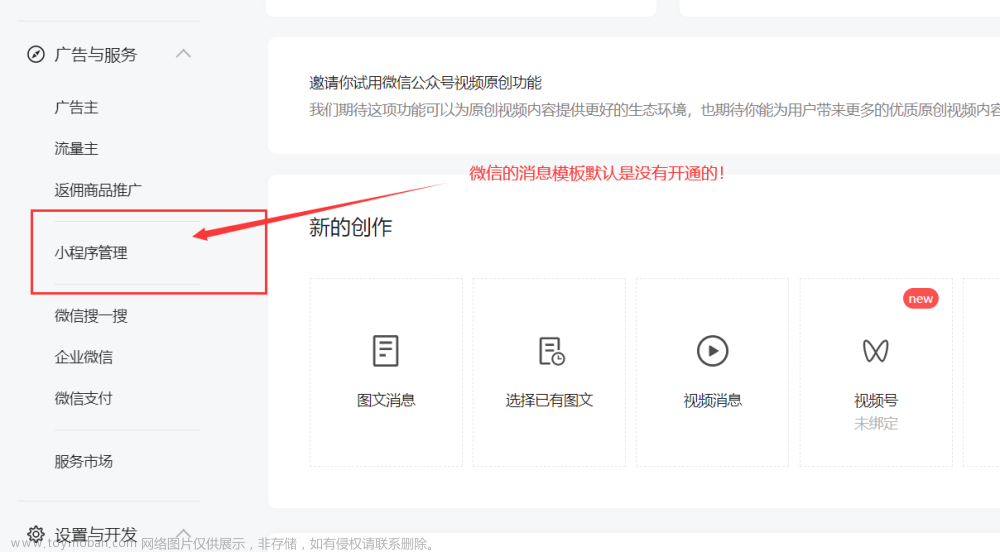
而创建消息模板需要去微信公众平台上创建,打开连接会出现如下界面;
一般依托微信平台的服务都是在这个平台申请和管理,例如公众号、订阅号、小程序…

一般一个邮箱只能申请一个小程序,如果你是个人开发可以先申请一个小程序进行开发测试,这里就不详细介绍如何
申请;如果你没有接触过小程序,是公司或者客户的小程序,那么就需要用客户的微信账号进行登录,一般申请人就
是管理员,还需要他将你添加到项目成员中;至此,你就可以开始进行开发了。

我们可以在 功能->订阅消息->我的模板中选用模板


选择需要的模板,这里有一点需要注意的,消息模板的有效性 分为一次性订阅和 长期订阅。
长期订阅:只需要用户授权一次即可长期推送订阅消息。
一次性订阅:需要用户先授权一次之后才能收到订阅消息,而且只能收到一次。下次则需要用户继续授权。
但是一般的账号主题只能申请一次性订阅,只有公共服务类账号才可以申请长期订阅;

选用模板时如果没有我们需要的关键词我们也可以申请,不过需要审核,大概一两天的时间;
OK,到这里我们已经搞定了小程序订阅消息的模板;
二、发送订阅消息
微信官方文档:https://developers.weixin.qq.com/miniprogram/dev/framework/open-ability/subscribe-message.html
设置好了模板消息接下来我们就需要考虑如何将我们准备的消息内容填到我们的准备好的模板参数中然后发送给指定的用
户,我们还需要获取几个发送订阅消息的必填参数;
1、 获取接口调用凭证(auth.getAccessToken)
官方文档连接:https://developers.weixin.qq.com/miniprogram/dev/api-backend/open-api/access-token/auth.getAccessToken.html

我们需要注意的调用此接口返回的参数access_token,它是小程序全局唯一后台接口调用凭据,调用绝大多数后台接
口时都需使用 access_token。
但是它的有效期是2小时,所以最好写一个定时任务比如每隔100分钟更新一次access_token,避免每次调用小程序后台接
口都的生成一个access_token,需要注意的是新的access_token会覆盖旧的access_token。
注意:
也就是说最后我们要发送订阅消息到指定用户调用sendSubscribeMsg方法是需要携带这个access_token的,所以我们
必须要先获取它,我们当然可以自己后端写个接口,然后前端拿appId和secret去请求这个接口然后返回
access_token,但是这个步骤在小程序已经在微信模版消息推送三方sdk中已帮我们封装好了,他会帮我们在获取微信
用户openid时调用这个接口然后发送消息时把access_token拼接上去;这个我们待会会说,所以我们暂时不需要考虑这
步。
这里说一下appId和AppSecret是什么?
1.1、appId和AppSecret
appid它相当于你的小程序在微信中的 ‘身份证’ ,有了它,微信客户端才能确定你的 ‘小程序’ 的身份,并使用微信提
供的高级接口;也就是说每一个小程序或者公众号对应一个appid;appid就像门牌,AppSecret就像钥匙。
appid可以公开,但是AppSecret必须保密。而且微信官方文档反复强调AppSecret的安全级别很高,也就是说如果泄露出
去安全风险很大,要小心保管。你可以重新生成AppSecret,但是切记重新生成AppSecret前,程序里如果有用AppSecret
的地方,要同步修改,否则程序会报错。
可以在微信公众平台开发-开发管理中-开发设置中获取APPID(小程序ID)和AppSecret:

2、 获取微信用户openid(auth.code2Session)
官方文档:https://developers.weixin.qq.com/miniprogram/dev/api-backend/open-api/login/auth.code2Session.html

这里需要注意的一点是 请求参数js_code:登录凭证校验;通过 wx.login 接口获得临时登录凭证 code 后传到开发者服
务器调用此接口完成登录流程然后返回openid,即用户唯一标识;
也就说我们要先在小程序前端调用 wx.login( )返回登录凭证code,然后我们拿这个code加上appid和secret再去后台访
问上面的链接就可以返回openid了;
ok,接下就可以开始写代码了,先看下前端是怎么写的:
2.1、前端代码
login.vue
export default {
		data() {
			return {
				openId: '',
			};
		},
		onShow() {},
		onLoad() {
            //调用wx.login()返回登录凭证code
            this.getCode()
        },
		methods: {
			async getCode(){
				let that = this;
				wx.login({
					provider: 'weixin',
					success: function(res) {
						console.log('code', res.code);
                        //调用接口返回openid
						that.getopenId(res.code);
					}
				})
			},
			async getopenId(code) {
				let params = {
					code: code,
				}
				const res = await this.$u.api.getOpenId(params);
				if(res.success) {
					console.log('openId', res.data.data.openId);
					this.openId = res.data.data.openId;
				}
			},
            async startLogin(formData) {
				//这里登陆接口密码的加密模式省略、、、
				let params = {
					username: formData.phone,
					password: password,
					secretKey: this.secretKey,
					openId: this.openId,
				};
				// 登录请求
				const res = await this.$u.api.userLogin(params);
				if (res.success) {
					uni.showToast({
					    title: '登录成功',
					    duration: 1000
					});
					setTimeout(()=>{
						this.$u.route({
							type: 'reLaunch',
							url: '/pages/orderList/orderList'
						});
					}, 1200)
					// 调起消息订阅界面
					await this.$u.api.subscribe();
				} else {
					this.$msg(res.msg)
				}
			},
        }
}
http.api.js
// api集中管理api
const install = (Vue, vm) => {
    let subscribe = () =>{
		wx.requestSubscribeMessage({   // 调起消息订阅界面
		  tmplIds: ['mTJ6Tdr42nOxVVoFn-zi3xGsQqUPRnyExIXpTNwHjWg'],
		  success (res) {
		    console.log('订阅消息 成功 ');
		    console.log(res);
		  },
		  fail (er){
		    console.log("订阅消息 失败 ");
		    console.log(er);
		  }
		})
	};

    //通过coed获取openId
	let getOpenId = (params = {}) => vm.$u.post('/app/api/driver/getOpenId', params);
    // 用户登录请求,需要传递params{手机号码,密码  }
	let userLogin = (params = {}) => vm.$u.post('/api/Applet/login/login', params);
    、、、
    、、、
}
http.interceptor.js
const install = (Vue, vm) => {
	// 请求拦截,配置Token等参数处理登录
	Vue.prototype.$u.http.interceptor.request = (config) => {
		config.header._sid = vm.vuex_token;
        //这里为了方便后续接口请求,我将appid放到了请求头中
		config.header.appId = 'wx2e5937bfdcc66ecf';
		return config;
	}
}
2.2、前端可能遇到的问题
(1)、login is not yet implemented
如果你是用HBuilder来进行开发小程序的,那么你调用wx.login(),大概率是会出现以下的报错:
[system] API `login` is not yet implemented
这个问题是说h5不支持调用这个方法,所以我们需要用微信小程序开发工具来进行调式,而且后面的消息订阅界面也必须
用小程序开发工具的真机调式才能拉起;
打开方式:
运行->运行到小程序模拟器->微信开发者工具(前提是你电脑上有安装微信开发者工具)
而且后h5这边保存代码后,开发者工具那边是能同步的;

开发者工具打开界面:

(2)、不合法域名请求

如果打开界面又出现以上报错,说明开启了合法域名校验,这样就不能连上本地了;
解决方法:

或者

(3)、uni-app(APPID)

还于第一次操作HBuilder的同学还需要注意一点,这里的APPID和前面的说的appid不是一个东西,这个代表这个小程
序在DCloud平台上的唯一白标识,你绑定的邮箱必须是当前小程序的所有者后续才有打包发布的权限,如果是接受
别人的小程序项目,必须点击右上角重新获取将当前小程序加到你的应用中才能后续操作
DCloud开发者中心链接:https://dev.dcloud.net.cn/#/pages/app/list

(4)、无法进行真机调试

要想进行真机调试,必须要满足以下三点:
1、前端调用后端的地址必须用局域网ip,cmd打开输入ipconfig即可查看,不能用127.0.0.1,否则无法调式;
2、手机连接网络必须要和pc端保持一致;
3、最后一点,也是最容易忽略的一点,那就是电脑端必须将防火墙关闭,否则无法进行连接
(5)、授权数据缓存
在第一次拉起订阅通知界面后,如果选择总是如此,那么之后就无法拉起授权通知界面,这个只要在开发者界面右上角点
击清除缓存然后选择清除授权数据,就可以再次拉起订阅通知界面了

(6)、无法调起消息订阅界面
上面的调起消息订阅界面方法subscribe必须在方法回调区内调用,无法在onLoad( )内调用;
2.3、后端代码
(1)、导入pom.xml
<!-- 微信小程序 -->
<dependency>
    <groupId>com.github.binarywang</groupId>
    <artifactId>weixin-java-miniapp</artifactId>
</dependency>
<!--微信模版消息推送三方sdk-->
<dependency>
    <groupId>com.github.binarywang</groupId>
    <artifactId>weixin-java-common</artifactId>
</dependency>
(2)、配置类
WxProperties
@Data
@ConfigurationProperties(prefix = "wx.miniapp")
public class WxProperties {

    private List<Config> configs;

    /**
     * 司机订阅消息模板id
     */
    private String driverTemplateId;

    /**
     * 管理端装载通知模板id
     */
    private String loadTemplateId;

    /**
     * 管理端签收通知模板id
     */
    private String unLoadTemplateId;

    public static class Config {
        /**
         * 设置微信小程序的appid
         */
        private String appid;

        /**
         * 设置微信小程序的Secret
         */
        private String secret;

        /**
         * 设置微信小程序消息服务器配置的token
         */
        private String token;

        /**
         * 设置微信小程序消息服务器配置的EncodingAESKey
         */
        private String aesKey;

        /**
         * 消息格式,XML或者JSON
         */
        private String msgDataFormat;

        /**
         * 小程序名称
         */
        private String name;

}
WxMaConfiguration
@Configuration
@EnableConfigurationProperties(WxProperties.class)
public class WxMaConfiguration {
    private WxProperties properties;

    private static Map<String, WxMaMessageRouter> routers = Maps.newHashMap();
    private static Map<String, WxMaService> maServices = Maps.newHashMap();
    private static Map<String, WxMaService> nameMaServices = Maps.newHashMap();
    private static Map<String, WxProperties.Config> appConfig = Maps.newHashMap();

    @Autowired
    public WxMaConfiguration(WxProperties properties) {
        this.properties = properties;
    }

    public static WxMaService getMaService(String appid) {
        WxMaService wxService = maServices.get(appid);
        if (wxService == null) {
            throw new IllegalArgumentException(String.format("未找到对应appid=[%s]的配置,请核实!", appid));
        }

        return wxService;
    }

    public static WxMaService getMaServiceByName(String name) {
        WxMaService wxService = nameMaServices.get(name);
        if (wxService == null) {
            throw new IllegalArgumentException(String.format("未找到对应name=[%s]的配置,请核实!", name));
        }
        return wxService;
    }

    public static WxProperties.Config getWxAppConfig(String appid) {
        return appConfig.get(appid);
    }

    public static WxMaMessageRouter getRouter(String appid) {
        return routers.get(appid);
    }

    @PostConstruct
    public void init() {
        List<WxProperties.Config> configs = this.properties.getConfigs();
        if (configs == null) {
            throw new WxRuntimeException("添加下相关配置,注意别配错了!");
        }

        maServices = configs.stream()
                .map(a -> {
                    WxMaDefaultConfigImpl config = new WxMaDefaultConfigImpl();
                    config.setAppid(a.getAppid());
                    config.setSecret(a.getSecret());
                    config.setToken(a.getToken());
                    config.setAesKey(a.getAesKey());
                    config.setMsgDataFormat(a.getMsgDataFormat());

                    WxMaService service = new WxMaServiceImpl();
                    service.setWxMaConfig(config);
                    appConfig.put(a.getAppid(), a);
                    routers.put(a.getAppid(), this.newRouter(service));
                    nameMaServices.put(a.getName(), service);
                    return service;
                }).collect(Collectors.toMap(s -> s.getWxMaConfig().getAppid(), a -> a));
    }

    private WxMaMessageRouter newRouter(WxMaService service) {
        final WxMaMessageRouter router = new WxMaMessageRouter(service);
        router
                .rule().handler(logHandler).next()
                .rule().async(false).content("模板").handler(templateMsgHandler).end()
                .rule().async(false).content("文本").handler(textHandler).end()
                .rule().async(false).content("图片").handler(picHandler).end()
                .rule().async(false).content("二维码").handler(qrcodeHandler).end();
        return router;
    }

    private final WxMaMessageHandler templateMsgHandler = (wxMessage, context, service, sessionManager) -> {
        service.getMsgService().sendSubscribeMsg(WxMaSubscribeMessage.builder()
                .templateId("此处更换为自己的模板id")
//                .formId("自己替换可用的formid")
//                .data(Lists.newArrayList(new WxMaSubscribeMessage.MsgData("2", "1")))
                .toUser(wxMessage.getFromUser())
//                .page("")
                .build());
        return null;
    };

    private final WxMaMessageHandler logHandler = (wxMessage, context, service, sessionManager) -> {
        System.out.println("收到消息:" + wxMessage.toString());
        service.getMsgService().sendKefuMsg(WxMaKefuMessage.newTextBuilder().content("收到信息为:" + wxMessage.toJson())
                .toUser(wxMessage.getFromUser()).build());
        return null;
    };

    private final WxMaMessageHandler textHandler = (wxMessage, context, service, sessionManager) -> {
        service.getMsgService().sendKefuMsg(WxMaKefuMessage.newTextBuilder().content("回复文本消息")
                .toUser(wxMessage.getFromUser()).build());
        return null;
    };

    private final WxMaMessageHandler picHandler = (wxMessage, context, service, sessionManager) -> {
        try {
            WxMediaUploadResult uploadResult = service.getMediaService()
                    .uploadMedia("image", "png",
                            ClassLoader.getSystemResourceAsStream("tmp.png"));
            service.getMsgService().sendKefuMsg(
                    WxMaKefuMessage
                            .newImageBuilder()
                            .mediaId(uploadResult.getMediaId())
                            .toUser(wxMessage.getFromUser())
                            .build());
        } catch (WxErrorException e) {
            e.printStackTrace();
        }

        return null;
    };

    private final WxMaMessageHandler qrcodeHandler = (wxMessage, context, service, sessionManager) -> {
        try {
            final File file = service.getQrcodeService().createQrcode("123", 430);
            WxMediaUploadResult uploadResult = service.getMediaService().uploadMedia("image", file);
            service.getMsgService().sendKefuMsg(
                    WxMaKefuMessage
                            .newImageBuilder()
                            .mediaId(uploadResult.getMediaId())
                            .toUser(wxMessage.getFromUser())
                            .build());
        } catch (WxErrorException e) {
            e.printStackTrace();
        }

        return null;
    };

}
(3)、yml配置文件
有多个小程序时可按照下面这种写法
wx:
  miniapp:
    driverTemplateId: mTJ6Tdr42nOxVVoFn-zi3xGsQqUPRnyExIXpTNwHjWg #司机订阅消息模板id
    loadTemplateId: wLrKJJNna6qZLsKa2xcKnoggN9oWfR_piPpJTX_pCyI #管理端装载通知模板id
    unLoadTemplateId: PnF5gExKwS-MHsXxzDv6LONRz0i7oJwa-aHswUOK0oY #管理端签收通知模板id
    configs:
      - appid: wx2e5937bfdcc66ecf #司机微信小程序的appid
        secret: XXXXXXXXXXXXXXXXXX #司机微信小程序的Secret
        token: token #微信小程序消息服务器配置的token
        name: 司机端小程序
        aesKey: #微信小程序消息服务器配置的EncodingAESKey
        msgDataFormat: JSON

      - appid: wxb12008a3b532e5c5 #货主微信小程序的appid
        secret: XXXXXXXXXXXXXXXXXX #货主微信小程序的Secret
        token: token #微信小程序消息服务器配置的token
        name: 货主端小程序
        aesKey: #微信小程序消息服务器配置的EncodingAESKey
        msgDataFormat: JSON
(4)、获取openid接口
/**
 * 通过appId和code换取openId
 *
 * @param codeCondition
 * @return
 * @throws WxErrorException
 */
@PostMapping("/getOpenId")
public ResponseData<DriverOpenIdInfoQuery> getOpenId(@RequestBody CodeCondition codeCondition, HttpServletRequest request) throws WxErrorException {
    String appId = request.getHeader("appId");
    if (EmptyUtil.isNotEmpty(codeCondition.getCode())) {
        ResponseData<DriverOpenIdInfoQuery> openId = appDriverService.getOpenId(appId, codeCondition.getCode());
        return ResponseData.success(openId);
    }
    return ResponseData.error(MsgConstant.OPENID_ERR);
}
appDriverService
/**
 * 获取openId
 *
 * @param appId appId
 * @param code code
 * @return
 */
public ResponseData<DriverOpenIdInfoQuery> getOpenId(String appId, String code) throws WxErrorException {

    final WxMaService wxMaService = WxMaConfiguration.getMaService(appId);

    try {
        WxMaJscode2SessionResult sessionInfo = wxMaService.getUserService().getSessionInfo(code);
        if (EmptyUtil.isEmpty(sessionInfo)){
            return ResponseData.error("login handler error");
        }
        //获取openId
        String openid = sessionInfo.getOpenid();
        DriverOpenIdInfoQuery openIdInfoQuery = new DriverOpenIdInfoQuery();
        openIdInfoQuery.setOpenId(openid);
        return ResponseData.success(openIdInfoQuery);
    } catch (WxErrorException e) {
        throw  new WxErrorException(e.getMessage());
    }
}
(5)、保存openid
AppletLoginController
@PostMapping("/login")
public ResponseData<SessionUserInfo> login(@RequestBody MapObject mapObject, HttpServletRequest request, HttpServletResponse response) {
```
//保存司机openId信息
String appId = request.getHeader("appId");
if (EmptyUtil.isNotEmpty(openId)){
    appletLoginService.saveOpenId(appId, openId, username);
}
}
AppletLoginService

```java
/**
 * 保存司机openId信息
 *
 * @param appId
 * @param openId
 * @param userName
 * @return
*/
public ResponseData saveOpenId(String appId, String openId, String userName) {
    CsDriver csDriver = dao.findFirst(CsDriver.class, CsDriver::getMobile, userName);
    CsDriverOpenIdInfo openIdInfo = dao.findFirst(CsDriverOpenIdInfo.class, CsDriverOpenIdInfo::getMobile, userName);
    //司机openId信息不存在时
    if (EmptyUtil.isEmpty(openIdInfo)){
        DriverOpenIdInfoItem openIdInfoItem = new DriverOpenIdInfoItem();
        openIdInfoItem.setOpenId(openId);
        openIdInfoItem.setAppId(appId);
        openIdInfoItem.setDriverId(csDriver.getId().toString());
        openIdInfoItem.setMobile(userName);
        saveOrUpdate(CsDriverOpenIdInfo.class, openIdInfoItem);
    } else {
        //如果司机openId和当前登录的openId不同则覆盖
        if (!openIdInfo.getOpenId().equals(openId)) {
            openIdInfo.setOpenId(openId);
            preSave(openIdInfo);
            dao.update(openIdInfo);
        }
    }
    return ResponseData.success();
}
2.4、后端解析
(1)、微信第三方jar做了什么
当我们获取openid时,调用wxMaService.getUserService().getSessionInfo(code)时,其实代码里面帮我们调用了接口
https://api.weixin.qq.com/sns/jscode2session?appid=APPID&secret=SECRET&js_code=JSCODE&grant_type=authorization_code
public interface WxMaService extends WxService {
    String GET_ACCESS_TOKEN_URL = "https://api.weixin.qq.com/cgi-bin/token?grant_type=client_credential&appid=%s&secret=%s";
    String JSCODE_TO_SESSION_URL = "https://api.weixin.qq.com/sns/jscode2session";
    String GET_PAID_UNION_ID_URL = "https://api.weixin.qq.com/wxa/getpaidunionid";
    String SET_DYNAMIC_DATA_URL = "https://api.weixin.qq.com/wxa/setdynamicdata";

    WxMaJscode2SessionResult jsCode2SessionInfo(String var1) throws WxErrorException;
}
public WxMaJscode2SessionResult getSessionInfo(String jsCode) throws WxErrorException {
    return this.service.jsCode2SessionInfo(jsCode);
}
public WxMaJscode2SessionResult jsCode2SessionInfo(String jsCode) throws WxErrorException {
    WxMaConfig config = this.getWxMaConfig();
    Map<String, String> params = new HashMap(8);
    params.put("appid", config.getAppid());
    params.put("secret", config.getSecret());
    params.put("js_code", jsCode);
    params.put("grant_type", "authorization_code");
    String result = this.get("https://api.weixin.qq.com/sns/jscode2session", Joiner.on("&").withKeyValueSeparator("=").join(params));
    return WxMaJscode2SessionResult.fromJson(result);
}

protected abstract String doGetAccessTokenRequest() throws IOException;
回到之前说的那个问题,封装的代码也帮我们调用了接口调用凭证接口
protected String doGetAccessTokenRequest() throws IOException {
    String url = StringUtils.isNotEmpty(this.getWxMaConfig().getApiHostUrl()) ? "https://api.weixin.qq.com/cgi-bin/token?grant_type=client_credential&appid=%s&secret=%s".replace("https://api.weixin.qq.com", this.getWxMaConfig().getApiHostUrl()) : "https://api.weixin.qq.com/cgi-bin/token?grant_type=client_credential&appid=%s&secret=%s";
    url = String.format(url, this.getWxMaConfig().getAppid(), this.getWxMaConfig().getSecret());
    HttpGet httpGet = null;
    CloseableHttpResponse response = null;

    String var13;
    try {
        httpGet = new HttpGet(url);
        if (this.getRequestHttpProxy() != null) {
            RequestConfig config = RequestConfig.custom().setProxy(this.getRequestHttpProxy()).build();
            httpGet.setConfig(config);
        }

        response = this.getRequestHttpClient().execute(httpGet);
        var13 = (new BasicResponseHandler()).handleResponse(response);
    } finally {
        if (httpGet != null) {
            httpGet.releaseConnection();
        }

        if (response != null) {
            try {
                response.close();
            } catch (IOException var11) {
            }
        }

    }

    return var13;
}
(2)、保存openid逻辑
这里创建一个表用来保存司机的openid,并和司机id进行关联;当用户进到小程序登陆界面会调用获取openid接口,
会返回当前用户的唯一标识;当进行登录时,接口会用openid在当前登陆手机号所对应的openid信息表中查找;
若司机openId信息不存在时,则用当前登录用户的openid和手机号码进行绑定;
若司机openId信息存在,再判断信息表中的司机openId和当前登录的openId是否相同,不同则覆盖;
@Entity
@Table ( name ="cs_driver_openidinfo" )
public class CsDriverOpenIdInfo  extends WmsBaseModel {

	/**
	 * 司机端appId
	 */
	private String appId;

	/**
	 * 司机openId
	 */
	private String openId;

	/**
	 * 司机id
	 */
	private String driverId;

	/**
	 * 司机手机号
	 */
	private String mobile;

	/**
	 * 登录标识(0: FALSE, 1: TRUE)
	 */
	private Integer loginInfo;

	/**
	 * 版本号
	 */
	private Long recVer;
}
3、发送小程序订阅消息(subscribeMessage.send)
官方文档链接:https://developers.weixin.qq.com/miniprogram/dev/api-backend/open-api/subscribe-message/subscribeMessage.send.html

具体填入的 请求参数根据自己的需求填入。这里需要注意的是:data 参数。
我们可以看一下它官方文档的 data参数是如何填写的:文章来源:https://www.toymoban.com/news/detail-443157.html
"data": {
      "number01": {
          "value": "339208499"
      },
      "date01": {
          "value": "2015年01月05日"
      },
      "site01": {
          "value": "TIT创意园"
      } ,
      "site02": {
          "value": "广州市新港中路397号"
      }
  }
按照上面我们选好的消息模板填入消息发送到指定用户即可文章来源地址https://www.toymoban.com/news/detail-443157.html
3.1、后端代码
/**
 * 推送司机订阅消息
 *
 * @param subscribeNewCondition
 */
public ResponseData pushDriverSubscribeNew(DriverSubscribeNewCondition subscribeNewCondition){
    WxMaService wxMaService = WxMaConfiguration.getMaServiceByName("司机端小程序");
    if (EmptyUtil.isEmpty(wxProperties.getDriverTemplateId())){
        return  ResponseData.error("没有司机微信小程序派车通知消息模板");
    }
    CsDriverOpenIdInfo driverOpenIdInfo = dao.findFirst(CsDriverOpenIdInfo.class, CsDriverOpenIdInfo::getMobile, subscribeNewCondition.getMobile());
    ArrayList<WxMaSubscribeMessage.MsgData> dataList = CollUtil.newArrayList();
    dataList.add(new WxMaSubscribeMessage.MsgData("character_string4", subscribeNewCondition.getDispatchNo()));
    dataList.add(new WxMaSubscribeMessage.MsgData("thing2", subscribeNewCondition.getRoute()));
    dataList.add(new WxMaSubscribeMessage.MsgData("time3", DateUtil.format(subscribeNewCondition.getLoadingDate(), "yyyy年MM月dd日 HH:mm")));
    dataList.add(new WxMaSubscribeMessage.MsgData("thing5", subscribeNewCondition.getVehicleName()));
    dataList.add(new WxMaSubscribeMessage.MsgData("thing1", "到达装货地附近后请点击装货打卡"));
    if (EmptyUtil.isNotEmpty(driverOpenIdInfo)) {
        WxMaSubscribeMessage wxMaSubscribeMessage = WxMaSubscribeMessage.builder().data(dataList)
            .templateId(wxProperties.getDriverTemplateId())
            .miniprogramState("formal") //developer为开发版;trial为体验版;formal为正式版;默认为正式版
            .toUser(driverOpenIdInfo.getOpenId())
            .page("/pages/orderList/orderList")
            .build();
        try {
            wxMaService.getMsgService().sendSubscribeMsg(wxMaSubscribeMessage);
        } catch (WxErrorException e) {
            e.printStackTrace();
            logger.error("通知司机派车消息失败:" + e.getMessage(), e);
        }
    }
    return ResponseData.success();
}
到了这里,关于SpringBoot实现微信订阅消息推送的文章就介绍完了。如果您还想了解更多内容,请在右上角搜索TOY模板网以前的文章或继续浏览下面的相关文章,希望大家以后多多支持TOY模板网!