前言
在上一篇文章中,我们深入探讨了 Spring 框架中 Bean 的实例化过程,该过程包括从 Bean 定义中加载当前类、寻找所有实现了 InstantiationAwareBeanPostProcessor 接口的类并调用实例化前的方法、进行实例化、调用 applyMergedBeanDefinitionPostProcessors 方法等多个步骤,最终生成了一个真正的 Bean 实例。但是,这个 Bean 实例还没有被初始化和注入属性,还不能真正发挥作用。
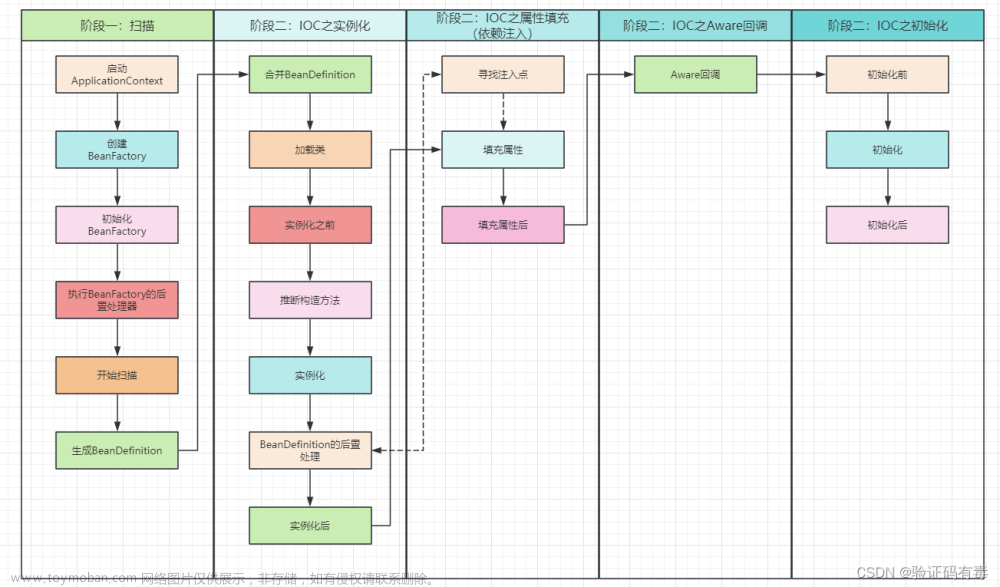
在今天的文章中,我们将深入探讨 Bean 的属性注入和初始化流程,从而使其成为一个真正意义上的 Bean。这个过程包括属性注入、Aware 接口回调、BeanPostProcessor 的前置和后置处理等多个步骤,通过本文的学习,读者将能够更深入地了解 Spring 框架中 Bean 的属性注入和初始化过程,为后续的学习和实践打下坚实的基础。
populateBean
在 Spring 框架中,属性注入是 Bean 初始化过程中的一个重要环节。在 Bean 实例化完成后,Spring 框架会根据 Bean 定义中的属性设置进行属性注入,同时还会调用一些 Aware 接口回调方法,以及一些 BeanPostProcessor 的前置和后置处理方法,最终完成 Bean 的初始化过程。好的,抛去不用看的,我们来看下剩下的源码:
	protected void populateBean(String beanName, RootBeanDefinition mbd, @Nullable BeanWrapper bw) {
	}
......
		PropertyValues pvs = (mbd.hasPropertyValues() ? mbd.getPropertyValues() : null);

		int resolvedAutowireMode = mbd.getResolvedAutowireMode();
		if (resolvedAutowireMode == AUTOWIRE_BY_NAME || resolvedAutowireMode == AUTOWIRE_BY_TYPE) {
			// MutablePropertyValues是PropertyValues具体的实现类
			MutablePropertyValues newPvs = new MutablePropertyValues(pvs);
			// Add property values based on autowire by name if applicable.
			if (resolvedAutowireMode == AUTOWIRE_BY_NAME) {
				autowireByName(beanName, mbd, bw, newPvs);
			}
			// Add property values based on autowire by type if applicable.
			if (resolvedAutowireMode == AUTOWIRE_BY_TYPE) {
				autowireByType(beanName, mbd, bw, newPvs);
			}
			pvs = newPvs;
		}

		boolean hasInstAwareBpps = hasInstantiationAwareBeanPostProcessors();
		boolean needsDepCheck = (mbd.getDependencyCheck() != AbstractBeanDefinition.DEPENDENCY_CHECK_NONE);

		PropertyDescriptor[] filteredPds = null;
		if (hasInstAwareBpps) {
			if (pvs == null) {
				pvs = mbd.getPropertyValues();
			}
			for (InstantiationAwareBeanPostProcessor bp : getBeanPostProcessorCache().instantiationAware) {
				// 这里会调用AutowiredAnnotationBeanPostProcessor的postProcessProperties()方法,会直接给对象中的属性赋值
				// AutowiredAnnotationBeanPostProcessor内部并不会处理pvs,直接返回了
				PropertyValues pvsToUse = bp.postProcessProperties(pvs, bw.getWrappedInstance(), beanName);
				if (pvsToUse == null) {
					if (filteredPds == null) {
						filteredPds = filterPropertyDescriptorsForDependencyCheck(bw, mbd.allowCaching);
					}
					pvsToUse = bp.postProcessPropertyValues(pvs, filteredPds, bw.getWrappedInstance(), beanName);
					if (pvsToUse == null) {
						return;
					}
				}
				pvs = pvsToUse;
			}
		}
		......

		// 如果当前Bean中的BeanDefinition中设置了PropertyValues,那么最终将是PropertyValues中的值,覆盖@Autowired
		if (pvs != null) {
			applyPropertyValues(beanName, mbd, bw, pvs);
		}
	}
PropertyValues
在 Spring 框架中,PropertyValues 对象是从 Bean 定义中获取的,而我们自己定义的 Bean 并没有这个属性值。一般情况下,这一步会被跳过,但如果需要注入属性值,我们可以通过实现 MergedBeanDefinitionPostProcessor 接口的 postProcessMergedBeanDefinition 方法来对 Bean 定义进行修改,从而添加需要注入的属性值。
具体来说,我们可以定义一个实现了 MergedBeanDefinitionPostProcessor 接口的类,比如下面这个例子::
@Component
public class MyInstantiationAwareBeanPostProcessors implements InstantiationAwareBeanPostProcessor, MergedBeanDefinitionPostProcessor {

	@Override
	public void postProcessMergedBeanDefinition(RootBeanDefinition beanDefinition, Class<?> beanType, String beanName) {
		if (beanName.equals("userService")) {
			beanDefinition.setPropertyValues(new MutablePropertyValues().add("orderService", new First()));
		}
	}
}
在这个例子中,我们判断如果 Bean 的名称是 "userService",则添加一个名为 "orderService" 的属性,并将其值设置为 First 类的一个实例。需要注意的是,为了能够正常注入属性值,我们需要在 Bean 中定义一个名为 "setOrderService" 的 setter 方法,这样就可以注入进去,当然我写的这个是报错的状态,这样大家可以找到他是在哪里进行调用的。
autowireByName/autowireByType
讲解之前,我先声明一下他跟我们的@autowired注解没有半毛钱关系,除了上面一种我们人为干预的,还有一种Spring自带的方式,在我们配置类中:
	@Bean(autowire = Autowire.BY_NAME)
	public UserService userService(){
		return new UserService();
	}
这样定义时,他就会自动扫描你这个当前类中所有的set方法,是所有的、而且不区分的。这里以autowireByName为例讲解,autowireByType类似:
	protected void autowireByName(
			String beanName, AbstractBeanDefinition mbd, BeanWrapper bw, MutablePropertyValues pvs) {

		// 当前Bean中能进行自动注入的属性名
		String[] propertyNames = unsatisfiedNonSimpleProperties(mbd, bw);
		// 遍历每个属性名,并去获取Bean对象,并设置到pvs中
		for (String propertyName : propertyNames) {
			if (containsBean(propertyName)) {
				Object bean = getBean(propertyName);
				pvs.add(propertyName, bean);
				// 记录一下propertyName对应的Bean被beanName给依赖了
				registerDependentBean(propertyName, beanName);
				if (logger.isTraceEnabled()) {
					logger.trace("Added autowiring by name from bean name '" + beanName +
							"' via property '" + propertyName + "' to bean named '" + propertyName + "'");
				}
			}
			else {
				if (logger.isTraceEnabled()) {
					logger.trace("Not autowiring property '" + propertyName + "' of bean '" + beanName +
							"' by name: no matching bean found");
				}
			}
		}
	}
- unsatisfiedNonSimpleProperties:找到所有set方法
- getBean:按照set方法名字获取bean
- pvs.add(propertyName, bean):设置到MutablePropertyValues属性中,不是对我们的bean进行属性注入
那有些同学可能会想到了,为什么Spring已经默认提供了一套注入方式还有弄一个@autowired注解呢?主要是因为它们各自有不同的优点和适用场景。
默认的注入方式非常灵活,它会遍历 Bean 中所有的 setter 方法,对每个属性进行注入,从而实现自动装配。这种方式适用于大多数情况,因为它能够自动识别并注入所有需要的依赖项,并且不需要进行任何额外的配置。
而 @Autowired 注解则提供了更加精细的控制,它可以指定需要注入的属性或方法,并且还可以指定注入的方式、名称、是否必须等属性。这种方式适用于需要更加精细的控制和配置的情况,@Autowired 注解是一个可插拔的组件,它只有在 Spring 容器启动时扫描到该注解时才能够进行自动装配。如果我们使用 XML 配置的方式启动 Spring 容器,需要在配置文件中添加 context:component-scan 元素来开启自动扫描功能,否则即使写了 @Autowired 注解也不会进行注入。
postProcessProperties
这一步将会对@autowired注解进行属性注入,其他的不看,这里只看下AutowiredAnnotationBeanPostProcessor对属性或者方法的注入:
	private InjectionMetadata buildAutowiringMetadata(final Class<?> clazz) {
		// 如果一个Bean的类型是String...,那么则根本不需要进行依赖注入
		if (!AnnotationUtils.isCandidateClass(clazz, this.autowiredAnnotationTypes)) {
			return InjectionMetadata.EMPTY;
		}

		List<InjectionMetadata.InjectedElement> elements = new ArrayList<>();
		Class<?> targetClass = clazz;

		do {
			final List<InjectionMetadata.InjectedElement> currElements = new ArrayList<>();

			// 遍历targetClass中的所有Field
			ReflectionUtils.doWithLocalFields(targetClass, field -> {
				// field上是否存在@Autowired、@Value、@Inject中的其中一个
				MergedAnnotation<?> ann = findAutowiredAnnotation(field);
				if (ann != null) {
					// static filed不是注入点,不会进行自动注入
					if (Modifier.isStatic(field.getModifiers())) {
						if (logger.isInfoEnabled()) {
							logger.info("Autowired annotation is not supported on static fields: " + field);
						}
						return;
					}

					// 构造注入点
					boolean required = determineRequiredStatus(ann);
					currElements.add(new AutowiredFieldElement(field, required));
				}
			});

			// 遍历targetClass中的所有Method
			ReflectionUtils.doWithLocalMethods(targetClass, method -> {

				Method bridgedMethod = BridgeMethodResolver.findBridgedMethod(method);
				if (!BridgeMethodResolver.isVisibilityBridgeMethodPair(method, bridgedMethod)) {
					return;
				}
				// method上是否存在@Autowired、@Value、@Inject中的其中一个
				MergedAnnotation<?> ann = findAutowiredAnnotation(bridgedMethod);
				if (ann != null && method.equals(ClassUtils.getMostSpecificMethod(method, clazz))) {
					// static method不是注入点,不会进行自动注入
					if (Modifier.isStatic(method.getModifiers())) {
						if (logger.isInfoEnabled()) {
							logger.info("Autowired annotation is not supported on static methods: " + method);
						}
						return;
					}
					// set方法最好有入参
					if (method.getParameterCount() == 0) {
						if (logger.isInfoEnabled()) {
							logger.info("Autowired annotation should only be used on methods with parameters: " +
									method);
						}
					}
					boolean required = determineRequiredStatus(ann);
					PropertyDescriptor pd = BeanUtils.findPropertyForMethod(bridgedMethod, clazz);
					currElements.add(new AutowiredMethodElement(method, required, pd));
				}
			});

			elements.addAll(0, currElements);
			targetClass = targetClass.getSuperclass();
		}
		while (targetClass != null && targetClass != Object.class);

		return InjectionMetadata.forElements(elements, clazz);
	}
- 如果一个Bean的类型是String...,那么则根本不需要进行依赖注入
- 遍历targetClass中的所有Field,static filed不是注入点,不会进行自动注入
- 遍历targetClass中的所有Method,static method不是注入点,不会进行自动注入
- 上面的注入点构造好后,会在外层直接invoke调用注入
这里强调一下在对方法注入点进行注入时,会先判断一下是否有PropertyValues,如果有的话则跳过注入,AutowiredMethodElement源码如下:
		protected void inject(Object bean, @Nullable String beanName, @Nullable PropertyValues pvs) throws Throwable {
			// 如果pvs中已经有当前注入点的值了,则跳过注入
			if (checkPropertySkipping(pvs)) {
				return;
			}
			......
		}
applyPropertyValues
直接应用PropertyValues注入属性,可以看到这一步在我们的@autowired解析注入之后,如果你有的属性字段已经被@autowired注入了,但是又有一个PropertyValues那么这个set方法会把你的@Autowired之前注入进去的对象值覆盖,源码很多为了篇幅就不看了。知道这个方法是干啥的就行。
initializeBean
属性填充完之后,终于进入到了初始化阶段,为什么需要初始化这一步呢?这是对bean的最终处理,该方法返回的对象才是Spring管理的最终对象,Spring AOP就是对初始化这一步做 的扩展。
	protected Object initializeBean(String beanName, Object bean, @Nullable RootBeanDefinition mbd) {
		if (System.getSecurityManager() != null) {
			AccessController.doPrivileged((PrivilegedAction<Object>) () -> {
				invokeAwareMethods(beanName, bean);
				return null;
			}, getAccessControlContext());
		}
		else {
			invokeAwareMethods(beanName, bean);
		}

		Object wrappedBean = bean;

		// 初始化前
		if (mbd == null || !mbd.isSynthetic()) {
			wrappedBean = applyBeanPostProcessorsBeforeInitialization(wrappedBean, beanName);
		}

		// 初始化
		try {
			invokeInitMethods(beanName, wrappedBean, mbd);
		}
		catch (Throwable ex) {
			throw new BeanCreationException(
					(mbd != null ? mbd.getResourceDescription() : null),
					beanName, "Invocation of init method failed", ex);
		}

		// 初始化后 AOP
		if (mbd == null || !mbd.isSynthetic()) {
			wrappedBean = applyBeanPostProcessorsAfterInitialization(wrappedBean, beanName);
		}

		return wrappedBean;
	}
invokeAwareMethods
该方法就是Aware接口的实现
	private void invokeAwareMethods(String beanName, Object bean) {
		if (bean instanceof Aware) {
			if (bean instanceof BeanNameAware) {
				((BeanNameAware) bean).setBeanName(beanName);
			}
			if (bean instanceof BeanClassLoaderAware) {
				ClassLoader bcl = getBeanClassLoader();
				if (bcl != null) {
					((BeanClassLoaderAware) bean).setBeanClassLoader(bcl);
				}
			}
			if (bean instanceof BeanFactoryAware) {
				((BeanFactoryAware) bean).setBeanFactory(AbstractAutowireCapableBeanFactory.this);
			}
		}
	}
applyBeanPostProcessorsBeforeInitialization
初始化前的类处理,我们主讲两个类:ApplicationContextAwareProcessor、
InitDestroyAnnotationBeanPostProcessor通过这两个类看看可以初始化前我们可以做哪些内容:
ApplicationContextAwareProcessor
	public Object postProcessBeforeInitialization(Object bean, String beanName) throws BeansException {
		if (!(bean instanceof EnvironmentAware || bean instanceof EmbeddedValueResolverAware ||
				bean instanceof ResourceLoaderAware || bean instanceof ApplicationEventPublisherAware ||
				bean instanceof MessageSourceAware || bean instanceof ApplicationContextAware ||
				bean instanceof ApplicationStartupAware)) {
			return bean;
		}
......
			// 执行aware方法
			invokeAwareInterfaces(bean);
		}
		return bean;
	}
初始化前会判断当前是否是某个Aware类,那么则执行aware方法进行回调。
InitDestroyAnnotationBeanPostProcessor
	public Object postProcessBeforeInitialization(Object bean, String beanName) throws BeansException {
		LifecycleMetadata metadata = findLifecycleMetadata(bean.getClass());
		try {
			metadata.invokeInitMethods(bean, beanName);
		}
		catch (InvocationTargetException ex) {
			throw new BeanCreationException(beanName, "Invocation of init method failed", ex.getTargetException());
		}
		catch (Throwable ex) {
			throw new BeanCreationException(beanName, "Failed to invoke init method", ex);
		}
		return bean;
	}
- findLifecycleMetadata:好奇的小伙伴可以看下这个方法,他会构造@PostConstruct、@PreDestroy执行点
- metadata.invokeInitMethods:执行带有@PostConstruct方法
invokeInitMethods
	protected void invokeInitMethods(String beanName, Object bean, @Nullable RootBeanDefinition mbd)
			throws Throwable {

		boolean isInitializingBean = (bean instanceof InitializingBean);
		if (isInitializingBean && (mbd == null || !mbd.isExternallyManagedInitMethod("afterPropertiesSet"))) {
			......
				((InitializingBean) bean).afterPropertiesSet();
			}
		}

		if (mbd != null && bean.getClass() != NullBean.class) {
			String initMethodName = mbd.getInitMethodName();
			if (StringUtils.hasLength(initMethodName) &&
					!(isInitializingBean && "afterPropertiesSet".equals(initMethodName)) &&
					!mbd.isExternallyManagedInitMethod(initMethodName)) {
				invokeCustomInitMethod(beanName, bean, mbd);
			}
		}
	}
- 如果当前类实现了InitializingBean接口,那么执行afterPropertiesSet方法进行初始化
- initMethodName:如果当前类指定了初始方法,那么直接invoke执行
applyBeanPostProcessorsAfterInitialization
	public Object applyBeanPostProcessorsAfterInitialization(Object existingBean, String beanName)
			throws BeansException {

		Object result = existingBean;

		for (BeanPostProcessor processor : getBeanPostProcessors()) {
			Object current = processor.postProcessAfterInitialization(result, beanName);
			if (current == null) {
				return result;
			}
			result = current;
		}
		return result;
	}
执行完postProcessAfterInitialization方法后,那么这个对象终于初始化成功了
总结
今天我们主讲bean的初始化,主要流程如下:文章来源:https://www.toymoban.com/news/detail-445438.html
- 属性注入,执行@autowired、PropertyValues注入等
- 初始化前置方法,执行@PostConstruct方法、回调Aware接口等
- 初始化,调用afterPropertiesSet或者initMethod
- 初始化后置方法
最后一节我们会讲bean的销毁,那么bean的生命周期系列文章会结束,实际上 Spring 框架还有很多其他的功能和特性,例如 AOP、事务管理、Web 开发等等,博主还会进行对Spring系列继续更新,请大家继续跟紧学习。文章来源地址https://www.toymoban.com/news/detail-445438.html
到了这里,关于Spring源码:Bean生命周期(五)的文章就介绍完了。如果您还想了解更多内容,请在右上角搜索TOY模板网以前的文章或继续浏览下面的相关文章,希望大家以后多多支持TOY模板网!