前不久yolov7(原yolov4团队)在yolov6(美团)开源不到两周的时间也更新了,
如下图所示,yolov7效果比前面的版本确实牛逼,在精度相同的情况下,速度上面提升了一大截,但是这是在比较好的设备上面;
YOLOv7 的发展方向与当前主流的实时目标检测器不同,研究团队希望它能够同时支持移动 GPU 和从边缘到云端的 GPU 设备。除了架构优化之外,该研究提出的方法还专注于训练过程的优化,将重点放在了一些优化模块和优化方法上。这可能会增加训练成本以提高目标检测的准确性,但不会增加推理成本。我想这才是运用到工业一个巨大的提升。
由于要训练自己的数据集,所以就需要人工标注数据,使用软件为labelme。该工具非常好用,基本可以满足深度学习众多任务的数据标注需求具体使用如下步骤所示:
http://labelme.csail.mit.edu/Release3.0/
安装labelme,数据标注
对于labelme标注工具,它是一个多功能的标注工具:
- 对图像进行多边形,矩形,圆形,多段线,线段,点形式的标注(可用于目标检测,图像分割,等任务)。
- 对图像进行进行 flag 形式的标注(可用于图像分类 和 清理 任务)。
- 视频标注
- 生成 VOC 格式的数据集(for semantic / instance segmentation)
- 生成 COCO 格式的数据集(for instance segmentation)
##################
## for Python 2 ##
##################
conda create --name=labelme python=2.7
source activate labelme
# conda install -c conda-forge pyside2
conda install pyqt
pip install labelme
# 如果想安装最新版本,请使用下列命令安装:
# pip install git+https://github.com/wkentaro/labelme.git

##################
## for Python 3 ##
##################
conda create --name=labelme python=3.6
source activate labelme
# conda install -c conda-forge pyside2
# conda install pyqt
pip install pyqt5  # pyqt5 can be installed via pip on python3
pip install labelme
OPENPOSE肢体检测
完整测试代码,只需要修改模型路径和测试视频路径
import torch
import cv2
import numpy as np
import time
import torchvision
from torchvision import transforms


def xyxy2xywh(x):
    # Convert nx4 boxes from [x1, y1, x2, y2] to [x, y, w, h] where xy1=top-left, xy2=bottom-right
    y = x.clone() if isinstance(x, torch.Tensor) else np.copy(x)
    y[:, 0] = (x[:, 0] + x[:, 2]) / 2  # x center
    y[:, 1] = (x[:, 1] + x[:, 3]) / 2  # y center
    y[:, 2] = x[:, 2] - x[:, 0]  # width
    y[:, 3] = x[:, 3] - x[:, 1]  # height
    return y
def xywh2xyxy(x):
    # Convert nx4 boxes from [x, y, w, h] to [x1, y1, x2, y2] where xy1=top-left, xy2=bottom-right
    y = x.clone() if isinstance(x, torch.Tensor) else np.copy(x)
    y[:, 0] = x[:, 0] - x[:, 2] / 2  # top left x
    y[:, 1] = x[:, 1] - x[:, 3] / 2  # top left y
    y[:, 2] = x[:, 0] + x[:, 2] / 2  # bottom right x
    y[:, 3] = x[:, 1] + x[:, 3] / 2  # bottom right y
    return y
def xywhn2xyxy(x, w=640, h=640, padw=0, padh=0):
    # Convert nx4 boxes from [x, y, w, h] normalized to [x1, y1, x2, y2] where xy1=top-left, xy2=bottom-right
    y = x.clone() if isinstance(x, torch.Tensor) else np.copy(x)
    y[:, 0] = w * (x[:, 0] - x[:, 2] / 2) + padw  # top left x
    y[:, 1] = h * (x[:, 1] - x[:, 3] / 2) + padh  # top left y
    y[:, 2] = w * (x[:, 0] + x[:, 2] / 2) + padw  # bottom right x
    y[:, 3] = h * (x[:, 1] + x[:, 3] / 2) + padh  # bottom right y
    return y
def box_iou(box1, box2):
    # https://github.com/pytorch/vision/blob/master/torchvision/ops/boxes.py
    """
    Return intersection-over-union (Jaccard index) of boxes.
    Both sets of boxes are expected to be in (x1, y1, x2, y2) format.
    Arguments:
        box1 (Tensor[N, 4])
        box2 (Tensor[M, 4])
    Returns:
        iou (Tensor[N, M]): the NxM matrix containing the pairwise
            IoU values for every element in boxes1 and boxes2
    """

    def box_area(box):
        # box = 4xn
        return (box[2] - box[0]) * (box[3] - box[1])

    area1 = box_area(box1.T)
    area2 = box_area(box2.T)

    # inter(N,M) = (rb(N,M,2) - lt(N,M,2)).clamp(0).prod(2)
    inter = (torch.min(box1[:, None, 2:], box2[:, 2:]) - torch.max(box1[:, None, :2], box2[:, :2])).clamp(0).prod(2)
    return inter / (area1[:, None] + area2 - inter)  # iou = inter / (area1 + area2 - inter)
def letterbox(img, new_shape=(640, 640), color=(114, 114, 114), auto=True, scaleFill=False, scaleup=True, stride=32):
    # Resize and pad image while meeting stride-multiple constraints
    shape = img.shape[:2]  # current shape [height, width]
    if isinstance(new_shape, int):
        new_shape = (new_shape, new_shape)

    # Scale ratio (new / old)
    r = min(new_shape[0] / shape[0], new_shape[1] / shape[1])
    if not scaleup:  # only scale down, do not scale up (for better test mAP)
        r = min(r, 1.0)

    # Compute padding
    ratio = r, r  # width, height ratios
    new_unpad = int(round(shape[1] * r)), int(round(shape[0] * r))
    dw, dh = new_shape[1] - new_unpad[0], new_shape[0] - new_unpad[1]  # wh padding
    if auto:  # minimum rectangle
        dw, dh = np.mod(dw, stride), np.mod(dh, stride)  # wh padding
    elif scaleFill:  # stretch
        dw, dh = 0.0, 0.0
        new_unpad = (new_shape[1], new_shape[0])
        ratio = new_shape[1] / shape[1], new_shape[0] / shape[0]  # width, height ratios

    dw /= 2  # divide padding into 2 sides
    dh /= 2

    if shape[::-1] != new_unpad:  # resize
        img = cv2.resize(img, new_unpad, interpolation=cv2.INTER_LINEAR)
    top, bottom = int(round(dh - 0.1)), int(round(dh + 0.1))
    left, right = int(round(dw - 0.1)), int(round(dw + 0.1))
    img = cv2.copyMakeBorder(img, top, bottom, left, right, cv2.BORDER_CONSTANT, value=color)  # add border
    return img, ratio, (dw, dh)
def non_max_suppression_kpt(prediction, conf_thres=0.25, iou_thres=0.45, classes=None, agnostic=False, multi_label=False,labels=(), kpt_label=False, nc=None, nkpt=None):
    """Runs Non-Maximum Suppression (NMS) on inference results

    Returns:
         list of detections, on (n,6) tensor per image [xyxy, conf, cls]
    """
    if nc is None:
        nc = prediction.shape[2] - 5  if not kpt_label else prediction.shape[2] - 56 # number of classes
    xc = prediction[..., 4] > conf_thres  # candidates

    # Settings
    min_wh, max_wh = 2, 4096  # (pixels) minimum and maximum box width and height
    max_det = 300  # maximum number of detections per image
    max_nms = 30000  # maximum number of boxes into torchvision.ops.nms()
    time_limit = 10.0  # seconds to quit after
    redundant = True  # require redundant detections
    multi_label &= nc > 1  # multiple labels per box (adds 0.5ms/img)
    merge = False  # use merge-NMS

    t = time.time()
    output = [torch.zeros((0,6), device=prediction.device)] * prediction.shape[0]
    for xi, x in enumerate(prediction):  # image index, image inference
        # Apply constraints
        # x[((x[..., 2:4] < min_wh) | (x[..., 2:4] > max_wh)).any(1), 4] = 0  # width-height
        x = x[xc[xi]]  # confidence

        # Cat apriori labels if autolabelling
        if labels and len(labels[xi]):
            l = labels[xi]
            v = torch.zeros((len(l), nc + 5), device=x.device)
            v[:, :4] = l[:, 1:5]  # box
            v[:, 4] = 1.0  # conf
            v[range(len(l)), l[:, 0].long() + 5] = 1.0  # cls
            x = torch.cat((x, v), 0)

        # If none remain process next image
        if not x.shape[0]:
            continue

        # Compute conf
        x[:, 5:5+nc] *= x[:, 4:5]  # conf = obj_conf * cls_conf

        # Box (center x, center y, width, height) to (x1, y1, x2, y2)
        box = xywh2xyxy(x[:, :4])

        # Detections matrix nx6 (xyxy, conf, cls)
        if multi_label:
            i, j = (x[:, 5:] > conf_thres).nonzero(as_tuple=False).T
            x = torch.cat((box[i], x[i, j + 5, None], j[:, None].float()), 1)
        else:  # best class only
            if not kpt_label:
                conf, j = x[:, 5:].max(1, keepdim=True)
                x = torch.cat((box, conf, j.float()), 1)[conf.view(-1) > conf_thres]
            else:
                kpts = x[:, 6:]
                conf, j = x[:, 5:6].max(1, keepdim=True)
                x = torch.cat((box, conf, j.float(), kpts), 1)[conf.view(-1) > conf_thres]


        # Filter by class
        if classes is not None:
            x = x[(x[:, 5:6] == torch.tensor(classes, device=x.device)).any(1)]

        # Apply finite constraint
        # if not torch.isfinite(x).all():
        #     x = x[torch.isfinite(x).all(1)]

        # Check shape
        n = x.shape[0]  # number of boxes
        if not n:  # no boxes
            continue
        elif n > max_nms:  # excess boxes
            x = x[x[:, 4].argsort(descending=True)[:max_nms]]  # sort by confidence

        # Batched NMS
        c = x[:, 5:6] * (0 if agnostic else max_wh)  # classes
        boxes, scores = x[:, :4] + c, x[:, 4]  # boxes (offset by class), scores
        i = torchvision.ops.nms(boxes, scores, iou_thres)  # NMS
        if i.shape[0] > max_det:  # limit detections
            i = i[:max_det]
        if merge and (1 < n < 3E3):  # Merge NMS (boxes merged using weighted mean)
            # update boxes as boxes(i,4) = weights(i,n) * boxes(n,4)
            iou = box_iou(boxes[i], boxes) > iou_thres  # iou matrix
            weights = iou * scores[None]  # box weights
            x[i, :4] = torch.mm(weights, x[:, :4]).float() / weights.sum(1, keepdim=True)  # merged boxes
            if redundant:
                i = i[iou.sum(1) > 1]  # require redundancy

        output[xi] = x[i]
        if (time.time() - t) > time_limit:
            print(f'WARNING: NMS time limit {time_limit}s exceeded')
            break  # time limit exceeded

    return output
def output_to_keypoint(output):
    # Convert model output to target format [batch_id, class_id, x, y, w, h, conf]
    targets = []
    for i, o in enumerate(output):
        kpts = o[:,6:]
        o = o[:,:6]
        for index, (*box, conf, cls) in enumerate(o.detach().cpu().numpy()):
            targets.append([i, cls, *list(*xyxy2xywh(np.array(box)[None])), conf, *list(kpts.detach().cpu().numpy()[index])])
    return np.array(targets)
def plot_skeleton_kpts(im, kpts, steps, orig_shape=None):
    #Plot the skeleton and keypointsfor coco datatset
    palette = np.array([[255, 128, 0], [255, 153, 51], [255, 178, 102],
                        [230, 230, 0], [255, 153, 255], [153, 204, 255],
                        [255, 102, 255], [255, 51, 255], [102, 178, 255],
                        [51, 153, 255], [255, 153, 153], [255, 102, 102],
                        [255, 51, 51], [153, 255, 153], [102, 255, 102],
                        [51, 255, 51], [0, 255, 0], [0, 0, 255], [255, 0, 0],
                        [255, 255, 255]])

    skeleton = [[16, 14], [14, 12], [17, 15], [15, 13], [12, 13], [6, 12],
                [7, 13], [6, 7], [6, 8], [7, 9], [8, 10], [9, 11], [2, 3],
                [1, 2], [1, 3], [2, 4], [3, 5], [4, 6], [5, 7]]

    pose_limb_color = palette[[9, 9, 9, 9, 7, 7, 7, 0, 0, 0, 0, 0, 16, 16, 16, 16, 16, 16, 16]]
    pose_kpt_color = palette[[16, 16, 16, 16, 16, 0, 0, 0, 0, 0, 0, 9, 9, 9, 9, 9, 9]]
    radius = 5
    num_kpts = len(kpts) // steps

    for kid in range(num_kpts):
        r, g, b = pose_kpt_color[kid]
        x_coord, y_coord = kpts[steps * kid], kpts[steps * kid + 1]
        if not (x_coord % 640 == 0 or y_coord % 640 == 0):
            if steps == 3:
                conf = kpts[steps * kid + 2]
                if conf < 0.5:
                    continue
            cv2.circle(im, (int(x_coord), int(y_coord)), radius, (int(r), int(g), int(b)), -1)

    for sk_id, sk in enumerate(skeleton):
        r, g, b = pose_limb_color[sk_id]
        pos1 = (int(kpts[(sk[0]-1)*steps]), int(kpts[(sk[0]-1)*steps+1]))
        pos2 = (int(kpts[(sk[1]-1)*steps]), int(kpts[(sk[1]-1)*steps+1]))
        if steps == 3:
            conf1 = kpts[(sk[0]-1)*steps+2]
            conf2 = kpts[(sk[1]-1)*steps+2]
            if conf1<0.5 or conf2<0.5:
                continue
        if pos1[0]%640 == 0 or pos1[1]%640==0 or pos1[0]<0 or pos1[1]<0:
            continue
        if pos2[0] % 640 == 0 or pos2[1] % 640 == 0 or pos2[0]<0 or pos2[1]<0:
            continue
        cv2.line(im, pos1, pos2, (int(r), int(g), int(b)), thickness=2)


#
#--------------------------------------------------------------
#
device = torch.device("cuda:0" if torch.cuda.is_available() else "cpu")
weigths = torch.load('yolov7-w6-pose.pt')
model = weigths['model']
model = model.half().to(device)
_ = model.eval()

cap = cv2.VideoCapture('gym_test.mp4')
if (cap.isOpened() == False):
    print('open failed.')

# 分辨率
frame_width = int(cap.get(3))
frame_height = int(cap.get(4))

# 图片缩放
vid_write_image = letterbox(cap.read()[1], (frame_width), stride=64, auto=True)[0]
resize_height, resize_width = vid_write_image.shape[:2]

# 保存结果视频
out = cv2.VideoWriter("result_keypoint.mp4",
                      cv2.VideoWriter_fourcc(*'mp4v'), 30,
                      (resize_width, resize_height))

frame_count = 0
total_fps = 0

while(cap.isOpened):
    ret, frame = cap.read()
    if ret:
        orig_image = frame
        image = cv2.cvtColor(orig_image, cv2.COLOR_BGR2RGB)
        image = letterbox(image, (frame_width), stride=64, auto=True)[0]
        image_ = image.copy()
        image = transforms.ToTensor()(image)
        image = torch.tensor(np.array([image.numpy()]))
        image = image.to(device)
        image = image.half()

        start_time = time.time()
        with torch.no_grad():
            output, _ = model(image)
        end_time = time.time()

        # 计算fps
        fps = 1 / (end_time - start_time)
        total_fps += fps
        frame_count += 1

        output = non_max_suppression_kpt(output, 0.25, 0.65, nc=model.yaml['nc'], nkpt=model.yaml['nkpt'], kpt_label=True)
        output = output_to_keypoint(output)
        nimg = image[0].permute(1, 2, 0) * 255
        nimg = nimg.cpu().numpy().astype(np.uint8)
        nimg = cv2.cvtColor(nimg, cv2.COLOR_RGB2BGR)
        for idx in range(output.shape[0]):
            plot_skeleton_kpts(nimg, output[idx, 7:].T, 3)

        # 显示fps
        cv2.putText(nimg, f"{fps:.3f} FPS", (15, 30), cv2.FONT_HERSHEY_SIMPLEX,
                    1, (0, 255, 0), 2)

        # 显示结果并保存
        cv2.imshow('image', nimg)
        out.write(nimg)

        # 按q退出
        if cv2.waitKey(1) & 0xFF == ord('q'):
            break
    else:
        break

# 资源释放
cap.release()
cv2.destroyAllWindows()

# 计算平均fps
avg_fps = total_fps / frame_count
print(f"Average FPS: {avg_fps:.3f}")
YOLOV7开源训练代码:
https://github.com/WongKinYiu/yolov7
YOLOV7openpose开源训练代码:
https://github.com/WongKinYiu/yolov7/tree/pose
YOLOV7openpose开源模型:
https://github.com/WongKinYiu/yolov7/releases/download/v0.1/yolov7-w6-pose.pt
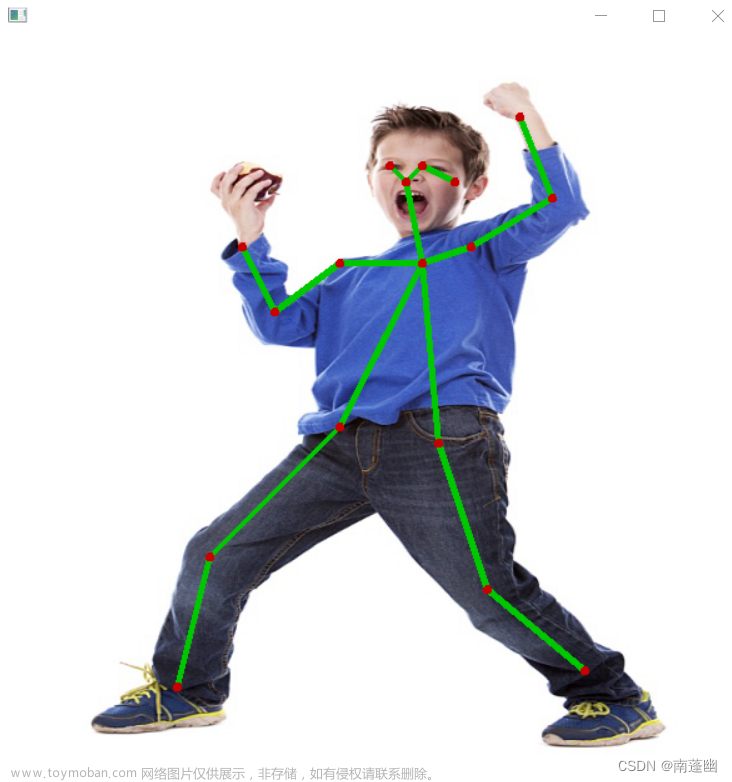
测试效果

参考文献:
https://github.com/WongKinYiu/yolov7
https://xugaoxiang.com/2022/07/21/yolov7/
https://github.com/WongKinYiu/yolov7/tree/pose
https://zhuanlan.zhihu.com/p/543743278文章来源:https://www.toymoban.com/news/detail-446061.html
希望这篇文章对你有用!
谢谢点赞评论!文章来源地址https://www.toymoban.com/news/detail-446061.html
到了这里,关于基于YOLOV7的openpose人体姿态检测识别,FPS可以达到“较高”的效果的文章就介绍完了。如果您还想了解更多内容,请在右上角搜索TOY模板网以前的文章或继续浏览下面的相关文章,希望大家以后多多支持TOY模板网!