一、概述
OpenCV(Open Source Computer Vision Library)是一个跨平台的计算机视觉库,它提供了许多用于图像和视频处理的功能,包括图像和视频的读取、预处理、特征提取、特征匹配、目标检测等。OpenCV是C++编写的,也提供了Python、Java等语言的接口,可以方便地在不同平台上使用。OpenCV已经被广泛应用于工业自动化、安防监控、机器人、医疗诊断、智能交通等领域。
MediaPipe是Google开发的一种跨平台、开源的框架,用于构建实时的、基于机器学习的应用程序。它提供了一系列的计算机视觉和机器学习算法和工具,包括对象检测、人脸检测、关键点检测、手部跟踪、语义分割等。这些算法都是经过训练的,可以在移动设备、桌面和服务器上运行,并且能够实现实时处理。
MediaPipe使用了图形数据流编程模型,可以快速地构建出复杂的机器学习应用程序。使用MediaPipe,开发人员可以构建跨平台的机器学习应用程序,包括移动应用、Web应用和桌面应用。MediaPipe还提供了多种语言的接口,包括C++、Python和Java等,可以方便地与其他应用程序进行集成。
本文利用mediapipe对手部的识别追踪,再通过手部21个坐标点的位置计算,实现一个简单的手势识别功能。
MediaPipe官网:https://github.com/google/mediapipe
MediaPipe说明文档
二、实现步骤
1.安装opencv和mediapipe
pip install mediapipe
pip install opencv-python
2.MediaPipe Hand Tracking
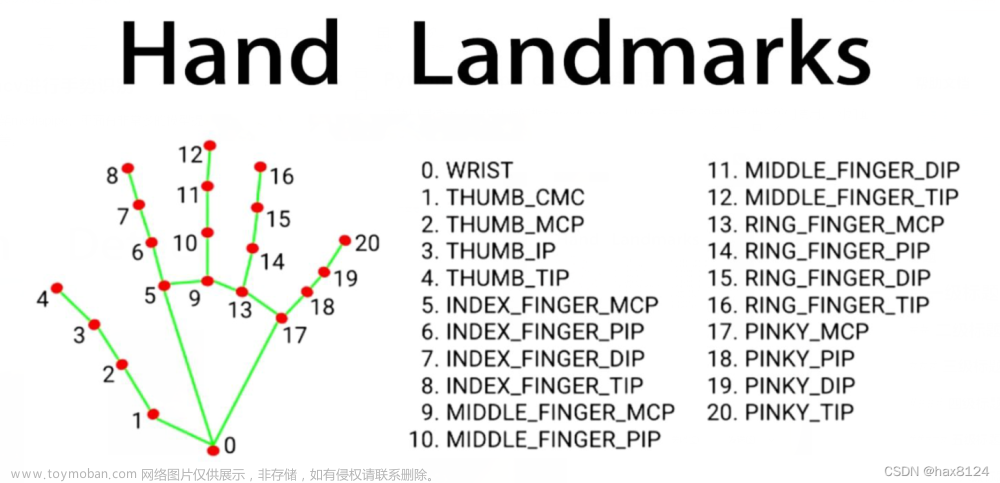
MediaPipe Hand Tracking模型可以精准地检测手的21个关键点,这些点包括:

以上21个关键点描述了手部的基本形状和姿态,可以用于许多应用,如手势识别、手写识别、AR/VR应用等。
3.手部识别跟踪代码
import cv2
import mediapipe as mp
import time

cap = cv2.VideoCapture(0)  # 调用镜头
wcap = cap.set(3, 800)     # 设置相框大小
hcap = cap.set(4, 800)

mpHands = mp.solutions.hands  # 使用mediapipe 手部模型
hands = mpHands.Hands()
drawmp = mp.solutions.drawing_utils  # 画线
topIds = [4, 8, 12, 16, 20]     #5根手指的指尖
pTime = 0
while True:
    success, img = cap.read()  # cap.read()会返回两个值:Ture或False 和 帧
    if success:
        list = []
        #opencv调用相机拍摄的图像格式是BGR,得转化为RGB格式便于图像处理
        imgRGB = cv2.cvtColor(img, cv2.COLOR_BGR2RGB)
        result = hands.process(imgRGB)
        # print(result.multi_hand_landmarks) #打印手部21个点的坐标信息
        if result.multi_hand_landmarks:
            for handlm in result.multi_hand_landmarks:
                # print(handlm) #打印坐标信息
                drawmp.draw_landmarks(img, handlm, mpHands.HAND_CONNECTIONS) #将21个点连线
                for id, lm in enumerate(handlm.landmark):
                    h, w, c = img.shape  #图像的长、宽、通道
                    cx, cy = int(lm.x * w), int(lm.y * h)  #坐标cx,cy转为整数
                    list.append([id, cx, cy])    #记录每点坐标
            if len(list) != 0:
                # 判断左右手
                if result.multi_hand_landmarks:
                    hand_landmarks = result.multi_hand_landmarks[0] # 仅取第一个检测到的手
                    if hand_landmarks.landmark[mpHands.HandLandmark.WRIST].x < hand_landmarks.landmark[
                        mpHands.HandLandmark.THUMB_TIP].x:
                        print("右手")
                    else:
                        print("左手")
        #检测帧数
        cTime = time.time()
        fps = 1 / (cTime - pTime)
        pTime = cTime
        cv2.putText(img, str(int(fps)), (10, 70), cv2.FONT_HERSHEY_PLAIN, 3, (255, 255, 255), 2)
    cv2.imshow("images", img)
    if cv2.waitKey(1) & 0xff == 27:  #按‘ESC’键退出
        break
效果图:

4.手势识别
这里手势识别的原理是:根据手部关键点的坐标位置,来判断手部姿态(手指弯曲或者伸直)。大拇指比较特殊,和其余四指的弯曲方向不同。大拇指可以依靠X坐标,比较第4点和第3点的X值,来判断是否弯曲;其余四指可以依靠Y坐标,比如食指比较第8点和第6点的Y值,来判断是否弯曲。如下图所示:


手势识别代码:
# 判断左右手
if result.multi_hand_landmarks:
    hand_landmarks = result.multi_hand_landmarks[0]  # 仅取第一个检测到的手
    #大拇指
    if hand_landmarks.landmark[mpHands.HandLandmark.WRIST].x < hand_landmarks.landmark[
        mpHands.HandLandmark.THUMB_TIP].x: #右手
        if list[topIds[0]][1] > list[topIds[0] - 1][1]:
            finger.append(1)
        else:
            finger.append(0)
    else:  #左手
        if list[topIds[0]][1] < list[topIds[0] - 1][1]:
            finger.append(1)
        else:
            finger.append(0)
#其余四指
for id in range(1, 5):
    if list[topIds[id]][2] < list[topIds[id] - 2][2]:
        finger.append(1)
        # print("---伸直----")
        # print('id:', topIds[id], ', Y:', list[topIds[id]][2])
        # print('id:', topIds[id] - 2, ', Y:', list[topIds[id] - 2][2])
        # print("_________ ")
    else:
        finger.append(0)
        # print("---弯曲----")
        # print('id:', topIds[id], ', Y:', list[topIds[id]][2])
        # print('id:', topIds[id] - 2, ', Y:', list[topIds[id] - 2][2])
        # print("_________ ")
    totalFinger = finger.count(1) #统计伸直的手指个数
    print(totalFinger)
cv2.putText(img, str(totalFinger), (40, 350), cv2.FONT_HERSHEY_PLAIN, 10, (255, 0, 0), 25)
5.完整代码
import cv2
import mediapipe as mp
import time

cap = cv2.VideoCapture(0)  # 调用镜头
wcap = cap.set(3, 800)
hcap = cap.set(4, 800)

mpHands = mp.solutions.hands  # 使用mediapipe 手部模型
hands = mpHands.Hands()
drawmp = mp.solutions.drawing_utils  # 画线
topIds = [4, 8, 12, 16, 20]
pTime = 0
while True:
    success, img = cap.read()  # cap.read()会返回两个值:Ture或False 和 帧
    if success:
        list = []
        # opencv调用相机拍摄的图像格式是BGR,得转化为RGB格式便于图像处理
        imgRGB = cv2.cvtColor(img, cv2.COLOR_BGR2RGB)
        result = hands.process(imgRGB)
        # print(result.multi_hand_landmarks) #打印手部21个点的坐标信息
        if result.multi_hand_landmarks:
            for handlm in result.multi_hand_landmarks:
                # print(landmarks) #打印坐标信息
                drawmp.draw_landmarks(img, handlm, mpHands.HAND_CONNECTIONS)
                for id, lm in enumerate(handlm.landmark):
                    h, w, c = img.shape  # 图像的长、宽、通道
                    cx, cy = int(lm.x * w), int(lm.y * h)  # 将坐标数值转为整数
                    list.append([id, cx, cy])
            if len(list) != 0:
                finger = []
                # 判断左右手
                if result.multi_hand_landmarks:
                    hand_landmarks = result.multi_hand_landmarks[0]  # 仅取第一个检测到的手
                    # 大拇指
                    if hand_landmarks.landmark[mpHands.HandLandmark.WRIST].x < hand_landmarks.landmark[
                        mpHands.HandLandmark.THUMB_TIP].x:
                        if list[topIds[0]][1] > list[topIds[0] - 1][1]:
                            finger.append(1)
                        else:
                            finger.append(0)
                    else:
                        if list[topIds[0]][1] < list[topIds[0] - 1][1]:
                            finger.append(1)
                        else:
                            finger.append(0)
                # 其余四指
                for id in range(1, 5):
                    if list[topIds[id]][2] < list[topIds[id] - 2][2]:
                        finger.append(1)
                        # print("---伸直----")
                        # print('id:', topIds[id], ', Y:', list[topIds[id]][2])
                        # print('id:', topIds[id] - 2, ', Y:', list[topIds[id] - 2][2])
                        # print("_________ ")
                    else:
                        finger.append(0)
                        # print("---弯曲----")
                        # print('id:', topIds[id], ', Y:', list[topIds[id]][2])
                        # print('id:', topIds[id] - 2, ', Y:', list[topIds[id] - 2][2])
                        # print("_________ ")
                    totalFinger = finger.count(1)
                    print(totalFinger)
            cv2.putText(img, str(totalFinger), (40, 350), cv2.FONT_HERSHEY_PLAIN, 10, (255, 0, 0), 25)
        # 检测帧数
        cTime = time.time()
        fps = 1 / (cTime - pTime)
        pTime = cTime
        cv2.putText(img, str(int(fps)), (10, 70), cv2.FONT_HERSHEY_PLAIN, 3, (255, 255, 255), 2)

    cv2.imshow("images", img)
    if cv2.waitKey(1) & 0xff == 27:  # 按'ESC'键退出
        break
6.效果图
可以实现数字0到5的识别,如图所示:
 文章来源:https://www.toymoban.com/news/detail-447072.html
最后,附上手势识别进阶篇《Unity 3D 手部追踪》,以及Mediapipe姊妹篇:《Opencv+Mediapipe->人脸特征点检测》和《OpenCV + Mediapipe ->人体姿态估计》,持续迸发。文章来源地址https://www.toymoban.com/news/detail-447072.html
到了这里,关于Opencv + MediaPipe -> 手势识别的文章就介绍完了。如果您还想了解更多内容,请在右上角搜索TOY模板网以前的文章或继续浏览下面的相关文章,希望大家以后多多支持TOY模板网!

![[ Python+OpenCV+Mediapipe ] 实现手势控制音量](https://imgs.yssmx.com/Uploads/2024/02/836149-1.jpg)


