Azure Kinect DK在python上的使用仍然很空白,开篇blog记录一下利用Open3D开发Kinect DK的笔记,内含利用Open3D对Azure Kinect DK相机读取的信息进行点云实时可视化及图像点云按键交互存储。
对官方的代码做些解读:
可视化:azure_kinect_viewer.py
main函数
import argparse
import open3d as o3d
if __name__ == '__main__':
    parser = argparse.ArgumentParser(description='Azure kinect mkv recorder.')
    parser.add_argument('--config', type=str, help='input json kinect config')
    parser.add_argument('--list',
                        action='store_true',
                        help='list available azure kinect sensors')
    parser.add_argument('--device',
                        type=int,
                        default=0,
                        help='input kinect device id')
    parser.add_argument('-a',
                        '--align_depth_to_color',
                        action='store_true',
                        help='enable align depth image to color')
    args = parser.parse_args()

    if args.list:
        o3d.io.AzureKinectSensor.list_devices()
        exit()

    if args.config is not None:
        config = o3d.io.read_azure_kinect_sensor_config(args.config)
    else:
        config = o3d.io.AzureKinectSensorConfig()

    device = args.device
    if device < 0 or device > 255:
        print('Unsupported device id, fall back to 0')
        device = 0

    v = ViewerWithCallback(config, device, args.align_depth_to_color)
    v.run()
代码首先是对argparse 模块的设置,argparse 模块可参考这篇文章:《argparse 模块详解》。
主要有以下四个参数:
- config: 配置文件。自行配置config可参考该链接调整参数:Enumerations
- list: 判断是否有设备连接。
- device: 设备号,默认为0。
- align_depth_to_color: 对齐深度至颜色(默认不对齐,命令行加-a开启),一般深度图像的范围比较大,采用对齐深度至颜色后将RGB图片区域对应的深度图像裁剪对齐。
视频读取显示类ViewerWithCallback(添加了存储RGB图像和深度图像的回调函数)
class ViewerWithCallback:

    def __init__(self, config, device, align_depth_to_color):
        self.flag_exit = False
        self.align_depth_to_color = align_depth_to_color

        self.sensor = o3d.io.AzureKinectSensor(config) # 配置相机参数
        if not self.sensor.connect(device):
            raise RuntimeError('Failed to connect to sensor')

    def escape_callback(self, vis):
        self.flag_exit = True
        return False

    def save_callback(self, vis): # 提取RGB图像和深度图像并保存,按's'键保存
        num = np.random.randint(100)
        o3d.io.write_image('color'+str(num)+'.png', self.rgbd.color, quality=- 1)
        o3d.io.write_image('depth'+str(num)+'.png', self.rgbd.depth, quality=- 1)
        return False

    def run(self):
        glfw_key_escape = 256
        glfw_key_save = 83
        vis = o3d.visualization.VisualizerWithKeyCallback() # 定义可视化类
        vis.register_key_callback(glfw_key_escape, self.escape_callback) # 注册退出回调函数
        vis.register_key_callback(glfw_key_save, self.save_callback) # 注册保存回调函数
        vis.create_window('viewer', 1920, 540) # 创建窗口
        print("Sensor initialized. Press [ESC] to exit.")

        vis_geometry_added = False
        while not self.flag_exit:
            self.rgbd = self.sensor.capture_frame(self.align_depth_to_color) # 采集图像
            print(self.align_depth_to_color)
            if self.rgbd is None:
                continue

            if not vis_geometry_added:
                vis.add_geometry(self.rgbd)
                vis_geometry_added = True


            # vis.capture_screen_image('b.png', do_render=False)
            vis.update_geometry(self.rgbd)
            vis.poll_events()
            vis.update_renderer()
录制视频:azure_kinect_recorder.py
import argparse
import datetime
import open3d as o3d


class RecorderWithCallback:

    def __init__(self, config, device, filename, align_depth_to_color):
        # Global flags
        self.flag_exit = False
        self.flag_record = False
        self.filename = filename

        self.align_depth_to_color = align_depth_to_color
        self.recorder = o3d.io.AzureKinectRecorder(config, device)
        if not self.recorder.init_sensor():
            raise RuntimeError('Failed to connect to sensor')

    def escape_callback(self, vis):
        self.flag_exit = True
        if self.recorder.is_record_created():
            print('Recording finished.')
        else:
            print('Nothing has been recorded.')
        return False

    def space_callback(self, vis): # 空格键用于录制交互
        if self.flag_record: # 停止
            print('Recording paused. '
                  'Press [Space] to continue. '
                  'Press [ESC] to save and exit.')
            self.flag_record = False

        elif not self.recorder.is_record_created(): # 开始
            if self.recorder.open_record(self.filename):
                print('Recording started. '
                      'Press [SPACE] to pause. '
                      'Press [ESC] to save and exit.')
                self.flag_record = True

        else: #继续
            print('Recording resumed, video may be discontinuous. '
                  'Press [SPACE] to pause. '
                  'Press [ESC] to save and exit.')
            self.flag_record = True

        return False

    def run(self):
        glfw_key_escape = 256
        glfw_key_space = 32
        vis = o3d.visualization.VisualizerWithKeyCallback()
        vis.register_key_callback(glfw_key_escape, self.escape_callback)
        vis.register_key_callback(glfw_key_space, self.space_callback)

        vis.create_window('recorder', 1920, 540)
        print("Recorder initialized. Press [SPACE] to start. "
              "Press [ESC] to save and exit.")

        vis_geometry_added = False
        while not self.flag_exit:
            rgbd = self.recorder.record_frame(self.flag_record,
                                              self.align_depth_to_color) # 录制函数,flag_record通过空格键控制
            if rgbd is None:
                continue

            if not vis_geometry_added:
                vis.add_geometry(rgbd)
                vis_geometry_added = True

            vis.update_geometry(rgbd)
            vis.poll_events()
            vis.update_renderer()

        self.recorder.close_record() # 停止录制,flag_exit通过Esc键控制


if __name__ == '__main__':
    parser = argparse.ArgumentParser(description='Azure kinect mkv recorder.')
    parser.add_argument('--config', type=str, help='input json kinect config')
    parser.add_argument('--output', type=str, help='output mkv filename')
    parser.add_argument('--list',
                        action='store_true',
                        help='list available azure kinect sensors')
    parser.add_argument('--device',
                        type=int,
                        default=0,
                        help='input kinect device id')
    parser.add_argument('-a',
                        '--align_depth_to_color',
                        action='store_true',
                        help='enable align depth image to color')
    # '-a'的'-'代表可选,'store_true'默认False,命令行开启后为True
    args = parser.parse_args()

    if args.list:
        o3d.io.AzureKinectSensor.list_devices()
        exit()

    if args.config is not None:
        config = o3d.io.read_azure_kinect_sensor_config(args.config)
    else:
        config = o3d.io.AzureKinectSensorConfig()

    if args.output is not None:
        filename = args.output
    else:
        filename = '{date:%Y-%m-%d-%H-%M-%S}.mkv'.format(
            date=datetime.datetime.now())
    print('Prepare writing to {}'.format(filename))

    device = args.device
    if device < 0 or device > 255:
        print('Unsupported device id, fall back to 0')
        device = 0

    r = RecorderWithCallback(config, device, filename,
                             args.align_depth_to_color)
    r.run()
点云实时可视化
pyKinectAzure是Azure Kinect DK开发的一个Python 3的库,里面包含各种Kinect点云、图像显示的例程,GitHub链接:https://github.com/ibaiGorordo/pyKinectAzure。
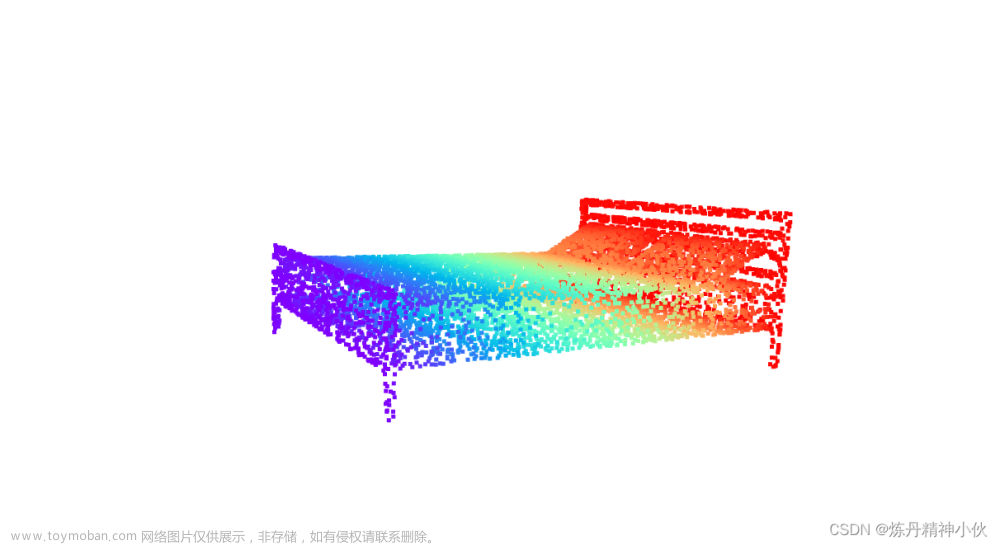
由于pyKinectAzure例程给的代码对图像有一定裁剪,用起来不大方便,于是我在pyKinectAzure基础上做了一定修改,写了一个例程,能够实时显示点云,并能通过键盘交互保存RGB图像、深度图像和点云,由于对原有库做了一定的更改,所以要下载我GitHub里的代码才能跑起来:https://github.com/struggler176393/Kinect_pointcloud。下载下来后主目录在Kinect_pointcloud下,连接相机,在VSCode运行examples/save_pointcloud.py文件,即可实时显示点云,重建得到的点云以相机的主点作为坐标原点,我在可视化界面的原点添加了坐标系,RGB对应XYZ轴,图中z轴箭头方向反了,实际数据的z方向值大于0,默认单位是米。
效果如图:

save_pointcloud.py:
import sys
sys.path.insert(1, './')
import argparse
import open3d as o3d
import numpy as np
import pykinect_azure as pykinect
from pykinect_azure.utils import Open3dVisualizer
import cv2
from datetime import datetime

class SaverWithCallback:

    def __init__(self, config, device, align_depth_to_color):
        self.flag_exit = False
        self.align_depth_to_color = align_depth_to_color
        self.open3dVisualizer = Open3dVisualizer()

        self.sensor = o3d.io.AzureKinectSensor(config)
        if not self.sensor.connect(device):
            raise RuntimeError('Failed to connect to sensor')

    def escape_callback(self, vis):
        self.flag_exit = True
        return False

    def save_callback(self, vis):
        timeStr = datetime.now().strftime("%Y-%m-%d_%H:%M:%S")
        o3d.io.write_image('color_'+timeStr+'.png', self.rgbd.color, quality=- 1)
        o3d.io.write_image('depth_'+timeStr+'.png', self.rgbd.depth, quality=- 1)
        o3d.io.write_point_cloud('point_cloud_'+timeStr+'.ply', self.point_cloud)
        return False

    def run(self):
        while not self.flag_exit:
            glfw_key_escape = 256
            glfw_key_save = 83
            self.open3dVisualizer.vis.register_key_callback(glfw_key_escape, self.escape_callback)
            self.open3dVisualizer.vis.register_key_callback(glfw_key_save, self.save_callback)

            self.rgbd = self.sensor.capture_frame(self.align_depth_to_color)
            if self.rgbd is None:
                continue
            color_image = self.rgbd.color
            depth_image = self.rgbd.depth

            rgbd_image = o3d.geometry.RGBDImage.create_from_color_and_depth(
                color_image, depth_image,
                convert_rgb_to_intensity=False)
            intrinsic = o3d.camera.PinholeCameraIntrinsic(
                o3d.camera.PinholeCameraIntrinsicParameters.PrimeSenseDefault )
            intrinsic.set_intrinsics(
                width=512, height=512, fx=251.730835, fy=251.734344, cx=259.099640, cy=262.528076)

            self.point_cloud = o3d.geometry.PointCloud.create_from_rgbd_image(rgbd_image, intrinsic)

            self.open3dVisualizer(self.point_cloud.points,self.point_cloud.colors)
            cv2.imshow('Transformed color', cv2.cvtColor(np.asarray(color_image), cv2.COLOR_BGRA2RGB))

            # Press q key to stop
            if cv2.waitKey(1) == ord('q'):
                break


if __name__ == '__main__':
    parser = argparse.ArgumentParser(description='Azure kinect mkv recorder.')
    parser.add_argument('--config', type=str, default='./myconfig.json', help='input json kinect config')
    parser.add_argument('--list',
                        action='store_true',
                        help='list available azure kinect sensors')
    parser.add_argument('--device',
                        type=int,
                        default=0,
                        help='input kinect device id')
    parser.add_argument('-a',
                        '--align_depth_to_color',
                        action='store_false',
                        help='enable align depth image to color')
    args = parser.parse_args()

    if args.list:
        o3d.io.AzureKinectSensor.list_devices()
        exit()

    if args.config is not None:
        config = o3d.io.read_azure_kinect_sensor_config(args.config)
    else:
        config = o3d.io.AzureKinectSensorConfig()

    device = args.device
    if device < 0 or device > 255:
        print('Unsupported device id, fall back to 0')
        device = 0

    v = SaverWithCallback(config, device, args.align_depth_to_color)
    v.run()
这里要注意的是myconfig.json文件在Kinect_pointcloud目录下,从实时性角度出发选择1280 * 720帧率,相机的内参与myconfig.json文件里面的配置息息相关,json文件配置完成后可参考这篇文章获取官方的标定数据:《Open3D从RGB图与depth图产生RGB-D点云(采坑记录)》,这篇教程是Windows里面用Visual Studio编译的,我是在Ubuntu里面编译的,出了个小bug,显示没有k4a::k4a这个库,要去CmakeList.txt文件里面把target_link_libraries(calibration_info PRIVATE k4a::k4a)改成target_link_libraries(calibration_info PRIVATE k4a)。由于获取的深度图像已经和彩色图像对齐了,因此选用彩色相机的内参进行点云重建,将main.cpp第76行auto calib = calibration.depth_camera_calibration;改为auto calib = calibration.color_camera_calibration;,然后修改deviceConfig的参数后进行编译操作即可获取内参:文章来源:https://www.toymoban.com/news/detail-449091.html
mkdir build
cd build
cmake ..
make
./calibration_info
OK,大致是得到了想要得到的效果,之后还想做个多帧重建的例程,毕竟单帧的点云重建精度有点低了。文章来源地址https://www.toymoban.com/news/detail-449091.html
到了这里,关于Azure Kinect DK点云实时可视化及图像点云按键交互存储(Open3D)的文章就介绍完了。如果您还想了解更多内容,请在右上角搜索TOY模板网以前的文章或继续浏览下面的相关文章,希望大家以后多多支持TOY模板网!