具体效果可参照海康公众号的演示视频https://mp.weixin.qq.com/s/K7C8BJGgwq3E1woXK7F6SQ
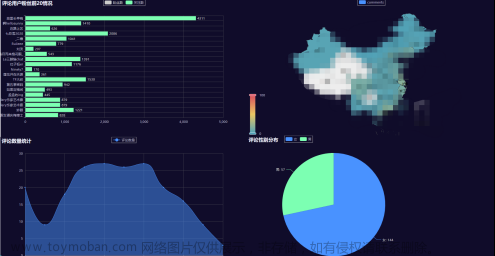
项目效果图:


能够在项目中播放鹰眼视频,其实前端的代码很少。
因为海康威视的AR鹰眼视频已经做成了一个集成控件,也就是一套完整的系统,相当于AR画面里面的东西都不需要重新写,只需要在自己的项目中调用AR控件的开关即可。
前提是需要获取已有的海康鹰眼设备的ip,端口号,账号和密码(需要海康公司提供),并且需要拉网络专线到视频监控室,当海康威视的运维安装好系统后接好网后,前端获取到海康的arIndexCode就可以看到鹰眼视频了。
重点是选取项目需要的部分,加入到自己的项目中就可以了;
html文件demo(har.min.js文件需要海康提供)
<!DOCTYPE html>
<htmllang="en">
<head>
<metacharset="UTF-8"/>
<metahttp-equiv="X-UA-Compatible"content="IE=edge"/>
<metaname="viewport"content="width=device-width, initial-scale=1.0"/>
<title>ARWebControl</title>
<linkhref="./index.css"rel="stylesheet">
</head>
<body>
<divclass="wrapper">
<divclass="dash-board">
<divclass="board-item">
<p>控件消息订阅(启动前订阅)</p>
<divclass="board-content">
<form>
<label>消息回调</label
><textareaid="callbackMessage"rows="7"readonly></textarea>
</form>
<divclass="form-buttons">
<buttononclick="registerEvent('ar_connect_timeout')">
监听控件连接超时
</button>
<buttononclick="registerEvent('ar_custom_message')">
监听自定义消息
</button>
<buttononclick="registerEvent('ar_scene_change')">
监听高点场景变更
</button>
<buttononclick="registerEvent('ar_keydown')">
监听AR控件按键
</button>
<buttononclick="registerEvent('ar_closed')">
监听AR控件关闭
</button>
</div>
</div>
</div>
<divclass="board-item">
<p>控件初始化/启动</p>
<divclass="board-content">
<form>
<label>平台IP</label><inputid="ip"value="10.19.185.97"/><label>平台端口</label
><inputid="port"value="443"/><label>登录方式</label
><selectid="loginType"value="0">
<optionvalue="0">明文登录</option>
<optionvalue="1">密文登录</option>
</select>
<label>用户名</label><inputid="userName"value="admin"/>
<label>登录凭据</label><inputid="credential"value="Hik12345"/>
<label>网域Id</label><inputid="domainId"value="0"/>
<label>AR高点编号</label><inputid="arIndexCode"/>
<label>控件WS端口</label><inputid="wsPort"value="8888"/>
<label>静默运行</label><inputid="background"type="checkbox"/>
</form>
<divclass="form-buttons">
<buttononclick="setupAR()">启动</button>
<buttononclick="frontRun()">取消静默运行</button>
<buttononclick="backRun()">静默运行</button>
</div>
</div>
</div>
<divclass="board-item">
<p>控件显示隐藏与关闭</p>
<divclass="board-content">
<buttonclass="show-buttons"onclick="showAR()">显示控件</button>
<buttonclass="show-buttons"onclick="hideAR()">隐藏控件</button>
<buttonclass="show-buttons"onclick="closeAR()">关闭控件</button>
</div>
</div>
<divclass="board-item">
<p>切换AR场景</p>
<divclass="board-content">
<form><label>AR高点编号</label><inputid="indexCodeChange"/></form>
<divclass="form-buttons">
<buttononclick="changeARScene()">切换</button>
</div>
</div>
</div>
<divclass="board-item">
<p>隐藏控件</p>
<divclass="board-content">
<form>
<label>内部控件</label
><selectid="hideControl"value="1">
<optionvalue="1">组织树</option>
<optionvalue="2">地图</option>
<optionvalue="3">底部按钮</option>
<optionvalue="4">关闭/最小化按钮</option>
<optionvalue="5">搜索框</option>
<optionvalue="6">报警</option>
<optionvalue="7">工具箱</option>
</select>
</form>
<divclass="form-buttons">
<buttononclick="hideARControl()">隐藏</button>
</div>
</div>
</div>
<divclass="board-item">
<p>发送自定义消息</p>
<divclass="board-content">
<form>
<label>自定义消息</label
><textareaid="customMessage"rows="4"></textarea>
</form>
<divclass="form-buttons">
<buttononclick="sendCustomMessage()">发送</button>
</div>
</div>
</div>
<divclass="board-item">
<p>设置视频预览窗口</p>
<divclass="board-content">
<form>
<label>窗口显示状态</label>
<selectid="windowShowStatus"value="0">
<optionvalue="0">显示</option>
<optionvalue="1">隐藏</option>
<optionvalue="2">关闭</option>
</select>
<label>监控点编号</label>
<inputid="windowCameraIndexCode"/>
<label>窗口标题</label>
<inputid="windowTitle"/>
<label>窗口X坐标</label>
<inputid="windowX"value="0"/>
<label>窗口Y坐标</label>
<inputid="windowY"value="0"/>
</form>
<divclass="form-buttons">
<buttononclick="setWindowStatus()">设置</button>
</div>
</div>
</div>
<divclass="board-item">
<p>批量设置视频预览窗口位置</p>
<divclass="board-content">
<form>
<label>已打开窗口</label
><select
id="selectedVideo"
value="请选择监控点"
onchange="onSelectedItem(this.options[this.options.selectedIndex].value)"
>
<optionvalue="-1">请选择监控点</option>
</select>
<label>监控点编号</label><inputid="openedVideoIndex"/>
<label>监控点名称</label><inputid="openedVideoName"/>
<label>窗口X</label><inputid="openedVideoX"value="0"/>
<label>窗口Y</label><inputid="openedVideoY"value="0"/>
</form>
<divclass="form-buttons">
<buttononclick="batchMove()">批量移动</button>
</div>
</div>
</div>
</div>
<divid="ar-div"></div>
</div>
<scripttype="text/javascript">
this.showedVideoInfo= [];
/**
* 注册AR控件事件
*/
functionregisterEvent(eventName) {
window.control=har.ARWebControl.getInstance();
consttextareaDom=document.getElementById("callbackMessage");
control.on(eventName, (msg) => {
switch (eventName) {
case"ar_connect_timeout":
textareaDom.value+=getMessage(
"AR控件连接超时,请检查:1.是否安装AR客户端;2.登录信息是否正确;3.WS端口是否被占用;4.查看客户端日志确定原因。"
);
break;
case"ar_custom_message":
textareaDom.value+=getMessage(
`接收来自AR传递的自定义消息:\n${msg}`
);
break;
case"ar_scene_change":
textareaDom.value+=getMessage(
`AR高点场景变更:\n高点内部编号:${msg.sceneIndex}\n高点编号:${msg.sceneCode}\n高点名称:${msg.sceneName}`
);
break;
case"ar_keydown":
textareaDom.value+=getMessage(`AR内按键触发:${msg}`);
break;
case"ar_closed":
textareaDom.value+=getMessage("AR控件关闭");
}
});
}
functiongetMessage(msg) {
return`====================================\n${msg}\n====================================\n`;
}
/**
* 启动AR
*/
functionsetupAR() {
window.control=har.ARWebControl.getInstance();
consttextareaDom=document.getElementById("callbackMessage");
control
.setup({
domId: "ar-div",
loginType: +getInput("loginType"),
ip: getInput("ip"),
port: getInput("port"),
userName: getInput("userName"),
credentials: getInput("credential"),
domainId: getInput("domainId"),
arIndexCode: getInput("arIndexCode"),
websocketPort: getInput("wsPort"),
visible: !getInput("background"),
processName:"chrome"
})
.then(() => {
textareaDom.value+=getMessage("AR控件启动成功");
})
.catch((err) => {
console.error(err.msg);
textareaDom.value+=getMessage("AR控件启动失败");
});
}
/**
* 取消AR静默展示状态
*/
functionfrontRun() {
window.control?.setARShowMode(false);
}
/**
* AR静默显示
*/
functionbackRun() {
window.control?.setARShowMode(true);
}
functiongetInput(id) {
returndocument.getElementById(id).type==="checkbox"
?document.getElementById(id).checked
: document.getElementById(id).value;
}
/**
* 显示AR
*/
functionshowAR() {
letarDom=document.getElementById("ar-div");
arDom.style="display:block;";
}
/**
* 隐藏AR
*/
functionhideAR() {
letarDom=document.getElementById("ar-div");
arDom.style="display:none;";
}
/**
* 关闭AR
*/
functioncloseAR() {
window.control
?.close()
.then(() => {
consttextareaDom=document.getElementById("callbackMessage");
textareaDom.value+=getMessage("JS关闭AR控件成功");
})
.catch((err) => {
console.error(err.msg);
});
}
/**
* 切换AR高点场景
*/
functionchangeARScene() {
window.control?.changeARScene(getInput("indexCodeChange")).then(
(ret) => {
console.log("成功发送切换高点场景命令");
},
(err) => {
console.error(err.msg);
}
);
}
/**
* 隐藏AR内部的控件
*/
functionhideARControl() {
window.control
?.setControlsVisibility([getInput("hideControl")])
.catch((err) => {
console.error(err.msg);
});
}
/**
* 发送自定义消息
*/
functionsendCustomMessage() {
window.control
?.sendBusinessInfo(getInput("customMessage"))
.catch((err) => {
console.error(err.msg);
});
}
/**
* 设置视频预览窗口状态
*/
functionsetWindowStatus() {
conststatus=getInput("windowShowStatus");
constname=getInput("windowTitle");
constindexCode=getInput("windowCameraIndexCode");
constleft=getInput("windowX");
consttop=getInput("windowY");
window.control
?.setVideoWindow(status, { indexCode, name, left: +left, top: +top })
.catch((err) => {
console.error(err.msg);
});
letinfo=this.showedVideoInfo.find((x) =>x.code==indexCode);
if (info) {
info.title=name;
info.x=left;
info.y=top;
if (status===har.ARWindowStatus.CLOSE) {
letindex=this.showedVideoInfo.indexOf(info);
if (index>-1) {
this.showedVideoInfo.splice(index, 1);
}
}
} else {
if (status===har.ARWindowStatus.VISIBLE) {
this.showedVideoInfo.push({
title: name,
code: indexCode,
x: left,
y: top,
});
}
}
updateVideoList();
}
/**
* 批量设置视频窗口位置
*/
functionbatchMove() {
letselect=document.getElementById("selectedVideo");
this.onSelectedItem(select.options[select.options.selectedIndex]);
letwindowList=this.showedVideoInfo.map((item) => {
return {
left: +item.x,
top: +item.y,
indexCode: item.code,
name: item.title,
};
});
window.control?.setVideoWindowList(windowList).catch((err) => {
console.error(err.msg);
});
}
/**
* 选择一个已打开的窗口
*/
functiononSelectedItem(v) {
if (parseInt(v) ===-1) {
this.lastSelectInfo=null;
document.getElementById("openedVideoIndex").value="";
document.getElementById("openedVideoName").value="";
document.getElementById("openedVideoX").value=0;
document.getElementById("openedVideoY").value=0;
return;
}
if (this.lastSelectInfo) {
this.lastSelectInfo.x=parseInt(
document.getElementById("openedVideoX").value
);
this.lastSelectInfo.y=parseInt(
document.getElementById("openedVideoY").value
);
}
letinfo=this.showedVideoInfo.find((x) =>x.code==v);
if (info) {
document.getElementById("openedVideoIndex").value=info.code;
document.getElementById("openedVideoName").value=info.title;
document.getElementById("openedVideoX").value=info.x;
document.getElementById("openedVideoY").value=info.y;
}
this.lastSelectInfo=info;
}
/**
* 记录已打开的视频窗口信息
*/
functionupdateVideoList() {
letselect=document.getElementById("selectedVideo");
select.options.length=1;
if (this.showedVideoInfo.length==0) {
this.onSelectedItem("-1");
}
this.showedVideoInfo.forEach((item) => {
select.options.add(newOption(item.title, item.code));
});
}
</script>
<scriptsrc="./har.min.js"></script>
</body>
</html>
vue代码:
放置跳转鹰眼画面的盒子
<div id="ar-div"></div>2.将海康ARweb控件的har.min.js文件放到项目中,在页面中引入;
import har from "../home/components/AR/har.min";3.只需要加入开启控件的API即可直接进入到海康的鹰眼系统;文章来源:https://www.toymoban.com/news/detail-452005.html
setupAR() {
  if (this.siteId == "23") {
  const control = har.ARWebControl.getInstance();
  control
    .setup({
      domId: "ar-div",//鹰眼画面的盒子
      loginType: 0,
      ip: "10.19.185.97",//AR鹰眼平台IP(海康提供的)
      port: "443",//AR鹰眼平台端口(海康提供的)
      userName: "admin",//平台用户名(海康提供的)
      credentials: "Hik12345",//平台密码(海康提供的)
      domainId: "0",//网域id
      arIndexCode: "gh001",//AR高点编号就是用于播放鹰眼视频的id(拉好鹰眼专线后才能确定)
      websocketPort: "8888",//控件WS端口
      visible: true,//控制鹰眼窗口是否可见
      processName: "chrome",//默认浏览器
    })
    .then(() => {
      this.isShow = true;
      // alert("控件启动成功")
    })
    .catch((err) => {
      console.error(err.msg);
      // alert("AR控件启动失败");
    });
}else {
        this.$message.warning("该工地暂无全景设备");
}4.点击坐标(site)后进入鹰眼文章来源地址https://www.toymoban.com/news/detail-452005.html
 const ARBtn = document.querySelector("#ar");
 ARBtn.onclick = this.setupAR;
到了这里,关于可视化大屏中用vue实现海康威视AR鹰眼画面(物联网项目—涉及硬件设备的连接)的文章就介绍完了。如果您还想了解更多内容,请在右上角搜索TOY模板网以前的文章或继续浏览下面的相关文章,希望大家以后多多支持TOY模板网!