使用示例
平时我们使用的一般是集成了Spring或是Spring Boot的Mybatis,封装了一层,看源码不直接;如下,看看原生的Mybatis使用示例

示例解析
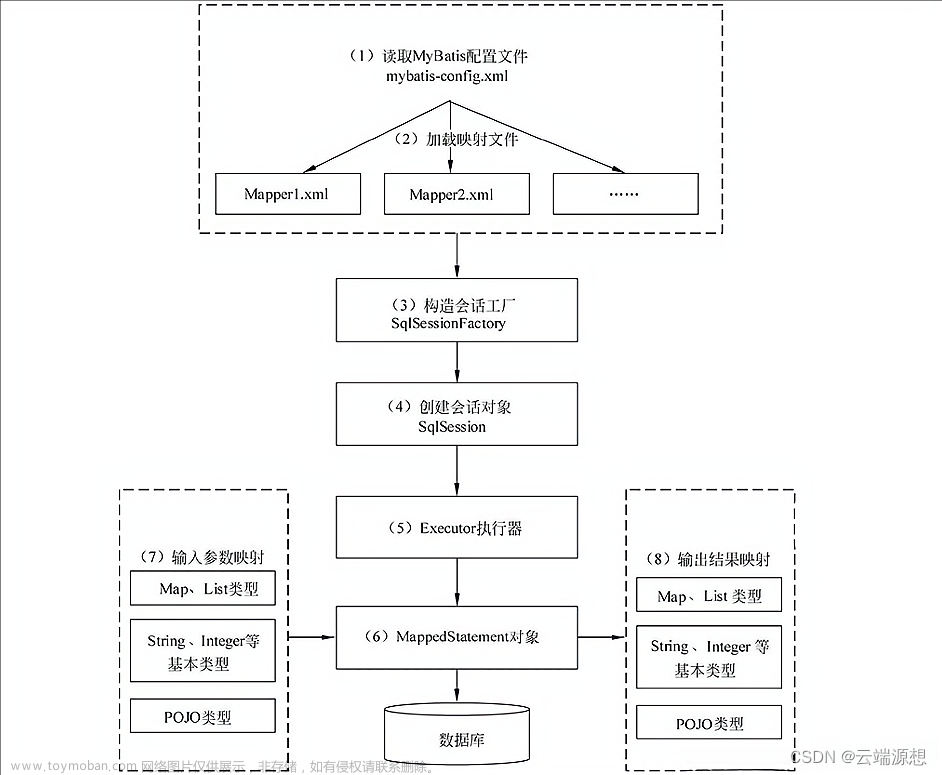
通过代码可以清晰地看出,MyBatis的操作主要分为两大阶段:
- 第一阶段:MyBatis初始化阶段。该阶段用来完成MyBatis运行环境的准备工作,读取配置并初始化关键的对象,提供给后续使用,只在 MyBatis启动时运行一次。
- 第二阶段:数据读写阶段。该阶段由数据读写操作触发,将根据要求完成具体的增、删、改、查等数据库操作。
在第一阶段,最关键的就是SqlSessionFactory对象。在Spring集成Mybatis的源码中,SqlSessionFactoryBean也是做这个事情,读取配置并初始化构建SqlSessionFactory。
public class SqlSessionFactoryBean implements FactoryBean<SqlSessionFactory>, InitializingBean, ApplicationListener<ApplicationEvent> {
    // Spring Bean的生命周期会调用此方法
    public void afterPropertiesSet() throws Exception {
        this.sqlSessionFactory = this.buildSqlSessionFactory();
    }
    protected SqlSessionFactory buildSqlSessionFactory(){
        // 构建Configuration....
        Configuration configuration;
        if (this.configuration != null) {
            configuration = this.configuration;
            if (configuration.getVariables() == null) {
                configuration.setVariables(this.configurationProperties);
            } else if (this.configurationProperties != null) {
                configuration.getVariables().putAll(this.configurationProperties);
            }
        } else if (this.configLocation != null) {
            xmlConfigBuilder = new XMLConfigBuilder(this.configLocation.getInputStream(), (String)null, this.configurationProperties);
            configuration = xmlConfigBuilder.getConfiguration();
        } else {
            if (LOGGER.isDebugEnabled()) {
                LOGGER.debug("Property `configuration` or 'configLocation' not specified, using default MyBatis Configuration");
            }

            configuration = new Configuration();
            configuration.setVariables(this.configurationProperties);
        }

        /// 其它code...

        return this.sqlSessionFactoryBuilder.build(configuration);
    }
}
配置文件的解析,最终会生成一个Configuration对象。
private void parseConfiguration(XNode root) {
    try {
        Properties settings = this.settingsAsPropertiess(root.evalNode("settings"));
        this.propertiesElement(root.evalNode("properties"));
        this.loadCustomVfs(settings);
        this.typeAliasesElement(root.evalNode("typeAliases"));
        this.pluginElement(root.evalNode("plugins"));
        this.objectFactoryElement(root.evalNode("objectFactory"));
        this.objectWrapperFactoryElement(root.evalNode("objectWrapperFactory"));
        this.reflectionFactoryElement(root.evalNode("reflectionFactory"));
        this.settingsElement(settings);
        this.environmentsElement(root.evalNode("environments"));
        this.databaseIdProviderElement(root.evalNode("databaseIdProvider"));
        this.typeHandlerElement(root.evalNode("typeHandlers"));
        // 解析mappers节点
        this.mapperElement(root.evalNode("mappers"));
    } catch (Exception var3) {
        throw new BuilderException("Error parsing SQL Mapper Configuration. Cause: " + var3, var3);
    }
}
前期的准备已就绪,关键的配置已解析且构建并初始化了SqlSessionFactory了。接下来就是创建数据库连接并执行业务的CRUD。在第二阶段的OpenSession方法负责创建并打开数据库链接。
public SqlSession openSession(Connection connection) {
    return this.openSessionFromConnection(this.configuration.getDefaultExecutorType(), connection);
}

private SqlSession openSessionFromDataSource(ExecutorType execType, TransactionIsolationLevel level, boolean autoCommit) {
    Transaction tx = null;

    DefaultSqlSession var8;
    try {
        Environment environment = this.configuration.getEnvironment();
        TransactionFactory transactionFactory = this.getTransactionFactoryFromEnvironment(environment);
        tx = transactionFactory.newTransaction(environment.getDataSource(), level, autoCommit);
        Executor executor = this.configuration.newExecutor(tx, execType);
        var8 = new DefaultSqlSession(this.configuration, executor, autoCommit);
    } catch (Exception var12) {
        this.closeTransaction(tx);
        throw ExceptionFactory.wrapException("Error opening session.  Cause: " + var12, var12);
    } finally {
        ErrorContext.instance().reset();
    }

    return var8;
}
最后就是调用Mapper接口的业务方法,返回业务数据。
//SqlSession.getMapper()
public <T> T getMapper(Class<T> type) {
    return this.configuration.getMapper(type, this);
}

// configuration.getMapper()
public <T> T getMapper(Class<T> type, SqlSession sqlSession) {
    return this.mapperRegistry.getMapper(type, sqlSession);
}

// mapperRegistry.getMapper()
public <T> T getMapper(Class<T> type, SqlSession sqlSession) {
    MapperProxyFactory<T> mapperProxyFactory = (MapperProxyFactory)this.knownMappers.get(type);
    if (mapperProxyFactory == null) {
        throw new BindingException("Type " + type + " is not known to the MapperRegistry.");
    } else {
        try {
            return mapperProxyFactory.newInstance(sqlSession);
        } catch (Exception var5) {
            throw new BindingException("Error getting mapper instance. Cause: " + var5, var5);
        }
    }
}

// mapperProxyFactory.newInstance()
protected T newInstance(MapperProxy<T> mapperProxy) {
    return Proxy.newProxyInstance(this.mapperInterface.getClassLoader(), new Class[]{this.mapperInterface}, mapperProxy);
}

public T newInstance(SqlSession sqlSession) {
    MapperProxy<T> mapperProxy = new MapperProxy(sqlSession, this.mapperInterface, this.methodCache);
    return this.newInstance(mapperProxy);
}
最后,打完收工,示例代码所涉及到的关键代码就这些。
反思
上面的示例是比较简单的,那么其实现思路到底是什么样的?首先就有几个问题:
- Mapper接口中的方法没有实现,那客户端调用接口的方法时,返回的数据是从哪来的?
- Mapper文件与Mapper接口是怎么关联绑定上的?
第一个问题,绝对离不开动态代理,因为只有接口的时候,那么一定会有动态代理生成代理类同时有拦截处理器(InvocationHandler)来增强其执行逻辑。
第二个问题,Mapper文件中有一个<mapper>节点,其namespace就是接口的全限定名称,而其下节点<select>|<update>|..都有一个id值,该值与接口的方法是一致的。因此从这里就可以看出来,业务的crud操作节点是通过namespace+id来对应mapper接口及其方法的。那么我们就可以考虑到,在第一个问题中的拦截处理器执行方法method时,我们就可以通过此关联关系找到要执行的SQL。
如上,这么一分析来看,其实大概的实现思路已经出来了。就是动态代理+<mapper>节点解析实现了接口方法的调用与业务SQL的执行。
因此在第一阶段的解析时,Mapper文件里的<Mapper>节点解析出来的对象就起到了关键的作用。如下,有几个关键的抽象:
MapperRegistry类的knownMappers属性保存着接口及其代理对象的关系。
// type = interface
knownMappers.put(type, new MapperProxyFactory(type));
MappedStatement类对应着<mapper>节点下的CRUD节点。文章来源:https://www.toymoban.com/news/detail-453197.html
public void parseStatementNode() {
    String id = this.context.getStringAttribute("id");
    if (this.databaseIdMatchesCurrent(id, databaseId, this.requiredDatabaseId)) {
        Integer fetchSize = this.context.getIntAttribute("fetchSize");
        Integer timeout = this.context.getIntAttribute("timeout");
        String parameterMap = this.context.getStringAttribute("parameterMap");
        String parameterType = this.context.getStringAttribute("parameterType");
        Class<?> parameterTypeClass = this.resolveClass(parameterType);
        String resultMap = this.context.getStringAttribute("resultMap");
        String resultType = this.context.getStringAttribute("resultType");
        // 解析其他属性...
        this.builderAssistant.addMappedStatement(id, sqlSource, statementType, sqlCommandType, fetchSize, timeout, parameterMap, parameterTypeClass, resultMap, resultTypeClass, resultSetTypeEnum, flushCache, useCache, resultOrdered, (KeyGenerator)keyGenerator, keyProperty, keyColumn, databaseId, langDriver, resultSets);
    }
}
如上是抽象出来整个执行过程的简单流程。最后就是基于JDBC创建Statement对象,并执行execute方法。文章来源地址https://www.toymoban.com/news/detail-453197.html
到了这里,关于聊聊Mybatis的实现原理的文章就介绍完了。如果您还想了解更多内容,请在右上角搜索TOY模板网以前的文章或继续浏览下面的相关文章,希望大家以后多多支持TOY模板网!


![聊聊分布式架构06——[NIO入门]简单的Netty NIO示例](https://imgs.yssmx.com/Uploads/2024/02/726605-1.png)


