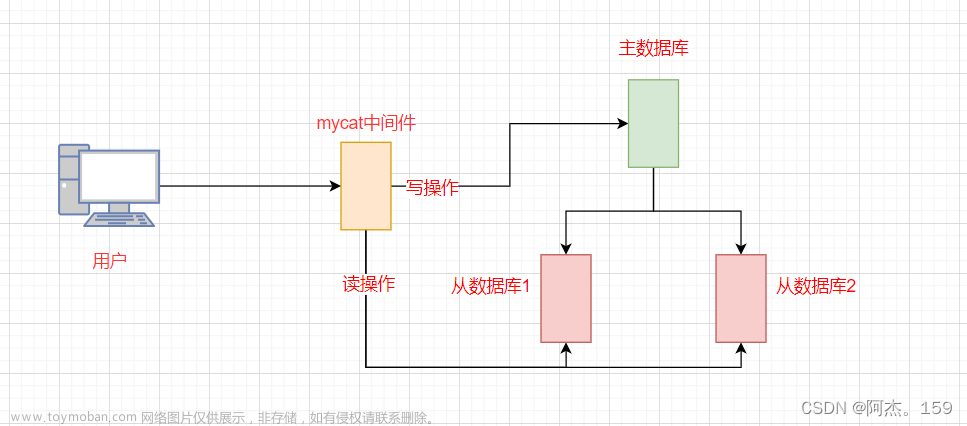
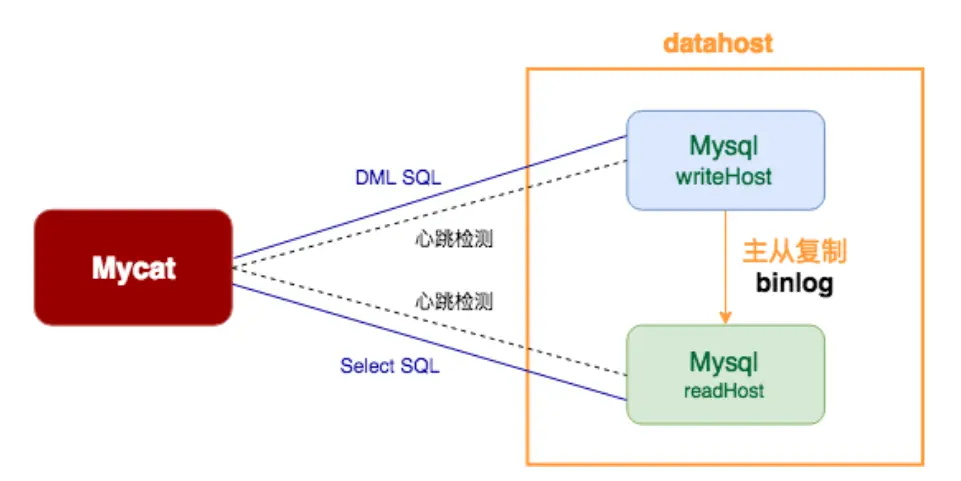
架构说明
10.0.0.18 master节点和10.0.0.22节点互为主
10.0.0.19 10.0.0.18的slave节点
10.0.0.22 master节点和10.0.0.19节点互为主
10.0.0.24 10.0.0.22的slave节点
10.0.0.23 mycat节点
mysql版本8.0.32
系统版本:rocky8.4
mysql主从搭建
#搭建双主节点
#搭建第一个主10.0.0.18
#注释掉/etc/my.cnf.d/mysql-server.cnf
cat >/etc/my.cnf.d/mysql-server.cnf<<'EOF'
#
# This group are read by MySQL server.
# Use it for options that only the server (but not clients) should see
#
# For advice on how to change settings please see
# http://dev.mysql.com/doc/refman/en/server-configuration-defaults.html

# Settings user and group are ignored when systemd is used.
# If you need to run mysqld under a different user or group,
# customize your systemd unit file for mysqld according to the
# instructions in http://fedoraproject.org/wiki/Systemd

#[mysqld]
#datadir=/var/lib/mysql
#socket=/var/lib/mysql/mysql.sock
#log-error=/var/log/mysql/mysqld.log
#pid-file=/run/mysqld/mysqld.pid
#log-bin=/data/mysql/logbin/mysql-bin
EOF

#配置主节点的my.cat配置
cat >/etc/my.cnf<<'EOF'
#
# This group is read both both by the client and the server
# use it for options that affect everything
#
[client-server]

#
# include all files from the config directory
#
!includedir /etc/my.cnf.d
[mysqld]
datadir=/var/lib/mysql
socket=/var/lib/mysql/mysql.sock
log-error=/var/log/mysql/mysqld.log
pid-file=/run/mysqld/mysqld.pid
server-id=18
#read-only
general_log
gtid_mode=ON
enforce_gtid_consistency
log-bin=/data/mysql/logbin/mysql-bin
EOF

#创建存放二进制日志的目录
mkdir -p /data/mysql/logbin/
chown -R mysql.mysql /data

#启动数据库
systemctl enable --now mysqld

#配置账号和授权
mysql
create user 'repluser'@'10.0.0.%' identified by '123456';
grant replication slave on *.* to 'repluser'@'10.0.0.%';
#创建mycat使用的账号
create user 'wbiao'@'10.0.0.%' IDENTIFIED BY '123456';
grant ALL ON hellodb.* TO 'wbiao'@'10.0.0.%';

#搭建第二个主10.0.0.22
#注释掉/etc/my.cnf.d/mysql-server.cnf
cat >/etc/my.cnf.d/mysql-server.cnf<<'EOF'
#
# This group are read by MySQL server.
# Use it for options that only the server (but not clients) should see
#
# For advice on how to change settings please see
# http://dev.mysql.com/doc/refman/en/server-configuration-defaults.html

# Settings user and group are ignored when systemd is used.
# If you need to run mysqld under a different user or group,
# customize your systemd unit file for mysqld according to the
# instructions in http://fedoraproject.org/wiki/Systemd

#[mysqld]
#datadir=/var/lib/mysql
#socket=/var/lib/mysql/mysql.sock
#log-error=/var/log/mysql/mysqld.log
#pid-file=/run/mysqld/mysqld.pid
#log-bin=/data/mysql/logbin/mysql-bin
EOF

#配置主节点的my.cat配置
cat >/etc/my.cnf<<'EOF'
#
# This group is read both both by the client and the server
# use it for options that affect everything
#
[client-server]

#
# include all files from the config directory
#
!includedir /etc/my.cnf.d
[mysqld]
datadir=/var/lib/mysql
socket=/var/lib/mysql/mysql.sock
log-error=/var/log/mysql/mysqld.log
pid-file=/run/mysqld/mysqld.pid
server-id=22
#read-only
general_log
gtid_mode=ON
enforce_gtid_consistency
log-bin=/data/mysql/logbin/mysql-bin
EOF

#创建存放二进制日志的目录
mkdir -p /data/mysql/logbin/
chown -R mysql.mysql /data

#启动数据库
systemctl enable --now mysqld

#10.0.0.22指向10.0.0.18
执行change master to
CHANGE MASTER TO
MASTER_HOST='10.0.0.18',
MASTER_USER='repluser',
MASTER_PASSWORD='123456',
MASTER_PORT=3306,
MASTER_AUTO_POSITION=1;
#开启IO线程和SQL线程
start slave;
#检查状态
show slave status\G
#检查
mysql> select user,host from mysql.user;
+------------------+-----------+
| user             | host      |
+------------------+-----------+
| repluser         | 10.0.0.%  |
| wbiao            | 10.0.0.%  |
| mysql.infoschema | localhost |
| mysql.session    | localhost |
| mysql.sys        | localhost |
| root             | localhost |
+------------------+-----------+
6 rows in set (0.00 sec)


10.0.0.18指向10.0.0.22
执行change master to
CHANGE MASTER TO
MASTER_HOST='10.0.0.22',
MASTER_USER='repluser',
MASTER_PASSWORD='123456',
MASTER_PORT=3306,
MASTER_AUTO_POSITION=1;
#开启IO线程和SQL线程
start slave;
#检查状态
show slave status\G

#配置10.0.0.18的从节点10.0.0.19
#注释掉/etc/my.cnf.d/mysql-server.cnf
cat >/etc/my.cnf.d/mysql-server.cnf<<'EOF'
#
# This group are read by MySQL server.
# Use it for options that only the server (but not clients) should see
#
# For advice on how to change settings please see
# http://dev.mysql.com/doc/refman/en/server-configuration-defaults.html

# Settings user and group are ignored when systemd is used.
# If you need to run mysqld under a different user or group,
# customize your systemd unit file for mysqld according to the
# instructions in http://fedoraproject.org/wiki/Systemd

#[mysqld]
#datadir=/var/lib/mysql
#socket=/var/lib/mysql/mysql.sock
#log-error=/var/log/mysql/mysqld.log
#pid-file=/run/mysqld/mysqld.pid
#log-bin=/data/mysql/logbin/mysql-bin
EOF
#配置从节点10.0.0.19的my.cat配置
cat >/etc/my.cnf<<'EOF'
#
# This group is read both both by the client and the server
# use it for options that affect everything
#
[client-server]

#
# include all files from the config directory
#
!includedir /etc/my.cnf.d
[mysqld]
datadir=/var/lib/mysql
socket=/var/lib/mysql/mysql.sock
log-error=/var/log/mysql/mysqld.log
pid-file=/run/mysqld/mysqld.pid
server-id=19
read-only
general_log
gtid_mode=ON
enforce_gtid_consistency
log-bin=/data/mysql/logbin/mysql-bin
EOF

#创建存放二进制日志的目录
mkdir -p /data/mysql/logbin/
chown -R mysql.mysql /data
#启动数据库
systemctl enable --now mysqld

#从节点10.0.0.19执行change master to
CHANGE MASTER TO
MASTER_HOST='10.0.0.18',
MASTER_USER='repluser',
MASTER_PASSWORD='123456',
MASTER_PORT=3306,
MASTER_AUTO_POSITION=1;
#开启IO线程和SQL线程
start slave;
#检查状态
show slave status\G


##配置10.0.0.22的从节点10.0.0.24
#注释掉/etc/my.cnf.d/mysql-server.cnf
cat >/etc/my.cnf.d/mysql-server.cnf<<'EOF'
#
# This group are read by MySQL server.
# Use it for options that only the server (but not clients) should see
#
# For advice on how to change settings please see
# http://dev.mysql.com/doc/refman/en/server-configuration-defaults.html

# Settings user and group are ignored when systemd is used.
# If you need to run mysqld under a different user or group,
# customize your systemd unit file for mysqld according to the
# instructions in http://fedoraproject.org/wiki/Systemd

#[mysqld]
#datadir=/var/lib/mysql
#socket=/var/lib/mysql/mysql.sock
#log-error=/var/log/mysql/mysqld.log
#pid-file=/run/mysqld/mysqld.pid
#log-bin=/data/mysql/logbin/mysql-bin
EOF
#配置从节点10.0.0.24的my.cat配置
cat >/etc/my.cnf<<'EOF'
#
# This group is read both both by the client and the server
# use it for options that affect everything
#
[client-server]

#
# include all files from the config directory
#
!includedir /etc/my.cnf.d
[mysqld]
datadir=/var/lib/mysql
socket=/var/lib/mysql/mysql.sock
log-error=/var/log/mysql/mysqld.log
pid-file=/run/mysqld/mysqld.pid
server-id=24
read-only
general_log
gtid_mode=ON
enforce_gtid_consistency
log-bin=/data/mysql/logbin/mysql-bin
EOF

#创建存放二进制日志的目录
mkdir -p /data/mysql/logbin/
chown -R mysql.mysql /data
#启动数据库
systemctl enable --now mysqld

#从节点10.0.0.24执行change master to
CHANGE MASTER TO
MASTER_HOST='10.0.0.22',
MASTER_USER='repluser',
MASTER_PASSWORD='123456',
MASTER_PORT=3306,
MASTER_AUTO_POSITION=1;
#开启IO线程和SQL线程
start slave;
#检查状态
show slave status\G

#10.0.0.18导入hellodb的数据库
[root@10 ~]# mysql <hellodb_innodb.sql
##检查状态
show slave status\G
#所有节点检查数据
select * from hellodb.students;
#双主只能对一个主进行写操作
mycat搭建10.0.0.23
#安装java环境
yum -y install java
#创建安装目录和解压
mkdir -p /apps
tar -xf Mycat-server-1.6.7.6-release-20210303094759-linux.tar.gz -C /app
#配置环境变量
[root@10 ~]# echo 'PATH=/apps/mycat/bin:$PATH' > /etc/profile.d/mycat.sh
[root@10 ~]# . /etc/profile.d/mycat.sh
[root@10 ~]# echo $PATH
/apps/mycat/bin:/usr/share/Modules/bin:/usr/local/sbin:/usr/local/bin:/usr/sbin:/usr/bin:/root/bin

#配置mycat实现读写分离主从高可用
#修改schema.xml的配置文件
#balance="2",所有读操作都随机的在writeHost、readhost上分发。
#balance="1",全部的readHost与stand by writeHost参与select语句的负载均衡,简单的说,当双主双从模式(M1->S1,M2->S2,并且M1与M2互为主备)
#writeType属性负载均衡类型,目前的取值有3种:
#1.writeType="0", 所有写操作发送到配置的第一个writeHost,第一个挂了切到还生存的第二个writeHost,重新启动后已切换后的为准,切换记录在配置文件中:dnindex.properties.
#2.writeType="1",所有写操作都随机的发送到配置的writeHost,1.5以后废弃不推荐。
#3.writeType="2",不执行写操作
[root@10 conf]# cat schema.xml
<?xml version="1.0"?>
<!DOCTYPE mycat:schema SYSTEM "schema.dtd">
<mycat:schema xmlns:mycat="http://io.mycat/">
    <schema name="wbiao" checkSQLschema="false" sqlMaxLimit="100" dataNode="dn1">
    </schema>
    <dataNode name="dn1" dataHost="localhost1" database="hellodb" />
    <dataHost name="localhost1" maxCon="1000" minCon="10" balance="1"
              writeType="0" dbType="mysql" dbDriver="native" switchType="1"  slaveThreshold="100">
        <heartbeat>select user()</heartbeat>
        <writeHost host="host1" url="10.0.0.18:3306" user="wbiao" password="123456">
         <readHost host="host2" url="10.0.0.19:3306" user="wbiao" password="123456" />
        </writeHost>
    <writeHost host="host3" url="10.0.0.22:3306" user="wbiao" password="123456">
         <readHost host="host4" url="10.0.0.23:3306" user="wbiao" password="123456" />
        </writeHost>
    </dataHost>
</mycat:schema>


#server.xml配置文件
[root@10 conf]# cat server.xml
<?xml version="1.0" encoding="UTF-8"?>
<!-- - - Licensed under the Apache License, Version 2.0 (the "License");
    - you may not use this file except in compliance with the License. - You
    may obtain a copy of the License at - - http://www.apache.org/licenses/LICENSE-2.0
    - - Unless required by applicable law or agreed to in writing, software -
    distributed under the License is distributed on an "AS IS" BASIS, - WITHOUT
    WARRANTIES OR CONDITIONS OF ANY KIND, either express or implied. - See the
    License for the specific language governing permissions and - limitations
    under the License. -->
<!DOCTYPE mycat:server SYSTEM "server.dtd">
<mycat:server xmlns:mycat="http://io.mycat/">
    <system>
    <property name="nonePasswordLogin">0</property> <!-- 0为需要密码登陆、1为不需要密码登陆 ,默认为0,设置为1则需要指定默认账户-->
    <property name="ignoreUnknownCommand">0</property><!-- 0遇上没有实现的报文(Unknown command:),就会报错、1为忽略该报文,返回ok报文。
    在某些mysql客户端存在客户端已经登录的时候还会继续发送登录报文,mycat会报错,该设置可以绕过这个错误-->
    <property name="useHandshakeV10">1</property>
    <property name="removeGraveAccent">1</property>
    <property name="useSqlStat">0</property>  <!-- 1为开启实时统计、0为关闭 -->
    <property name="useGlobleTableCheck">0</property>  <!-- 1为开启全加班一致性检测、0为关闭 -->
    <property name="sqlExecuteTimeout">300</property>  <!-- SQL 执行超时 单位:秒-->
        <property name="sequenceHandlerType">1</property>
    <!--<property name="sequnceHandlerPattern">(?:(\s*next\s+value\s+for\s*MYCATSEQ_(\w+))(,|\)|\s)*)+</property>
    INSERT INTO `travelrecord` (`id`,user_id) VALUES ('next value for MYCATSEQ_GLOBAL',"xxx");
    -->
    <!--必须带有MYCATSEQ_或者 mycatseq_进入序列匹配流程 注意MYCATSEQ_有空格的情况-->
    <property name="sequnceHandlerPattern">(?:(\s*next\s+value\s+for\s*MYCATSEQ_(\w+))(,|\)|\s)*)+</property>
    <property name="subqueryRelationshipCheck">false</property> <!-- 子查询中存在关联查询的情况下,检查关联字段中是否有分片字段 .默认 false -->
    <property name="sequenceHanlderClass">io.mycat.route.sequence.handler.HttpIncrSequenceHandler</property>
      <!--  <property name="useCompression">1</property>--> <!--1为开启mysql压缩协议-->
        <!--  <property name="fakeMySQLVersion">5.6.20</property>--> <!--设置模拟的MySQL版本号-->
    <!-- <property name="processorBufferChunk">40960</property> -->
    <!--
    <property name="processors">1</property>
    <property name="processorExecutor">32</property>
     -->
        <!--默认为type 0: DirectByteBufferPool | type 1 ByteBufferArena | type 2 NettyBufferPool -->
        <property name="processorBufferPoolType">0</property>
        <property name="serverPort">3306</property>
        <!--默认是65535 64K 用于sql解析时最大文本长度 -->
        <!--<property name="maxStringLiteralLength">65535</property>-->
        <!--<property name="sequenceHandlerType">0</property>-->
        <!--<property name="backSocketNoDelay">1</property>-->
        <!--<property name="frontSocketNoDelay">1</property>-->
        <!--<property name="processorExecutor">16</property>-->
        <!--
            <property name="serverPort">8066</property>
            <property name="managerPort">9066</property>
            <property name="idleTimeout">300000</property>
            <property name="authTimeout">15000</property>
            <property name="bindIp">0.0.0.0</property>
            <property name="dataNodeIdleCheckPeriod">300000</property> 5 * 60 * 1000L; //连接空闲检查
            <property name="frontWriteQueueSize">4096</property> <property name="processors">32</property> -->
        <!--分布式事务开关,0为不过滤分布式事务,1为过滤分布式事务(如果分布式事务内只涉及全局表,则不过滤),2为不过滤分布式事务,但是记录分布式事务日志-->
        <property name="handleDistributedTransactions">0</property>

            <!--
            off heap for merge/order/group/limit      1开启   0关闭
        -->
        <property name="useOffHeapForMerge">0</property>

        <!--
            单位为m
        -->
        <property name="memoryPageSize">64k</property>

        <!--
            单位为k
        -->
        <property name="spillsFileBufferSize">1k</property>

        <property name="useStreamOutput">0</property>

        <!--
            单位为m
        -->
        <property name="systemReserveMemorySize">384m</property>


        <!--是否采用zookeeper协调切换  -->
        <property name="useZKSwitch">false</property>

        <!-- XA Recovery Log日志路径 -->
        <!--<property name="XARecoveryLogBaseDir">./</property>-->

        <!-- XA Recovery Log日志名称 -->
        <!--<property name="XARecoveryLogBaseName">tmlog</property>-->
        <!--如果为 true的话 严格遵守隔离级别,不会在仅仅只有select语句的时候在事务中切换连接-->
        <property name="strictTxIsolation">false</property>
        <!--如果为0的话,涉及多个DataNode的catlet任务不会跨线程执行-->
        <property name="parallExecute">0</property>
        <property name="serverBacklog">2048</property>
    </system>

    <!-- 全局SQL防火墙设置 -->
    <!--白名单可以使用通配符%或着*-->
    <!--例如<host host="127.0.0.*" user="root"/>-->
    <!--例如<host host="127.0.*" user="root"/>-->
    <!--例如<host host="127.*" user="root"/>-->
    <!--例如<host host="1*7.*" user="root"/>-->
    <!--这些配置情况下对于127.0.0.1都能以root账户登录-->
    <!--
    <firewall>
       <whitehost>
          <host host="1*7.0.0.*" user="root"/>
       </whitehost>
       <blacklist check="false">
       </blacklist>
    </firewall>
    -->

    <user name="root" defaultAccount="true">
        <property name="password">qwe123</property>
        <property name="schemas">wbiao</property>
        <property name="defaultSchema">wbiao</property>
        <!--No MyCAT Database selected 错误前会尝试使用该schema作为schema,不设置则为null,报错 -->

        <!-- 表级 DML 权限设置 -->
        <!--
        <privileges check="false">
            <schema name="wbiao" dml="0110" >
                <table name="tb01" dml="0000"></table>
                <table name="tb02" dml="1111"></table>
            </schema>
        </privileges>
         -->
    </user>

    <user name="user">
        <property name="password">user</property>
        <property name="schemas">wbiao</property>
        <property name="readOnly">true</property>
        <property name="defaultSchema">wbiao</property>
    </user>

</mycat:server>


#启动mycat
[root@10 conf]# mycat start
Starting Mycat-server...
监控日志
[root@10 ~]# tail -F /apps/mycat/logs/wrapper.log
STATUS | wrapper  | 2023/05/24 02:44:41 | <-- Wrapper Stopped
STATUS | wrapper  | 2023/05/24 02:44:45 | --> Wrapper Started as Daemon
STATUS | wrapper  | 2023/05/24 02:44:45 | Launching a JVM...
INFO   | jvm 1    | 2023/05/24 02:44:46 | Wrapper (Version 3.2.3) http://wrapper.tanukisoftware.org
INFO   | jvm 1    | 2023/05/24 02:44:46 |   Copyright 1999-2006 Tanuki Software, Inc.  All Rights Reserved.
INFO   | jvm 1    | 2023/05/24 02:44:46 |
INFO   | jvm 1    | 2023/05/24 02:44:48 | MyCAT Server startup successfully. see logs in logs/mycat.log

#链接测试
[root@10 conf]# mysql -uroot -pqwe123 -h10.0.0.23
#读测试
mysql> select @@hostname;
+------------+
| @@hostname |
+------------+
| 10.0.0.24  |
+------------+
1 row in set (0.08 sec)

mysql> select @@hostname;
+------------+
| @@hostname |
+------------+
| 10.0.0.22  |
+------------+
1 row in set (0.00 sec)

mysql> select @@hostname;
+------------+
| @@hostname |
+------------+
| 10.0.0.19  |
+------------+
1 row in set (0.01 sec)

mysql> select @@hostname;
+------------+
| @@hostname |
+------------+
| 10.0.0.19  |
+------------+
1 row in set (0.01 sec)

mysql> select @@hostname;
+------------+
| @@hostname |
+------------+
| 10.0.0.24  |
+------------+
1 row in set (0.01 sec)

mysql> select @@hostname;
+------------+
| @@hostname |
+------------+
| 10.0.0.22  |
+------------+
1 row in set (0.00 sec)
#写测试
mysql> update teachers set name=@@hostname where tid=5;
Query OK, 0 rows affected (0.00 sec)
Rows matched: 0  Changed: 0  Warnings: 0

mysql> select * from teachers;
+-----+---------------+-----+--------+
| TID | Name          | Age | Gender |
+-----+---------------+-----+--------+
|   1 | Song Jiang    |  45 | M      |
|   2 | Zhang Sanfeng |  94 | M      |
|   3 | Miejue Shitai |  77 | F      |
|   4 | 10.0.0.18     |  93 | F      |
+-----+---------------+-----+--------+
4 rows in set (0.00 sec)
mysql> update teachers set name=@@hostname where tid=3;
Query OK, 1 row affected (0.01 sec)
Rows matched: 1  Changed: 1  Warnings: 0

mysql> select * from teachers;
+-----+---------------+-----+--------+
| TID | Name          | Age | Gender |
+-----+---------------+-----+--------+
|   1 | Song Jiang    |  45 | M      |
|   2 | Zhang Sanfeng |  94 | M      |
|   3 | 10.0.0.18     |  77 | F      |
|   4 | 10.0.0.18     |  93 | F      |
+-----+---------------+-----+--------+
4 rows in set (0.00 sec)

#关闭10.0.0.18的mysql
[root@10 ~]# systemctl stop mysqld
#mycat做主的高可用的写测试
mysql> select * from teachers;
+-----+---------------+-----+--------+
| TID | Name          | Age | Gender |
+-----+---------------+-----+--------+
|   1 | Song Jiang    |  45 | M      |
|   2 | Zhang Sanfeng |  94 | M      |
|   3 | 10.0.0.18     |  77 | F      |
|   4 | 10.0.0.18     |  93 | F      |
+-----+---------------+-----+--------+
4 rows in set (0.00 sec)

mysql> update teachers set name=@@hostname where tid=1;
Query OK, 1 row affected (0.01 sec)
Rows matched: 1  Changed: 1  Warnings: 0

mysql> select * from teachers;
+-----+---------------+-----+--------+
| TID | Name          | Age | Gender |
+-----+---------------+-----+--------+
|   1 | 10.0.0.22     |  45 | M      |
|   2 | Zhang Sanfeng |  94 | M      |
|   3 | 10.0.0.18     |  77 | F      |
|   4 | 10.0.0.18     |  93 | F      |
+-----+---------------+-----+--------+
4 rows in set (0.01 sec)

mysql> update teachers set name=@@hostname where tid=2;
Query OK, 1 row affected (0.00 sec)
Rows matched: 1  Changed: 1  Warnings: 0

mysql> select * from teachers;
+-----+-----------+-----+--------+
| TID | Name      | Age | Gender |
+-----+-----------+-----+--------+
|   1 | 10.0.0.22 |  45 | M      |
|   2 | 10.0.0.22 |  94 | M      |
|   3 | 10.0.0.18 |  77 | F      |
|   4 | 10.0.0.18 |  93 | F      |
+-----+-----------+-----+--------+
4 rows in set (0.00 sec)
文章来源地址https://www.toymoban.com/news/detail-456751.html
文章来源:https://www.toymoban.com/news/detail-456751.html
到了这里,关于mycat实现mysql基于GITD实现双主双从读写分离master节点高可用的文章就介绍完了。如果您还想了解更多内容,请在右上角搜索TOY模板网以前的文章或继续浏览下面的相关文章,希望大家以后多多支持TOY模板网!


