概述
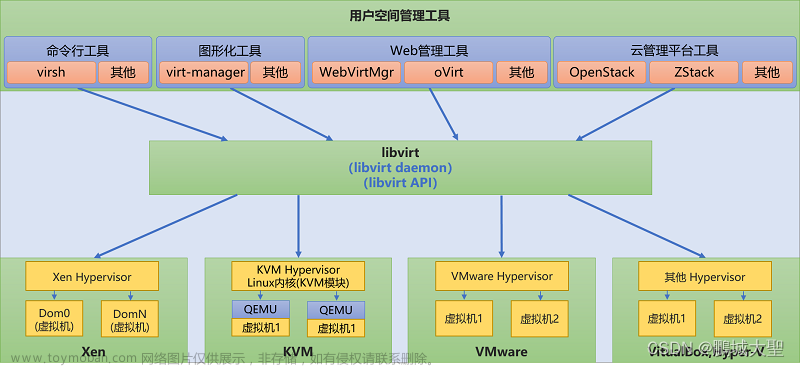
gpu-manager是腾讯的一个开源vGPU应用,具体原理就不介绍了,详见GPUManager虚拟化方案。
本文主要参照腾讯开源vgpu方案gpu-manager安装教程进行安装,并就安装时出现的问题,对其中的部分配置进行了更改,如果根据上述文章安装失败,可以参考本文来进行安装。
准备工作
gpu-manager不提供nvidia容器运行时,需要提前在所有有GPU的节点上安装nvidia驱动。如果集群中之前安装了gpu-operator之类的应用,需要先卸载,否则会因为kubelet占用Xserver进程导致安装过程出现error。具体过程不赘述了,参考如下文章:
超全超详细的安装nvidia显卡驱动教程
Ubuntu安装nvidia驱动
解决centos下安装显卡驱动出现的unable to find the kernel source tree等关于内核版本问题
如何关闭X Server,以避免在更新nVidia驱动程序时出错?
安装完之后重启(没有试过不重启是否可以)并运行如下命令,以初始化/dev下的硬件:
nvidia-smi
nvidia-modprobe -u -c=0
运行后/dev下应该有如下等内容被创建:
[root@xxxxxx dev]# ls /dev|grep nvid
nvidia0
nvidia-caps
nvidiactl
nvidia-uvm
nvidia-uvm-tools
否则容器初始化时会报一个/dev/xxx找不到的错误
(参考:https://blog.csdn.net/JosephThatwho/article/details/107869332)
部署gpu-manager
本文集群中docker的驱动是systemd,而gpu-manager默认为cgroupfs,因此需要修改配置,而更换驱动的配置在gpu-manager较高版本才支持。
并且如果集群版本较高,低版本的gpu-manager会不兼容(本文k8s版本为v1.22.10)。
创建gpu-manager.yaml配置如下:
apiVersion: v1
kind: ServiceAccount
metadata:
  name: gpu-manager
  namespace: kube-system
---
apiVersion: rbac.authorization.k8s.io/v1
kind: ClusterRoleBinding
metadata:
  name: gpu-manager-role
subjects:
- kind: ServiceAccount
  name: gpu-manager
  namespace: kube-system
roleRef:
  kind: ClusterRole
  name: cluster-admin
  apiGroup: rbac.authorization.k8s.io
---
apiVersion: apps/v1
kind: DaemonSet
metadata:
  name: gpu-manager-daemonset
  namespace: kube-system
spec:
  updateStrategy:
    type: RollingUpdate
  selector:
    matchLabels:
      name: gpu-manager-ds
  template:
    metadata:
      # This annotation is deprecated. Kept here for backward compatibility
      # See https://kubernetes.io/docs/tasks/administer-cluster/guaranteed-scheduling-critical-addon-pods/
      annotations:
        scheduler.alpha.kubernetes.io/critical-pod: ""
      labels:
        name: gpu-manager-ds
    spec:
      serviceAccount: gpu-manager
      tolerations:
        # This toleration is deprecated. Kept here for backward compatibility
        # See https://kubernetes.io/docs/tasks/administer-cluster/guaranteed-scheduling-critical-addon-pods/
        - key: CriticalAddonsOnly
          operator: Exists
        - key: tencent.com/vcuda-core
          operator: Exists
          effect: NoSchedule
      # Mark this pod as a critical add-on; when enabled, the critical add-on
      # scheduler reserves resources for critical add-on pods so that they can
      # be rescheduled after a failure.
      # See https://kubernetes.io/docs/tasks/administer-cluster/guaranteed-scheduling-critical-addon-pods/
      priorityClassName: "system-node-critical"
      # only run node has gpu device
      nodeSelector:
        nvidia-device-enable: enable
      hostPID: true
      containers:
        - image: tkestack/gpu-manager:v1.1.5
          name: gpu-manager
          securityContext:
            privileged: true
          ports:
            - containerPort: 5678
          volumeMounts:
            - name: device-plugin
              mountPath: /var/lib/kubelet/device-plugins
            - name: vdriver
              mountPath: /etc/gpu-manager/vdriver
            - name: vmdata
              mountPath: /etc/gpu-manager/vm
            - name: log
              mountPath: /var/log/gpu-manager
            - name: checkpoint
              mountPath: /etc/gpu-manager/checkpoint
            - name: run-dir
              mountPath: /var/run
            - name: cgroup
              mountPath: /sys/fs/cgroup
              readOnly: true
            - name: usr-directory
              mountPath: /usr/local/host
              readOnly: true
            - name: kube-root
              mountPath: /root/.kube
              readOnly: true
          env:
            - name: LOG_LEVEL
              value: "4"
            - name: EXTRA_FLAGS
              value: "--cgroup-driver=systemd"
            - name: NODE_NAME
              valueFrom:
                fieldRef:
                  fieldPath: spec.nodeName
      volumes:
        - name: device-plugin
          hostPath:
            type: Directory
            path: /var/lib/kubelet/device-plugins
        - name: vmdata
          hostPath:
            type: DirectoryOrCreate
            path: /etc/gpu-manager/vm
        - name: vdriver
          hostPath:
            type: DirectoryOrCreate
            path: /etc/gpu-manager/vdriver
        - name: log
          hostPath:
            type: DirectoryOrCreate
            path: /etc/gpu-manager/log
        - name: checkpoint
          hostPath:
            type: DirectoryOrCreate
            path: /etc/gpu-manager/checkpoint
        # We have to mount the whole /var/run directory into container, because of bind mount docker.sock
        # inode change after host docker is restarted
        - name: run-dir
          hostPath:
            type: Directory
            path: /var/run
        - name: cgroup
          hostPath:
            type: Directory
            path: /sys/fs/cgroup
        # We have to mount /usr directory instead of specified library path, because of non-existing
        # problem for different distro
        - name: usr-directory
          hostPath:
            type: Directory
            path: /usr
        - name: kube-root
          hostPath:
            type: Directory
            path: /root/.kube
主要修改了如下:
更换了高版本镜像
去掉–incluster-mode=true,因为高版本没有该选项
其次如果不指定或者将–logtostderr为true,那么日志就会显示在容器的log(命令行)中,按需指定
最后指定–cgroup-driver为systemd(如果你的驱动是cgroupfs则无需指定)
它会创建daemonset,并在对应搭上了一个标签的node上运行。
所以需要给所有需要调度gpu节点打上标签,如下:
kubectl label node <你的GPU节点> nvidia-device-enable=enable
kubectl label node <你的GPU节点> nvidia-device-enable=enable
...
kubectl apply -f gpu-manager.yaml
如果一切正确的话,守护进程应该在给打了label的节点上正常运行:
部署gpu-admission
gpu-admission的部署按照上述教程(https://www.jianshu.com/p/7d795bc226c7)的来没有问题,不过我做了一些小小的改变
创建gpu-admission.yaml如下:
apiVersion: v1
kind: ServiceAccount
metadata:
  name: gpu-admission
  namespace: kube-system
---
apiVersion: rbac.authorization.k8s.io/v1
kind: ClusterRoleBinding
metadata:
  name: gpu-admission-as-kube-scheduler
subjects:
- kind: ServiceAccount
  name: gpu-admission
  namespace: kube-system
roleRef:
  kind: ClusterRole
  name: system:kube-scheduler
  apiGroup: rbac.authorization.k8s.io
---
apiVersion: rbac.authorization.k8s.io/v1
kind: ClusterRoleBinding
metadata:
  name: gpu-admission-as-volume-scheduler
subjects:
- kind: ServiceAccount
  name: gpu-admission
  namespace: kube-system
roleRef:
  kind: ClusterRole
  name: system:volume-scheduler
  apiGroup: rbac.authorization.k8s.io
---
apiVersion: rbac.authorization.k8s.io/v1
kind: ClusterRoleBinding
metadata:
  name: gpu-admission-as-daemon-set-controller
subjects:
- kind: ServiceAccount
  name: gpu-admission
  namespace: kube-system
roleRef:
  kind: ClusterRole
  name: system:controller:daemon-set-controller
  apiGroup: rbac.authorization.k8s.io
---
apiVersion: apps/v1
kind: Deployment
metadata:
  labels:
    component: scheduler
    tier: control-plane
    app: gpu-admission
  name: gpu-admission
  namespace: kube-system
spec:
  selector:
    matchLabels:
      component: scheduler
      tier: control-plane
  replicas: 1
  template:
    metadata:
      labels:
        component: scheduler
        tier: control-plane
        version: second
    spec:
      serviceAccountName: gpu-admission
      containers:
      - image: thomassong/gpu-admission:47d56ae9
        name: gpu-admission
        env:
          - name: LOG_LEVEL
            value: "4"
        ports:
          - containerPort: 3456
      dnsPolicy: ClusterFirstWithHostNet
      hostNetwork: true
      priority: 2000000000
      priorityClassName: system-cluster-critical
---
apiVersion: v1
kind: Service
metadata:
  name: gpu-admission
  namespace: kube-system
spec:
  ports:
  - port: 3456
    protocol: TCP
    targetPort: 3456
  selector:
    app: gpu-admission
  type: ClusterIP
我为该deploy配置了一个service,之后就配置时就不用通过pod IP访问了(参考了https://cloud.tencent.com/developer/article/1685122):
为deploy再打一个标签
创建service
kubectl create -f gpu-admission.yaml
创建/etc/kubernetes/scheduler-policy-config.json,如下:
{
    "kind": "Policy",
    "apiVersion": "v1",
    "predicates": [
        {
            "name": "PodFitsHostPorts"
        },
        {
            "name": "PodFitsResources"
        },
        {
            "name": "NoDiskConflict"
        },
        {
            "name": "MatchNodeSelector"
        },
        {
            "name": "HostName"
        }
    ],
    "priorities": [
        {
            "name": "BalancedResourceAllocation",
            "weight": 1
        },
        {
            "name": "ServiceSpreadingPriority",
            "weight": 1
        }
    ],
    "extenders": [
        {
            "urlPrefix": "http://gpu-admission.kube-system:3456/scheduler",
            "apiVersion": "v1beta1",
            "filterVerb": "predicates",
            "enableHttps": false,
            "nodeCacheCapable": false
        }
    ],
    "hardPodAffinitySymmetricWeight": 10,
    "alwaysCheckAllPredicates": false
}
之后的过程与上述教程(https://www.jianshu.com/p/7d795bc226c7)完全一致。
创建/etc/kubernetes/scheduler-extender.yaml
apiVersion: kubescheduler.config.k8s.io/v1alpha1
kind: KubeSchedulerConfiguration
clientConnection:
  kubeconfig: "/etc/kubernetes/scheduler.conf"
algorithmSource:
  policy:
    file:
      path: "/etc/kubernetes/scheduler-policy-config.json"
修改/etc/kubernetes/manifests/kube-scheduler.yaml,修改完后kube-scheduler会自动重启,如下:
apiVersion: v1
kind: Pod
metadata:
  creationTimestamp: null
  labels:
    component: kube-scheduler
    tier: control-plane
  name: kube-scheduler
  namespace: kube-system
spec:
  containers:
  - command:
    - kube-scheduler
    - --authentication-kubeconfig=/etc/kubernetes/scheduler.conf
    - --authorization-kubeconfig=/etc/kubernetes/scheduler.conf
    - --bind-address=0.0.0.0
    - --feature-gates=TTLAfterFinished=true,ExpandCSIVolumes=true,CSIStorageCapacity=true,RotateKubeletServerCertificate=true
    - --kubeconfig=/etc/kubernetes/scheduler.conf
    - --leader-elect=true
    - --port=0
    - --config=/etc/kubernetes/scheduler-extender.yaml
    image: registry.cn-beijing.aliyuncs.com/kubesphereio/kube-scheduler:v1.22.10
    imagePullPolicy: IfNotPresent
    livenessProbe:
      failureThreshold: 8
      httpGet:
        path: /healthz
        port: 10259
        scheme: HTTPS
      initialDelaySeconds: 10
      periodSeconds: 10
      timeoutSeconds: 15
    name: kube-scheduler
    resources:
      requests:
        cpu: 100m
    startupProbe:
      failureThreshold: 24
      httpGet:
        path: /healthz
        port: 10259
        scheme: HTTPS
      initialDelaySeconds: 10
      periodSeconds: 10
      timeoutSeconds: 15
    volumeMounts:
    - mountPath: /etc/kubernetes/scheduler.conf
      name: kubeconfig
      readOnly: true
    - mountPath: /etc/localtime
      name: localtime
      readOnly: true
    - mountPath: /etc/kubernetes/scheduler-extender.yaml
      name: extender
      readOnly: true
    - mountPath: /etc/kubernetes/scheduler-policy-config.json
      name: extender-policy
      readOnly: true
  hostNetwork: true
  priorityClassName: system-node-critical
  securityContext:
    seccompProfile:
      type: RuntimeDefault
  volumes:
  - hostPath:
      path: /etc/kubernetes/scheduler.conf
      type: FileOrCreate
    name: kubeconfig
  - hostPath:
      path: /etc/localtime
      type: File
    name: localtime
  - hostPath:
      path: /etc/kubernetes/scheduler-extender.yaml
      type: FileOrCreate
    name: extender
  - hostPath:
      path: /etc/kubernetes/scheduler-policy-config.json
      type: FileOrCreate
    name: extender-policy
status: {}
该作者修改了3处地方,如下:
启动命令
挂载配置
卷配置
如果正常,修改完之后,调度器会自动重新创建:
如果没有创建,可以手动apply,然后就可以看到错误原因了。
查看结果
至此,集群中应该有如下几类Pod正常运行:
可以查看节点是否存在vGPU资源:
kubectl describe node <你的GPU节点>

可以自己部署个pod测试,如果成功的话,比如pytorch,应该会有如下输出:
(下图为当前分配了多少资源,与上图无关) 文章来源:https://www.toymoban.com/news/detail-459469.html
参考
腾讯开源vgpu方案gpu-manager安装教程
GPUManager虚拟化方案
超全超详细的安装nvidia显卡驱动教程
解决centos下安装显卡驱动出现的unable to find the kernel source tree等关于内核版本问题
如何关闭X Server,以避免在更新nVidia驱动程序时出错?
https://github.com/tkestack/gpu-manager/issues/138
https://github.com/tkestack/gpu-manager/issues/151
https://github.com/tkestack/gpu-manager/issues/89文章来源地址https://www.toymoban.com/news/detail-459469.html
到了这里,关于k8s中GPU虚拟化工具gpu-manager的安装的文章就介绍完了。如果您还想了解更多内容,请在右上角搜索TOY模板网以前的文章或继续浏览下面的相关文章,希望大家以后多多支持TOY模板网!


