准备工作
1、一台带有英伟达显卡的电脑
2、anaconda环境
3、CUDA以及cudnn
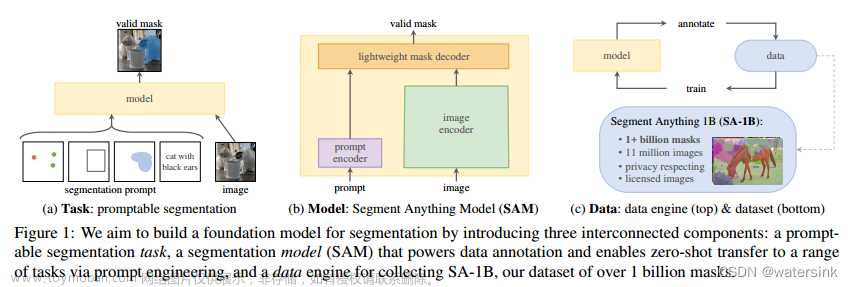
前言
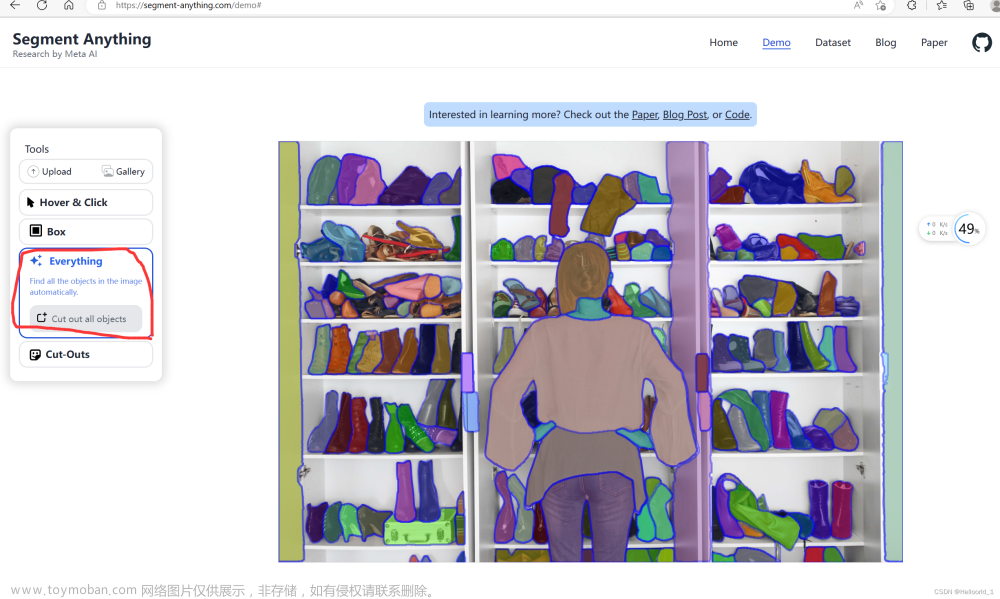
最近sam火遍了cv圈,号称可用一个模型分割一切,本文使用sam导出onnx模型,并通过onnxruntime(ort)进行部署,能够明显提升sam在本地的运算速度。话不多说,先看效果:
pytorch运行时间:![[segment-anything]使用onnxruntime部署sam模型,速度提高30倍!](https://imgs.yssmx.com/Uploads/2023/05/461140-1.jpeg)
ort运行时间:![[segment-anything]使用onnxruntime部署sam模型,速度提高30倍!](https://imgs.yssmx.com/Uploads/2023/05/461140-2.jpeg)
可见,sam的vit encoder运行时间ort足足比pytorch快了30倍!接下来让我们一步一步安装sam并导出onnx模型并部署在ort上面。
可运行的代码文件在我的GitHub仓库当中,有需要的小伙伴可以下载运行,别忘了给我的仓库点个star。
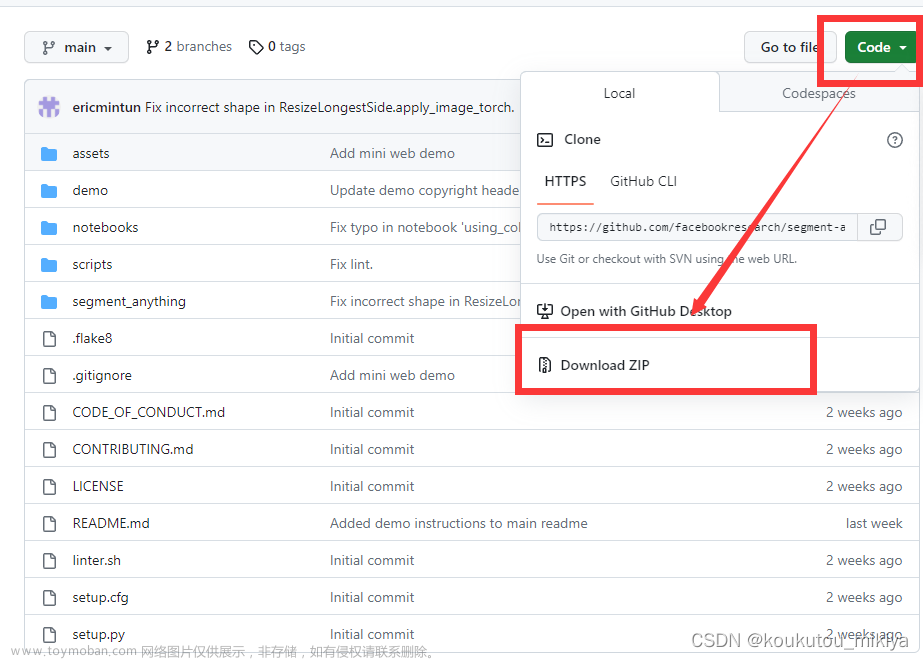
SAM官方代码下载与安装
首先,打开SAM的GitHub主页,并将其克隆到本地:![[segment-anything]使用onnxruntime部署sam模型,速度提高30倍!](https://imgs.yssmx.com/Uploads/2023/05/461140-3.jpeg)
git clone https://github.com/facebookresearch/segment-anything.git
然后,通过源码安装sam,并安装pytorch,pytorch建议安装2.0版本,1.x版本在导出onnx时会报错。
cd segment-anything
conda create -n sam python==3.8
conda activate sam
pip install -e .
pip install opencv-python pycocotools matplotlib onnxruntime onnx
这样就安装好sam了,可以运行以下代码验证安装结果,代码如下:
from segment_anything import SamPredictor, sam_model_registry
sam = sam_model_registry["<model_type>"](checkpoint="<path/to/checkpoint>")
predictor = SamPredictor(sam)
predictor.set_image(<your_image>)
masks, _, _ = predictor.predict(<input_prompts>)
若无报错则说明安装成功。
onnx文件的导出
sam提供了三种不同大小的模型文件,分别为vit_h、vit_l和vit_b。由于博主的电脑性能有限,只能运行vit_b模型,因此之后的讲解都是基于此模型。
prompt encoder和mask decoder模型导出
在sam的仓库中,scripts文件夹下的export_onnx_model.py可以直接导出prompt encoder和mask decoder,因此若想获取onnx文件,则需在命令行中输入以下命令:
python .\scripts\export_onnx_model.py --checkpoint .\model\sam_vit_b_01ec64.pth --output test.onnx --model-type vit_b --opset 12
其中,命令的参数如下:
–checkpoint为模型存放位置;
–output为生成的onnx存放路径;
–model-type表示image encoder所用的模型,共有vit_b、vit_l和vit_h三种模型,在这里我使用的是vit_b;
–opset表示生成onnx的版本,这里我输入的是12。
vit encoder模型的导出
sam官方代码中自带的导出程序当中,只支持prompt encoder和mask decoder模型的导出,而vit encoder是sam中计算量最为庞大的一部分,占据了主要的计算时间,因此,为了加速模型的运行时间,必须手动导出vit encoder模型的权重。
由于sam模型权重保存在pth文件当中,而pytorch的权重参数由一个OrderedDict字典进行保存,它的key为权重的名称,item为权重参数,因此,新建一个exprot_encoder.py文件,并初始化一个vit encoder模型,将其权重名称与sam权重文件进行对比,下列是部分的对比结果:
# sam官方权重
image_encoder.neck.0.weight
image_encoder.neck.1.weight
image_encoder.neck.1.bias
image_encoder.neck.2.weight
image_encoder.neck.3.weight
image_encoder.neck.3.bias
# encoder权重
neck.0.weight
neck.1.weight
neck.1.bias
neck.2.weight
neck.3.weight
neck.3.bias
可见,在vit encoder部分,官方权重的名称中前面多了"image_encoder."这几个字符,因此只需要将其提取并放入手动生成的encoder当中,即可导出vit encoder的onnx文件,以下是导出代码:
import torch

from collections import OrderedDict
from functools import partial
from segment_anything.modeling.image_encoder import ImageEncoderViT


encoder = ImageEncoderViT(
            depth=12,
            embed_dim=768,
            img_size=1024,
            mlp_ratio=4,
            norm_layer=partial(torch.nn.LayerNorm, eps=1e-6),
            num_heads=12,
            patch_size=16,
            qkv_bias=True,
            use_rel_pos=True,
            global_attn_indexes=[2, 5, 8, 11],
            window_size=14,
            out_chans=256,
        )

param = torch.load("./model/sam_vit_b_01ec64.pth")

d = OrderedDict()
for k in param:
    if "image_encoder" in k:
        d[k[14:]] = param[k]

encoder.load_state_dict(d)
encoder.eval()

x = torch.randn((1, 3, 1024, 1024))
torch.onnx.export(encoder,
                  x,
                  "vit_b.onnx",
                  opset_version=12,
                  input_names=["input"],
                  output_names=["output"])
也可使用我修改过的sam库进行导出,地址在这里。
在库中我修改了segment_anything/utils/onnx.py文件,添加以下代码以用于导出image encoder:
class ImageEncoderOnnxModel(nn.Module):
    """
    This model should not be called directly, but is used in ONNX export.
    It combines the image encoder of Sam, with some functions modified to enable
    model tracing. Also supports extra options controlling what information. See
    the ONNX export script for details.
    """

    def __init__(
        self,
        model: Sam,
        use_preprocess: bool,
        pixel_mean: List[float] = [123.675, 116.28, 103.53],
        pixel_std: List[float] = [58.395, 57.12, 57.375],
    ):
        super().__init__()
        self.use_preprocess = use_preprocess
        self.pixel_mean = torch.tensor(pixel_mean, dtype=torch.float)
        self.pixel_std = torch.tensor(pixel_std, dtype=torch.float)
        self.image_encoder = model.image_encoder

    @torch.no_grad()
    def forward(self, input_image: torch.Tensor):
        if self.use_preprocess:
            input_image = self.preprocess(input_image)
        image_embeddings = self.image_encoder(input_image)
        return image_embeddings

    def preprocess(self, x: torch.Tensor) -> torch.Tensor:
        # Normalize colors
        x = (x - self.pixel_mean) / self.pixel_std

        # permute channels
        x = torch.permute(x, (2, 0, 1))

        # Pad
        h, w = x.shape[-2:]
        padh = self.image_encoder.img_size - h
        padw = self.image_encoder.img_size - w
        x = F.pad(x, (0, padw, 0, padh))

        # expand channels
        x = torch.unsqueeze(x, 0)
        return x
并添加scripts/export_image_encoder.py文件,通过运行此代码导出onnx模型,以下是代码:
# Copyright (c) Meta Platforms, Inc. and affiliates.
# All rights reserved.

# This source code is licensed under the license found in the
# LICENSE file in the root directory of this source tree.

import torch
import numpy as np

from segment_anything import sam_model_registry
from segment_anything.utils.onnx import ImageEncoderOnnxModel

import os
import argparse
import warnings

try:
    import onnxruntime  # type: ignore

    onnxruntime_exists = True
except ImportError:
    onnxruntime_exists = False

parser = argparse.ArgumentParser(
    description="Export the SAM image encoder to an ONNX model."
)

parser.add_argument(
    "--checkpoint",
    type=str,
    required=True,
    help="The path to the SAM model checkpoint.",
)

parser.add_argument(
    "--output", type=str, required=True, help="The filename to save the ONNX model to."
)

parser.add_argument(
    "--model-type",
    type=str,
    required=True,
    help="In ['default', 'vit_h', 'vit_l', 'vit_b']. Which type of SAM model to export.",
)

parser.add_argument(
    "--use-preprocess",
    action="store_true",
    help="Whether to preprocess the image by resizing, standardizing, etc.",
)

parser.add_argument(
    "--opset",
    type=int,
    default=17,
    help="The ONNX opset version to use. Must be >=11",
)

parser.add_argument(
    "--quantize-out",
    type=str,
    default=None,
    help=(
        "If set, will quantize the model and save it with this name. "
        "Quantization is performed with quantize_dynamic from onnxruntime.quantization.quantize."
    ),
)

parser.add_argument(
    "--gelu-approximate",
    action="store_true",
    help=(
        "Replace GELU operations with approximations using tanh. Useful "
        "for some runtimes that have slow or unimplemented erf ops, used in GELU."
    ),
)


def run_export(
    model_type: str,
    checkpoint: str,
    output: str,
    use_preprocess: bool,
    opset: int,
    gelu_approximate: bool = False,
):
    print("Loading model...")
    sam = sam_model_registry[model_type](checkpoint=checkpoint)

    onnx_model = ImageEncoderOnnxModel(
        model=sam,
        use_preprocess=use_preprocess,
        pixel_mean=[123.675, 116.28, 103.53],
        pixel_std=[58.395, 57.12, 57.375],
    )

    if gelu_approximate:
        for n, m in onnx_model.named_modules():
            if isinstance(m, torch.nn.GELU):
                m.approximate = "tanh"

    image_size = sam.image_encoder.img_size
    if use_preprocess:
        dummy_input = {
            "input_image": torch.randn((image_size, image_size, 3), dtype=torch.float)
        }
        dynamic_axes = {
            "input_image": {0: "image_height", 1: "image_width"},
        }
    else:
        dummy_input = {
            "input_image": torch.randn(
                (1, 3, image_size, image_size), dtype=torch.float
            )
        }
        dynamic_axes = None

    _ = onnx_model(**dummy_input)

    output_names = ["image_embeddings"]

    with warnings.catch_warnings():
        warnings.filterwarnings("ignore", category=torch.jit.TracerWarning)
        warnings.filterwarnings("ignore", category=UserWarning)
        print(f"Exporting onnx model to {output}...")
        if model_type == "vit_h":
            output_dir, output_file = os.path.split(output)
            os.makedirs(output_dir, mode=0o777, exist_ok=True)
            torch.onnx.export(
                onnx_model,
                tuple(dummy_input.values()),
                output,
                export_params=True,
                verbose=False,
                opset_version=opset,
                do_constant_folding=True,
                input_names=list(dummy_input.keys()),
                output_names=output_names,
                dynamic_axes=dynamic_axes,
            )
        else:
            with open(output, "wb") as f:
                torch.onnx.export(
                    onnx_model,
                    tuple(dummy_input.values()),
                    f,
                    export_params=True,
                    verbose=False,
                    opset_version=opset,
                    do_constant_folding=True,
                    input_names=list(dummy_input.keys()),
                    output_names=output_names,
                    dynamic_axes=dynamic_axes,
                )

    if onnxruntime_exists:
        ort_inputs = {k: to_numpy(v) for k, v in dummy_input.items()}
        providers = ["CPUExecutionProvider"]

        if model_type == "vit_h":
            session_option = onnxruntime.SessionOptions()
            ort_session = onnxruntime.InferenceSession(output, providers=providers)
            param_file = os.listdir(output_dir)
            param_file.remove(output_file)
            for i, layer in enumerate(param_file):
                with open(os.path.join(output_dir, layer), "rb") as fp:
                    weights = np.frombuffer(fp.read(), dtype=np.float32)
                    weights = onnxruntime.OrtValue.ortvalue_from_numpy(weights)
                    session_option.add_initializer(layer, weights)
        else:
            ort_session = onnxruntime.InferenceSession(output, providers=providers)

        _ = ort_session.run(None, ort_inputs)
        print("Model has successfully been run with ONNXRuntime.")


def to_numpy(tensor):
    return tensor.cpu().numpy()


if __name__ == "__main__":
    args = parser.parse_args()
    run_export(
        model_type=args.model_type,
        checkpoint=args.checkpoint,
        output=args.output,
        use_preprocess=args.use_preprocess,
        opset=args.opset,
        gelu_approximate=args.gelu_approximate,
    )

    if args.quantize_out is not None:
        assert onnxruntime_exists, "onnxruntime is required to quantize the model."
        from onnxruntime.quantization import QuantType  # type: ignore
        from onnxruntime.quantization.quantize import quantize_dynamic  # type: ignore

        print(f"Quantizing model and writing to {args.quantize_out}...")
        quantize_dynamic(
            model_input=args.output,
            model_output=args.quantize_out,
            optimize_model=True,
            per_channel=False,
            reduce_range=False,
            weight_type=QuantType.QUInt8,
        )
        print("Done!")
其中,命令的参数如下:
–checkpoint为模型存放位置;
–output为生成的onnx存放路径;
–model-type表示image encoder所用的模型,共有vit_b、vit_l和vit_h三种模型,在这里我使用的是vit_b;
–opset表示生成onnx的版本,这里我输入的是12。
使用onnxruntime加速sam
从上文可以得到sam的两个onnx文件,接下来需要部署到ort当中使用。
部署vit encoder部分
vit encoder作为sam的特征提取模块,会将输入的图像通过一个vit模型进行特征提取,并输出特征提取后的image embedding。首先创建vit encoder类,用于加载vit encoder模型
class Vit:
    """Vit encoder model for sam.

    In this class, vit model will encoder the input image.

    Args:
        model_path (str): Vit model path.
        device (str): Inference device, user can choose 'cuda' or 'cpu'. default to 'cuda'.
        warmup_epoch (int): Warmup, if set 0,the model won`t use random inputs to warmup. default to 5.
    """

    def __init__(self,
                 model_path: str,
                 device: str = "cuda",
                 warmup_epoch: int = 5,
                 **kwargs):
        opt = ort.SessionOptions()

        if device == "cuda":
            provider = ['CUDAExecutionProvider']
        elif device == "cpu":
            provider = ['CPUExecutionProvider']
        else:
            raise ValueError("Invalid device, please use 'cuda' or 'cpu' device.")

        print("loading vit model...")
        self.session = ort.InferenceSession(model_path,
                                            opt,
                                            providers=provider,
                                            **kwargs)

        self.input_name = self.session.get_inputs()[0].name
        self.input_shape = self.session.get_inputs()[0].shape
        self.output_name = self.session.get_outputs()[0].name
        self.output_shape = self.session.get_outputs()[0].shape

        self.mean = np.array([123.675, 116.28, 103.53])
        self.std = np.array([58.395, 57.12, 57.375])

        if warmup_epoch:
            self.warmup(warmup_epoch)
由于ort在推理过程中,往往前几轮的推理时间较长,因此需要预热,稳定网络推理时间。
    def warmup(self, epoch: int) -> None:
        """warmup function

        Args:
            epoch (int): warmup epoch.
        """
        x = np.random.random(self.input_shape).astype(np.float32)
        print("start warmup!")
        for i in tqdm(range(epoch)):
            self.session.run(None, {self.input_name: x})
        print("warmup finish!")
在图像输入后,需要对输入图像进行预处理,包括resize、减均值除方差等操作,才可输入网络推理。
    def transform(self, img: np.ndarray) -> np.ndarray:
        """image transform

        This function can convert the input image to the required input format for vit.

        Args:
            img (np.ndarray): input image, the image type should be BGR.

        Returns:
            np.ndarray: transformed image.
        """
        h, w, c = img.shape

        img = cv2.cvtColor(img, cv2.COLOR_BGR2RGB)
        img = (img - self.mean) / self.std

        size = max(h, w)
        img = np.pad(img, ((0, size - h), (0, size - w), (0, 0)), 'constant', constant_values=(0, 0))
        img = cv2.resize(img, self.input_shape[2:])
        img = np.expand_dims(img, axis=0)
        img = np.transpose(img, axes=[0, 3, 1, 2]).astype(np.float32)
        return img
在sam的预处理当中,在resize图像时,会将长宽较短的一侧在后方填充0,具体的操作类似于下图所示
resize前![[segment-anything]使用onnxruntime部署sam模型,速度提高30倍!](https://imgs.yssmx.com/Uploads/2023/05/461140-4.jpeg)
resize后![[segment-anything]使用onnxruntime部署sam模型,速度提高30倍!](https://imgs.yssmx.com/Uploads/2023/05/461140-5.jpeg)
最后,vit encoder会将图像喂入网络推理,获取image embedding
    def _extract_feature(self, tensor: np.ndarray) -> np.ndarray:
        """extract image feature

        this function can use vit to extract feature from transformed image.

        Args:
            tensor (np.ndarray): input image.

        Returns:
            np.ndarray: image`s feature.
        """
        assert list(tensor.shape) == self.input_shape
        feature = self.session.run(None, {self.input_name: tensor})[0]
        assert list(feature.shape) == self.output_shape
        return feature
部署prompt encoder和mask decoder模型
在sam当中prompt encoder用于接受外部prompt,例如关键点、检测框、mask等,而mask decoder用于接受encoder生成的embedding。首先,定义decoder类,用于存放模型以及推理。
class Decoder:
    """Sam decoder model.

    This class is the sam prompt encoder and lightweight mask decoder.

    Args:
        model_path (str): decoder model path.
        device (str): Inference device, user can choose 'cuda' or 'cpu'. default to 'cuda'.
        warmup_epoch (int): Warmup, if set 0,the model won`t use random inputs to warmup. default to 10.
    """
    img_size = (1024, 1024)
    mask_threshold = 0.0

    def __init__(self,
                 model_path: str,
                 device: str = "cuda",
                 warmup_epoch: int = 10,
                 **kwargs):
        opt = ort.SessionOptions()

        if device == "cuda":
            provider = ['CUDAExecutionProvider']
        elif device == "cpu":
            provider = ['CPUExecutionProvider']
        else:
            raise ValueError("Invalid device, please use 'cuda' or 'cpu' device.")

        print("loading decoder model...")
        self.session = ort.InferenceSession(model_path,
                                            opt,
                                            providers=provider,
                                            **kwargs)

        if warmup_epoch:
            self.warmup(warmup_epoch)
网络的输入共有6个输入,分别是vit encoder的输出embedding、坐标点位置、坐标点label、mask、是否有mask输入以及原图大小,在坐标点的label当中,1表示前景点、0表示背景点,而box输入为左上角点与右下角点,并整合入坐标点输入网络,其label分别为2、3。以下为推理代码:
    def run(self,
            img_embeddings: np.ndarray,
            origin_image_size: Union[list, tuple],
            point_coords: Union[list, np.ndarray] = None,
            point_labels: Union[list, np.ndarray] = None,
            boxes: Union[list, np.ndarray] = None,
            mask_input: np.ndarray = None) -> dict:
        """decoder forward function

        This function can use image feature and prompt to generate mask. Must input
        at least one box or point.

        Args:
            img_embeddings (np.ndarray): the image feature from vit encoder.
            origin_image_size (list or tuple): the input image size.
            point_coords (list or np.ndarray): the input points.
            point_labels (list or np.ndarray): the input points label, 1 indicates
                a foreground point and 0 indicates a background point.
            boxes (list or np.ndarray): A length 4 array given a box prompt to the
                model, in XYXY format.
            mask_input (np.ndarray): A low resolution mask input to the model,
                typically coming from a previous prediction iteration. Has form
                1xHxW, where for SAM, H=W=256.

        Returns:
            dict: the segment results.
        """
        if point_coords is None and point_labels is None and boxes is None:
            raise ValueError("Unable to segment, please input at least one box or point.")

        if img_embeddings.shape != (1, 256, 64, 64):
            raise ValueError("Got wrong embedding shape!")
        if mask_input is None:
            mask_input = np.zeros((1, 1, 256, 256), dtype=np.float32)
            has_mask_input = np.zeros(1, dtype=np.float32)
        else:
            mask_input = np.expand_dims(mask_input, axis=0)
            has_mask_input = np.ones(1, dtype=np.float32)
            if mask_input.shape != (1, 1, 256, 256):
                raise ValueError("Got wrong mask!")
        if point_coords is not None:
            if isinstance(point_coords, list):
                point_coords = np.array(point_coords, dtype=np.float32)
            if isinstance(point_labels, list):
                point_labels = np.array(point_labels, dtype=np.float32)

        if point_coords is not None:
            point_coords = apply_coords(point_coords, origin_image_size, self.img_size[0]).astype(np.float32)
            point_coords = np.expand_dims(point_coords, axis=0)
            point_labels = np.expand_dims(point_labels, axis=0)

        if boxes is not None:
            if isinstance(boxes, list):
                boxes = np.array(boxes, dtype=np.float32)
            assert boxes.shape[-1] == 4

            boxes = apply_boxes(boxes, origin_image_size, self.img_size[0]).reshape((1, -1, 2)).astype(np.float32)
            box_label = np.array([[2, 3] for i in range(boxes.shape[1] // 2)], dtype=np.float32).reshape((1, -1))

            if point_coords is not None:
                point_coords = np.concatenate([point_coords, boxes], axis=1)
                point_labels = np.concatenate([point_labels, box_label], axis=1)
            else:
                point_coords = boxes
                point_labels = box_label

        assert point_coords.shape[0] == 1 and point_coords.shape[-1] == 2
        assert point_labels.shape[0] == 1

        input_dict = {"image_embeddings": img_embeddings,
                      "point_coords": point_coords,
                      "point_labels": point_labels,
                      "mask_input": mask_input,
                      "has_mask_input": has_mask_input,
                      "orig_im_size": np.array(origin_image_size, dtype=np.float32)}
        res = self.session.run(None, input_dict)

        result_dict = dict()
        for i in range(len(res)):
            out_name = self.session.get_outputs()[i].name
            if out_name == "masks":
                mask = (res[i] > self.mask_threshold).astype(np.int32)
                result_dict[out_name] = mask
            else:
                result_dict[out_name] = res[i]

        return result_dict
这样,即可将sam部署至ort当中。经过测试,ort运行sam的速度平均要比pytorch块30倍,大大提高了网络的运行效率。
运行效果
最后,贴出sam的运行结果图,只用输入两个点,就能精准的将蔡徐坤分割出来,可见sam还是很强大的。![[segment-anything]使用onnxruntime部署sam模型,速度提高30倍!](https://imgs.yssmx.com/Uploads/2023/05/461140-6.jpeg)
![[segment-anything]使用onnxruntime部署sam模型,速度提高30倍!](https://imgs.yssmx.com/Uploads/2023/05/461140-7.jpeg) 文章来源:https://www.toymoban.com/news/detail-461140.html
文章来源:https://www.toymoban.com/news/detail-461140.html
参考链接
1、https://github.com/facebookresearch/segment-anything文章来源地址https://www.toymoban.com/news/detail-461140.html
到了这里,关于[segment-anything]使用onnxruntime部署sam模型,速度提高30倍!的文章就介绍完了。如果您还想了解更多内容,请在右上角搜索TOY模板网以前的文章或继续浏览下面的相关文章,希望大家以后多多支持TOY模板网!