1. 作者介绍
杨金鹏,男,西安工程大学电子信息学院,2022级研究生
研究方向:机器视觉与人工智能
电子邮件:1394026082@qq.com
路治东,男,西安工程大学电子信息学院,2022级研究生,张宏伟人工智能课题组
研究方向:机器视觉与人工智能
电子邮件:2063079527@qq.com
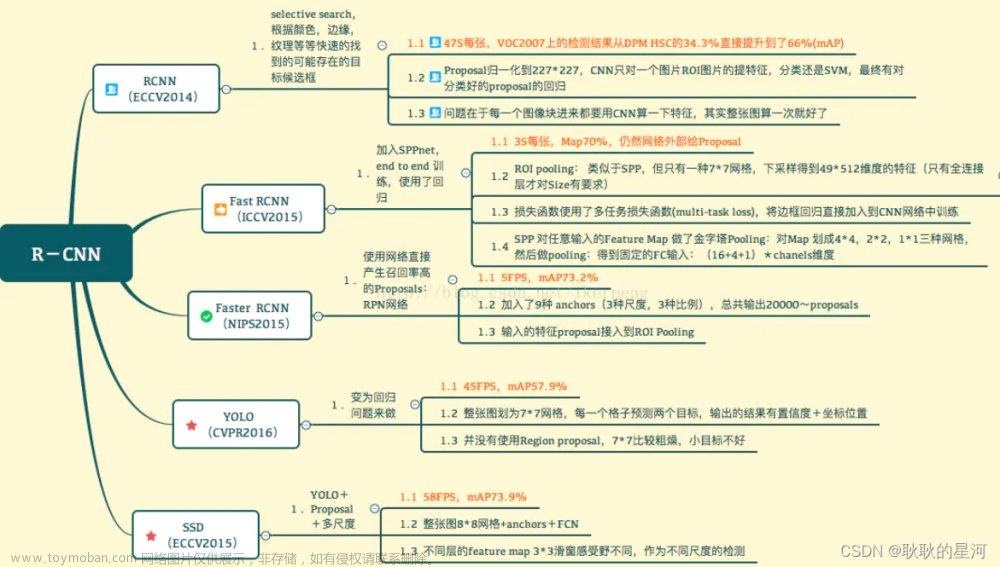
2. Faster RCNN基本框架

Faster RCNN检测部分主要可以分为四个模块:
(1)conv layers。即特征提取网络,用于提取特征。通过一组conv+relu+pooling层来提取图像的feature maps,用于后续的RPN层和取proposal。
(2)RPN(Region Proposal Network)。即区域候选网络,该网络替代了之前RCNN版本的Selective Search,用于生成候选框。这里任务有两部分,一个是分类:判断所有预设anchor是属于positive还是negative(即anchor内是否有目标,二分类);还有一个bounding box regression:修正anchors得到较为准确的proposals。因此,RPN网络相当于提前做了一部分检测,即判断是否有目标(具体什么类别这里不判),以及修正anchor使框的更准一些。
(3)RoI Pooling。即兴趣域池化(SPP net中的空间金字塔池化),用于收集RPN生成的proposals(每个框的坐标),并从(1)中的feature maps中提取出来(从对应位置扣出来),生成proposals feature maps送入后续全连接层继续做分类(具体是哪一类别)和回归。
(4)Classification and Regression。利用proposals feature maps计算出具体类别,同时再做一次bounding box regression获得检测框最终的精确位置。
3.模型训练及测试
3.1 数据集
训练前需要制作数据集,进行数据准备。采用收线送线装置实时采集图片,图像大小为1536*1280,然后进行标注,最后送进网络进行训练。为模拟检测的现场效果,划分了纱线中常见的四种常见缺陷:毛圈、毛团、分叉以及毛瑕,并通过标注软件对数据集进行了标注。标注文件放在VOC2007/ Annotations,图像文件放在VOC2007/JPEGImages目录下,生成ImageSet\Main里的四个txt文件,分别是:trainval.txt(训练和验证集总和)、train.txt(训练集)、val.txt(验证集)、test.txt(测试集),训练集/验证集/测试集比例为6:2:2。
3.2 环境配置


3.3 训练参数
(1)修改lib/datasets/pascal_voc.py,将类别改成自己的类别。这里有一个注意点就是,这里的类别以及之前的类别名称最好是全部小写,假如是大写的话,则会报keyError的错误
(2)根据实际需求及硬件情况设置代码中的相关参数,需要修改–num-classes、–data-path和–weights-path 等参数,训练过程如图所示。

如图所示为预测结果

3.4 训练参数
PicoDet测试
如图所示为训练过程及预测结果

YOLOv3测试
如图所示为训练过程及预测结果

3.5 代码展示
import os
import time
import torch
import torchvision.transforms as transforms
import torchvision
from PIL import Image
from matplotlib import pyplot as plt

# 获取当前路径
BASE_DIR = os.path.dirname(os.path.abspath(__file__))
device = torch.device("cuda" if torch.cuda.is_available() else "cpu")


# classes_coco类别信息
COCO_INSTANCE_CATEGORY_NAMES = [
    '__background__', 'person', 'bicycle', 'car', 'motorcycle', 'airplane', 'bus',
    'train', 'truck', 'boat', 'traffic light', 'fire hydrant', 'N/A', 'stop sign',
    'parking meter', 'bench', 'bird', 'cat', 'dog', 'horse', 'sheep', 'cow',
    'elephant', 'bear', 'zebra', 'giraffe', 'N/A', 'backpack', 'umbrella', 'N/A', 'N/A',
    'handbag', 'tie', 'suitcase', 'frisbee', 'skis', 'snowboard', 'sports ball',
    'kite', 'baseball bat', 'baseball glove', 'skateboard', 'surfboard', 'tennis racket',
    'bottle', 'N/A', 'wine glass', 'cup', 'fork', 'knife', 'spoon', 'bowl',
    'banana', 'apple', 'sandwich', 'orange', 'broccoli', 'carrot', 'hot dog', 'pizza',
    'donut', 'cake', 'chair', 'couch', 'potted plant', 'bed', 'N/A', 'dining table',
    'N/A', 'N/A', 'toilet', 'N/A', 'tv', 'laptop', 'mouse', 'remote', 'keyboard', 'cell phone',
    'microwave', 'oven', 'toaster', 'sink', 'refrigerator', 'N/A', 'book',
    'clock', 'vase', 'scissors', 'teddy bear', 'hair drier', 'toothbrush'
]


if __name__ == "__main__":

    # 检测图片路径
    path_img = os.path.join(BASE_DIR, "xxxx.jpg")

    # 预处理
    preprocess = transforms.Compose([
        transforms.ToTensor(),
    ])

    input_image = Image.open(path_img).convert("RGB")
    img_chw = preprocess(input_image)

    # 加载预训练模型
    model = torchvision.models.detection.fasterrcnn_resnet50_fpn(pretrained=True)
    model.eval()

    # if torch.cuda.is_available():
    #     img_chw = img_chw.to('cuda')
    #     model.to('cuda')

    # 前向传播
    input_list = [img_chw]
    with torch.no_grad():
        tic = time.time()
        print("input img tensor shape:{}".format(input_list[0].shape))
        output_list = model(input_list)
        output_dict = output_list[0]
        print("pass: {:.3f}s".format(time.time() - tic))
        # 打印输出信息
        for k, v in output_dict.items():
            print("key:{}, value:{}".format(k, v))

    # 取得相应结果
    out_boxes = output_dict["boxes"].cpu()
    out_scores = output_dict["scores"].cpu()
    out_labels = output_dict["labels"].cpu()

    # 可视化
    fig, ax = plt.subplots(figsize=(12, 12))
    ax.imshow(input_image, aspect='equal')

    num_boxes = out_boxes.shape[0]
    max_vis = 400
    thres = 0.6

    # 循环描框
    for idx in range(0, min(num_boxes, max_vis)):
        score = out_scores[idx].numpy()
        bbox = out_boxes[idx].numpy()
        class_name = COCO_INSTANCE_CATEGORY_NAMES[out_labels[idx]]

        if score < thres:
            continue

        ax.add_patch(plt.Rectangle((bbox[0], bbox[1]), bbox[2] - bbox[0], bbox[3] - bbox[1], fill=False,
                                   edgecolor='red', linewidth=3.5))
        ax.text(bbox[0], bbox[1] - 2, '{:s} {:.3f}'.format(class_name, score), bbox=dict(facecolor='blue', alpha=0.5),
                fontsize=14, color='white')
        ax.set_title("test_result", fontsize=28, color='blue')
    plt.show()
    plt.savefig("test_result.png")
    plt.close()
3.6 问题及分析
训练参数调试及环境配置
在训练前要注意将所需的环境配置好,同时所调用的库版本是否符合要求,各个库之间有时也需要版本一一对应。在训练时参数的调试非常重要,对模型的检测效果有着非常重要的影响,要多去尝试多做实验探究不同参数对模型的影响。
准备数据集
在数据集采集过程中要注意尽可能避免外界干扰,同时注意打光方式以及亮度等等,确保能够把待检测的物体和缺陷采集清晰。虽然数据集在整个项目中看起来不太重要,但是数据集采集的是否清晰,标注的是否正确等都会对检测结果造成很大的影响。文章来源:https://www.toymoban.com/news/detail-466733.html
参考(可供参考的链接和引用文献)
1.链接: [http://t.csdn.cn/JrWZ1]
2.链接: [http://t.csdn.cn/TjQov]文章来源地址https://www.toymoban.com/news/detail-466733.html
到了这里,关于基于Faster R-CNN实现目标检测的文章就介绍完了。如果您还想了解更多内容,请在右上角搜索TOY模板网以前的文章或继续浏览下面的相关文章,希望大家以后多多支持TOY模板网!


![[论文阅读]Voxel R-CNN——迈向高性能基于体素的3D目标检测](https://imgs.yssmx.com/Uploads/2024/02/731110-1.png)


