JWT(Json Web Token)
jwt是一种用于身份验证的开放标准,他可以在网络之间传递信息,jwt由三部分组成:头部,载荷,签名。头部包含了令牌的类型和加密算法,载荷包含了用户的信息,签名则是对头部和载荷的加密结果。
jwt鉴权验证是指在用户登录成功后,服务器生成一个jwt令牌并返回给客户端,客户端在后续的请求中携带该令牌,服务通过令牌的签名来确定用户的身份和权限。这种方式可以避免在每个请求中都需要进行身份验证,提高了系统的性能和安全性。
jwt具有以下优点:
1.无状态:jwt令牌包含了所有必要的信息,服务器不需要再每个请求中都进行身份验证,避免了服务器存储会话信息的开销。
2.可扩展性:jwt令牌可以包含任意的信息,可以根据需要添加自定义的字段。
3.安全性:jwt令牌使用签名来保证数据的完整性和真实性,防止数据被篡改或伪造。
4.跨平台:jwt令牌是基于json格式的,可以再不同的变成语言和平台之间进行传递和解析。
如何在webapi中使用JWT?
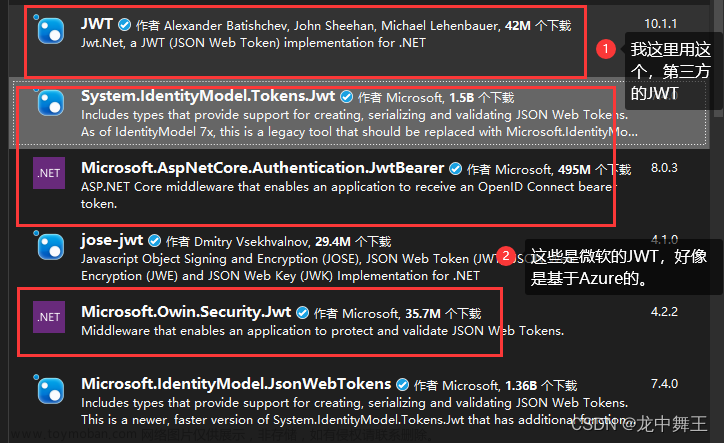
1.首先在项目中添加如下两个包
dotnet add package Microsoft.AspNetCore.Authentication.JwtBearer
dotnet add package System.IdentityModel.Tokens.Jwt
也可以直接在Nuget包管理工具中搜索

2.创建JwtOptions模型类,同时在appsetting.json中添加对应配置
    public class JwtOptions
    {
        /// <summary>
        /// 签发者
        /// </summary>
        public string Issuer { get; set; }

        /// <summary>
        /// 接收者
        /// </summary>
        public string Audience { get; set; }

        /// <summary>
        /// 密钥
        /// </summary>
        public string Key { get; set; }

        /// <summary>
        /// 过期时间
        /// </summary>
        public int ExpireSeconds { get; set; }
    }
  "JWT": {
    "Issuer": "签发方",
    "Audience": "接受方",
    "Key": "A86DA130-1B95-4748-B3B2-1B6AA9F2F743",//加密密钥
    "ExpireSeconds": 600 //密钥过期时间
  }
3.创建JWTExtensions静态类,添加AddJWTAuthentication扩展方法
    public static class JWTExtensions
    {
        public static AuthenticationBuilder AddJWTAuthentication(this IServiceCollection services, JwtOptions jwtOptions)
        {
            return services.AddAuthentication(JwtBearerDefaults.AuthenticationScheme)
                .AddJwtBearer(x =>
                {
                    x.TokenValidationParameters = new()
                    {
                        ValidateIssuer = true,//是否验证发行商
                        ValidateAudience = true,//是否验证受众者
                        ValidateLifetime = true,//是否验证失效时间
                        ValidateIssuerSigningKey = true,//是否验证签名键
                        ValidIssuer = jwtOptions.Issuer,
                        ValidAudience = jwtOptions.Audience,
                        IssuerSigningKey = new SymmetricSecurityKey(Encoding.UTF8.GetBytes(jwtOptions.Key))
                    };
                });
        }
    }
4.创建SwaggerGenOptionsExtensions静态类,添加AddAuthenticationHeader扩展方法,为swagger增加Authentication报文头
    public static class SwaggerGenOptionsExtensions
    {
        /// <summary>
        /// 为swagger增加Authentication报文头
        /// </summary>
        /// <param name="option"></param>
        public static void AddAuthenticationHeader(this SwaggerGenOptions option)
        {
            option.AddSecurityDefinition("Authorization",
                new OpenApiSecurityScheme
                {
                    Description = "Authorization header. \r\nExample:Bearer 12345ABCDE",
                    Name = "Authorization",
                    In = ParameterLocation.Header,
                    Type = SecuritySchemeType.ApiKey,
                    Scheme = "Authorization"
                }
                ); ;

            option.AddSecurityRequirement(new OpenApiSecurityRequirement()
            {
                {
                    new OpenApiSecurityScheme
                    {
                        Reference=new OpenApiReference
                        {
                            Type=ReferenceType.SecurityScheme,
                            Id="Authorization"
                        },
                        Scheme="oauth2",
                        Name="Authorization",
                        In=ParameterLocation.Header,
                    },
                    new List<string>()
                }
            });
        }
    }
5.创建IJwtService接口及实现JwtService类,其为构建token服务
    public interface IJwtService
    {
        string BuildToken(IEnumerable<Claim> claims, JwtOptions options);
    }
    public class JwtService : IJwtService
    {
        public string BuildToken(IEnumerable<Claim> claims, JwtOptions options)
        {
            //过期时间
            TimeSpan timeSpan = TimeSpan.FromSeconds(options.ExpireSeconds);//token过期时间
            var securityKey = new SymmetricSecurityKey(Encoding.UTF8.GetBytes(options.Key));//加密的token密钥
            var credentials = new SigningCredentials(securityKey, SecurityAlgorithms.HmacSha256Signature);//签名证书,其值为securityKey和HmacSha256Signature算法
            var tokenDescriptor = new JwtSecurityToken(options.Issuer, options.Audience, claims, expires: DateTime.Now.Add(timeSpan), signingCredentials: credentials);//表示jwt token的描述信息,其值包括Issuer签发方,Audience接收方,Claims载荷,过期时间和签名证书
            return new JwtSecurityTokenHandler().WriteToken(tokenDescriptor);//使用该方法转换为字符串形式的jwt token返回
        }
    }
6.将上述服务尽数注册
builder.Services.AddControllers();
// Learn more about configuring Swagger/OpenAPI at https://aka.ms/aspnetcore/swashbuckle
builder.Services.AddEndpointsApiExplorer();
builder.Services.AddSwaggerGen();
builder.Services.AddScoped<IJwtService, JwtService>();
JwtOptions jwtOpt = builder.Configuration.GetSection("JWT").Get<JwtOptions>();
builder.Services.AddJWTAuthentication(jwtOpt);
builder.Services.Configure<SwaggerGenOptions>(c =>
{
    c.AddAuthenticationHeader();
});

var app = builder.Build();
app.UseSwagger();
app.UseSwaggerUI();
app.UseHttpsRedirection();
app.UseAuthentication();//注意,一定得先启动这个
app.UseAuthorization();
//以下回答来自GPT
//app.UseAuthentication()是启用身份验证中间件,它会验证请求中的身份信息,并将身份信息存储在HttpContext.User属性中。而app.UseAuthorization()是启用授权中间件,它会检查HttpContext.User中的身份信息是否有访问当前请求所需的权限。
//一定要先启用身份验证中间件再启用授权中间件,因为授权中间件需要使用身份验证中间件存储的身份信息来进行权限验证。如果没有启用身份验证中间件,授权中间件将无法获取到身份信息,从而无法进行权限验证。
app.MapControllers();
app.Run();
7.在控制器中添加[ApiController]特性开启jwt鉴权,在登录接口中返回token
    [ApiController]
    [Route("[controller]/[action]")]
    [Authorize]
    public class WeatherForecastController : ControllerBase
    {
        private static readonly string[] Summaries = new[]
        {
        "Freezing", "Bracing", "Chilly", "Cool", "Mild", "Warm", "Balmy", "Hot", "Sweltering", "Scorching"
    };

        private readonly ILogger<WeatherForecastController> _logger;
        //jwt服务

        private readonly IJwtService _jwtService;

        private readonly IConfiguration _configuration;

        public WeatherForecastController(ILogger<WeatherForecastController> logger, IJwtService jwtService, IConfiguration configuration)
        {
            _logger = logger;
            _jwtService = jwtService;
            _configuration = configuration;
        }

        [HttpGet]
        public IEnumerable<WeatherForecast> Get()
        {
            return Enumerable.Range(1, 5).Select(index => new WeatherForecast
            {
                Date = DateTime.Now.AddDays(index),
                TemperatureC = Random.Shared.Next(-20, 55),
                Summary = Summaries[Random.Shared.Next(Summaries.Length)]
            })
            .ToArray();
        }

        //AllowAnonymous允许匿名访问
        [AllowAnonymous, HttpGet]
        public string GetToken()
        {
            var jwtopntion = _configuration.GetSection("JWT").Get<JwtOptions>();
            List<Claim> claims = new List<Claim>();
            claims.Add(new Claim(ClaimTypes.Name, "用户1"));
            claims.Add(new Claim(ClaimTypes.Role, "超级管理员"));
            return _jwtService.BuildToken(claims, jwtopntion);
        }
    }
效果测试

直接调用Get方法返回401,鉴权失败

调用GetToken方法,取得token

点击右上角绿色按钮

value中输入的值为bearer,空一格,加上之前取得的token,点击授权
 文章来源:https://www.toymoban.com/news/detail-468215.html
调用成功文章来源地址https://www.toymoban.com/news/detail-468215.html
到了这里,关于如何在.net6webapi中配置Jwt实现鉴权验证的文章就介绍完了。如果您还想了解更多内容,请在右上角搜索TOY模板网以前的文章或继续浏览下面的相关文章,希望大家以后多多支持TOY模板网!


