一、QT(WIN10)安装
1.首先下载QT(VS有对应的QT)
下载链接
windows程序的后缀是.exe
Ubuntu程序的后缀是.run
2.安装QT
按照安装指示操作、注册QT,然后出现”选择“界面时勾选“MinGW 7.3.0 64-bit”,“MSVC 2017 64-bit”;点击“Developer and Designer Tools”前的尖号,打开其中选项,勾选“MinGW 7.3.0 64-bit”。
二、将QT加载到VS中
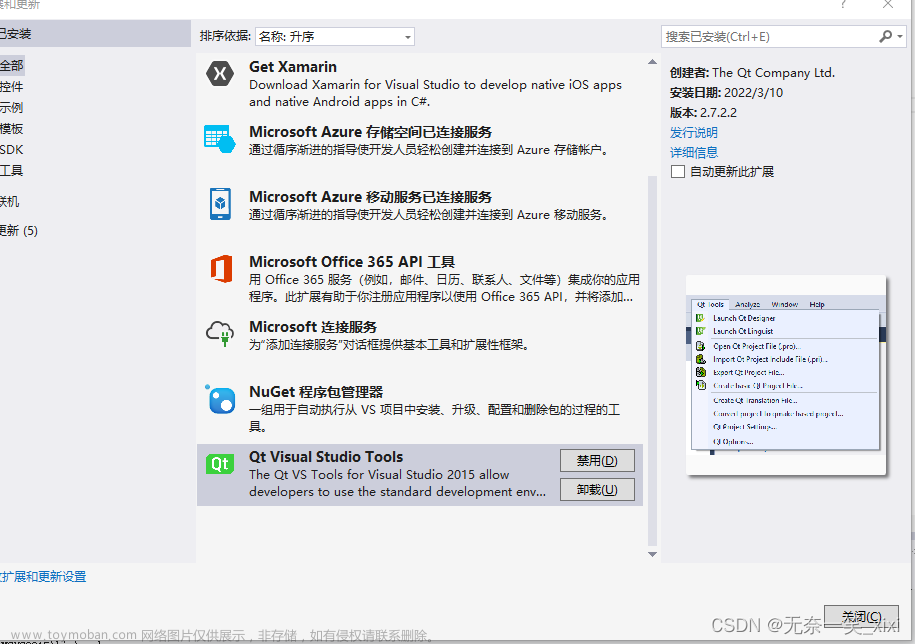
在VS"工具"→"扩展与更新"→"联机"中搜索“QT”并下载,重启生效
三、QT设置
1.在VS"Qt Vs Tools"→"QT Versions"中添加"msvc2017_64"qmake的路径

2.在"General"→"QT Designer"中将"False"改为"True"

四、QT程序打包
1.新建QT Widges项目,Base class也选择"QWidget"类(QMainWindow是一个含有菜单的窗口、QDialog是对话框、QWidget是不确定的窗口)

2.先在VS中使用Release模式发布,在x64中找到生成的exe

3.在空白处"shift"+右键打开Windows PowerShell模式,使用QT自带的搜索程序QT\mingw73_64\bin\windeployqt.exe将exe需要的动态库都拷贝过来

4. 安装包制作,首先下载Inno Setup官方链接
5.新建脚本模式

6.修改程序信息

7.设置打包程序位置

8.添加原始exe和文件夹路径

9.下面这个关联格式的不要点

10.创建快捷方式(无需修改)

11.设置安装向导(无需修改)

12.选择安全模式(无需修改)

13.语言选择(无需修改,没得中文)
14.设置安装文件的相关信息(生成的exe位置、名称、图标和安装时的密码)
后面的一路ok就好了就可以打开了
#五、第一个项目(摄像头播放)
要用到opencv调摄像头,所以把opencv也配置到vs中:
1.在”VC++目录"→“包含目录”中增加opencv\bulid的include和include中的opencv2路径
2.在"库目录"中增加opencv\build\x64\vc15\lib路径
3.在"链接器"→"输入"→"附加依赖项"中增加opencv_worldxxx_lib(如果配置为Debug,选择opencv_worldxxxd.lib
如果为Release,选择opencv_worldxxx.lib)
1.原代码(已改过命名方式)
ui
/********************************************************************************
** Form generated from reading UI file 'QT_learning1.ui'
**
** Created by: Qt User Interface Compiler version 5.14.2
**
** WARNING! All changes made in this file will be lost when recompiling UI file!
********************************************************************************/

#ifndef UI_QT_LEARNING1_H
#define UI_QT_LEARNING1_H

#include <QtCore/QVariant>
#include <QtWidgets/QApplication>
#include <QtWidgets/QLabel>
#include <QtWidgets/QPushButton>
#include <QtWidgets/QWidget>

QT_BEGIN_NAMESPACE

class Ui_QT_learning1Class
{
public:
    QPushButton *Open_Camera;
    QPushButton *Capture;
    QPushButton *Close_Camera;
    QLabel *Video;
    QLabel *Photo;
    QLabel *label;
    QLabel *label_2;

    void setupUi(QWidget *QT_learning1Class)
    {
        if (QT_learning1Class->objectName().isEmpty())
            QT_learning1Class->setObjectName(QString::fromUtf8("QT_learning1Class"));
        QT_learning1Class->resize(600, 400);
        Open_Camera = new QPushButton(QT_learning1Class);
        Open_Camera->setObjectName(QString::fromUtf8("Open_Camera"));
        Open_Camera->setGeometry(QRect(100, 330, 93, 28));
        Capture = new QPushButton(QT_learning1Class);
        Capture->setObjectName(QString::fromUtf8("Capture"));
        Capture->setGeometry(QRect(250, 330, 93, 28));
        Close_Camera = new QPushButton(QT_learning1Class);
        Close_Camera->setObjectName(QString::fromUtf8("Close_Camera"));
        Close_Camera->setGeometry(QRect(400, 330, 93, 28));
        Video = new QLabel(QT_learning1Class);
        Video->setObjectName(QString::fromUtf8("Video"));
        Video->setGeometry(QRect(40, 40, 224, 224));
        Photo = new QLabel(QT_learning1Class);
        Photo->setObjectName(QString::fromUtf8("Photo"));
        Photo->setGeometry(QRect(310, 40, 224, 224));
        label = new QLabel(QT_learning1Class);
        label->setObjectName(QString::fromUtf8("label"));
        label->setGeometry(QRect(110, 280, 81, 16));
        label_2 = new QLabel(QT_learning1Class);
        label_2->setObjectName(QString::fromUtf8("label_2"));
        label_2->setGeometry(QRect(410, 280, 72, 15));

        retranslateUi(QT_learning1Class);

        QMetaObject::connectSlotsByName(QT_learning1Class);
    } // setupUi

    void retranslateUi(QWidget *QT_learning1Class)
    {
        QT_learning1Class->setWindowTitle(QCoreApplication::translate("QT_learning1Class", "QT_learning1", nullptr));
        Open_Camera->setText(QCoreApplication::translate("QT_learning1Class", "\346\211\223\345\274\200\346\221\204\345\203\217\345\244\264", nullptr));
        Capture->setText(QCoreApplication::translate("QT_learning1Class", "\346\213\215\347\205\247", nullptr));
        Close_Camera->setText(QCoreApplication::translate("QT_learning1Class", "\345\205\263\351\227\255\346\221\204\345\203\217\345\244\264", nullptr));
        Video->setText(QString());
        Photo->setText(QString());
        label->setText(QCoreApplication::translate("QT_learning1Class", "\346\221\204\345\203\217\345\244\264\351\242\204\350\247\210", nullptr));
        label_2->setText(QCoreApplication::translate("QT_learning1Class", "\347\205\247\347\211\207", nullptr));
    } // retranslateUi

};

namespace Ui {
    class QT_learning1Class: public Ui_QT_learning1Class {};
} // namespace Ui

QT_END_NAMESPACE

#endif // UI_QT_LEARNING1_H
h文件
#pragma once

#include <QtWidgets/QWidget>
#include "ui_QT_learning1.h"

#ifndef QT_LEARNING1_H
#define QT_LEARNING1_H

#include <opencv2\core\core.hpp>
#include <QWidget>
#include <QImage>
#include <QTimer>     // 设置采集数据的间隔时间


#include <QGraphicsScene>
#include <QGraphicsView>

#include <highgui/highgui_c.h>  //包含opencv库头文件

#include <opencv2\imgproc\imgproc.hpp>
#include <opencv2\core\core.hpp>
#include <opencv2\highgui\highgui.hpp>  //opencv申明

#include <opencv.hpp>
using namespace cv;

namespace Ui {
	class QT_learning1;
}

class QT_learning1 : public QWidget
{
	Q_OBJECT

public:
	explicit QT_learning1(QWidget *parent = 0);
	~QT_learning1();

private slots:
	void openCamara();      // 打开摄像头
	void getFrame();       // 读取当前帧信息
	void closeCamara();     // 关闭摄像头。
	void takingPictures();  // 拍照

private:
	Ui::QT_learning1Class ui;
	QTimer    *timer;
	QImage    *imag;
	CvCapture *cam;// 视频获取结构, 用来作为视频获取函数的一个参数
	IplImage  *frame;
	VideoCapture capture1;
	Mat showimage;
	QImage Mat2Qimage(Mat cvImg);

	//QT_learning1(QWidget * parent);
		//申请IplImage类型指针,就是申请内存空间来存放每一帧图像
};

#endif // QT_LEARNING1_H
cpp文件
(摄像头找不到得话,将capture1.open(0)中的0改成1或者-1试试)
#include "QT_learning1.h"
#include<stdlib.h>
#include <ctime>
#include<random>
#include<opencv.hpp>
using namespace cv;
using namespace std;


QT_learning1::QT_learning1(QWidget *parent) :
	QWidget(parent)
{
	ui.setupUi(this);
	connect(ui.Open_Camera, SIGNAL(clicked()), this, SLOT(openCamara()));
	connect(ui.Capture, SIGNAL(clicked()), this, SLOT(takingPictures()));
	connect(ui.Close_Camera, SIGNAL(clicked()), this, SLOT(closeCamara()));
	setWindowTitle(tr("Main Window"));

	timer = new QTimer(this);
	imag = new QImage();
	connect(timer, SIGNAL(timeout()), this, SLOT(getFrame()));//超时就读取当前摄像头信息
}
QT_learning1::~QT_learning1()
{

}

void QT_learning1::openCamara()
{
	capture1.open(0);                                            //打开摄像头,从摄像头中获取视频
	timer->start(10);

}

void QT_learning1::getFrame() {
	capture1 >> showimage;
	QImage imag = Mat2Qimage(showimage);

	ui.Video->setScaledContents(true);
	ui.Video->setPixmap(QPixmap::fromImage(imag));
}

void QT_learning1::closeCamara()
{
	timer->stop();
	ui.Video->clear();
	capture1.release();
}


void QT_learning1::takingPictures()
{
	capture1.open(0);
	capture1 >> showimage;
	QImage img = Mat2Qimage(showimage);
	ui.Photo->setScaledContents(true);
	ui.Photo->setPixmap(QPixmap::fromImage(img));

	string writePath = "./";
	string name;
	time_t now = time(0);
	name = writePath + to_string(now) + ".jpg";
	imwrite(name, showimage);

}


QImage QT_learning1::Mat2Qimage(Mat cvImg)
{
	// 8-bits unsigned, NO. OF CHANNELS = 1
	if (cvImg.type() == CV_8UC1)
	{
		QImage image(cvImg.cols, cvImg.rows, QImage::Format_Indexed8);
		// Set the color table (used to translate colour indexes to qRgb values)
		image.setColorCount(256);
		for (int i = 0; i < 256; i++)
		{
			image.setColor(i, qRgb(i, i, i));
		}
		// Copy input Mat
		uchar *pSrc = cvImg.data;
		for (int row = 0; row < cvImg.rows; row++)
		{
			uchar *pDest = image.scanLine(row);
			memcpy(pDest, pSrc, cvImg.cols);
			pSrc += cvImg.step;
		}
		return image;
	}
	// 8-bits unsigned, NO. OF CHANNELS = 3
	else if (cvImg.type() == CV_8UC3)
	{
		// Copy input Mat
		const uchar *pSrc = (const uchar*)cvImg.data;
		// Create QImage with same dimensions as input Mat
		QImage image(pSrc, cvImg.cols, cvImg.rows, cvImg.step, QImage::Format_RGB888);
		return image.rgbSwapped();
	}
	else if (cvImg.type() == CV_8UC4)
	{
		//		qDebug() << "CV_8UC4";
				// Copy input Mat
		const uchar *pSrc = (const uchar*)cvImg.data;
		// Create QImage with same dimensions as input Mat
		QImage image(pSrc, cvImg.cols, cvImg.rows, cvImg.step, QImage::Format_ARGB32);
		return image.copy();
	}
	else
	{
		//		qDebug() << "ERROR: Mat could not be converted to QImage.";
		return QImage();
	}
}
main.cpp
#include "QT_learning1.h"
#include <QtWidgets/QApplication>

int main(int argc, char *argv[])
{
    QApplication a(argc, argv);
	QT_learning1 w;
    w.show();
    return a.exec();
}
效果
还行,但有两个问题:
1.拍照得到的照片失真,原因是打开摄像头和拍照重复使用摄像头接口,导致数据传输变慢、冲突
2.没有多线程,如果再来个功能或者运算量变大就over了
2.把cpp文件替换为下面得即可解决第一个问题
#include "QT_learning1.h"
#include<stdlib.h>
#include <thread>
#include <ctime>
#include<random>
#include<opencv.hpp>
using namespace cv;
using namespace std;


QT_learning1::QT_learning1(QWidget *parent) :
	QWidget(parent)
{
	ui.setupUi(this);
	connect(ui.Open_Camera, SIGNAL(clicked()), this, SLOT(openCamara()));
	connect(ui.Capture, SIGNAL(clicked()), this, SLOT(takingPictures()));
	connect(ui.Close_Camera, SIGNAL(clicked()), this, SLOT(closeCamara()));
	setWindowTitle(tr("Main Window"));

	timer = new QTimer(this);
	imag = new QImage();
	connect(timer, SIGNAL(timeout()), this, SLOT(getFrame()));//超时就读取当前摄像头信息
}
QT_learning1::~QT_learning1()
{

}

void QT_learning1::openCamara()
{
	capture1.open(0);                                            //打开摄像头,从摄像头中获取视频
	timer->start(10);

}

void QT_learning1::getFrame() {
	capture1 >> showimage;
	QImage imag = Mat2Qimage(showimage);

	ui.Video->setScaledContents(true);
	ui.Video->setPixmap(QPixmap::fromImage(imag));
}

void QT_learning1::closeCamara()
{
	timer->stop();
	ui.Video->clear();
	capture1.release();
}


void QT_learning1::takingPictures()
{
	QImage img = Mat2Qimage(showimage);
	ui.Photo->setScaledContents(true);
	ui.Photo->setPixmap(QPixmap::fromImage(img));

	string writePath = "./";
	string name;
	time_t now = time(0);
	name = writePath + to_string(now) + ".jpg";
	imwrite(name, showimage);

}


QImage QT_learning1::Mat2Qimage(Mat cvImg)
{
	// 8-bits unsigned, NO. OF CHANNELS = 1
	if (cvImg.type() == CV_8UC1)
	{
		QImage image(cvImg.cols, cvImg.rows, QImage::Format_Indexed8);
		// Set the color table (used to translate colour indexes to qRgb values)
		image.setColorCount(256);
		for (int i = 0; i < 256; i++)
		{
			image.setColor(i, qRgb(i, i, i));
		}
		// Copy input Mat
		uchar *pSrc = cvImg.data;
		for (int row = 0; row < cvImg.rows; row++)
		{
			uchar *pDest = image.scanLine(row);
			memcpy(pDest, pSrc, cvImg.cols);
			pSrc += cvImg.step;
		}
		return image;
	}
	// 8-bits unsigned, NO. OF CHANNELS = 3
	else if (cvImg.type() == CV_8UC3)
	{
		// Copy input Mat
		const uchar *pSrc = (const uchar*)cvImg.data;
		// Create QImage with same dimensions as input Mat
		QImage image(pSrc, cvImg.cols, cvImg.rows, cvImg.step, QImage::Format_RGB888);
		return image.rgbSwapped();
	}
	else if (cvImg.type() == CV_8UC4)
	{
		//		qDebug() << "CV_8UC4";
				// Copy input Mat
		const uchar *pSrc = (const uchar*)cvImg.data;
		// Create QImage with same dimensions as input Mat
		QImage image(pSrc, cvImg.cols, cvImg.rows, cvImg.step, QImage::Format_ARGB32);
		return image.copy();
	}
	else
	{
		//		qDebug() << "ERROR: Mat could not be converted to QImage.";
		return QImage();
	}
}

这样就ok了
3.多线程
C++中可直接使用thread库实现
而QT提供了两种方式实现多线程:
1.继承QThread的run函数,是个虚函数,会自动调用的
2.继承于QObject的类用moveToThread函数转移到一个Thread里
第一种QThread已经不推荐了,我们使用QObject实现
1.QObject实现思路

1.创键一个继承于 QObject 的自定义线程类(如:MyThread),用来盛放比较耗时,需要放入子线程的处理函数
(1)定义一个线程处理函数(如:MyWork),当然也可以定义多个,这时多个处理函数就共用一个子线程
(2)在处理函数中进行处理,此过程可能时间较长(如:QThread::sleep(1))
(3)在处理函数中发送处理完成的信号(如:emit signal_back()),当然该信号中可能含有处理的结果信息(如计算结果)
2、 在主线程(亦称界面线程)中创建一个子线程(QThread* subthread = new QThread(this))
3、新建一个自定义线程类对象(MyThread* m_MyThread = new MyThread())
4、将自定义线程类对象移入子线程容器中(m_MyThread->moveToThread(subthread)),其实也可以移入多个自定义线程类到同一个subthread中,这时他们就共享一个子线程了
5、连接主线程和子线程之间的信号和槽
(1)主线程——>子线程,主线程的信号和子线程的槽
connect ( this, &MainWindow::StartThread, m_MyThread, &MyThread::MyWork )
(2)子线程——>主线程,子线程的信号和主线程的槽
connect (m_MyThread, &MyThread::signal_back, this, &MainWindow::slot_handle_finish )
6、子线程使用完毕需要回收销毁,不然该线程会一直占用,而系统可分配的线程数量是有限的
(1)subthread->qiut(); //该停止函数比较弱,会等到线程处理函数MyWork()的任务执行完之后,才会停止线程
(2)subthread->wait();文章来源:https://www.toymoban.com/news/detail-471168.html
所有通常会加入一个标志位,来终止任务。
未完待续。。。文章来源地址https://www.toymoban.com/news/detail-471168.html
到了这里,关于【使用VS开发的第一个QT项目——实现相机功能(包括QT下载、配置、摄像头程序)】的文章就介绍完了。如果您还想了解更多内容,请在右上角搜索TOY模板网以前的文章或继续浏览下面的相关文章,希望大家以后多多支持TOY模板网!


