目录
项目展示:(增删改查)环境:Tomcat 8.5
1.数据库结构
1.1 创建数据库(source_db)
1.2 创建数据表(tb_source),结构如下。
2.项目文件结构
3.jar包导入
4.创建JDBC数据库访问类:JDBCutil
5.创建实体类:Source
6.创建数据访问层:SourceDao
7.创建业务逻辑层:SourceService
8.HTTP响应:SourceServlet
9.index.jsp
10.add.jsp
11.update.jsp
12.web.xml
整体项目文件:
项目展示:(增删改查)环境:Tomcat 8.5

1.数据库结构
1.1 创建数据库(source_db)
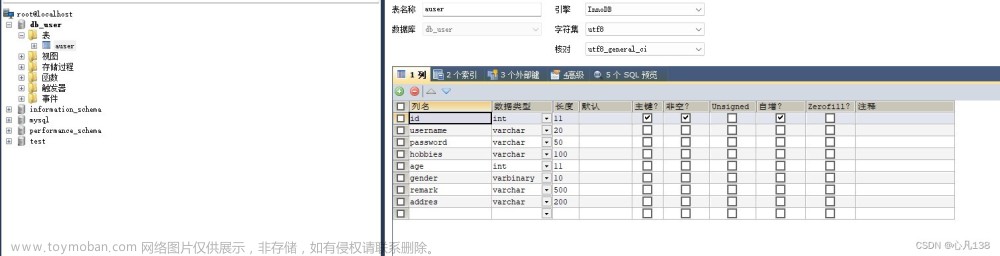
1.2 创建数据表(tb_source),结构如下。
| 字段名 | 说明 | 字段类型 | 长度 | 备注 |
| id | 编号 | int | 主键,自增,增量为 1 | |
| name | 名称 | varchar | 50 | 不能为空 |
| type | 类型 | varchar | 20 | 不能为空 |
| uploadDate | 上传日期 | date | 不能为空 |
2.项目文件结构

3.jar包导入
下载链接:
https://download.csdn.net/download/kai212/87724319https://download.csdn.net/download/kai212/87724319文章来源:https://www.toymoban.com/news/detail-480378.html
4.创建JDBC数据库访问类:JDBCutil
package com.ydhl.util;

import java.sql.Connection;
import java.sql.DriverManager;
import java.sql.PreparedStatement;
import java.sql.ResultSet;
import java.sql.SQLException;

public class JDBCutil {

	private static final String QD = "com.mysql.cj.jdbc.Driver";
	private static final String URL = "jdbc:mysql://localhost:3306/source_db?serverTimezone=GMT%2B8";
	private static final String USE = "root";
	private static final String PAS = "root";

	static {
		try {
			Class.forName(QD);
		} catch (ClassNotFoundException e) {
			e.printStackTrace();
		}
	}

	public static Connection getConnection() {
		Connection con = null;
		try {
			con = DriverManager.getConnection(URL, USE, PAS);
		} catch (SQLException e) {
			e.printStackTrace();
		}
		return con;
	}

	public static void close(ResultSet rs, PreparedStatement st, Connection con) {
		try {
			if (rs != null) {
				rs.close();
			}
			if (st != null) {
				st.cancel();
			}
			if (con != null) {
				con.close();
			}
		} catch (Exception e) {
			e.printStackTrace();
		}
	}
}
5.创建实体类:Source
package com.ydhl.entity;

public class Source {
	private int id;
	private String name;
	private String type;
	private String uploadDate;

	public int getId() {
		return id;
	}

	public void setId(int id) {
		this.id = id;
	}

	public String getName() {
		return name;
	}

	public void setName(String name) {
		this.name = name;
	}

	public String getType() {
		return type;
	}

	public void setType(String type) {
		this.type = type;
	}

	public String getUploadDate() {
		return uploadDate;
	}

	public void setUploadDate(String uploadDate) {
		this.uploadDate = uploadDate;
	}

	public Source() {

	}

	public Source(int id, String name, String type, String uploadDate) {
		super();
		this.id = id;
		this.name = name;
		this.type = type;
		this.uploadDate = uploadDate;
	}

}
6.创建数据访问层:SourceDao
package com.ydhl.dao;

import java.sql.Connection;
import java.sql.PreparedStatement;
import java.sql.ResultSet;
import java.sql.SQLException;
import java.util.ArrayList;
import java.util.List;

import com.ydhl.entity.Source;
import com.ydhl.util.JDBCutil;

public class SourceDao {

    // 创建connection对象
    private Connection con = null;
    // 创建PreparedStatement对象
    private PreparedStatement st = null;
    // 创建resultSet对象
    private ResultSet rs = null;

    //查询
    public List<Source> Query(String name) {
        // 创建一个arraylist集合 填充数据库表数据
        ArrayList<Source> list = new ArrayList<>();
        try {
            // 获取数据库连接对象
            con = JDBCutil.getConnection();
            String sq = "SELECT * FROM tb_source WHERE name LIKE ?";
            st = con.prepareStatement(sq);// 将sql存放入小汽车中搬运
            st.setString(1, "%" + name + "%");
            rs = st.executeQuery();// 获取结果
            // 使用while循环读取resultset数据
            while (rs.next()) {
                Source sr = new Source();
                sr.setId(rs.getInt("id"));
                sr.setName(rs.getString("name"));
                sr.setType(rs.getString("type"));
                sr.setUploadDate(rs.getString("uploadDate"));
                // 将对象保存到对应arraylist
                list.add(sr);
            }
        } catch (SQLException e) {
            // 异常抛出
            e.printStackTrace();
        } finally {
            // 使用之后关闭连接
            JDBCutil.close(rs, st, con);
        }
        // 返回最终结果
        return list;
    }

    // 删除
    public boolean del(int id) {
        try {
            // 获取对应数据库connection对象
            con = JDBCutil.getConnection();
            // 删除数据库sql
            String sql = "delete from tb_source where id=?";
            st = con.prepareStatement(sql);
            // 设置删除ID
            st.setInt(1, id);
            // 执行sql 并且返回结果
            return st.executeUpdate() > 0;
        } catch (SQLException e) {
            // 抛出异常
            e.printStackTrace();
        } finally {
            // 关闭连接
            JDBCutil.close(rs, st, con);
        }
        // 如果异常默认返回false
        return false;
    }

    // 添加
    public boolean add(Source source) {
        try {
            // 根据对应数据库获取对应连接
            con = JDBCutil.getConnection();
            // 新增sql
            String sql = "INSERT INTO tb_source(name, type, uploadDate) VALUES (?, ?, ?)";
            // 传入sql值
            st = con.prepareStatement(sql);
            st.setString(1, source.getName());
            st.setString(2, source.getType());
            st.setString(3, source.getUploadDate());
            // 执行sql并且返回结果
            return st.executeUpdate() > 0;
        } catch (SQLException e) {
            // 抛出异常
            e.printStackTrace();
        } finally {
            // 关闭连接
            JDBCutil.close(rs, st, con);
        }
        // 如果异常则默认返回false
        return false;
    }

    // 根据id查询对应数据
    public Source Modifysel(int id) {
        try {
            con = JDBCutil.getConnection();
            // 根据id查询sql
            String sql = "SELECT * FROM tb_source where id=?";
            st = con.prepareStatement(sql);// 将sql存放入小汽车中搬运
            // 替换?值
            st.setInt(1, id);
            // 执行查询结果
            rs = st.executeQuery();// 获取结果
            // 绑定对象
            while (rs.next()) {
                Source sr = new Source();
                sr.setId(rs.getInt("id"));
                sr.setName(rs.getString("name"));
                sr.setType(rs.getString("type"));
                sr.setUploadDate(rs.getString("uploadDate"));
                return sr;
            }
        } catch (SQLException e) {
            // 抛出异常
            e.printStackTrace();
        } finally {
            // 关闭连接
            JDBCutil.close(rs, st, con);
        }
        // 如果出现异常则默认抛出null
        return null;
    }

    // 修改方法
    public boolean modify(Source source) {
        try {
            con = JDBCutil.getConnection();
            // 修改sql
            String sql = "UPDATE tb_source SET name=?, type=?, uploadDate=? WHERE id=?";
            // 填充sql
            st = con.prepareStatement(sql);
            // 替换参数
            st.setString(1, source.getName());
            st.setString(2, source.getType());
            st.setString(3, source.getUploadDate());
            st.setInt(4, source.getId());
            // 返回结果
            return st.executeUpdate() > 0;
        } catch (SQLException e) {
            // 抛出异常
            e.printStackTrace();
        } finally {
            // 关闭连接
            JDBCutil.close(rs, st, con);
        }
        // 如果异常则默认返回false
        return false;
    }

}
7.创建业务逻辑层:SourceService
package com.ydhl.service;

import java.util.List;

import com.ydhl.dao.SourceDao;
import com.ydhl.entity.Source;

public class SourceService {

	// 查询-模糊查询
	public List<Source> Query(String name) {
		// 调用数据访问层
		SourceDao dao = new SourceDao();
		return dao.Query(name);
	}

	// 删除方法
	public boolean del(int id) {
		SourceDao dao = new SourceDao();
		return dao.del(id);
	}

	// 新增方法
	public boolean add(Source source) {
		SourceDao dao = new SourceDao();
		return dao.add(source);
	}

	//根据id查询对应数据 方面后续修改
	public Source Modifysel(int id) {
		SourceDao dao = new SourceDao();
		return dao.Modifysel(id);
	}

	//修改方法
	public boolean Modify(Source source) {
		SourceDao dao = new SourceDao();
		return dao.modify(source);
	}

}
8.HTTP响应:SourceServlet
package com.ydhl.servlet;

import java.io.IOException;
import java.util.ArrayList;

import javax.servlet.ServletException;
import javax.servlet.annotation.WebServlet;
import javax.servlet.http.HttpServlet;
import javax.servlet.http.HttpServletRequest;
import javax.servlet.http.HttpServletResponse;

import com.ydhl.entity.Source;
import com.ydhl.service.SourceService;

@WebServlet("/SourceServlet")
public class SourceServlet extends HttpServlet {

    private static final long serialVersionUID = 1L;

    protected void service(HttpServletRequest req, HttpServletResponse resp) throws ServletException, IOException {
        // 也是可以直接获取参数的
        // 设置编码字符集
        req.setCharacterEncoding("utf-8");
        // 假设我们的参数请求中都有一个标记
        String action = req.getParameter("action");
        if (action == null) {
            action = "";// 这是查询请求中没有action参数
        }
        switch (action) {
            case "":
                Query(req, resp);
                break;
            case "del":
                // 如果标记是del 代表删除
                del(req, resp);
                break;
            case "add":
                // 如果标记是add 代表新增
                add(req, resp);
                break;
            case "Modifysel":
                // 如果标记是Modifysel 代表根据id查询对应对象
                Modifysel(req, resp);
                break;
            case "modify":
                // 获取页面参数直接修改对应数据
                Modify(req, resp);
                break;
        }
    }

    protected void Query(HttpServletRequest request, HttpServletResponse response)
            throws ServletException, IOException {
        SourceService service = new SourceService();// 创建业务逻辑层对象
        String name = request.getParameter("name");
        if (name == null) {
            name = "";
        }
        ArrayList<Source> list = (ArrayList<Source>) service.Query(name);// 调用业务逻辑层方法
        // 将数据保存到request作用域中 稍后配合转发请求携带数据到页面
        request.setAttribute("list", list);
        // 使用转发请求 携带查询到的数据到页面当中以方便获取
        request.getRequestDispatcher("/index.jsp").forward(request, response);// 转发跳转页面
    }

    // 根据id删除对应数据
    protected void del(HttpServletRequest request, HttpServletResponse response) throws ServletException, IOException {
        // 获取唯一的id
        int id = Integer.parseInt(request.getParameter("id"));
        SourceService service = new SourceService();// 创建业务逻辑层对象
        // 执行删除方法
        service.del(id);
        // 重定向到对应查询工作 删除之后需要重新查询
        response.sendRedirect("source");
    }

    // 新增方法
    protected void add(HttpServletRequest request, HttpServletResponse response) throws ServletException, IOException {
        // 获取所有的参数
        String name = request.getParameter("name");
        String type = request.getParameter("type");
        String uploadDate = request.getParameter("uploadDate");
        // 将参数保存到对应person对象中
        Source person = new Source(0, name, type, uploadDate);
        SourceService service = new SourceService();// 创建业务逻辑层对象
        // 执行对应新增操作
        service.add(person);
        // 重定向 重新查询数据 并且跳转首页
        response.sendRedirect("source");
    }

    // 根据id查询对应数据
    protected void Modifysel(HttpServletRequest request, HttpServletResponse
            response)
            throws ServletException, IOException {
        // 获取所有的参数
        int id = Integer.parseInt(request.getParameter("id"));
        SourceService service = new SourceService();// 创建业务逻辑层对象
        // 根据id查询到单个对应数据
        Source sr = service.Modifysel(id);
        // 将数据保存到对应的request域中
        request.setAttribute("Source", sr);
        // 转发数据
        request.getRequestDispatcher("update.jsp").forward(request, response);//转发跳转页面
    }

    // 获取用户修改后的数据
    protected void Modify(HttpServletRequest request, HttpServletResponse
            response)
            throws ServletException, IOException {
        // 获取所有的参数 然后传入修改方法
        int id = Integer.parseInt(request.getParameter("id"));
        String name = request.getParameter("name");
        String type = request.getParameter("type");
        String uploadDate = request.getParameter("uploadDate");
        //和新增一样 保存到对应方法中
        Source sr = new Source(id, name, type, uploadDate);
        // 创建业务逻辑层对象
        SourceService service = new SourceService();
        // 调用修改方法
        service.Modify(sr);
        // 重定向 重新查询数据
        response.sendRedirect("source");
    }
}
9.index.jsp
<%@ page language="java" contentType="text/html; charset=UTF-8"
         pageEncoding="UTF-8" %>
<%@ taglib uri="http://java.sun.com/jsp/jstl/core" prefix="c" %>
<!DOCTYPE html>
<html>
<head>
    <meta charset="UTF-8">
    <title>前端素材管理系统</title>
</head>
<body>
<form style="padding-bottom: 10px;">
    <fieldset>
        <legend>搜索</legend>
        名称:<input type="text" name="name" id="">
        <input type="submit" value="搜索">
    </fieldset>
</form>
<table border="1" style="width: 100%;">
    <tr style="text-align: center; background-color:#ffaa00;">
        <th>编号</th>
        <th>名称</th>
        <th>类型</th>
        <th>上传时间</th>
        <th>操作</th>
    </tr>
    <c:forEach items="${list}" var="Source">
        <tr>
            <td>${Source.id }</td>
            <td>${Source.name }</td>
            <td>${Source.type }</td>
            <td>${Source.uploadDate }</td>
            <td>
                <a href="/Source/SourceServlet?action=del&id=${Source.id}"
                   onclick="return confirm('您确定删除该人员信息')">删除</a>
                <a href="/Source/SourceServlet?action=Modifysel&id=${Source.id}">修改</a>
            </td>
        </tr>
    </c:forEach>
</table>
<div style="float: right;">
    <a href="add.jsp">新增</a>
    <span>共
			<c:out value="${list.size()}"/>
			条数据</span>
</div>
</body>
</html>
10.add.jsp
<%@ page language="java" contentType="text/html; charset=UTF-8"
         pageEncoding="UTF-8" %>
<!DOCTYPE html>
<html>
<head>
    <meta charset="UTF-8">
    <title>add</title>
</head>
<body>
<form action="source" method="post">
    <table>
        <tr>
            <td>名称</td>
            <td><input type="text" name="name"></td>
        </tr>
        <tr>
            <td>类型</td>
            <td><input type="text" name="type"></td>
        </tr>
        <tr>
            <td>上传时间</td>
            <td><input type="date" name="uploadDate"></td>
        </tr>
        <tr>
            <td><input type="submit" value="添加"></td>
            <td><input type="reset" value="重置"></td>
            <td><input type="hidden" value="add" name="action"></td>
        </tr>
    </table>
</form>
</body>
</html>
11.update.jsp
<%--
  Created by IntelliJ IDEA.
  User: 一念陨星
  Date: 2023/4/24
  Time: 15:06
  To change this template use File | Settings | File Templates.
--%>
<%@ page contentType="text/html;charset=UTF-8" language="java" %>
<%@ taglib uri="http://java.sun.com/jsp/jstl/core" prefix="c" %>
<html>
<head>
    <title>update</title>
</head>
<body>
<form action="source" method="post">
    <table>
        <tr>
            <td>名称:</td>
            <td><input type="text" name="name" value=${Source.name }></td>
        </tr>
        <tr>
            <td>类型:</td>
            <td><input type="text" name="type" value=${Source.type }>
            </td>
        </tr>
        <tr>
            <td>上传时间:</td>
            <td><input type="date" name="uploadDate"
                       value=${Source.uploadDate }></td>
        </tr>
        <tr>
            <td><input type="submit" value="修改"/></td>
            <td><input type="reset" value="删除"/></td>
            <td><input type="hidden" value="modify" name="action">
                <input type="hidden" value="${Source.id}" name="id"></td>
        </tr>
    </table>
</form>
</body>
</html>
12.web.xml
<?xml version="1.0" encoding="UTF-8"?>
<web-app xmlns:xsi="http://www.w3.org/2001/XMLSchema-instance"
         xmlns="http://xmlns.jcp.org/xml/ns/javaee"
         xsi:schemaLocation="http://xmlns.jcp.org/xml/ns/javaee http://xmlns.jcp.org/xml/ns/javaee/web-app_4_0.xsd"
         version="4.0">

    <servlet>
        <servlet-name>SourceServlet</servlet-name>
        <servlet-class>com.ydhl.servlet.SourceServlet</servlet-class>
    </servlet>
    <servlet-mapping>
        <servlet-name>SourceServlet</servlet-name>
        <url-pattern>/source</url-pattern>
    </servlet-mapping>
    <welcome-file-list>
        <welcome-file>source</welcome-file>
    </welcome-file-list>


</web-app>
整体项目文件:
https://download.csdn.net/download/kai212/87724913https://download.csdn.net/download/kai212/87724913文章来源地址https://www.toymoban.com/news/detail-480378.html
到了这里,关于Java/JavaWeb连接数据库完成增删改查(胎教级教程)的文章就介绍完了。如果您还想了解更多内容,请在右上角搜索TOY模板网以前的文章或继续浏览下面的相关文章,希望大家以后多多支持TOY模板网!