一、实现需求
实现用户在规定区域内完成打卡操作并以日历的形式记录。
注:本篇文章能够实现打卡记录是建立在有后端接口传输返回的数据上
二、效果展示

三、业务逻辑
点击打卡按钮,打卡成功后弹出相应的弹窗,并在日历记录上留下当天打卡的痕迹。在规定区域内打卡即是指在规定经纬度内打卡,使用 wx.getLocation()。
四、具体步骤
1.安装插件--极点日历
步骤一:扫码进入微信公众平台 (qq.com)
步骤二:点击左侧边栏最底行”设置“
步骤三:找到”第三方设置“,找打”添加插件“按钮,输入”极点日历“
步骤四:在要使用该插件的小程序 app.json 文件中引入插件声明
"plugins": {
    "calendar": {
      "version": "1.1.3",
      "provider": "wx92c68dae5a8bb046"
    }
  },
步骤五:在相应布局页面添加以下语句嵌入插件,属性详情请移步开发文档查看
极点日历开发文档:https://github.com/czcaiwj/calendar
注:上方链接需要如若打不开,文章底部有复制来的文档
<calendar
    start-date="{{currentYear}}-01" // 日历的开始日期
    end-date="{{currentYear}}-12" // 日历的结束日期
    days-color="{{daysColor}}" // 打卡成功后日期上的背景色
    weeks-type="cn"  // 上方星期显示为:日,一,二,三,四,五,六
/>
2.完成.wxml页面(部分代码)
<view class="circular" bindtap="submit">
        <view class="text">打卡</view>
</view>

<calendar
    start-date="{{currentYear}}-01"
    end-date="{{currentYear}}-12"
    days-color="{{daysColor}}"
    weeks-type="cn"
    bindnextMonth="getMonthRecordDataByCalendar" // 监听点击下个月事件
    bindprevMonth="getMonthRecordDataByCalendar" // 监听点击上个月事件
    binddateChange="getMonthRecordDataByCalendar" // 监听点击日历标题日期选择器事件
/>
3. .wxss页面(略)
4.完成js逻辑部分
· .js页面的代码
import {
  EverydayClockRecord
} from "这里填自己所定义的EverydayClockRecord类的页面路径"
import {
  EverydayClock
} from "这里填自己所定义的EverydayClock类的页面路径"

Page({

  /**
   * 页面的初始数据
   */
  data: {
    latitude: '', //纬度
    longitude: '', // 经度
    clockShow: false,
    daysColor: null, //打卡的成功后日历日期上的颜色
    currentYear: "2021",
  },

  /**
   * 生命周期函数--监听页面加载
   */
  onLoad(options) {
    this.checkLocation()
    this.location()
    this.getClockInfo()
    let that = this
    let myDate = new Date()
    let currentYear = myDate.getFullYear()
    let currentMonth = myDate.getMonth() + 1
    let currentDay = myDate.getDate()
    that.setData({
      currentYear,
      currentMonth,
      currentDay,
    })
    that.getMonthRecordData(that.data.currentMonth)
    that.getOnedayRecordData(that.data.currentYear, that.data.currentMonth, that.data.currentDay)
  },
  // 控制打卡后日期的颜色
  async getMonthRecordData(currentMonth) {
    let daysColorList = await EverydayClockRecord.getMonthRecord(currentMonth)
    this.setData({
      daysColor: daysColorList,
    })
  },
  // 日期控制
  async getMonthRecordDataByCalendar(e) {
    let daysColorList = await EverydayClockRecord.getMonthRecord(e.detail.currentMonth)
    this.setData({
      daysColor: daysColorList,
    })
  },


  // 日期控制
  async getOnedayRecordData(currentYear, currentMonth, currentDay) {
    let date = `${currentYear}-${currentMonth < 10 ? "0" + currentMonth : currentMonth}-${currentDay < 10 ? "0" + currentDay : currentDay}`
    console.log(date);  // 打印出的日期格式是这样:2023-2-9
  },

  // 点击打卡后执行的事件
  async submit() {
    let {
      longitude,
      latitude
    } = this.data

    let data = {
      longitude,
      latitude
    }
    wx.showLoading({
      title: '加载中',
    })
    this.setData({
      clockShow: false
    })
    let res = await EverydayClock.sendClockData2(data)
    console.log(data);
    console.log(res) // {clockIn: true}
    if (res.clockIn) { // .clockIn是接口里面的字段,可以作为判断是否打卡成功的依据
      this.linShowToast("打卡成功~", "success")
    } else {
      this.linShowToast("打卡失败~", "error")
    }
    setTimeout(() => {
      this.setData({
        clockShow: false
      })
    }, 1000)

    wx.hideLoading()
    this.getOnedayRecordData(this.data.currentYear, this.data.currentMonth, this.data.currentDay)
    this.getMonthRecordData(this.data.currentMonth)


  },


  checkLocation(){
    let that = this
    wx.getSetting({
      success(res) {
        console.log(res);
        if (!res.authSetting['scope.userLocation']) {
          wx.authorize({
            scope: 'scope.userLocation',
            success() {
              wx.showToast({
                title: '授权成功',
                duration:1500
              })
            },
            fail() {
              // that.showSettingToast('需授权位置信息')
            }
          })
        }
      }
    })
  },
  location(){
        // wx.getLocation是微信自带的api,能够获取当前的地理位置、速度
        wx.getLocation({
          type: 'wgs84',
          success:res=>{
            console.log(res);
            console.log(res.latitude);
            this.setData({
              latitude:res.latitude,
              longitude:res.longitude,
            })
          }
        });
},


  //lin-ui弹窗控制
  // 用到了lin-ui的组件库,需要自行安装相应的包
  linShowToast(title, icon, duration = 750) {
    wx.showToast({
      title: title,
      icon: icon,
      duration: duration,
      mask: "true",
    })
  },
})
· EverydayClockRecord类页面的js代码
注:Http里面是封装的get、post的请求
import {Http} from "../../../utils/http"

class EverydayClockRecord {
  // 获取用户某月的打卡记录
  static async getMonthRecord(month) {
    // console.log(month);  // month是传入的当月月份,如 2
    let monthRecord = [];
    let url = `自己的接口/2023/${month}`; // ${}能够动态获取url
    let result = await Http.get({ url });
    // console.log(result); // result里面是用户当月的打卡情况的
    let resultDataArray = result.teacher_sign_record; // teacher_sign_record是接口里面的字段,resultDataArray是数组,数组里的元素是当月成功打卡的情况记录
    resultDataArray.forEach((element) => {
    console.log(month);
    monthRecord.push({
        month: "current",
        day: String(element.date).slice(8,10), // day处理后的格式就是05、21,这样的格式
        color: "#FFFFFF",
        // #3C8CF8:蓝色
        background: "#3C8CF8",
            });
    });
    console.log(monthRecord);
    return monthRecord;
  }

}

export { EverydayClockRecord };monthRecord数组push()后里面内容如下:文章来源:https://www.toymoban.com/news/detail-482657.html

·EverydayClock类的js代码
import {Http} from "../../../utils/http";

class EverydayClock {
  static async sendClockData2(data){
        let url = "写自己的接口";
        return await Http.post({ url, data });
  }
}

export {EverydayClock}
五、极点日历属性接口文档
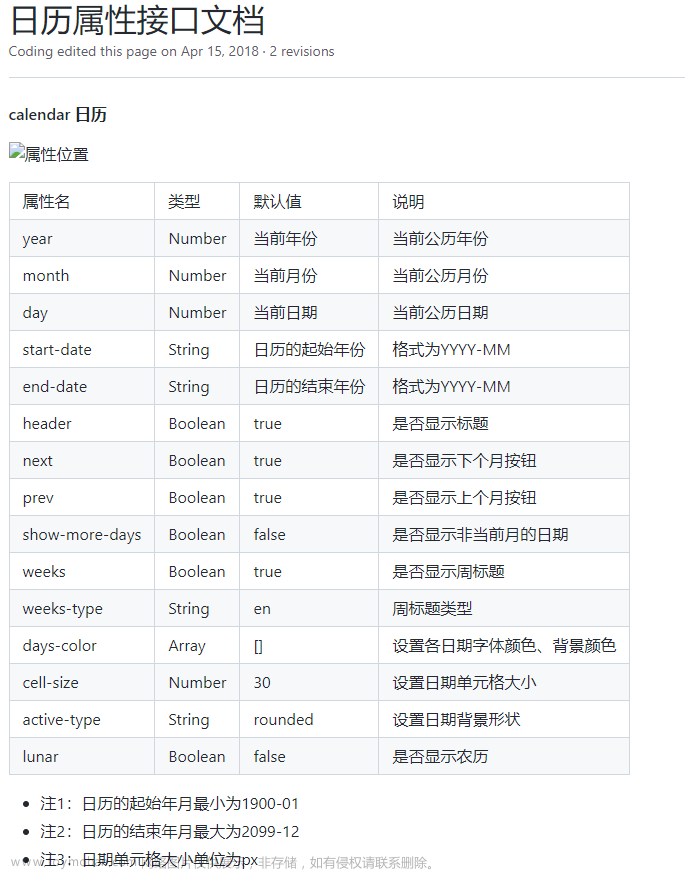
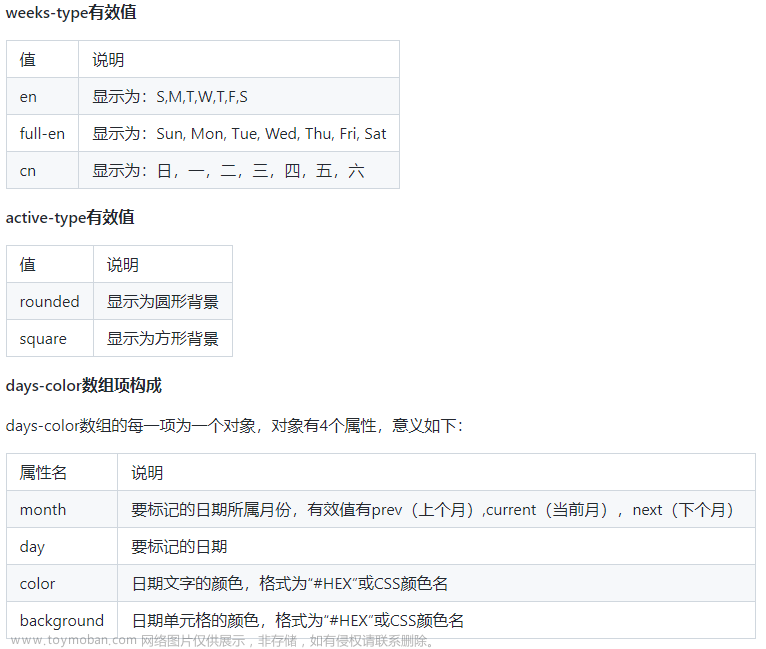
日历插件安装方法借鉴了此篇博客文章来源地址https://www.toymoban.com/news/detail-482657.html
到了这里,关于小程序实现签到打卡功能--用户端的文章就介绍完了。如果您还想了解更多内容,请在右上角搜索TOY模板网以前的文章或继续浏览下面的相关文章,希望大家以后多多支持TOY模板网!



![[安全]Git用户端敏感信息检查方案](https://imgs.yssmx.com/Uploads/2024/04/846644-1.png)
