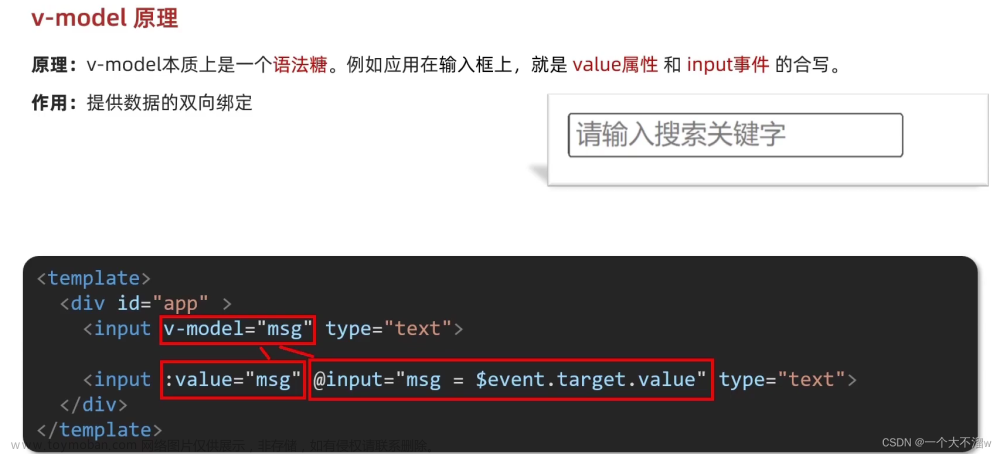
vue父子组件之间双向数据绑定的四种方法(vue2/vue3)
vue考虑到组件的可维护性,是不允许子组件改变父组件传的props值的。父组件通过绑定属性的方式向子组件传值,而在子组件中可以通过$emit向父组件通信(第一种方式),通过这种间接的方式改变父组件的data,从而实现子组件改变props的值。
第一种(原始,比较麻烦)
//父组件
<template>
    <div>
        <child :value='value' @getChildData='getChildData'></child>
         来自子组件的数据:<span>{{value}}</span>
    <div/>
</template>
<script>
data() {
      return {
        value: '父组件的数据'
      }
    },
methods:{
    getChildData(v){
        this.value = v
    }
}
</script>


//子组件child
<template>
    <input v-model='value' @input='childInputChange'></input>
</template>
<script>
export default{
props:{
    value:{
        type:String,//在props接受父组件传递数据
        default:''
    }
},
watch:{
    value(){
        this.childValue = this.value //监听父组件的数据,同步更新子组件数据
    }
   },
methods:{
    childInputChange(){
        this.$emit('getChildData',this.childValue) // 通过emit触发getChildData,将子组件数据传递给父组件
    }
}

</script>
第二种 (自定义组件的 v-model 2.2.0+ 新增)
<input v-model="searchText">
等价于:
<input
  v-bind:value="searchText"
  v-on:input="searchText = $event.target.value"
>
当用在组件上时,v-model 则会这样文章来源:https://www.toymoban.com/news/detail-482717.html
<custom-input
  v-bind:value="searchText"
  v-on:input="searchText = $event"
></custom-input>

//1、将其 value attribute 绑定到一个名叫 value 的 prop 上
//2、子组件通过自定义的 input 事件抛出
Vue.component('custom-input', {
  props: ['value'],
  template: `
    <input
      v-bind:value="value"
      v-on:input="$emit('input', $event.target.value)"
    >
  `
})
第三种(.sync 2.3.0+ 新增)
//父组件
<template>
    <TestCom :num.sync="data"></TestCom>
</template>
<script>
export default({
  components: {
    TestCom,
  },
  data() {
    return {
      data:2
    }
  },
});
</script>


//子组件
<template>
  <div>
    <button @click="cahngeNum">按钮</button>
    {{ num }}
  </div>
</template>

<script>
export default({
  props: {
    num: {
      default: "",
      type: String,
    },
  },
  methods: {
    cahngeNum() {
      this.$emit("update:num", 999); // 触发update:data将子组件值传递给父组件
    },
  },
});
</script>
第四种 (vue3)
- vue3取消了.sync这种语法,使用v-model 语法代替。
- 默认情况下,v-model 在组件上都是使用 modelValue 作为 prop,并以 update:modelValue 作为对应的事件。
- 我们可以通过给 v-model 指定一个参数来更改这些名字
- vue3允许写多个v-model
// 父组件
<template>
    <div>
        // 父组件传递给子组件num属性(默认使用modelValue)
        <child v-model:num = data></child>
    </div>
</template>
<script>
    data(){
      return {
        data:'我是来自父组件的数据'
      }
    }
</script>


//子组件
<template>
  <div>
    <button @click="cahngeNum">按钮</button>
    {{ num }}
  </div>
</template>

<script lang="ts">
import { defineComponent } from "vue";
export default defineComponent({
  emits: ["update:num"],
  props: {
    num: {
      default: "",
      type: String,
    },
  },
  setup(props, { emit }) {
    function cahngeNum() {
      emit("update:num", 999);
    }
    return { cahngeNum };
  },
});
</script>
ve3多个 v-model 绑定文章来源地址https://www.toymoban.com/news/detail-482717.html
//父组件
<UserName
  v-model:first-name="first"
  v-model:last-name="last"
/>


//子组件
<script setup>
defineProps({
  firstName: String,
  lastName: String
})

defineEmits(['update:firstName', 'update:lastName'])
</script>

<template>
  <input
    type="text"
    :value="firstName"
    @input="$emit('update:firstName', $event.target.value)"
  />
  <input
    type="text"
    :value="lastName"
    @input="$emit('update:lastName', $event.target.value)"
  />
</template>
到了这里,关于vue父子组件之间双向数据绑定的(vue2/vue3)的文章就介绍完了。如果您还想了解更多内容,请在右上角搜索TOY模板网以前的文章或继续浏览下面的相关文章,希望大家以后多多支持TOY模板网!


