一、Android与iOS之间的不同(开启蓝牙)
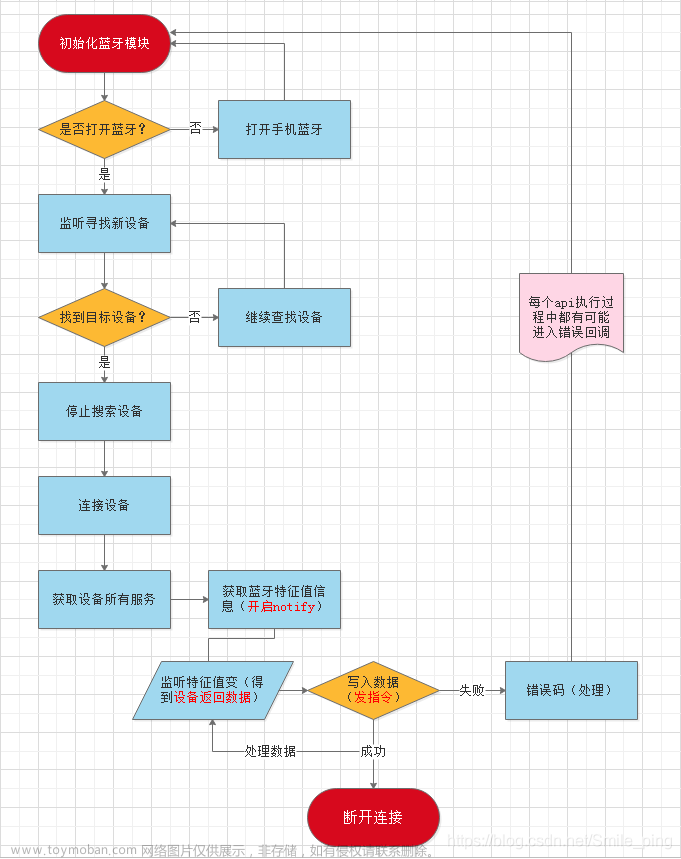
扫描蓝牙首先需要打开手机上的蓝牙。iOS只需打开蓝牙即可开始扫描蓝牙;Android需要打开蓝牙及位置信息才可以开始扫描蓝牙。下面的代码可以在扫描之前使用,用来检查是否已经很打开蓝牙及位置信息
官方地址https://developers.weixin.qq.com/miniprogram/dev/api/device/bluetooth/wx.stopBluetoothDevicesDiscovery.html
代码如下:
wx.getSystemInfo({
      success: function (res) {
        var res = wx.getSystemInfoSync();
        if (!res.bluetoothEnabled && !res.locationEnabled) {
          wx.showModal({
            title: '提示',
            content: '您的蓝牙和GPS未开启,请先开启蓝牙和GPS',
            showCancel: false,
            success: function () {
              wx.navigateBack({
                delta: 1,
              })
            }
          })
        } else if (!res.bluetoothEnabled) {
          wx.showModal({
            title: '提示',
            content: '您的蓝牙未开启,请先开启蓝牙',
            showCancel: false,
            success: function () {
              wx.navigateBack({
                delta: 1,
              })
            }
          })
        } else if (!res.locationEnabled) {
          wx.showModal({
            title: '提示',
            content: '您的GPS未开启,请先开启GPS',
            showCancel: false,
            success: function () {
              wx.navigateBack({
                delta: 1,
              })
            }
          })
        } else if (res.bluetoothEnabled && res.locationEnabled) {
          if (callback) {// 这里是回调方法
            callback() // 这里是回调方法
          }
        }
      },
    })
二、打开与关闭蓝牙适配器
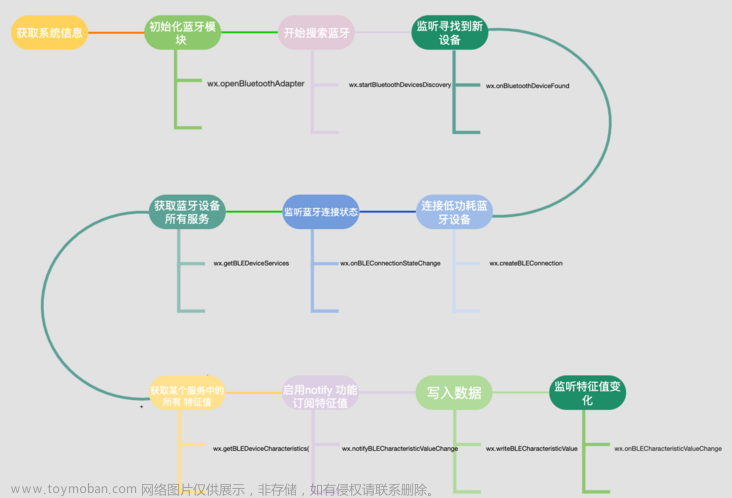
wx.openBluetoothAdapter与wx.closeBluetoothAdapter配套使用,在开始时调用wx.openBluetoothAdapter,在不需要继续扫描蓝牙的时候调用wx.closeBluetoothAdapter。
代码如下(示例):
//打开蓝牙适配器
wx.openBluetoothAdapter({
  success (res) {
    console.log(res)
  }
})
//关闭蓝牙适配器
wx.closeBluetoothAdapter({
  success (res) {
    console.log(res)
  }
})
三、开始与关闭搜寻附近的蓝牙外围设备
代码中的services是一个蓝牙设备中的UUID所包含的字符串。
(iOS的蓝牙ID名叫UUID,Android的蓝牙ID名叫MAC地址)只搜索ID中含有它的蓝牙设备。
代码如下(示例):
//开始搜寻附近的蓝牙外围设备
wx.startBluetoothDevicesDiscovery({
  services: ['FEE7'],
  success (res) {
    console.log(res)
  }
})
//关闭搜寻附近的蓝牙外围设备
wx.stopBluetoothDevicesDiscovery({
  success (res) {
    console.log(res)
  }
})
四、开启与取消监听搜索到新设备的事件
在开启监听之后你可以陆陆续续扫描到新的蓝牙设备(第一次扫描的不够全面,不能扫到附近所有蓝牙设备)
提示:Android扫描蓝牙能力不如iOS扫描蓝牙能力。大致形容(一共30个蓝牙设备在附近,且各不相同。安卓三次左右扫描到所有蓝牙设备。iOS一次左右扫描到所有蓝牙设备)
代码如下(示例):
// ArrayBuffer转16进度字符串示例
function ab2hex(buffer) {
  var hexArr = Array.prototype.map.call(
    new Uint8Array(buffer),
    function(bit) {
      return ('00' + bit.toString(16)).slice(-2)
    }
  )
  return hexArr.join('');
}
//开启监听搜索到新设备的事件
wx.onBluetoothDeviceFound(function(res) {
  console.log(res)
})
//取消监听搜索到新设备的事件
wx.offBluetoothDeviceFound()
五、获取蓝牙
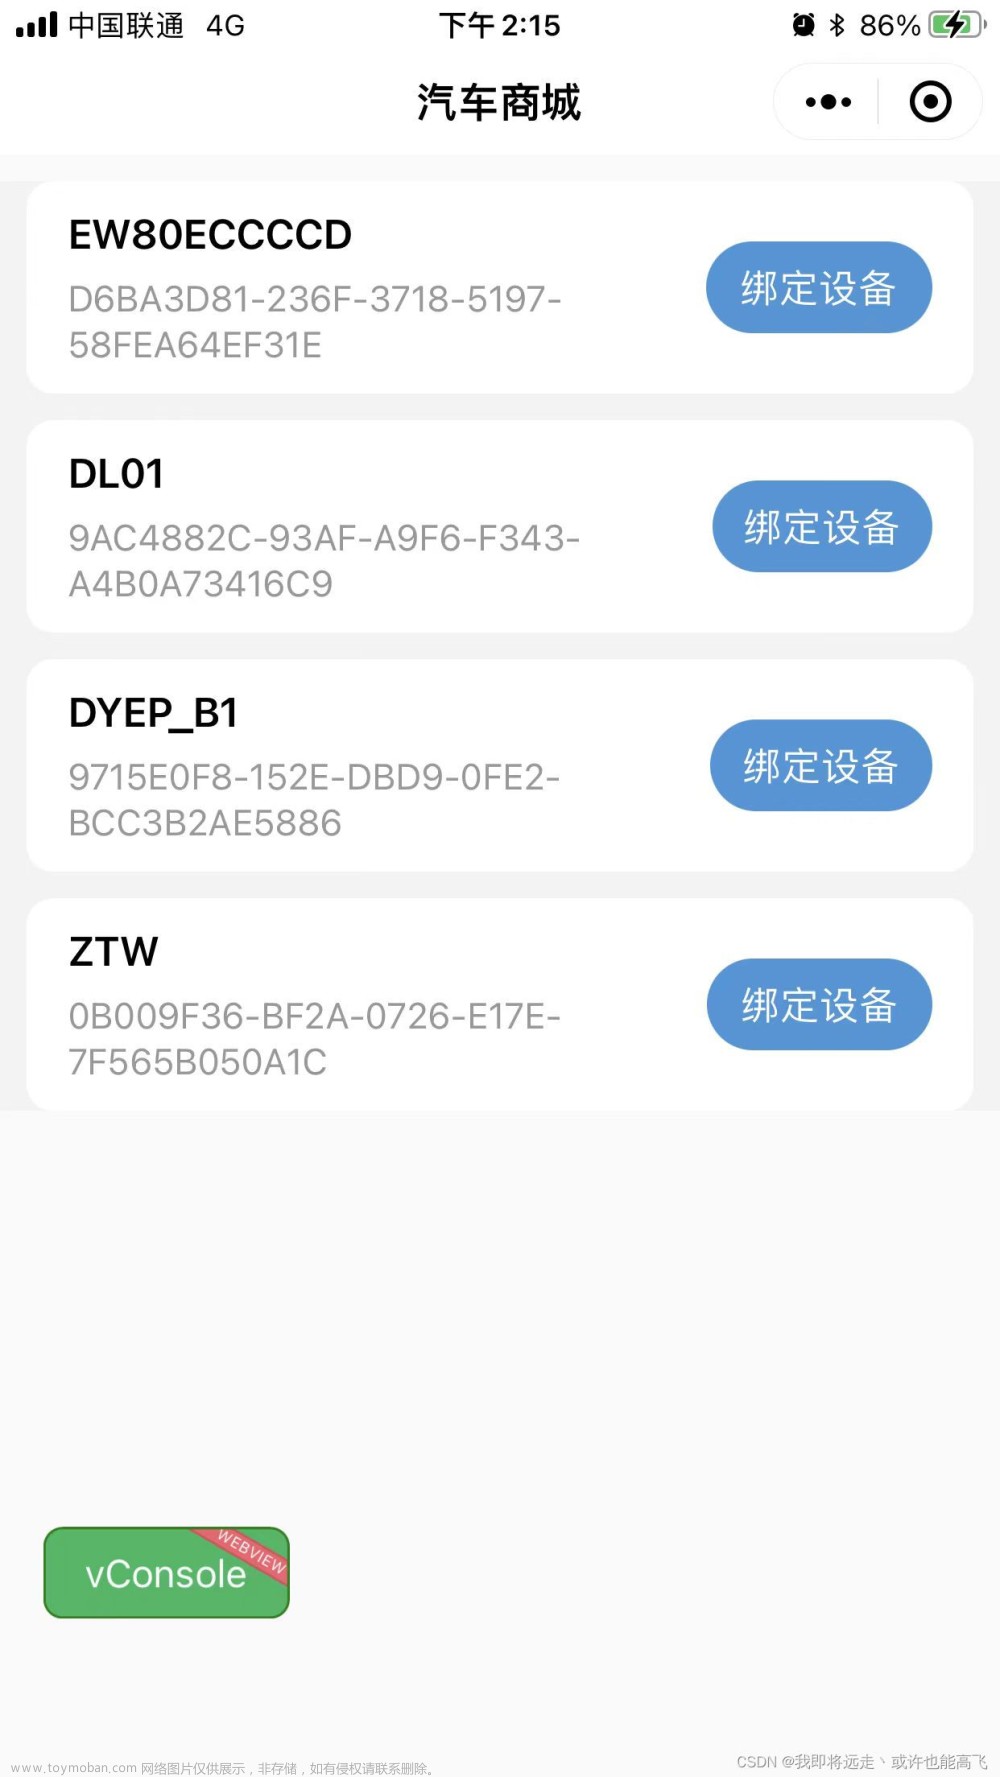
获取在蓝牙模块生效期间所有搜索到的蓝牙设备。包括已经和本机处于连接状态的设备。
wx.getBluetoothDevices({
  success: function (res) {
    console.log(res)//蓝牙列表
  }
})
六、连接与断开蓝牙
想要读取、监听、修改(低功耗BLE)蓝牙的数据,也就必须先连接蓝牙。拿到蓝牙广播包并解密广播包。(利用上面的方法将广播包中的数据转16进制-----方法ab2hex()解密)
//开始连接蓝牙
    wx.createBLEConnection({
      deviceId: deviceId,
      success: function (res) {
		console.log(res)
     }
   })
//断开蓝牙连接
wx.closeBLEConnection({
   deviceId: deviceId,
  success (res) {
    console.log(res)
  }
})
七、读取、监听、修改(写入)蓝牙
 deviceId(这个设备的UUID), serviceId为Time顶上的UUID(这整个服务的UUID), characteristicId下面每个单独的小UUID(功能性UUID—读、监听、写入)。每个单独的模式下的Properties代表的就是可以进行读、监听、写入的功能。文章来源:https://www.toymoban.com/news/detail-483405.html
// 读取低功耗蓝牙设备的特征值的二进制数据值。注意:必须设备的特征值支持 read 才可以成功调用
  Read: function (deviceId, serviceId, characteristicId, callback) {
    wx.readBLECharacteristicValue({
      deviceId: deviceId,
      serviceId: serviceId,
      characteristicId: characteristicId,
      success: function (res) {
        wx.onBLECharacteristicValueChange(function (res) {
          if (callback) {
            callback(res)
          }
        })
      },
      fail: function (res) {
        if (callback) {
          callback(res)
        }
      }
    })
  },
  //监听
  notify: function (deviceId, serviceId, characteristicId, callback) {
    wx.notifyBLECharacteristicValueChange({
      state: true,
      deviceId: deviceId,
      serviceId: serviceId,
      characteristicId: characteristicId,
      success: function (res) {
        if (callback) {
          callback(characteristicId)
        }
      },
      fail: function (res) {
        if (callback) {
          callback(res)
        }
      }
    })
  },
  //写入
  write: function (deviceId, serviceId, characteristicId, callback) {
    let buffer = new ArrayBuffer(1)
    let dataView = new DataView(buffer)
    dataView.setUint8(0, 0x01)
    wx.writeBLECharacteristicValue({
      deviceId: deviceId,
      serviceId: serviceId,
      characteristicId: characteristicId,
      value: buffer,
      success: function (res) {
        console.log(res)
        wx.onBLECharacteristicValueChange(function (res) {
          // console.log(res)
          if (callback) {
            callback(res)
          }
        })
      },
      fail: function (res) {
        // console.log(res)
        if (callback) {
          callback(res)
        }
      }
    })
  },
尾言
这也只是做完项目之后对于蓝牙扫描的一个总结。有大佬觉得不对需要补充的可以评论联系我,觉得有用或者不懂得兄弟也可以在下面评论,我也会把我所知道的都告诉你的。文章来源地址https://www.toymoban.com/news/detail-483405.html
到了这里,关于微信小程序扫描蓝牙及操作(低功耗)蓝牙数据(全套流程)的文章就介绍完了。如果您还想了解更多内容,请在右上角搜索TOY模板网以前的文章或继续浏览下面的相关文章,希望大家以后多多支持TOY模板网!


