前言
为了帮助同学们完成痛苦的实验课程设计,本作者将其作出的实验结果及代码贴至CSDN中,供同学们学习参考。如有不足或描述不完善之处,敬请各位指出,欢迎各位的斧正!
一、实验目的
1、掌握ListControl类控件与数据源的绑定方法。
2、熟练掌握GridView控件的应用。
3、掌握DetailsView控件的应用。
二、实验环境
Visual Studio 2019 ASP.Net Framework
三、实验内容
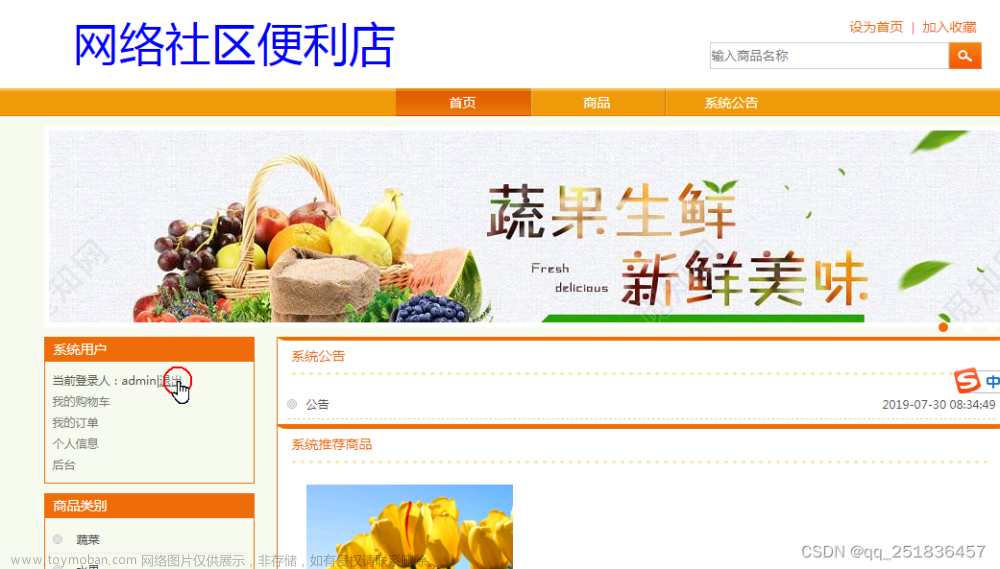
1、利用GridView控件设计并实现一个商品展示页。要求如下:
·浏览效果如图1所示。当选择不同的分类名时,显示该分类中包含的商品信息。若分类中包含多个商品,则分页显示商品信息。
·当单击“购买”链接时将页面重定向到购物车页面。
图1 “商品展示页”浏览效果
2、利用DetailsView控件实现数据插入、编辑和删除等操作。要求如下:
·浏览效果如图2所示。在插入和编辑数据时涉及的外键数据以下拉框形式进行选择输入。
图2 “数据浏览”效果
图3 “数据插入”效果
图4 “数据编辑”效果
四、代码及截图
1.ProductShow.aspx代码:
<%@ Page Language="C#" AutoEventWireup="true" CodeFile="ProductShow.aspx.cs" Inherits="ProShow" %>

<!DOCTYPE html>

<html xmlns="http://www.w3.org/1999/xhtml">
<head runat="server">
<meta http-equiv="Content-Type" content="text/html; charset=utf-8"/>
    <title></title>
    <style type="text/css">
        .auto-style6 {
            width: 100%;
            height: 220px;
        }
        .auto-style7 {
            width: 140px;
        }
        .auto-style8 {
            width: 110px;
        }
    </style>
</head>
<body>
    <form id="form1" runat="server">
        <div>分类名:<asp:DropDownList ID="ddlCategory" runat="server" AutoPostBack="true" DataTextField="Name" DataValueField="CategoryId" OnSelectedIndexChanged="ddlCategory_SelectedIndexChanged"></asp:DropDownList><br/>
            <asp:GridView ID="GvProduct" runat="server" AllowPaging="True"   AutoGenerateColumns="False" PageSize="1" OnPageIndexChanging="gvProduct_PageIndexChanging">
                <PagerSettings FirstPageText="首页" LastPageText="尾页" NextPageText="下一页" PreviousPageText="上一页" Mode="NextPrevious" Position="TopAndBottom" />
                <Columns>
                    <asp:TemplateField>
                        <ItemTemplate>
                            <table>
                                <tr><td rowspan="4"><asp:Image ID="imgProduct" runat="server" imageUrl='<%# Bind("Image") %>' Width="100px" Height="100px"/></td><td>产品名称:</td><td><asp:Label ID="lblName" runat="server" Text='<%# Bind("Name") %>'></asp:Label></td></tr>
                                <tr><td >产品价格:</td><td><asp:Label ID="lblListPrice" runat="server" Text='<%# Bind("ListPrice") %>'></asp:Label></td></tr>
                                <tr><td >产品描述:</td> <td><asp:Label ID="lblDecsn" runat="server" Text='<%# Bind("Descn") %>'></asp:Label></td></tr>
                                <tr><td >库存:</td><td><asp:Label ID="lblQty" runat="server" Text='<%# Bind("Qty") %>'></asp:Label></td></tr>
                            </table>
                        </ItemTemplate>
                    </asp:TemplateField>
                    <asp:HyperLinkField DataNavigateUrlFields="ProductId"
                        DataNavigateUrlFormatString="~/ShopCart.aspx?ProductId={0}"
                        HeaderText="放入购物车" Text="购买"/>
                </Columns>
            </asp:GridView><br/>
        </div>
    </form>
</body>
</html>
设计界面:
ProductShow.aspx.cs:
using System;
using System.Collections.Generic;
using System.Linq;
using System.Web;
using System.Web.UI;
using System.Web.UI.WebControls;

public partial class ProShow : System.Web.UI.Page
{
    MyPetShopDataContext db = new MyPetShopDataContext();
    protected void Page_Load(object sender, EventArgs e)
    {
        if (!IsPostBack)
        {
            var categories = from c in db.Category select new{c.CategoryId,c.Name};
            foreach (var category in categories)
            {
                ddlCategory.Items.Add(new ListItem(category.Name.ToString(), category.CategoryId.ToString()));
            }
            Bind();
        }
    }
    protected void ddlCategory_SelectedIndexChanged(object sender, EventArgs e)
    {
        Bind();
    }

    protected void gvProduct_PageIndexChanging(object sender, GridViewPageEventArgs e)
    {
        GvProduct.PageIndex = e.NewPageIndex;
        Bind();
    }
    private void Bind()
    {
        int categoryId = int.Parse(ddlCategory.SelectedValue);
        var products = from p in db.Product where p.CategoryId == categoryId select p;
        GvProduct.DataSource = products;
        GvProduct.DataBind();
    }
}
运行截图:
更换分类为Bugs
单击下一页
再单击上一页
2.Details.aspx代码:
<%@ Page Language="C#" AutoEventWireup="true" CodeFile="Detials.aspx.cs" Inherits="Detials" %>

<!DOCTYPE html>

<html xmlns="http://www.w3.org/1999/xhtml">
<head runat="server">
<meta http-equiv="Content-Type" content="text/html; charset=utf-8"/>
    <title></title>
</head>
<body>
    <form id="form1" runat="server">
        <div>
            <asp:DetailsView ID="dvProduct" runat="server" AllowPaging="True" AutoGenerateRows="False" DataKeyNames="ProductId" DataSourceID="ldsProduct">
                <Fields>
                    <asp:BoundField DataField="ProductId" HeaderText="ProductId"
                        InsertVisible="False" ReadOnly="True" SortExpression="ProductId" />
                    <asp:TemplateField HeaderText="CategoryId" SortExpression="CategoryId">
                        <EditItemTemplate>
                            <asp:DropDownList ID="ddlCategoryId" runat="server" DataSourceID="ldsCategory" DataTextField="Name" DataValueField="CategoryId">
                            </asp:DropDownList>
                        </EditItemTemplate>
                        <InsertItemTemplate>
                            <asp:DropDownList ID="ddlCategoryID" runat="server" DataSourceID="ldsCategory" DataTextField="Name" DataValueField="CategoryId">
                            </asp:DropDownList>
                        </InsertItemTemplate>
                        <ItemTemplate>
                            <asp:Label ID="lblCategoryId" runat="server" Text='<%# Bind("CategoryId") %>'></asp:Label>
                        </ItemTemplate>
                    </asp:TemplateField>
                    <asp:BoundField DataField="ListPrice" HeaderText="ListPrice" SortExpression="ListPrice" />
                    <asp:BoundField DataField="UnitCost" HeaderText="UnitCost" SortExpression="UnitCost" />
                    <asp:TemplateField HeaderText="SuppId" SortExpression="SuppId">
                        <EditItemTemplate>
                            <asp:DropDownList ID="ddlSuppId" runat="server" DataSourceID="ldsSupplier" DataTextField="Name" DataValueField="SuppId">
                            </asp:DropDownList>
                        </EditItemTemplate>
                        <InsertItemTemplate>
                            <asp:DropDownList ID="ddlSuppId" runat="server" DataSourceID="ldsSupplier" DataTextField="Name" DataValueField="SuppId">
                            </asp:DropDownList>
                        </InsertItemTemplate>
                        <ItemTemplate>
                            <asp:Label ID="lblSuppId" runat="server" Text='<%# Bind("SuppId") %>'></asp:Label>
                        </ItemTemplate>
                    </asp:TemplateField>
                    <asp:BoundField DataField="Name" HeaderText="Name" SortExpression="Name" />
                    <asp:BoundField DataField="Descn" HeaderText="Descn" SortExpression="Descn" />
                    <asp:BoundField DataField="Image" HeaderText="Image" SortExpression="Image" />
                    <asp:BoundField DataField="Qty" HeaderText="Qty" SortExpression="Qty" />
                    <asp:CommandField ShowDeleteButton="True" ShowEditButton="True" ShowInsertButton="True" />
                </Fields>
            </asp:DetailsView><br/>
            <asp:LinqDataSource ID="ldsProduct" runat="server"
                ContextTypeName="MyPetShopDataContext" EnableDelete="True"
                EnableInsert="True" EnableUpdate="True" EntityTypeName=""
                TableName="Product"></asp:LinqDataSource><br/>
            <asp:LinqDataSource ID="ldsCategory" runat="server"
                ContextTypeName="MyPetShopDataContext" EntityTypeName=""
                Select="new (CategoryId, Name)" TableName="Category"></asp:LinqDataSource><br/>
            <asp:LinqDataSource ID="ldsSupplier" runat="server"
                ContextTypeName="MyPetShopDataContext" EntityTypeName=""
                Select="new (SuppId, Name)" TableName="Supplier"></asp:LinqDataSource><br/>
        </div>
    </form>
</body>
</html>
设计页面:
运行截图:
单击“2”:
单击编辑:
将Qty修改为200后单击更新:
单击新建:
单击插入:
插入后单击删除 文章来源:https://www.toymoban.com/news/detail-483791.html
五、实验总结
在实验四的编程过程中,我通过在网络中大量搜索关于GridView的相关知识与操作技巧,结合数据库系统概论所学知识,对实验进行了反复尝试与修改,并最终对数据连接尤其是GridView在ASP.NET环境下的实践有了更深的理解。整个实验最终达到了令人较为满意的效果。文章来源地址https://www.toymoban.com/news/detail-483791.html
到了这里,关于Web网络编程第四次试验:数据绑定的文章就介绍完了。如果您还想了解更多内容,请在右上角搜索TOY模板网以前的文章或继续浏览下面的相关文章,希望大家以后多多支持TOY模板网!


