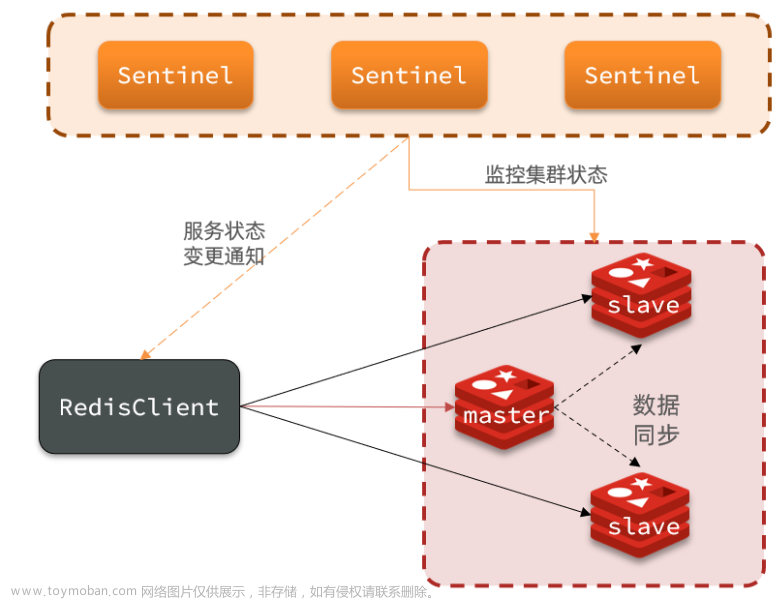
说明
本文主要参考:
https://www.cnblogs.com/coderaniu/p/15352323.html
https://developer.aliyun.com/article/892805
但是这两篇博客均缺失部分关键性细节,所以重新撰文。读者可以结合本文和上述文章一起阅读。
安装步骤
安装docker和docker-compose
此处略
安装redis一主两从
创建docker-compose.yml文件,内容如下:
version: '3.7'
services:
  master:
    image: redis:5.0.14
    container_name: redis-master
    restart: always
    command: redis-server --requirepass redispwd  --appendonly yes
    ports:
      - 6379:6379
    volumes:
      - ./data1:/data
  slave1:
    image: redis:5.0.14
    container_name: redis-slave-1
    restart: always
    command: redis-server --slaveof redis-master 6379  --requirepass redispwd --masterauth redispwd  --appendonly yes
    ports:
      - 6380:6379
    volumes:
      - ./data2:/data
  slave2:
    image: redis:5.0.14
    container_name: redis-slave-2
    restart: always
    command: redis-server --slaveof redis-master 6379  --requirepass redispwd --masterauth redispwd  --appendonly yes
    ports:
      - 6381:6379
    volumes:
      - ./data3:/data
执行命令docker-compose up -d创建三个redis容器。
通过docker ps | grep redis命令可以查看已经启动了三个redis容器,其中master节点容器id为:d0baa2f30fb9

通过docker inspect d0baa2f30fb9查看该容器的IP地址和网络:

安装哨兵
创建sentinel.conf文件,文件内容如下:
port 26379
dir /tmp
sentinel monitor mymaster 172.18.0.2 6379 2
sentinel down-after-milliseconds mymaster 30000
sentinel parallel-syncs mymaster 1
sentinel auth-pass mymaster redispwd
sentinel failover-timeout mymaster 180000
sentinel deny-scripts-reconfig yes
注意第三行的IP地址,和上一步截图中的IP地址一致。
将sentinel.conf复制为三个完全一样的文件sentinel1.conf,sentinel2.conf,sentinel3.conf
创建另一个docker-compose.yml文件,内容如下:
version: '3.7'
services:
  sentinel1:
    image: redis:5.0.14
    container_name: redis-sentinel-1
    restart: always
    ports:
      - 26379:26379
    command: redis-sentinel /usr/local/etc/redis/sentinel.conf
    volumes:
      - ./sentinel1.conf:/usr/local/etc/redis/sentinel.conf
  sentinel2:
    image: redis:5.0.14
    container_name: redis-sentinel-2
    restart: always
    ports:
    - 26380:26379
    command: redis-sentinel /usr/local/etc/redis/sentinel.conf
    volumes:
      - ./sentinel2.conf:/usr/local/etc/redis/sentinel.conf
  sentinel3:
    image: redis:5.0.14
    container_name: redis-sentinel-3
    ports:
      - 26381:26379
    command: redis-sentinel /usr/local/etc/redis/sentinel.conf
    volumes:
      - ./sentinel3.conf:/usr/local/etc/redis/sentinel.conf
networks:
  default:
    external:
      name: sen-redis_default
这里注意最后一行,和上一步截图中的名称一致
执行命令docker-compose up -d创建三个redis哨兵容器:

查看哨兵的日志:
 文章来源:https://www.toymoban.com/news/detail-485973.html
待定问题
由于使用的是docker的网络,开发机器无法直接连接进行测试。
只能使用docker的方式启动测试代码,并通过docker run --name contianername - -network sen-redis_default imageid启动进行测试。这里需要注意- -network sen-redis_default,和前续提到的网络名称一致。文章来源地址https://www.toymoban.com/news/detail-485973.html
到了这里,关于使用docker快速搭建redis哨兵模式的文章就介绍完了。如果您还想了解更多内容,请在右上角搜索TOY模板网以前的文章或继续浏览下面的相关文章,希望大家以后多多支持TOY模板网!


