项目背景
。功能要求为:一对一聊天,可以发送文字,图片,语音,文件,视频,含消息列表页。 暑假没事干来写篇博客复盘一下。框架和样式部分就是采用了colorUI 的组件,没啥好说的,这方面我也不会
聊天室
成品展示


这是聊天内容部分
<scroll-view class="cu-chat" scroll-y="true"  scroll-into-view="{{scrollId}}"
style="height:{{systemInfo.windowHeight - 50}}px;"enable-flex="true">
  <block wx:for="{{msgList}}" wx:key="index" wx:if="{{msgList!=[]}}">
    <view class="cu-chat">

      <!-- 我的部分 -->

      <!-- 文字 -->
      <block wx:if="{{item.creator == myOpenid && item.type == 'text'}}">
        <view class="cu-item self">
            <!-- 我的发送消息 -->
            <view class="main">
              <view class="content bg-green shadow" id="msg-{{index}}">
                <text>{{item.content}}</text>
              </view>
            </view>
            <!--我的头像  -->
            <view class="cu-avatar radius" style="background-image:url({{myUserInfo.avaUrl}});"></view>
        </view>
      </block>
      <!-- 图片 -->
      <block wx:if="{{item.creator == myOpenid && item.type == 'image'}}">
        <view class="cu-item self"  id="msg-{{index}}">
          <view class="main" bindtap="viewImage" data-url="{{item.content}}">
            <image src="{{item.content}}" class="radius" mode="widthFix"></image>
          </view>
          <view class="cu-avatar radius" style="background-image:url({{myUserInfo.avaUrl}});"></view>
        </view>
      </block>
      <!-- 视频 -->
      <block wx:if="{{item.creator == myOpenid && item.type == 'video'}}">
        <view class="cu-item self"  id="msg-{{index}}">
          <view class="main" bindtap="viewvideo" data-url="{{item.content}}">
            <video src="{{item.content}}" class="radius" mode="widthFix"></video>
          </view>
          <view class="cu-avatar radius" style="background-image:url({{myUserInfo.avaUrl}});"></view>
        </view>
      </block>
      <!-- 文件 -->
      <block wx:if="{{item.creator == myOpenid && item.type == 'file'}}">
        <view class="cu-item self"  id="msg-{{index}}">
          <view class="main" bindtap="viewFile" data-fileid="{{item.content.fileID}}">
            <view class="content" style="width: 500rpx;height: 200rpx;display: flex;justify-content: space-around;padding-left:30rpx;padding-right:40rpx;padding-top:0rpx">
              <view class="fileName" style="margin-right: 30rpx;">
                <view class="view" style="font-size: 30rpx; font-weight: 20rpx;">{{item.content.fileName}}</view>
              </view>
              <!-- 文件图标 -->
              <view class="image" >
                <image class="cu-avatar radius" style="background-image:url({{fileImg}});width:70rpx;height: 80rpx;"></image>
              </view>
            </view>
          </view>
          <view class="cu-avatar radius" style="background-image:url({{myUserInfo.avaUrl}});"></view>
        </view>
      </block>
      <!-- 语音 -->
      <block wx:if="{{item.creator == myOpenid && item.type == 'voice'}}">
        <view class="cu-item self"  id="msg-{{index}}">
          <view class="main" bindtap="voicePlay" data-voiceID="{{item.content.fileID}}">
            <view class="action text-bold text-grey">{{item.content.duration}}"</view>
            <view class="content bg-green shadow">
              <text class="cuIcon-sound text-xxl padding-right-xl" > </text>
            </view>
          </view>
          <!-- 头像 -->
          <view class="cu-avatar radius" style="background-image:url({{myUserInfo.avaUrl}});"></view>
        </view>
      </block>

      <!-- 他的部分 -->

      <!-- 文字 -->
      <block wx:if="{{item.creator !== myOpenid && item.type == 'text'}}">
        <view class="cu-item">
          <!-- 他的头像 -->
          <view class="cu-avatar radius" style="background-image:url({{hisUserInfo}});"></view>
          <!-- 他的消息 -->
          <view class="main">
            <view class="content shadow" id="msg-{{index}}">
              <text>{{item.content}}</text>
            </view>
          </view>
        </view>
      </block>
      <!-- 图片 -->
      <block wx:if="{{item.creator !== myOpenid && item.type == 'image'}}">
        <view class="cu-item"  id="msg-{{index}}">
          <!-- 他的头像 -->
          <view class="cu-avatar radius" style="background-image:url({{hisUserInfo}});"></view>
          <!-- 他的图片 -->
          <view class="main" bindtap="viewImage" data-url="{{item.content}}">
            <image src="{{item.content}}" class="radius" mode="widthFix"></image>
          </view>
        </view>
      </block>
      <!-- 视频 -->
      <block wx:if="{{item.creator !== myOpenid && item.type == 'video'}}">
        <view class="cu-item "  id="msg-{{index}}">
          <!-- 他的头像 -->
          <view class="cu-avatar radius" style="background-image:url({{hisUserInfo}});"></view>
          <view class="main" bindtap="viewvideo" data-url="{{item.content}}">
            <video src="{{item.content}}" class="radius" mode="widthFix"></video>
          </view>

        </view>
      </block>
      <!-- 文件 -->
      <block wx:if="{{item.creator !== myOpenid && item.type == 'file'}}">
        <view class="cu-item "  id="msg-{{index}}">
          <!-- 他的头像 -->
          <view class="cu-avatar radius" style="background-image:url({{hisUserInfo}});"></view>
          <!-- 他的文件 -->
          <view class="main"bindtap="viewFile" data-fileid="{{item.content.fileID}}">
            <view class="content" style="width: 500rpx;height: 200rpx;display: flex;justify-content: space-around;padding-left:30rpx;padding-right:40rpx;padding-top:0rpx">
              <view class="fileName" style="margin-right: 30rpx;">
                <view class="view" style="font-size: 30rpx; font-weight: 20rpx;">{{item.content.fileName}}</view>
              </view>
              <!-- 文件图标 -->
              <view class="image" >
                <image class="cu-avatar radius" style="background-image:url({{fileImg}});width:70rpx;height: 80rpx;"></image>
              </view>
            </view>
          </view>
        </view>
      </block>
      <!-- 语音 -->
      <block wx:if="{{item.creator !== myOpenid && item.type == 'voice'}}">
        <view class="cu-item" id="msg-{{index}}">
          <!-- 他的头像 -->
          <view class="cu-avatar radius" style="background-image:url({{hisUserInfo}});"></view>
          <!-- 他的消息 -->
          <view class="main"bindtap="voicePlay" data-voiceID="{{item.content.fileID}}">
            <view class="content shadow" >
              <text class="cuIcon-sound text-xxl padding-right-xl"></text>
            </view>
            <view class="action text-bold text-grey">{{item.content.duration}}"</view>
          </view>
        </view>
      </block>
    </view>
  </block>
</scroll-view>
浅浅地小讲一下
<scroll-view class="cu-chat" scroll-y="true"  scroll-into-view="{{scrollId}}"
style="height:{{systemInfo.windowHeight - 50}}px;"enable-flex="true">

</scroll-view>| scroll-into-view | string | 值应为某子元素id(id不能以数字开头)。设置哪个方向可滚动,则在哪个方向滚动到该元素 |
scrollId的值会在聊天内容发生变化时,变更为最后一条消息元素的id
msgList 是消息数组

集合chat_msg储存了聊天数据(部分),其中一条记录保存一个会话房间的数据,下面为一条记录的示例
| _id | 自动生成 | |||||||
| session_id | 代码中用了唯一确定会话房间的字段, 志愿者用户首次联系负责人时将在chat_msg创建会话房间记录,生成session_id字段,session_id由负责人和志愿者的_openid连接而成) | |||||||
| msg_set | 会话房间的消息数组,数组成员为对象类型,按消息类型分类 | 消息对象属性&消息类型 | 文字 | 图片 | 视频 | 文件 | 语音 | |
|---|---|---|---|---|---|---|---|---|
| type | text | image | video |
file |
voice |
|||
| content | 文字消息 | 云ID | ||||||
| creator | 消息创建者的_openid | |||||||
| createTimeStamp | 消息发送时的时间戳 | |||||||
下面是图片、文件、语音消息的点击事件
  //点击图片预览
  viewImage(e){
    var urls = [e.currentTarget.dataset.url]
    wx.previewImage({
      current: '', // 当前显示图片的http链接
      urls: urls, // 需要预览的图片http链接列表
      showmenu : true
    })
  },
  //打开文件
  viewFile(e){
    var fileid = e.currentTarget.dataset.fileid;//云文件fileID
    var that = this;
    wx.cloud.downloadFile({
      fileID: fileid,
    })
    .then((res)=>{
      console.log('res',res.tempFilePath);
      wx.openDocument({
        filePath: res.tempFilePath,
        showMenu: true,
      })
      .then(()=>{})
      .catch((err)=>{console.log('文件预览失败',err);})
    })
  },

  //播放录音(该页面的js文件中全局变量  有const innerAudioContext   =wx.createInnerAudioContext();//播放语音)
  voicePlay(e){
    innerAudioContext.stop();
    innerAudioContext.src = '';
    console.log(e.currentTarget.dataset.voiceid)
    let id = e.currentTarget.dataset.voiceid;
    innerAudioContext.src = id;
    innerAudioContext.onPlay(()=>{console.log('语音播放')});
    innerAudioContext.onError((res)=>{
      console.log(res.errMsg)
      console.log(res.errCode)
    })
    innerAudioContext.play();
  },
底部消息编辑区
  <!-- 发送部分 -->
<view class="cu-bar foot input {{InputBottom!=0?'cur':''}}" style="bottom:{{InputBottom}}px">
  <!-- +更多 -->
  <view class="action" bindtap="showModal">
    <text class="cuIcon-roundadd lg text-gray"></text>
  </view>
  <!-- text&voice -->
  <view class="action" wx:if="{{inputMode == 'voice'}}" bindtap="switchInputMode">
    <text class="cuIcon-keyboard lg text-grey"></text>
  </view>
  <view class="action" wx:if="{{inputMode=='text'}}"bindtap="switchInputMode">
    <text class="cuIcon-sound text-grey"></text>
  </view>
  <!-- 文字输入框 -->
  <input
  hidden="{{inputMode=='voice'}}"
  class="solid-bottom"
  bindfocus="InputFocus"
  bindblur="InputBlur"
  adjust-position="{{false}}"
  focus="{{false}}"
  maxlength="300"
  cursor-spacing="10"
  value="{{inputContent}}"
  bindinput="onInputContent"></input>
    <!-- 语音按住区 -->
  <view
  hidden="{{inputMode=='text'}}"
  class="middle-view"
  bindtouchstart="RecordStart"
  catch:touchmove="RecordMove"
  bindtouchend="RecordEnd">{{voiceTip}}</view>
  <!-- 发送按钮 -->
  <button hidden="{{inputMode=='voice'}}"class="cu-btn bg-green shadow" bindtap="sendContent">发送</button>
</view>

<!-- 底部多选功能窗口 -->
<view class="cu-modal bottom-modal {{modalName=='bottomModal'?'show':''}}">
  <view class="cu-dialog">
    <view class="cu-bar bg-white">
      <view class="action text-blue" bindtap="hideModal">取消</view>
    </view>
    <view class="padding-xl">
      <view class="cu-list grid col-3">

        <view class="cu-item" bindtap="sendPic">
          <text class="cuIcon-pic lg text-gray"></text>
          <text>图片</text>
        </view>

        <view class="cu-item" bindtap="sendVideo">
          <text class="cuIcon-video lg text-gray"></text>
          <text>视频</text>
        </view>

        <view class="cu-item" bindtap="sendFile">
          <text class="cuIcon-send lg text-gray"></text>
          <text>文件</text>
        </view>

      </view>
    </view>
  </view>
</view>
<!-- 录音中的图样 -->
<view class="voice-tip" hidden="{{!recording}}">
    <view><image src="{{recordimg}}"></image></view>
    <view>{{showtip}}</view>
</view>
浅浅地小讲一下
inputMode这个变量用来表示当前的输入形式,如果是text显示文字输入框,如果是voice则显示语音输入框。bindtap="switchInputMode"这个点击事件用来切换输入方式。
发送的消息都会包装成msg对象作为对应云函数(lyc_consult -- sendMsg )的参数,经由云函数处理,写入数据库集合的对应记录中,其中文字和图片消息还会经过合法性检验。通过监听对应会话记录达到实时聊天。
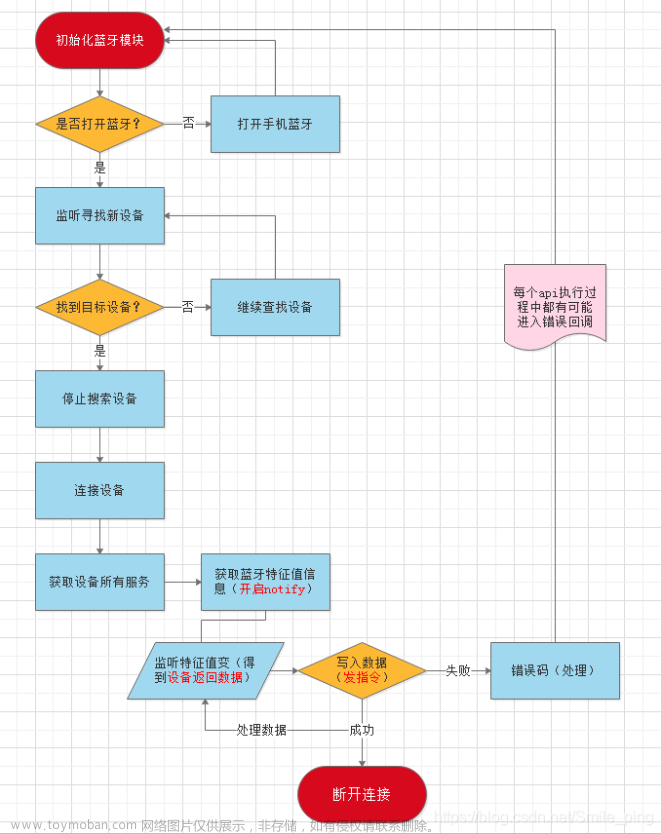
实时聊天实现
  onLoad:async function (e) {
    loading=true;
    if(msgWatcher) await msgWatcher.close();
    console.log('进入会话页,携带会话号',e.session_id);
    console.log("hisUserInfo",e.hisUserInfo);
    this.data.sid = e.session_id;
    this.setData({
      hisUserInfo: e.hisUserInfo,
      myUserInfo:App.globalData.userInfo.userInfo,
    })
    var that=this;
    //获取系统信息,得到可用窗口高度
    wx.getSystemInfo({
      success: function (res) {
        that.setData({
          systemInfo: res,
        })
      }
    })
    //开启集合chat_msg.session_id的消息监听
    setTimeout(this.initWatcher,1000)
    //初始化录音器
    this.initRecord();
  },
  //消息监听器开启
  async initWatcher(){
    wx.showLoading({
      title: '加载中...',
      mask: true,
    })
    console.log('initWatcher函数执行,消息监听器开启');
    msgWatcher = await db.collection('chat_msg')
    .where({
      session_id : this.data.sid,
    })
    .watch({
      onChange:this.onChange.bind(this),
      onError:function(err){
        console.log("onError",err);
        wx.showModal({
          title: '提示',
          content: '数据监听失败',
          showCancel:false,
          confirmText:'重新加载',
          success (res) {
            if (res.confirm) {
              that.onLoad();
            }
          }
        })
      }
    })
  },
  //消息监听回调函数
  onChange(snapshot){
    console.log('onChange监听回调函数的snapshot',snapshot)
    //即时聊天
    this.sortRenderMsg(snapshot.docs[0].msg_set)
  },
  //对消息对象数组进行时间排序并渲染
  async sortRenderMsg(e){
    console.log('排序渲染函数执行');
    var list=e.sort(function(a,b){return a.createTimeStamp-b.createTimeStamp});
    await this.setData({
      msgList : list,
      scrollId: 'msg-'+(list.length-1)
    });
    if(loading==true){
      wx.hideLoading({
        complete: () => {loading=false},
      })
    }
  },
消息列表页

当会话房间有为读消息时,会有红点提示,且红点内数字即为未读消息条数。
由于只能志愿者主动去联系负责人,从而达到新开会话房间的行为,所以不必考虑有新的会话进来这种情况,只用监听已有的会话记录,负责人端则既需要考虑监听已有的会话房间,还要考虑监听负责人的会话房间数组的更新情况,及时显示首次来联系的志愿者消息。
  //监听我的所有项目会话(是否有项目负责人发来新消息)
    watch() {
    console.log('开启消息列表页的会话监听');
    var arr = sids;
    var that = this;
    watcher =
      db.collection('chat_msg')
        .where({
          session_id: _.in(arr),
        })
        .watch({
          onChange: this.onChange.bind(this),
          onError: function (err) {
            console.log("onError", err);
            if(loading==false){
              wx.hideLoading({
                complete: () => {loading=true},
              })
              }
            wx.showModal({
              title: '提示',
              content: '数据监听失败',
              showCancel:false,
              confirmText:'重新加载',
              success (res) {
                if (res.confirm) {
                  that.onShow();
                }
              }
            })
          }
        })

  },
  //监听回调函数
  onChange(snapshot) {
    console.log('消息列表页监听回调函数的snapshot', snapshot);
    const sessions = this.data.sessions;
    snapshot.docChanges.forEach(update);//对发生改变的会话记录进行了遍历
    function update(e) {
      const sid = e.doc.session_id;
      const index = sids.indexOf(sid);
      const msg_set = e.doc.msg_set;
      const len = msg_set.length;
      //如果该会话无任何消息,则跳出
      if (len == 0) return;
      const lastMsgTime = msg_set[len - 1].createTimeStamp;
      const leaveTimeStamp = sessions[index].leaveTimeST;
      let unReadNum = 0;
      if ((lastMsgTime > leaveTimeStamp) || (lastMsgTime == leaveTimeStamp)) {
        if (lastMsgTime == leaveTimeStamp) { unReadNum = 1; }
        if (lastMsgTime > leaveTimeStamp) {
          unReadNum = function () {
            let sum = 0;
            for (let x = len - 1 ; (msg_set[x].createTimeStamp > leaveTimeStamp) || (msg_set[x].createTimeStamp == leaveTimeStamp); --x) {
              ++sum;
            }
            console.log('sum',sum)
            return sum;
          }();
        }
        db.collection('all_user')
        .where({
          _openid: myOpenid,
          'mySession_ids.session_id': sid
        })
        .update({
          data: {
            'mySession_ids.$.unReadNum': parseInt(unReadNum)
          }
        })
        console.log('unReadNum',unReadNum)
      }
      else {
        console.log('会话' + sid + '无新消息');
      }
    }
    let that = this;
    setTimeout(f, 100)
    async function f() {
      await db.collection('all_user')
        .where({
          _openid: myOpenid
        })
        .get()
        .then((res) => {
          if (res.data.length) {
            that.setData({
              sessions: res.data[0].mySession_ids,
            });
            console.log('列表页渲染完成');
          }
        })

      if(loading==false){
      wx.hideLoading({
        complete: () => {loading=true},
      })
      }
    }
  },
开摆 这里是源码 https://gitee.com/YYCCbigbig/applet-chat-function.git文章来源:https://www.toymoban.com/news/detail-487679.html
有用的话,点个赞吧文章来源地址https://www.toymoban.com/news/detail-487679.html
到了这里,关于微信小程序 云开发 聊天功能的文章就介绍完了。如果您还想了解更多内容,请在右上角搜索TOY模板网以前的文章或继续浏览下面的相关文章,希望大家以后多多支持TOY模板网!