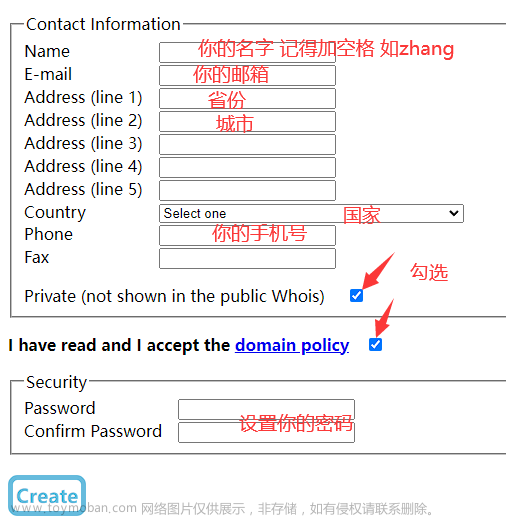
1、阿里云域名申请


买到域名之后,要对域名进行实名认证(上传身份证并拍照)(阿里云审核一天)
2、域名工信部备案
1、阿里云域名备案,这个也要实名认证,其中阿里云员工审核并打电话(半天左右)
2、工信部短信验证,直接把验证码,身份证短信验证一下就行(短信时间一两天左右),并提交管局审核

3、域名资料交管局审核(一个星期左右),时间久一些,具体看一看短信时间
3、申请阿里云免费ssl证书,阿里云单域名证书

2、网上申请证书的教程很多大同小异,但是现在阿里云免费证书页面改版了,有一点点不同

3、证书申请并下载
4、配置阿里云免费证书
1、Nginx配置证书
原本的config原生页面如下
#user  nobody;
worker_processes  1;

#error_log  logs/error.log;
#error_log  logs/error.log  notice;
#error_log  logs/error.log  info;

#pid        logs/nginx.pid;


events {
    worker_connections  1024;
}


http {
    include       mime.types;
    default_type  application/octet-stream;

    #log_format  main  '$remote_addr - $remote_user [$time_local] "$request" '
    #                  '$status $body_bytes_sent "$http_referer" '
    #                  '"$http_user_agent" "$http_x_forwarded_for"';

    #access_log  logs/access.log  main;

    sendfile        on;
    #tcp_nopush     on;

    #keepalive_timeout  0;
    keepalive_timeout  65;

    #gzip  on;

    server {
        listen       80;
        server_name  localhost;

        #charset koi8-r;

        #access_log  logs/host.access.log  main;

        location / {
            root   html;
            index  index.html index.htm;
        }

        #error_page  404              /404.html;

        # redirect server error pages to the static page /50x.html
        #
        error_page   500 502 503 504  /50x.html;
        location = /50x.html {
            root   html;
        }

        # proxy the PHP scripts to Apache listening on 127.0.0.1:80
        #
        #location ~ \.php$ {
        #    proxy_pass   http://127.0.0.1;
        #}

        # pass the PHP scripts to FastCGI server listening on 127.0.0.1:9000
        #
        #location ~ \.php$ {
        #    root           html;
        #    fastcgi_pass   127.0.0.1:9000;
        #    fastcgi_index  index.php;
        #    fastcgi_param  SCRIPT_FILENAME  /scripts$fastcgi_script_name;
        #    include        fastcgi_params;
        #}

        # deny access to .htaccess files, if Apache's document root
        # concurs with nginx's one
        #
        #location ~ /\.ht {
        #    deny  all;
        #}
    }


    # another virtual host using mix of IP-, name-, and port-based configuration
    #
    #server {
    #    listen       8000;
    #    listen       somename:8080;
    #    server_name  somename  alias  another.alias;

    #    location / {
    #        root   html;
    #        index  index.html index.htm;
    #    }
    #}


    # HTTPS server
    #
    #server {
    #    listen       443 ssl;
    #    server_name  localhost;

    #    ssl_certificate      cert.pem;
    #    ssl_certificate_key  cert.key;

    #    ssl_session_cache    shared:SSL:1m;
    #    ssl_session_timeout  5m;

    #    ssl_ciphers  HIGH:!aNULL:!MD5;
    #    ssl_prefer_server_ciphers  on;

    #    location / {
    #        root   html;
    #        index  index.html index.htm;
    #    }
    #}

}
可以查看Nginx部署证书的帮助文档
2、我结合文档总结一下
1、下载到配置好域名的证书,服务器自定义的文件夹下面
2、在需要的端口配置证书位置,和方式
3、开放443端口
下面是阿里云443配置的代码
#以下属性中,以ssl开头的属性表示与证书配置有关。
server {
    listen 443 ssl;
    #配置HTTPS的默认访问端口为443。
    #如果未在此处配置HTTPS的默认访问端口,可能会造成Nginx无法启动。
    #如果您使用Nginx 1.15.0及以上版本,请使用listen 443 ssl代替listen 443和ssl on。
    server_name yourdomain.com; #需要将yourdomain.com替换成证书绑定的域名。
    root html;
    index index.html index.htm;
    ssl_certificate cert/cert-file-name.pem;  #需要将cert-file-name.pem替换成已上传的证书文件的名称。
    ssl_certificate_key cert/cert-file-name.key; #需要将cert-file-name.key替换成已上传的证书密钥文件的名称。
    ssl_session_timeout 5m;
    ssl_ciphers ECDHE-RSA-AES128-GCM-SHA256:ECDHE:ECDH:AES:HIGH:!NULL:!aNULL:!MD5:!ADH:!RC4;
    #表示使用的加密套件的类型。
    ssl_protocols TLSv1 TLSv1.1 TLSv1.2; #表示使用的TLS协议的类型。
    ssl_prefer_server_ciphers on;
    location / {
        root html;  #站点目录。
        index index.html index.htm;
    }
}
3、我的配置带证书的nginx.conf如下
#user  nobody;
worker_processes  1;

#error_log  logs/error.log;
#error_log  logs/error.log  notice;
#error_log  logs/error.log  info;

#pid        logs/nginx.pid;


events {
    worker_connections  1024;
}


http {
    include       mime.types;
    default_type  application/octet-stream;

    #log_format  main  '$remote_addr - $remote_user [$time_local] "$request" '
    #                  '$status $body_bytes_sent "$http_referer" '
    #                  '"$http_user_agent" "$http_x_forwarded_for"';

    #access_log  logs/access.log  main;

    sendfile        on;
    #tcp_nopush     on;

    #keepalive_timeout  0;
    keepalive_timeout  65;

    #gzip  on;

    server {
        listen       80;
        server_name www.jianghaojie.xyz; #需要将yourdomain.com替换成证书绑定的域名。
        #配置的证书
        listen 443 ssl;
        ssl_certificate cert/5883433_www.jianghaojie.xyz.pem;  #需要将cert-file-name.pem替换成已上传的证书文件的名称。
        ssl_certificate_key cert/5883433_www.jianghaojie.xyz.key; #需要将cert-file-name.key替换成已上传的证书密钥文件的名称。
        ssl_session_timeout 5m;
        ssl_ciphers ECDHE-RSA-AES128-GCM-SHA256:ECDHE:ECDH:AES:HIGH:!NULL:!aNULL:!MD5:!ADH:!RC4;
        #表示使用的加密套件的类型。
        ssl_protocols TLSv1 TLSv1.1 TLSv1.2; #表示使用的TLS协议的类型。
        ssl_prefer_server_ciphers on;

        location / {
            root   html;
            index  index.html index.htm;
        }

        #error_page  404              /404.html;

        # redirect server error pages to the static page /50x.html
        #
        error_page   500 502 503 504  /50x.html;
        location = /50x.html {
            root   html;
        }

        # proxy the PHP scripts to Apache listening on 127.0.0.1:80
        #
        #location ~ \.php$ {
        #    proxy_pass   http://127.0.0.1;
        #}

        # pass the PHP scripts to FastCGI server listening on 127.0.0.1:9000
        #
        #location ~ \.php$ {
        #    root           html;
        #    fastcgi_pass   127.0.0.1:9000;
        #    fastcgi_index  index.php;
        #    fastcgi_param  SCRIPT_FILENAME  /scripts$fastcgi_script_name;
        #    include        fastcgi_params;
        #}

        # deny access to .htaccess files, if Apache's document root
        # concurs with nginx's one
        #
        #location ~ /\.ht {
        #    deny  all;
        #}
    }


    # another virtual host using mix of IP-, name-, and port-based configuration
    #
    #server {
    #    listen       8000;
    #    listen       somename:8080;
    #    server_name  somename  alias  another.alias;

    #    location / {
    #        root   html;
    #        index  index.html index.htm;
    #    }
    #}


    # HTTPS server
    #
    #server {
    #    listen       443 ssl;
    #    server_name  localhost;

    #    ssl_certificate      cert.pem;
    #    ssl_certificate_key  cert.key;

    #    ssl_session_cache    shared:SSL:1m;
    #    ssl_session_timeout  5m;

    #    ssl_ciphers  HIGH:!aNULL:!MD5;
    #    ssl_prefer_server_ciphers  on;

    #    location / {
    #        root   html;
    #        index  index.html index.htm;
    #    }
    #}
}
在server中主要添加的东西如下,配置pom 和key的地址
        listen 443 ssl;
        ssl_certificate cert/5883433_www.jianghaojie.xyz.pem;  #需要将cert-file-name.pem替换成已上传的证书文件的名称。
        ssl_certificate_key cert/5883433_www.jianghaojie.xyz.key; #需要将cert-file-name.key替换成已上传的证书密钥文件的名称。
        ssl_session_timeout 5m;
        ssl_ciphers ECDHE-RSA-AES128-GCM-SHA256:ECDHE:ECDH:AES:HIGH:!NULL:!aNULL:!MD5:!ADH:!RC4;
        #表示使用的加密套件的类型。
        ssl_protocols TLSv1 TLSv1.1 TLSv1.2; #表示使用的TLS协议的类型。
        ssl_prefer_server_ciphers on;
4、重启nginx
cd /usr/local/nginx/sbin
./nginx -s reload
5、开放443端口
阿里云上开放443端口
6、服务器上开放443端口,并重启防火墙
# 增加443端口
 firewall-cmd --zone=public --add-port=443/tcp --permanent
 # 重启防火墙
 firewall-cmd --reload
重启好了打开你的页面,带https的就能访问了
nginx反向代理多个后台端口
因为多个小程序部署,所以需要使用到多个后台,这样就需要nginx做反向代理,一个服务器只能安装一个ssl证书绑定80端口,所以这里用nginx代理来解决,
上面已经配置好了nginx及域名证书了,下面开始配置多个IP加端口
如下所示
        location / {
            root   html;
            index  index.html index.htm;
        }

       location /xx{
         proxy_pass   http://你的ip:你的端口/;
         proxy_redirect off;
         proxy_set_header X-Real-IP $remote_addr;
         proxy_set_header X-Forwarded-For $proxy_add_x_forwarded_for;
       }
       location /yy{
         proxy_pass   http://IP:端口/;
         proxy_redirect off;
         proxy_set_header X-Real-IP $remote_addr;
         proxy_set_header X-Forwarded-For $proxy_add_x_forwarded_for;
        }
这样就可以通过不同的/xx 或者 /yy 来区别代理不同的地址了。
https代理多个vue项目
server {
listen 443 ssl;
server_name 域名; #需要将yourdomain.com替换成证书绑定的域名。
#配置的证书
ssl_certificate cert/public.pem; #需要将cert-file-name.pem替换成已上传的证书文件的名称。
ssl_certificate_key cert/private.key; #需要将cert-file-name.key替换成已上传的证书密钥文件的名称。
ssl_session_timeout 5m;
ssl_ciphers ECDHE-RSA-AES128-GCM-SHA256:ECDHE:ECDH:AES:HIGH:!NULL:!aNULL:!MD5:!ADH:!RC4;
#表示使用的加密套件的类型。
ssl_protocols TLSv1 TLSv1.1 TLSv1.2; #表示使用的TLS协议的类型。
ssl_prefer_server_ciphers on;
#项目一
location / {
root /home/dbxq/dl/dist; #dist文件的位置(根据自己dist包放置的位置决定)
try_files $uri $uri/ /index.html;
index index.html index.htm;
}
#项目二
location /ht {
alias /home/dbxq/ht/dist/;
try_files $uri $uri/ /ht/index.html;
index index.html;
}
#项目minio配置
location /fileShow/ {
proxy_pass http://172.43.130.196:9000/;
proxy_redirect off;
proxy_set_header X-Real-IP $remote_addr;
proxy_set_header X-Forwarded-For $proxy_add_x_forwarded_for;
}
#后端接口配置配置
location /prod-api/ {
proxy_pass http://172.43.130.195:7006/;
proxy_redirect off;
proxy_set_header X-Real-IP $remote_addr;
proxy_set_header X-Forwarded-For $proxy_add_x_forwarded_for;
}文章来源:https://www.toymoban.com/news/detail-488224.html
2、 第一个项目直接用/ 就可以访问,第二个因为加了/ht ,所以在vue.config.js下面的publicPath要改路径 ,

这样打包的dist文件夹下面的index.html可以看到如下这样,就OK了 文章来源地址https://www.toymoban.com/news/detail-488224.html
到了这里,关于阿里云申请域名及域名配置https的文章就介绍完了。如果您还想了解更多内容,请在右上角搜索TOY模板网以前的文章或继续浏览下面的相关文章,希望大家以后多多支持TOY模板网!


