续:spring boot 完整后端接口案例_cc&的博客-CSDN博客
后台代码
1.在pom.xml中添加spring-boot-starter-websocket

      <!--WebSocket-->
        <dependency>
            <groupId>org.springframework.boot</groupId>
            <artifactId>spring-boot-starter-websocket</artifactId>
        </dependency>
2. 添加配置,先在src\main\resources\application.yml中添加:
server:
  max-http-header-size: 8192
如果不加的话可能导致无法进行访问。
3.新建一个配置类,主要一个Bean,用来启动服务是也启动WebSocket服务

package com.cc.springServer.config;

import org.springframework.context.annotation.Bean;
import org.springframework.context.annotation.Configuration;
import org.springframework.web.socket.server.standard.ServerEndpointExporter;

@Configuration
public class webSocketConfig {
    //WebSocket
    @Bean
    public ServerEndpointExporter serverEndpointExporter() {
        return new ServerEndpointExporter();
    }

}
注意:这个类必须有@Configuration注解
4.新建一个model来封装进行对话的对象

package com.cc.springServer.entity;

import javax.websocket.Session;

public class SocketUserInfo {
    //用户sessionId
    private String sessionId;

    //用户session
    private Session session;

    //目标用户sessionid
    private String targetSessionId;

    //用户角色
    private String userRole;

    public String getUserRole() {
        return userRole;
    }

    public void setUserRole(String userRole) {
        this.userRole = userRole;
    }

    public String getSessionId() {
        return sessionId;
    }

    public void setSessionId(String sessionId) {
        this.sessionId = sessionId;
    }

    public Session getSession() {
        return session;
    }

    public void setSession(Session session) {
        this.session = session;
    }

    public String getTargetSessionId() {
        return targetSessionId;
    }

    public void setTargetSessionId(String targetSessionId) {
        this.targetSessionId = targetSessionId;
    }
}
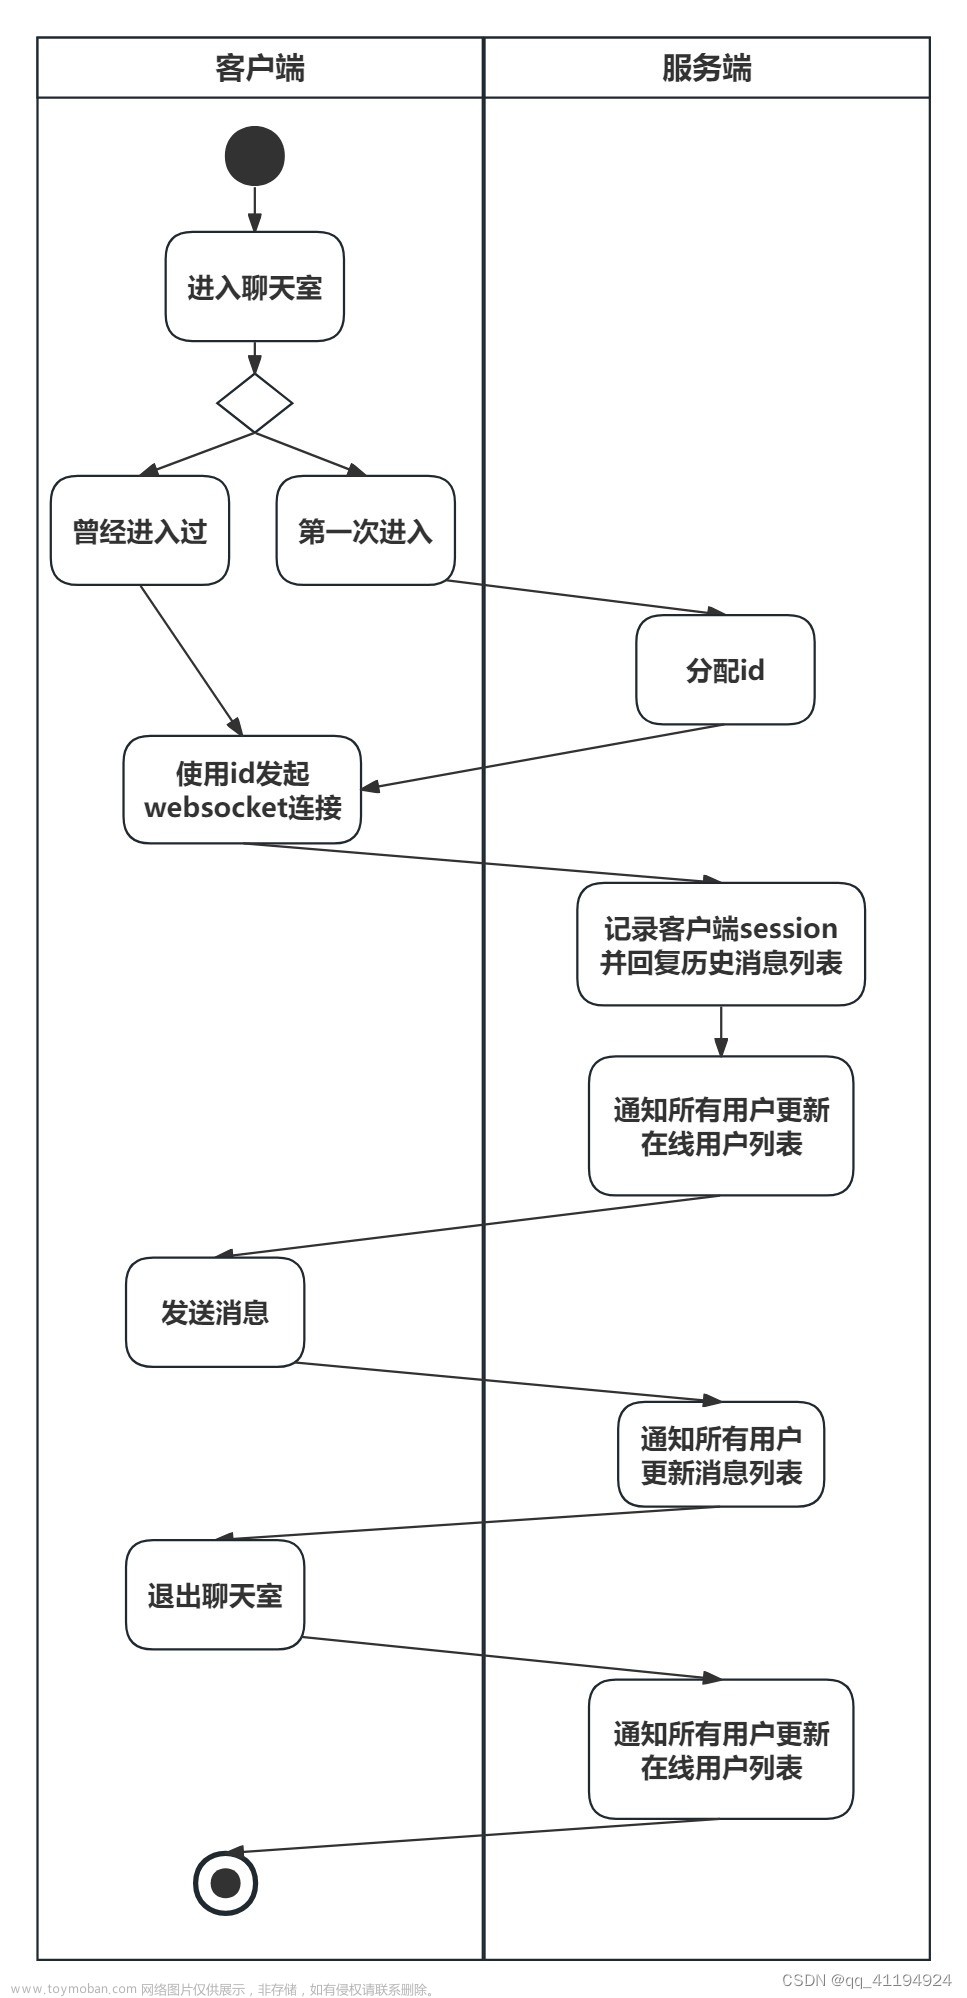
5.新建一个Controller类来管理Socket会话,它主要完成如下场景业务:
1.用户连接上线:如果是一个客服上线,就保存一个客服信息,同时去查找有没有再排队中的用户,如果有就给他们俩建立会话关系;如果是一个用户上线,先建立保存用户信息,再去查找有没有空闲客服,如果有就建立会话关系,如果没有就告诉他系统繁忙,让他进入等待状态。
2.用户下线:如果是客户下线,就删除客服信息,为了方便,我直接让用户刷新页面重新匹配客服,其实这样做不是很好;如果是用户下线,就删除用户信息,让空闲下来的客服和排队中的用户建立会话关系。
3.发送消息:如果是用户发的消息,就将消息推送给相应客服;如果是客服发的消息,就推送给相应用户。

package com.cc.springServer.controller;

import com.alibaba.fastjson.JSON;
import com.cc.springServer.entity.SocketUserInfo;
import org.springframework.stereotype.Component;

import javax.websocket.*;
import javax.websocket.server.PathParam;
import javax.websocket.server.ServerEndpoint;
import java.io.IOException;
import java.util.HashMap;
import java.util.Map;
import java.util.concurrent.ConcurrentHashMap;

//参数role判断用户角色0是客服,1是用户
@ServerEndpoint(value = "/websocket/{role}")
@Component
public class webSocketController {

    //用本地线程保存session
    private static ThreadLocal<Session> sessions = new ThreadLocal<Session>();
    //保存所有连接上的用户的session
    private static Map<String, SocketUserInfo> userSessionMap = new ConcurrentHashMap<>();
    //保存在线客服的session
    private static Map<String, SocketUserInfo> serverSessionMap = new ConcurrentHashMap<>();

    //连接
    @OnOpen
    public void onOpen(Session session, @PathParam(value="role") Integer role) {

        //默认返回错误状态
        Map<String, String> resultMap = new HashMap<>();
        resultMap.put("state", "error");

        //保证各个线程里的变量相对独立于其他线程内的变量
        sessions.set(session);

        //客服上线
        if (role.equals(0)) {

            //创建一个在线客服信息
            SocketUserInfo serverInfo = new SocketUserInfo();
            serverInfo.setSessionId(session.getId());
            serverInfo.setSession(session);
            serverInfo.setUserRole("客服");

            //告诉客服连接成功
            resultMap.put("state", "success");

            //去查询是否有排队中的用户
            //如果存在排队的用户,就将用户和客服绑定
            if (findLineUser() != null){
                SocketUserInfo userInfo = userSessionMap.get(findLineUser());
                //将用户绑定到客服
                serverInfo.setTargetSessionId(userInfo.getSessionId());
                //将客服绑定到用户
                userInfo.setTargetSessionId(serverInfo.getSessionId());
                userSessionMap.put(userInfo.getSessionId(), userInfo);
                System.out.println("客户"+ serverInfo.getSessionId() + "正在为用户" + userInfo.getSessionId()+"服务");

                Map<String, String> result = new HashMap<>();
                //客服显示用户信息
                result.put("msg", "正在为用户"+userInfo.getSessionId()+"服务!");
                sendMsg(serverInfo.getSession(), JSON.toJSONString(result));
                //告诉用户有客服为他服务
                result.put("msg", "客服"+serverInfo.getSessionId()+"正在为您服务!");
                sendMsg(userInfo.getSession(), JSON.toJSONString(result));
            }

            //将在线客服信息保存到map中
            serverSessionMap.put(session.getId(), serverInfo);
            System.out.println("客服:" + serverInfo.getSessionId() + "连接上服务器,当前在线客服共计:" + serverSessionMap.size());
        }
        if (role.equals(1)) {

            //创建一个在线用户信息
            SocketUserInfo userInfo = new SocketUserInfo();
            userInfo.setSessionId(session.getId());
            userInfo.setSession(session);
            userInfo.setUserRole("用户");

            //告诉用户连接成功
            resultMap.put("state", "success");

            //去查询是否有在线的客服
            //有空闲客服就将用户和客服绑定
            if (findFreeServer() != null){
                SocketUserInfo serverInfo = serverSessionMap.get(findFreeServer());
                //将用户绑定到客服
                serverInfo.setTargetSessionId(userInfo.getSessionId());
                serverSessionMap.put(serverInfo.getSessionId(), serverInfo);
                //将客服绑定到用户
                userInfo.setTargetSessionId(serverInfo.getSessionId());
                System.out.println("客户"+ serverInfo.getSessionId() + "正在为" + userInfo.getSessionId()+"服务");

                Map<String, String> result = new HashMap<>();
                //客服显示用户信息
                result.put("msg", "正在为用户"+userInfo.getSessionId()+"服务!");
                sendMsg(serverInfo.getSession(), JSON.toJSONString(result));
                result.put("msg", "客服"+serverInfo.getSessionId()+"正在为您服务!");
                sendMsg(userInfo.getSession(), JSON.toJSONString(result));
            } else {
                //告诉用户系统繁忙
                resultMap.put("msg", "系统繁忙!");
            }

            //将在线用户信息保存到map中
            userSessionMap.put(session.getId(), userInfo);
            System.out.println("用户编号:" + userInfo.getSessionId() + "连接上服务器,当前在线用户共计:" + userSessionMap.size());
        }
        //返回连接信息
        String result = JSON.toJSONString(resultMap);
        System.out.println(result);
        sendMsg(session, result);
    }

    //关闭连接
    @OnClose
    public void onClose(Session session) {
        SocketUserInfo serverInfo = serverSessionMap.get(session.getId());
        //客服下线
        if (serverInfo != null) {
            //将客户从map中移除
            serverSessionMap.remove(session.getId());

            //查看是否有服务服务对象
            if (null != serverInfo.getTargetSessionId()){
                //给用户说系统错误
                Map<String, String> result = new HashMap<>();
                result.put("msg", "系统错误,请刷新重试!");
                sendMsg(userSessionMap.get(serverInfo.getTargetSessionId()).getSession(), JSON.toJSONString(result));
            }
            System.out.println("客服编号:" + serverInfo.getSessionId() + "退出了连接,当前在线客服共计:" + serverSessionMap.size());
        } else {//用户下线
            //将用户从map中移除
            userSessionMap.remove(session.getId());

            //从客服中解绑
            for (SocketUserInfo serverSocketInfo: serverSessionMap.values()) {
                //查找绑定的客服,即客服绑定的用户不为空,并且绑定的用户id和现在下线的用户id一样
                if (serverSocketInfo.getTargetSessionId() != null && serverSocketInfo.getTargetSessionId().equals(session.getId())){
                    //解绑
                    serverSocketInfo.setTargetSessionId(null);
                    serverSessionMap.put(serverSocketInfo.getSessionId(), serverSocketInfo);
                    System.out.println("用户编号:" + session.getId() + "断开了与客服" + serverSocketInfo.getSessionId() + "的连接");

                    //客服解绑以后,可能还会有在线排队的用户,就让这个客服去
                    String lineUser = findLineUser();
                    if (lineUser != null){
                        //将用户绑定到客服
                        serverSocketInfo.setTargetSessionId(lineUser);
                        serverSessionMap.put(serverSocketInfo.getSessionId(), serverSocketInfo);
                        //将客服绑定到用户
                        userSessionMap.get(lineUser).setTargetSessionId(serverSocketInfo.getSessionId());
                        System.out.println("客户"+ serverSocketInfo.getSessionId() + "正在为" + lineUser+"服务");

                        Map<String, String> result = new HashMap<>();
                        //客服显示用户信息
                        result.put("msg", "正在为用户"+lineUser+"服务!");
                        sendMsg(serverSocketInfo.getSession(), JSON.toJSONString(result));
                        //用户显示客户信息
                        result.put("msg", "客服"+serverSocketInfo.getSessionId()+"正在为您服务!");
                        sendMsg(userSessionMap.get(lineUser).getSession(), JSON.toJSONString(result));
                    }
                }
            }
            System.out.println("用户编号:" + session.getId() + "退出了连接,当前在线用户共计:" + userSessionMap.size());
        }
    }

    //用户和客户端互相传递消息
    @OnMessage
    public void onMessage(String message, Session session) {
        //消息
        Map<String, String> result = new HashMap<>();

        SocketUserInfo serverInfo = serverSessionMap.get(session.getId());
        //客服消息
        if (serverInfo != null) {
            System.out.println("客服"+ session.getId()+"发送消息:\""+ message +"\"给用户"+serverSessionMap.get(session.getId()).getTargetSessionId());
            result.put("msg", "客服"+session.getId()+":"+message);
            //将消息发送给用户
            //要判断是否绑定到有用户如果有就将消息传递到用户
            if (null != serverSessionMap.get(session.getId()).getTargetSessionId()){
                sendMsg(userSessionMap.get(serverSessionMap.get(session.getId()).getTargetSessionId()).getSession(), JSON.toJSONString(result));
            } else {//如果没有就将消息给自己,嘻嘻嘻
                sendMsg(session, JSON.toJSONString(result));
            }

        } else {//用户消息
            System.out.println("用户"+ session.getId()+"发送消息:\""+ message +"\"给客户"+userSessionMap.get(session.getId()).getTargetSessionId());
            result.put("msg", "用户"+session.getId()+":"+message);
            //将消息发送给客服
            //判断是否绑定了客服,如果有就发送消息
            if (null != userSessionMap.get(session.getId()).getTargetSessionId()){
                sendMsg(serverSessionMap.get(userSessionMap.get(session.getId()).getTargetSessionId()).getSession(), JSON.toJSONString(result));
            } else{//同上
                sendMsg(session,JSON.toJSONString(result));
            }
        }
    }

    //异常
    @OnError
    public void onError(Session session, Throwable throwable) {
        System.out.println("发生异常!");
        throwable.printStackTrace();
    }


    //统一的发送消息方法
    private synchronized void sendMsg(Session session, String msg) {
        try {
            session.getBasicRemote().sendText(msg);
        } catch (IOException e) {
            e.printStackTrace();
        }
    }

    //查询排队用户
    private synchronized String findLineUser(){
        //判断是否有用户
        if (userSessionMap.size() > 0){
            //遍历所有用户,查找一个排队的用户
            for (SocketUserInfo UserInfo: userSessionMap.values()) {
                if (null == UserInfo.getTargetSessionId()){
                    return UserInfo.getSessionId();
                }
            }
        }
        return null;
    }

    //查询在线空闲客服
    private  synchronized String findFreeServer(){
        //判断是否有客服
        if (serverSessionMap.size() > 0){
            //遍历所有客服,查找一个空闲的客服
            for (SocketUserInfo serverInfo: serverSessionMap.values()) {
                if (null == serverInfo.getTargetSessionId()){
                    return serverInfo.getSessionId();
                }
            }
        }
        return null;
    }
}
后台代码到这来就完成了。
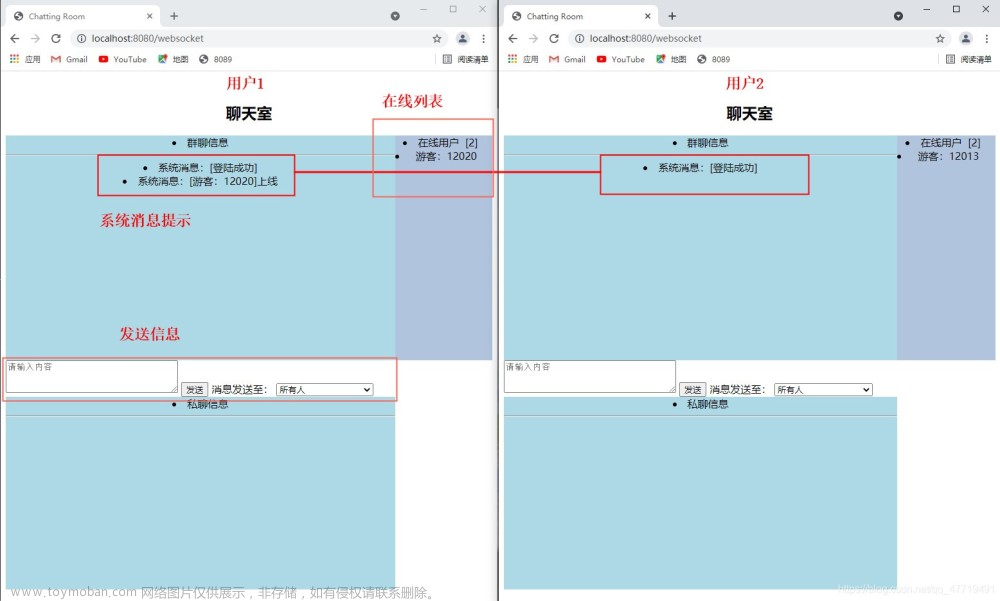
前端代码
1) 客户端
<!DOCTYPE html>
<html>
<head>
	<meta charset="utf-8">
	<title>辕门-在线咨询</title>
    <script src="https://code.jquery.com/jquery-3.1.1.min.js"></script>
</head>
<body>
	<p id="message"></p>
	<form id="clientChat">
		<input type="text" style="display: none;" id="userName"  />
		<input type="text" style="display: none;" id="targetUserName" />
		<input type="text" id="sendMsg"></input>
		<button type="button" onclick="send()">发送</button>
	</form>
</body>
<script>
var websocket = null;

var userId = null;

//判断当前浏览器是否支持WebSocket
if('WebSocket' in window){
    websocket = new WebSocket("ws://127.0.0.1:9999/websocket/1");
} else {
    alert("Don't support websocket!")
}

//连接发生错误的回调方法
websocket.onerror = function(){
    alert("Connect error!");
};

//连接成功建立的回调方法
websocket.onopen = function(event){
    setMessageInnerHTML("连接已建立!");
}

//接收到消息的回调方法
websocket.onmessage = function(event){
	var result = event.data
	var ob = JSON.parse(result)
	//判断用户状态
	if(ob.state != undefined && ob.state != "success"){
		setMessageInnerHTML("非法连接!");
		websocket.close();
	}

	//判断是否有消息
	if(ob.msg != undefined){
		setMessageInnerHTML(ob.msg);
	}
}

//连接关闭的回调方法
websocket.onclose = function(){
    setMessageInnerHTML("close");
}

//监听窗口关闭事件,当窗口关闭时,主动去关闭websocket连接,防止连接还没断开就关闭窗口,server端会抛异常。
window.onbeforeunload = function(){
    websocket.close();
}

//将消息显示在网页上
function setMessageInnerHTML(innerHTML){
    document.getElementById('message').innerHTML += innerHTML + '<br/>';
}

//关闭连接
function closeWebSocket(){
    websocket.close();
}

//发送消息
function send(){
	var sendMsg = $("#sendMsg").val();
	setMessageInnerHTML("我 :" + sendMsg)
    websocket.send(sendMsg);
    $("#sendMsg").val("");
}
</script>
</html>

2)服务端
<!DOCTYPE html>
<html>
<head>
	<meta charset="utf-8">
	<title>辕门-IM</title>
	<script src="https://code.jquery.com/jquery-3.1.1.min.js"></script>
</head>
<body>
	<p id="message"></p>
	<form id="clientChat">
		<input type="text" style="display: none;" id="userName"  />
		<input type="text" style="display: none;" id="targetUserName" />
		<input type="text" id="sendMsg"></input>
		<button type="button" onclick="send()">发送</button>
	</form>
</body>
<script>
var websocket = null;

var userId = null;

//判断当前浏览器是否支持WebSocket
if('WebSocket' in window){
    websocket = new WebSocket("ws://127.0.0.1:9999/websocket/0");
} else {
    alert("Don't support websocket!")
}

//连接发生错误的回调方法
websocket.onerror = function(){
    alert("Connect error!");
};

//连接成功建立的回调方法
websocket.onopen = function(event){
    setMessageInnerHTML("连接已建立!");
}

//接收到消息的回调方法
websocket.onmessage = function(event){
	var result = event.data
	var ob = JSON.parse(result)
	//判断用户状态
	if(ob.state != undefined && ob.state != "success"){
		setMessageInnerHTML("非法连接!");
		websocket.close();
	}

	//判断是否有消息
	if(ob.msg != undefined){
		setMessageInnerHTML(ob.msg);
	}
}

//连接关闭的回调方法
websocket.onclose = function(){
    setMessageInnerHTML("close");
}

//监听窗口关闭事件,当窗口关闭时,主动去关闭websocket连接,防止连接还没断开就关闭窗口,server端会抛异常。
window.onbeforeunload = function(){
    websocket.close();
}

//将消息显示在网页上
function setMessageInnerHTML(innerHTML){
    document.getElementById('message').innerHTML += innerHTML + '<br/>';
}

//关闭连接
function closeWebSocket(){
    websocket.close();
}

//发送消息
function send(){
	var sendMsg = $("#sendMsg").val();
	setMessageInnerHTML("我 :" + sendMsg)
    websocket.send(sendMsg);
    $("#sendMsg").val("");
}
</script>
</html>

文章来源地址https://www.toymoban.com/news/detail-488481.html文章来源:https://www.toymoban.com/news/detail-488481.html
到了这里,关于springboot+websocket客服聊天的文章就介绍完了。如果您还想了解更多内容,请在右上角搜索TOY模板网以前的文章或继续浏览下面的相关文章,希望大家以后多多支持TOY模板网!