uni-app 微信小程序 图文生成图片 wxml-to-canvas

这篇具有很好参考价值的文章主要介绍了uni-app 微信小程序 图文生成图片 wxml-to-canvas。希望对大家有所帮助。如果存在错误或未考虑完全的地方,请大家不吝赐教,您也可以点击"举报违法"按钮提交疑问。

在做的小程序要增加一个将文字与图片生成图片不可修改的功能,第一次做,在网上找了不少资料。参考了wxml-to-canvas | 微信开放文档  ,又看了一些相关事例,尝试写了一下。
 

需要准备的文件及配置项:

1、先把代码片段下载到本地

uni-app 微信小程序 图文生成图片 wxml-to-canvas

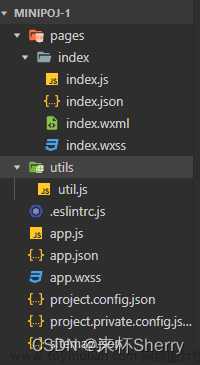
2、创建wxcomponents目录,把代码片段中的文件拷到此目录下,并将下图的目录改成真实目录。

uni-app 微信小程序 图文生成图片 wxml-to-canvas

3、修改配置文件pages.json,找到要写此功能的路径,加上

"style": {
                "app-plus": {
                    "titleNView": false //禁用原生导航栏
                },
                "navigationBarTitleText": "",
                "enablePullDownRefresh": false,
                "navigationStyle": "custom",
                "usingComponents":{
                    "wxml-to-canvas": "/wxcomponents/wxml-to-canvas/index"
                }
            }

 uni-app 微信小程序 图文生成图片 wxml-to-canvas

 4、开始写组件。注意this.widget = this.selectComponent('.widget');一定要放在onLoad页面生命周期中,不然不生效

 <view :style="{width: canvasWidth + 'px', height: canvasHeight + 'px' }">
        <wxml-to-canvas class="widget" :width="canvasWidth" :height="canvasHeight"></wxml-to-canvas>
    </view>

const {
        wxml,
        style
    } = require('./notification.js')
    export default {
        data() {
            return {
                imgSrc: '/static/img/3.png',
                //最后生成的图片信息
                imageData: null,
                canvasWidth: 320, // 默认canvas宽高
                canvasHeight: 480,
                screenWidth: null, // 设备宽度
                screenHeight: null, // 设备宽度
                userInfo: {},
                isRegister: '',
                controlContent: undefined,
                statusCode: undefined,
                //上个页面用到的图片地址
                tempFile:undefined
            }
        },
        onLoad(option) {
            this.userInfo = uni.getStorageSync('weixin-userInfo') ? JSON.parse(uni.getStorageSync('weixin-userInfo')) :{};
            // 获取设备信息
            wx.getSystemInfo({
                success: (res) => {
                    this.screenWidth = res.screenWidth
                    this.screenHeight = 800 //高度建议计算得出或写死。如使用res.screenHeight,文字过长时无法生成(安卓手机,最新鸿蒙系统高度不能超过1000)
                    this.canvasWidth = this.screenWidth
                    this.canvasHeight = this.screenHeight
                    setTimeout(() => {
                        this.widget = this.selectComponent('.widget');
                        this.controlContent = option.controlContent;
                        this.tempFile = option.tempFile
                        this.download();
                    }, 1000)
                }
            });
        },
        methods: {
            //生成图片
            download() {
                // 数字容器宽度 动态设置 
                setTimeout(() => {
                    uni.showLoading({
                        title: '图片生成中...'
                    })
                    this.renderToCanvas()
                }, 1000)
            },
            renderToCanvas() {
                const _wxml = wxml('test', this.tempFile, this.controlContent) //调用wxml
                const _style = style(this.screenWidth, this.canvasWidth, this.canvasHeight)
                setTimeout(() => {
                    const p1 = this.widget.renderToCanvas({
                        wxml: _wxml,
                        style: _style
                    })
                    p1.then((res) => {
                        uni.hideLoading()
                        this.saveImageToPhotosAlbum();
                    }).catch((err) => {
                        console.log('生成失败')
                    })
                }, 100)

            },
           //保存图片到本地
			saveImageToPhotosAlbum() {
				uni.showLoading({
					title: '正在保存中...'
				})
				const p2 = this.widget.canvasToTempFilePath()
				let that = this
				p2.then(result => {
					let path = result.tempFilePath
					uni.uploadFile({
						url: '上传服务地址',
						filePath: path,
						name: 'file',
						formData: {
							'user': 'test'
						},
						success: (res) => {
							let data = JSON.parse(res.data)
							if (data.code == 200) {
								uni.saveImageToPhotosAlbum({
									filePath: path,
									success: () => {
										uni.hideLoading()
										uni.showToast({
											title: '保存成功,可去手机相册查看',
											duration: 2000,
											icon: 'none'
										});
										/* uni.redirectTo({
										    url: '../communityControl/notification?tempFile='+ this.tempFile    
										});     */
										uni.navigateBack();
									}
								});
							}

						}
					});
				})
			}
        }
    }

 5、写notification.js文件,必须要按照wxml-to-canvas写生成模板,不然不生效

const wxml = (name, pic, content) => `
<view class="container">
    <text class="content">` + content + `</text>
     <image src="` + pic + `"  class="pic"/>
</view>
`

/**
 * @param {*} screenWidth 屏幕宽度
 * @param {*} canvasWidth  画布宽度
 * @param {*} canvasHeight  画布高度
 * @param {*} numberWidth  数字宽度,动态设置
 * @return {*} 
 */
const style = (screenWidth, canvasWidth, canvasHeight) => {
    return {
        "container": {
            width: canvasWidth,
            height: canvasHeight,
            position: 'relative',
            overflow: 'hidden',
            backgroundColor: '#ffffff',
			padding: '30rpx 20rpx',
        },
        "name": {
            fontSize: 20,
            color: '#333',
            marginLeft: canvasWidth * 0.08,
            width: canvasWidth * 0.84,
            height: screenWidth * 0.18,
            textAlign: 'center',
        },
        "content": {
            fontSize: 14,
            color: '#333',
            width: canvasWidth * 0.84,
            height: screenWidth * 0.84,
            marginLeft: canvasWidth * 0.08,
			marginTop: canvasWidth * 0.08,
        },
        "pic": {
            width: canvasWidth * 0.4,
            height: screenWidth * 0.2,
            marginTop: canvasWidth * 0.1,
            marginLeft: canvasWidth * 0.35,
            marginBottom: canvasWidth * 0.05,
            borderRadius: screenWidth * 0.14,
            overflow: 'hidden',
        },
    }
}

module.exports = {
    wxml,
    style
}

本文档适用于vue2,并正式运用到项目中,但本人未在vue3的环境下使用,有友友提醒说不能用在vue3中,特在此说明,也欢迎使用的友友们提出宝贵意见。文章来源地址https://www.toymoban.com/news/detail-489535.html

到了这里,关于uni-app 微信小程序 图文生成图片 wxml-to-canvas的文章就介绍完了。如果您还想了解更多内容,请在右上角搜索TOY模板网以前的文章或继续浏览下面的相关文章,希望大家以后多多支持TOY模板网!

本文来自互联网用户投稿,该文观点仅代表作者本人,不代表本站立场。本站仅提供信息存储空间服务,不拥有所有权,不承担相关法律责任。如若转载,请注明出处: 如若内容造成侵权/违法违规/事实不符,请点击违法举报进行投诉反馈,一经查实,立即删除!

领支付宝红包 赞助服务器费用

相关文章

  • uni-app/微信小程序 实现图片或元素淡入淡出效果

    如题: 直接上代码 html js部分 需要在date中声明好                 current: 0,                 hidepic: null,                 showpic: null 因为是已进入就开始的,所以 要在生命周期中使用 最后一部别忘了,要给需要淡入淡出的元素或者图片设置绝对定位

    2024年02月12日
    浏览(46)
  • uqrcode+uni-app 微信小程序生成二维码

    使用微信小程序需要弹出 动态 二维码的需求,从插件市场选了一个下载次数较多的组件引入到项目中 uqrcode ,使用步骤如下: 1、从插件市场下载 插件地址:https://ext.dcloud.net.cn/plugin?id=1287,若你是跟我一样是用uni-app开发微信小程序的,则该插件的介绍只需要看下面的即可,

    2024年02月06日
    浏览(27)
  • uni-app(微信小程序)图片旋转放缩,文字绘制、海报绘制

    总结一下: 要进行海报绘制离不开canvas,我们是先进行图片,文字的拖拽、旋转等操作 最后再对canvas进行绘制,完成海报绘制。 背景区域设置为 position: relative,方便图片在当前区域中拖动等处理。 添加图片,监听图片在背景区域下的 touchstart touchmove touchend 事件 拖动图片,

    2024年02月09日
    浏览(40)
  • uni-app:使用 Painter 在微信小程序将当前页面保存为图片

    手机截屏 Painter 实现 方式一:Painter Painter 是一个微信小程序组件,具体介绍和 API 请参考:GitHub文档。 在 GitHub 下载下来之后只需要将 components 下的 painter 文件夹放到项目根目录下的 wxcomponents 文件夹即可。然后就是如何在 uni-app 中使用微信小程序形式的组件,其实很简单,

    2024年02月12日
    浏览(45)
  • uni-app(微信小程序) 根据小程序页面路径(可带参数) 生成二维码、分享码

    微信官方文档 小程序 看文档点这里 第一个获取小程序码,就是根据你要通过二维码打开的页面路径生成一个小程序码,且这个小程序码是永久的 其实文档内也说明了,很少用到。即使需要生成这样的小程序码,可以去微信公众平台的小程序管理后台生成,还方便。 调用方

    2024年02月06日
    浏览(40)
  • uni-app uni-file-picker文件上传实现拍摄从相册选择获取图片上传文档服务器(H5上传-微信小程序上传)

    前言 最近在使用uni-app写H5移动端,有一个从手机拍摄从相册选择获取图片上传到文档服务器功能。 查阅uni-app发现关于上传图片,uni-file-picker文件上传,uni.chooseImage,uni.uploadFile H5上传时它和pc端原理差不多,都是file对象上传,PC端是通过new file对象,uni-app是直接提供了 微信

    2024年02月15日
    浏览(41)
  • 微信小程序uni-app

    小程序 是一种不需要下载、安装即可使用的应用,它实现了应用触手可及的梦想,用户扫一扫或者搜一下就能打开应用,也实现了用完即走的理念,用户不用安装太多应用,应用随处可用,但又无须安装卸载。 微信开发文档 1、工作原理 网页开发,渲染线程和脚本是互斥的

    2024年02月10日
    浏览(91)
  • 微信小程序授权(uni-app)

    概述 为了避免重复开发,自己封装了一个通用用户授权回调方法,只需要传入需要授权的scope,权限中文描述、回调函数,就可以实现一整套小程序是否授权、打开授权设置,调用后续操作函数的工作 功能 可以根据自己的实际应用进行微调 目前使用的uni-app版本,可以根据自

    2024年02月16日
    浏览(44)
  • 语法速通 uni-app随笔【uni-app】【微信小程序】【vue】

    其中, pages 目录/ index 目录【必有】: index.js 编写业务逻辑 【初始数据,生命周期函数】 index.json 编写配置 index.wxml 编写模板 【可理解为本页html】 index.wxss 【可理解为本页css】 直接输入敲回车,连尖括号都不需要就可以标签补全 1)初始数据写死 在 index.wxml 引入变

    2024年02月12日
    浏览(76)
  • 【uni-app微信小程序】实现支付功能

    实现微信支付功能需要在小程序后台配置支付相关信息,并且在前端代码中调用微信支付API进行支付操作。好的, uni-app微信小程序实现支付功能整体流程 大致如下: 注册微信公众平台,并完成开发者资质认证; 在微信商户平台注册商户账号,并完成商户资质认证; 在商户

    2024年02月13日
    浏览(56)

觉得文章有用就打赏一下文章作者

支付宝扫一扫打赏

博客赞助

微信扫一扫打赏

请作者喝杯咖啡吧~博客赞助

支付宝扫一扫领取红包,优惠每天领

二维码1

领取红包

二维码2

领红包