Spring Boot多模块项目打包
例如父项目 build_test 下面有三个子模块,一个是common模块 一个是a模块,一个b模块;其中common是公共模块,a和b都依赖于公共模块common,我现在想把a和b模块打包成jar包。
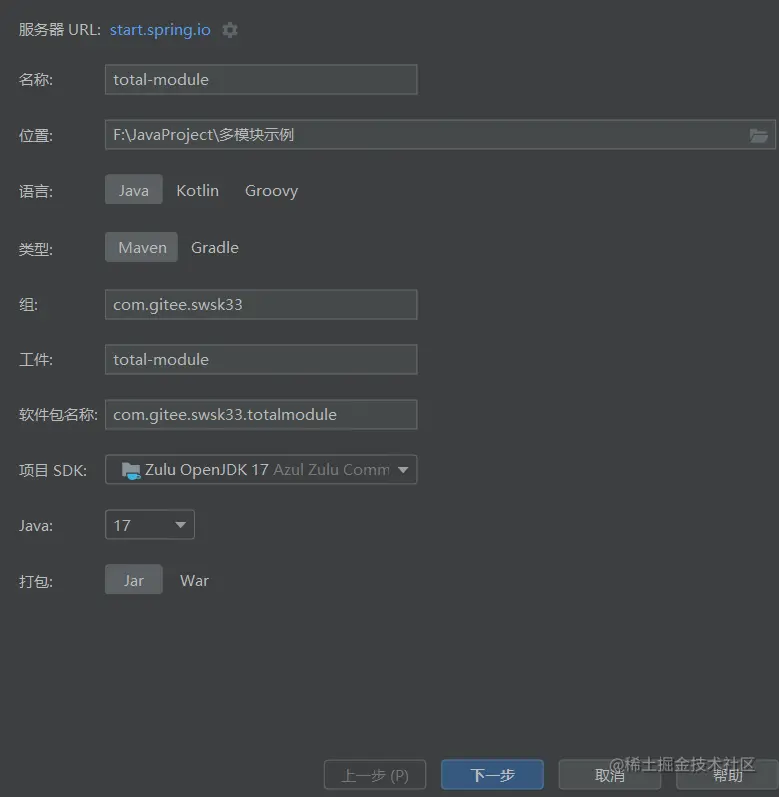
创建项目
创建父工程


创建3个子模块,分别是common和a和b模块
鼠标右击红框位置

选New 再选Module,鼠标左键点一下,


同理创建出后面两个模块,最后删除父工程的src目录

项目创建成功
添加项目依赖
build_test 父工程的pom.xml
<?xml version="1.0" encoding="UTF-8"?>
<project xmlns="http://maven.apache.org/POM/4.0.0"
         xmlns:xsi="http://www.w3.org/2001/XMLSchema-instance"
         xsi:schemaLocation="http://maven.apache.org/POM/4.0.0 http://maven.apache.org/xsd/maven-4.0.0.xsd">
    <modelVersion>4.0.0</modelVersion>

    <groupId>com.hongchun</groupId>
    <artifactId>build_test</artifactId>
    <packaging>pom</packaging>
    <version>1.0-SNAPSHOT</version>
    <modules>
        <module>common</module>
        <module>a</module>
        <module>b</module>
    </modules>

    <dependencyManagement>
        <dependencies>
            <!-- SpringBoot的依赖配置-->
            <dependency>
                <groupId>org.springframework.boot</groupId>
                <artifactId>spring-boot-dependencies</artifactId>
                <version>2.3.12.RELEASE</version>
                <type>pom</type>
                <scope>import</scope>
            </dependency>
            <!--mybatisPlus依赖-->
            <dependency>
                <groupId>com.baomidou</groupId>
                <artifactId>mybatis-plus-boot-starter</artifactId>
                <version>3.4.3</version>
            </dependency>
        </dependencies>
    </dependencyManagement>


    <build>
        <plugins>
            <plugin>
                <groupId>org.apache.maven.plugins</groupId>
                <artifactId>maven-compiler-plugin</artifactId>
                <version>3.1</version>
                <configuration>
                    <source>1.8</source>
                    <target>1.8</target>
                    <encoding>UTF-8</encoding>
                </configuration>
            </plugin>
            <plugin>
                <groupId>org.apache.maven.plugins</groupId>
                <artifactId>maven-surefire-plugin</artifactId>
                <version>2.19.1</version>
                <configuration>

                    <skipTests>true</skipTests>  <!--默认关掉单元测试 -->

                </configuration>
            </plugin>
        </plugins>
    </build>
</project>
主要是build部分 还有上面要打包成pom包
    <build>
        <plugins>
            <plugin>
                <groupId>org.apache.maven.plugins</groupId>
                <artifactId>maven-compiler-plugin</artifactId>
                <version>3.1</version>
                <configuration>
                    <source>1.8</source>
                    <target>1.8</target>
                    <encoding>UTF-8</encoding>
                </configuration>
            </plugin>
            <plugin>
                <groupId>org.apache.maven.plugins</groupId>
                <artifactId>maven-surefire-plugin</artifactId>
                <version>2.19.1</version>
                <configuration>

                    <skipTests>true</skipTests>  <!--默认关掉单元测试 -->

                </configuration>
            </plugin>
        </plugins>
    </build>
<packaging>pom</packaging>
common模块的pom.xml
<?xml version="1.0" encoding="UTF-8"?>
<project xmlns="http://maven.apache.org/POM/4.0.0"
         xmlns:xsi="http://www.w3.org/2001/XMLSchema-instance"
         xsi:schemaLocation="http://maven.apache.org/POM/4.0.0 http://maven.apache.org/xsd/maven-4.0.0.xsd">
    <parent>
        <artifactId>build_test</artifactId>
        <groupId>com.hongchun</groupId>
        <version>1.0-SNAPSHOT</version>
    </parent>
    <modelVersion>4.0.0</modelVersion>

    <artifactId>common</artifactId>
    <packaging>jar</packaging>
    <dependencies>
        <!--spring boot-->
        <dependency>
            <groupId>org.springframework.boot</groupId>
            <artifactId>spring-boot-starter-web</artifactId>
        </dependency>
        <!--mybatisPlus依赖-->
        <dependency>
            <groupId>com.baomidou</groupId>
            <artifactId>mybatis-plus-boot-starter</artifactId>
        </dependency>
        <!--mysql数据库驱动-->
        <dependency>
            <groupId>mysql</groupId>
            <artifactId>mysql-connector-java</artifactId>
        </dependency>
    </dependencies>

</project>
common模块这里不是启动模块,不需要加build,也是打包成jar包
a模块的pom.xml
<?xml version="1.0" encoding="UTF-8"?>
<project xmlns="http://maven.apache.org/POM/4.0.0"
         xmlns:xsi="http://www.w3.org/2001/XMLSchema-instance"
         xsi:schemaLocation="http://maven.apache.org/POM/4.0.0 http://maven.apache.org/xsd/maven-4.0.0.xsd">
    <parent>
        <artifactId>build_test</artifactId>
        <groupId>com.hongchun</groupId>
        <version>1.0-SNAPSHOT</version>
    </parent>
    <modelVersion>4.0.0</modelVersion>

    <artifactId>a</artifactId>
    <packaging>jar</packaging>
    <dependencies>
        <dependency>
            <groupId>com.hongchun</groupId>
            <artifactId>common</artifactId>
            <version>1.0-SNAPSHOT</version>
        </dependency>
    </dependencies>
    <!--重要,一定要配置,不然会出现找不到清单文件-->
    <build>
        <plugins>
            <plugin>
                <groupId>org.springframework.boot</groupId>

                <artifactId>spring-boot-maven-plugin</artifactId>
                <configuration>
                    <mainClass>com.hongchun.AApplication</mainClass>
                </configuration>
                <executions>
                    <execution>
                        <goals>
                            <goal>repackage</goal>
                        </goals>
                    </execution>
                </executions>
            </plugin>
        </plugins>
    </build>
</project>
这里build一定要配置,com.hongchun.AApplication换成你的启动类
b模块的pom.xml
<?xml version="1.0" encoding="UTF-8"?>
<project xmlns="http://maven.apache.org/POM/4.0.0"
         xmlns:xsi="http://www.w3.org/2001/XMLSchema-instance"
         xsi:schemaLocation="http://maven.apache.org/POM/4.0.0 http://maven.apache.org/xsd/maven-4.0.0.xsd">
    <parent>
        <artifactId>build_test</artifactId>
        <groupId>com.hongchun</groupId>
        <version>1.0-SNAPSHOT</version>
    </parent>
    <modelVersion>4.0.0</modelVersion>

    <artifactId>b</artifactId>
    <packaging>jar</packaging>
    <dependencies>
        <dependency>
            <groupId>com.hongchun</groupId>
            <artifactId>common</artifactId>
            <version>1.0-SNAPSHOT</version>
        </dependency>
    </dependencies>

    <build>
        <plugins>
            <plugin>
                <groupId>org.springframework.boot</groupId>

                <artifactId>spring-boot-maven-plugin</artifactId>
                <configuration>
                    <mainClass>com.hongchun.BApplication</mainClass>
                </configuration>
                <executions>
                    <execution>
                        <goals>
                            <goal>repackage</goal>
                        </goals>
                    </execution>
                </executions>
            </plugin>
        </plugins>
    </build>
</project>
也是打包成jar,和a模块一样,只是启动类不同
开始打包

一定要选择带root的,先clean,再package.
找到a和b模块的jar包,然后测试启动
测试
找到jar包所在目录,打开doc窗口,输入java -jar a-1.0-SNAPSHOT.jar
再把b模块的jar包启动
使用postman测试接口
1.a模块的localhost:8000/a/list

2.b模块的localhost:9000/b/list

本次测试的源代码如下
阿里云盘地址: https://www.aliyundrive.com/s/EdFuAwfqoFE文章来源:https://www.toymoban.com/news/detail-492347.html
百度网盘地址:链接:https://pan.baidu.com/s/14P48B2bnF3OosB9mynZzgA
提取码:midp文章来源地址https://www.toymoban.com/news/detail-492347.html
到了这里,关于Spring Boot多模块项目打包的文章就介绍完了。如果您还想了解更多内容,请在右上角搜索TOY模板网以前的文章或继续浏览下面的相关文章,希望大家以后多多支持TOY模板网!