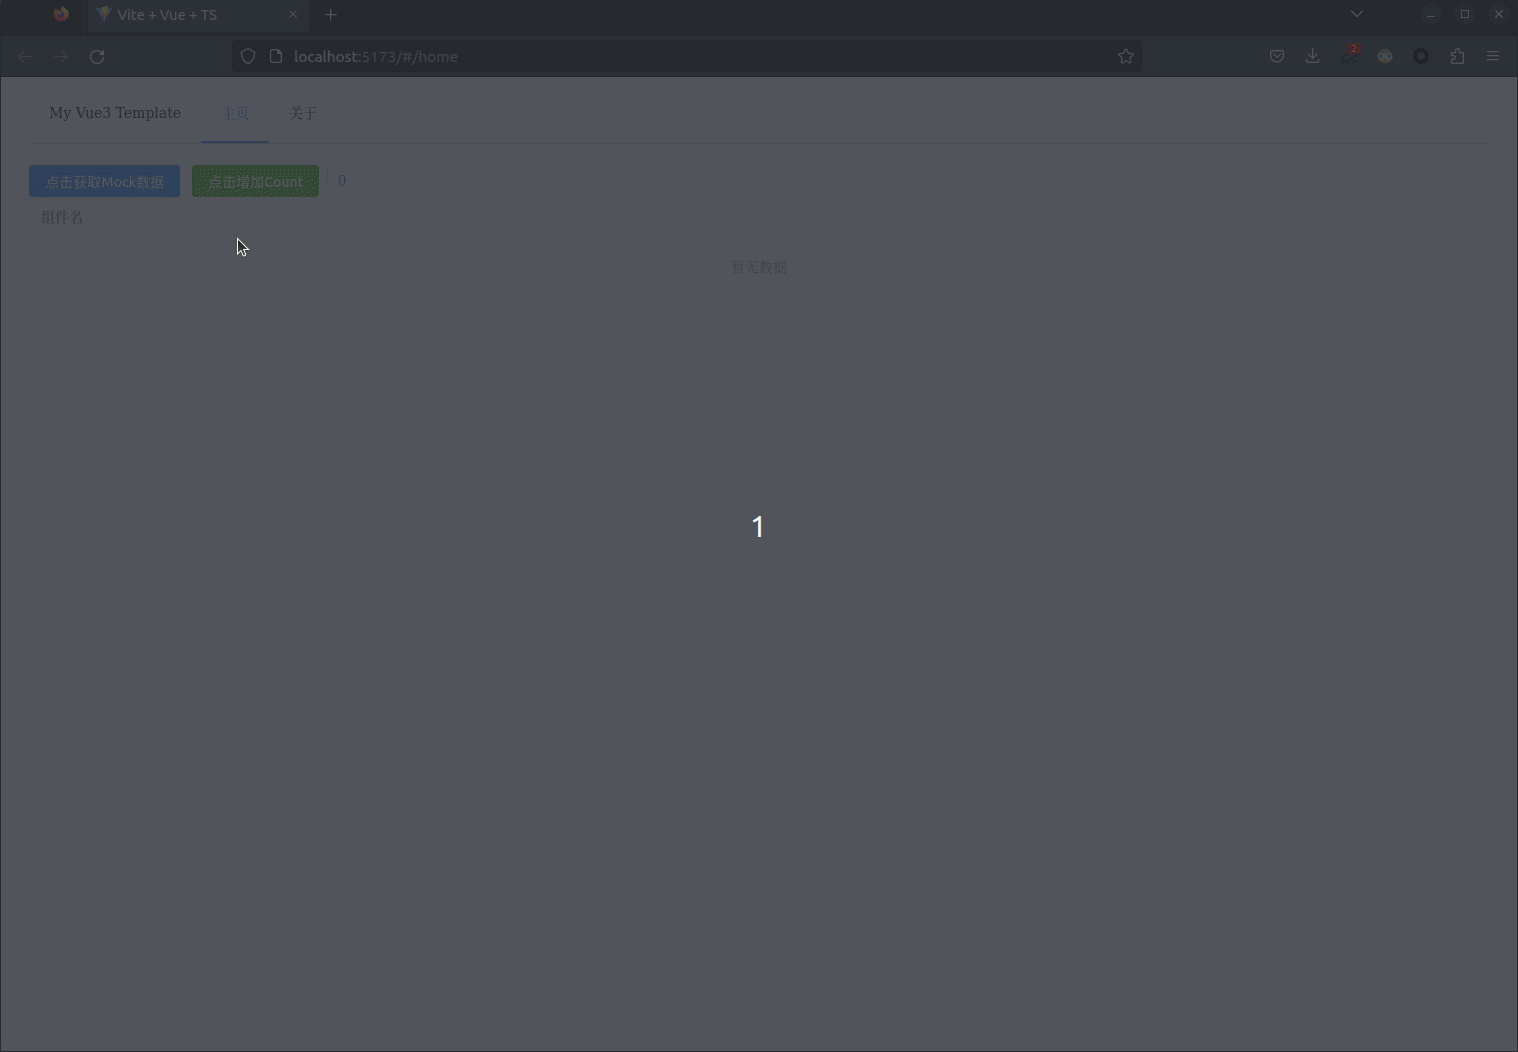
效果图:

home.vue页面代码
<template>
<el-container>
<el-aside width="collapse ? 200px : 70px">
<el-button color="#626aef" @click="collapseToggle()">
<el-icon>
<Expand v-if="collapse" />
<Fold v-else />
</el-icon>
</el-button>
<el-menu
:collapse="collapse"
:default-active="store.bbc"
class="el-menu-vertical-demo"
unique-opened
active-text-color="#ffd04b"
text-color="#fff"
background-color="transparent"
@select="store.vv"
>
<left :dataToSon="store.mm" />
</el-menu>
</el-aside>
<el-container>
<el-header height="80px">
<h1 @click="fff">大可的管理系统 - v1.0</h1>
<div>
<img src="@/assets/111.jpg" alt="">
<span></span>
<el-button type="primary" @click="LogOut">退出登录</el-button>
</div>
</el-header>
<el-main>
<tab></tab>
</el-main>
<el-footer height="50px">
<p>© 版权所有: 大可</p>
</el-footer>
</el-container>
</el-container>
</template>
<script setup lang="ts">
import { ref } from 'vue';
import { useRouter } from "vue-router";
import left from "../left.vue";
import tab from '../tab.vue';
import { ElMessage, ElMessageBox} from "element-plus";
import { useAuthStore } from '@/store';
import preventBack from 'vue-prevent-browser-back';//组件内单独引入
const mixins = [preventBack];
const store = useAuthStore();
const collapse = ref<boolean>(false)
const router = useRouter();
const tiao = () => {
console.log('路由')
router.push('/son1')
}
const fff = () => {
router.replace('/son2')
}
const collapseToggle = () => {
collapse.value = !collapse.value
}
const ggvv = ref([1,2,3])
const handleOpen = () => {
console.log()
}
const gg = (e) => {
console.log(e)
}
const handleClose = () => {
console.log()
}
const LogOut = () => {
ElMessageBox.confirm(
'确定要退出登录?',
'Warning',
{
confirmButtonText: '确定',
cancelButtonText: '取消',
type: 'warning',
}
)
.then(() => {
router.replace('/login')
ElMessage({
type: 'success',
message: '退出成功',
})
})
.catch(() => {
ElMessage({
type: 'info',
message: '您取消了退出',
})
})
}
</script>
<style scoped>
.el-header {
background: url("@/assets/111.jpg");
background-color: #f3d19e;
display: flex;
align-items: center;
justify-content: space-between;
}
.el-header h1 {
font-size: 26px;
color: #fff;
letter-spacing: 10px;
}
.el-header div {
margin-right: 30px;
}
.el-header img {
width: 40px;
border-radius: 40px;
vertical-align: middle;
margin-right: 10px;
}
.el-header span {
font-size: 18px;
color: #fff;
margin-right: 10px;
}
.el-header el-button {
margin-left: 10px;
}
.el-aside {
height: 100vh;
background: url('@/assets/111.jpg');
transition: width 0.3s;
text-align: right;
}
.el-aside .el-button {
margin: 20px 10px 20px 0;
}
.el-aside .el-menu {
border-right: none;
}
.el-footer {
background-color: #EBEEF5;
display: flex;
align-items: center;
}
.el-footer p {
font-size: 12px;
color: #666;
}
</style>left.vue页面代码
<script setup lang="ts">
import { ref, defineProps } from 'vue';
import { useAuthStore } from '@/store';
type HeaderProps = {
  dataToSon: number[];
};
// 2. type 声明的HeaderProps 用 defineProps注册
const zz = defineProps<HeaderProps>();
const hhkk = zz.dataToSon;
const list = ref<Array<object>>([]);
const store = useAuthStore();
const gg = () => {

}
</script>

<template>
    <template v-for="(item, index) in hhkk" :key="item.id">
      <!-- 非叶子节点 -->
      <el-sub-menu v-if="item.children" :index="item.id">
        <template #title>
          <el-icon>
            <Setting />
          </el-icon>
          <span v-text="item.name"></span>
        </template>
        <left :dataToSon="item.children"/>
      </el-sub-menu>
      <!-- 叶子节点(功能节点) -->
      <el-menu-item v-else :index="item.path">
        <el-icon>
          <Menu />
        </el-icon>
        <span v-text="item.name"></span>
      </el-menu-item>

    </template>
</template>

<style scoped lang="stylus">
</style>
tab.vue页面代码
<template>
  <el-tabs
      v-model="store.bbc"
      type="card"
      class="demo-tabs"
      closable
      @tab-remove="store.kk"
      @tab-click="jj"
  >
<!--    @tab-click="jj"-->
    <el-tab-pane
        v-for="item in ff"
        :key="item.id"
        :label="item.name"
        :name="item.path"
    >
      <router-view :name="item.path" v-slot="{Component}">
        <keep-alive>
          <component :is="Component"></component>
        </keep-alive>
      </router-view>
    </el-tab-pane>
  </el-tabs>
</template>

<script setup lang="ts">
import { ref, onMounted } from 'vue'
import {useAuthStore} from '@/store';
import {useRouter} from "vue-router";
const store = useAuthStore();
const router = useRouter();
onMounted(() => {
  // store.bbc = router.currentRoute._value.fullPath;
})

const fv = store.bbc;

const jj = (e) => {
  // router.replace(e.props.name)
  console.log(e)
}
const hh = (ee) => {
  console.log(ee)
}
let tabIndex = 2
const editableTabsValue = ref(store.zx.length)
const ff = store.zx;
const gg = (e) => {
  ff.forEach(item => {
    if (item.path == e) {
      ff.splice(item,1)
    }
  })
}
</script>

<style scoped>
.demo-tabs > .el-tabs__content {
  padding: 32px;
  color: #6b778c;
  font-size: 32px;
  font-weight: 600;
}
</style>
pinia里面的代码
import { defineStore } from 'pinia';

export default defineStore('auth',  {
   state: () => {
       return {
           loginName: "张三",
           ss: [],
           mm: [
               {
                 path: 'vv',
                 name:'首页',
                 func_fid: 0,
                 id:"1000",
                 children: [
                     {
                         path: 'sy',
                         name:'首页儿子',
                         func_fid: 1000,
                         id:"1212",
                     }
                 ]
               },
               {
                   path:'hh',
                   name:'系统管理',
                   func_fid: 0,
                   id: '1',
                   children: [
                       {
                           id: '1',
                           func_fid: 1,
                           path:'son1',
                           name: '系统管理儿子',
                       },
                       {
                           id:' 2',
                           func_fid: 1,
                           path:'hhh',
                           name: '系统管理-角色',
                           children: [
                               {
                                   id: '222',
                                   func_fid: 1,
                                   path: 'son1-1-1',
                                   name: '角色管理',
                                   children:[
                                       {
                                           id: '12',
                                           func_fid: 2,
                                           path: 'son1-1-1',
                                           name: '角色管理儿子',
                                           children:[
                                               {
                                                   id:' 122',
                                                   func_fid: 2,
                                                   path: 'son1-1-1',
                                                   name: '角色管理儿子-----孙子',
                                               }
                                           ]
                                       }
                                   ]
                               }
                           ]
                       },
                       {
                           id: '12',
                           path: 'son1-2',
                           name: '用户管理'
                       }

                   ]
               },
               {
                   path:'ss',
                   name:'教学管理',
                   id: '22',
                   func_fid: 0,
                   children: [
                       {
                           path:'son2',
                           name:'教学管理儿子',
                           id: '202',
                           func_fid: 22,
                       }
                   ]
               },
               {
                   path:'zz',
                   name:'行政管理',
                   id: '3',
                   func_fid: 0,
                   children: [
                       {
                           path:'son3',
                           name:'行政管理儿子',
                           id: '33',
                           func_fid: 3,
                       }
                   ]
               },

           ],
           zx:[],
           bbx:[],
           bbc: '',
       }
   },
    persist: {
        enabled: true, // 开启缓存  默认会存储在本地localstorage
        storage: sessionStorage, // 缓存使用方式
        paths:[] // 需要缓存键
    },
    actions: {
       zz(ss:string) {
           this.loginName = ss
       },
       vv(e) {
           let hh = [];
           function traverse(node) {
               hh.push(JSON.parse(JSON.stringify(node)))
               if (node.children && node.children.length > 0) {
                   for (let i = 0; i < node.children.length; i++) {
                       traverse(node.children[i]);
                   }
               }
           }
           this.mm.forEach(item => {
               traverse(item)
           })
           const bb =[]
           hh.forEach(item => {
              if (item.path == e) {
                  const index = this.zx.findIndex(i => JSON.stringify(i) === JSON.stringify(item));
                  this.bbc = item.path;
                  if (index === -1) {
                      this.zx.push({...item})
                  }
              }
           })
       },
        kk(e) {
            let i = this.zx.findIndex(item => item.path === e);
            if(e != this.bbc) {} //删除的是一个不激活的tab那么就什么都不做
            else if (this.zx.length === 1) //删除的是最后剩下的一个激活的tab
                this.bbc = '';
            else if (i === this.zx.length - 1) //删除的是最末尾的一个tab,让前面那个激活
                this.bbc = this.zx[i - 1].path;
            else                                 //删除的是中间的一个激活的tab
                this.bbc = this.zx[i + 1].path;

            this.zx.splice(i, 1);
        },
    }
})
安装
yarn add pinia-plugin-persistedstate
or
npm i  pinia-plugin-persistedstate
使用插件 在main.ts中注册
import { createApp } from "vue";
import App from "./App.vue";
import piniaPluginPersistedstate from 'pinia-plugin-persistedstate'

const pinia = createPinia();
pinia.use(piniaPluginPersistedstate);
createApp(App).use(pinia);
路由代码
// import {createRouter, createWebHistory, createWebHashHistory} from "vue-router";

// // 1. 配置路由
// const routes: ({ redirect: string; path: string } | { path: string; component: () => Promise<any> } | { path: string; component: () => Promise<any>; children: ({ path: string; components: { son2: () => Promise<any> } } | { path: string; components: { son3: () => Promise<any> } })[] } | { path: string; components: { son1: () => Promise<any> }; name: string; props: { son1: boolean } })[] = [
//     {path: '/', redirect: '/login'},
//     {path: '/login', component: () => import('../views/login.vue')},
//     {
//         path: '/home',
//         component: () => import('../views/home/home.vue'),
//         children: [
//             // {path: 'son1', name: 'son1', components: {son1: () => import('../views/home/son/son1.vue')}},
//             {path: 'son2', components: {son2: () => import('../views/home/son/son2.vue')}},
//             {path: 'son3', components: {son3: () => import('../views/home/son/son3.vue')}},
//         ]
//     },
//     {
//         path: '/son1',
//         name: 'son1',
//         components: {son1: () => import('../views/home/son/son1.vue')},
//         props: { son1: true }
//     }
//
// ];
// // 2.返回一个 router 实列,为函数,配置 history 模式
// const router = createRouter({
//     history: createWebHashHistory(),
//     routes,
// });
//
//
// // 3.导出路由   去 main.ts 注册 router.ts
//
// export default router

import { createRouter, createWebHistory } from 'vue-router'

const router = createRouter({
    history: createWebHistory(),
    routes: [
            {path: '/', redirect: '/login'},
    {path: '/login', component: () => import('../views/login.vue')},
    {
        path: '/home',
        component: () => import('../views/home/home.vue'),
        children: [
            {
                path:'',
                components: {
                    son1: () => import('../views/home/son/son1.vue'),
                    son2: () => import('../views/home/son/son2.vue'),
                    son3: () => import('../views/home/son/son3.vue'),
                    sy:() => import('../views/home/son/sy.vue'),
                }
            },
        ]
    },
    ]
})

export default router
我把代码放git上了,有需要的自行拉取文章来源:https://www.toymoban.com/news/detail-492515.html
https://gitee.com/Flechazo7/vue3.git文章来源地址https://www.toymoban.com/news/detail-492515.html
到了这里,关于vue3 + TS + elementplus + pinia实现后台管理系统左侧菜单联动实现 tab根据路由切换联动内容的文章就介绍完了。如果您还想了解更多内容,请在右上角搜索TOY模板网以前的文章或继续浏览下面的相关文章,希望大家以后多多支持TOY模板网!