一、概述
ConfigMap是k8s的一个配置管理组件,可以将配置以key-value的形式传递,通常用来保存不需要加密的配置信息,加密信息则需用到Secret,主要用来应对以下场景:
-
生成为容器内的环境变量;
-
设置容器启动命令的启动参数(需设置为环境变量)文章来源:https://www.toymoban.com/news/detail-494011.html
-
以Volume的形式挂载为容器内部的文件或目录。文章来源地址https://www.toymoban.com/news/detail-494011.html
二、创建configmap
- 从普通文件创建
1: 创建configmap
[root@node1 ~]#
[root@node1 ~]# kubectl create ns configmap
namespace/configmap created
[root@node1 ~]#
[root@node1 ~]# kubectl create cm test-config --from-file=/root/local.repo -n configmap
configmap/test-config created

2:查看configmap内容
[root@node1 ~]# kubectl get cm -n configmap
NAME               DATA   AGE
kube-root-ca.crt   1      41s
test-config        1      39s
[root@node1 ~]# kubectl describe  cm test-config -n configmap
Name:         test-config
Namespace:    configmap
Labels:       <none>
Annotations:  <none>

Data
====
local.repo:
----
[local]
name=local repo from http
baseurl=http://192.168.10.162:7080
enabled=1
gpgcheck=0


BinaryData
====

Events:  <none>
- 从目录创建cm
1:创建对应的cm信息
[root@node1 ~]# mkdir config
[root@node1 ~]# echo hello > config/hello.txt
[root@node1 ~]# echo world > config/world.txt
[root@node1 ~]#
[root@node1 ~]# kubectl create cm test-config-dir --from-file=/root/config -n configmap
configmap/test-config-dir created
[root@node1 ~]#

2:查看cm
[root@node1 ~]# kubectl get cm -n configmap
NAME               DATA   AGE
kube-root-ca.crt   1      3m58s
test-config        1      3m56s
test-config-dir    2      66s
[root@node1 ~]#
[root@node1 ~]# kubectl describe  cm test-config-dir -n configmap
Name:         test-config-dir
Namespace:    configmap
Labels:       <none>
Annotations:  <none>

Data
====
hello.txt:
----
hello

world.txt:
----
world


BinaryData
====

Events:  <none>
[root@node1 ~]#
- 自定义数据源
类似和从文件创建一样,多了一个key的定义
[root@node1 ~]# kubectl create configmap cm-data --from-file=test-cm-define=/etc/yum.repos.d/local.repo  -n configmap
configmap/cm-data created
[root@node1 ~]#
[root@node1 ~]# kubectl get cm -n configmap
NAME               DATA   AGE
cm-data            1      31s
kube-root-ca.crt   1      14m
test-config        1      14m
test-config-dir    2      11m
[root@node1 ~]# kubectl describe  cm cm-data -n configmap
Name:         cm-data
Namespace:    configmap
Labels:       <none>
Annotations:  <none>

Data
====
test-cm-define:
----
[local]
name=local repo from http
baseurl=http://192.168.10.162:7080
enabled=1
gpgcheck=0


BinaryData
====

Events:  <none>
[root@node1 ~]#
- 从字符集创建
[root@node1 ~]# kubectl create cm test-cm-zifu --from-literal=name=www --from-literal=edge=30 -n configmap
configmap/test-cm-zifu created
[root@node1 ~]# kubectl get cm -n configmap
NAME               DATA   AGE
cm-data            1      4m43s
kube-root-ca.crt   1      18m
test-cm-zifu       2      2s
test-config        1      18m
test-config-dir    2      16m
[root@node1 ~]# kubectl describe  cm test-cm-zifu -n configmap
Name:         test-cm-zifu
Namespace:    configmap
Labels:       <none>
Annotations:  <none>

Data
====
edge:
----
30
name:
----
www

BinaryData
====

Events:  <none>
[root@node1 ~]#
- 从yaml创建
1:编辑yaml文件

---
apiVersion: v1
data:
  customization.cnf: |-
    [mysqld]
    datadir = /mariadb_data
    lower_case_table_names = 1
    sql-mode="NO_AUTO_CREATE_USER,NO_ENGINE_SUBSTITUTION"
    character-set-server=utf8
    [client]
    default-character-set=utf8
kind: ConfigMap
metadata:
  name: mysql-config
  namespace: configmap

[root@node1 ~]# kubectl apply -f  configmap.yaml
configmap/mysql-config created
[root@node1 ~]# kubectl get cm -n configmap
NAME               DATA   AGE
cm-data            1      9m24s
kube-root-ca.crt   1      23m
mysql-config       1      2s
test-cm-zifu       2      4m43s
test-config        1      23m
test-config-dir    2      20m
[root@node1 ~]# kubectl describe  cm mysql-config -n configmap
Name:         mysql-config
Namespace:    configmap
Labels:       <none>
Annotations:  <none>

Data
====
customization.cnf:
----
[mysqld]
datadir = /mariadb_data
lower_case_table_names = 1
sql-mode="NO_AUTO_CREATE_USER,NO_ENGINE_SUBSTITUTION"
character-set-server=utf8
[client]
default-character-set=utf8

BinaryData
====

Events:  <none>
[root@node1 ~]#
三、configmap应用
- 以volume形式挂载
1:编辑podyaml文件
---
apiVersion: v1
kind: Pod
metadata:
  name: nginx
  namespace: configmap
spec:
  containers:
  - name: nginx
    image: docker.io/library/nginx:latest
    imagePullPolicy: IfNotPresent
    volumeMounts:
    - name:  mysql-config
      mountPath: /etc/config
  volumes:
  - name: mysql-config
    configMap:
      name: mysql-config

2:启动pod
[root@node1 ~]# kubectl apply -f  pod.yaml
pod/nginx created
[root@node1 ~]# kubectl get po -n configmap
NAME    READY   STATUS    RESTARTS   AGE
nginx   1/1     Running   0          7s

3:进入pod查看挂载内容
[root@node1 ~]# kubectl exec -it nginx bash -n configmap
kubectl exec [POD] [COMMAND] is DEPRECATED and will be removed in a future version. Use kubectl exec [POD] -- [COMMAND] instead.
root@nginx:/# cd etc/config/
root@nginx:/etc/config# ls
customization.cnf
root@nginx:/etc/config# cat customization.cnf
[mysqld]
datadir = /mariadb_data
lower_case_table_names = 1
sql-mode="NO_AUTO_CREATE_USER,NO_ENGINE_SUBSTITUTION"
character-set-server=utf8
[client]
default-character-set=utf8root@nginx:/etc/config#
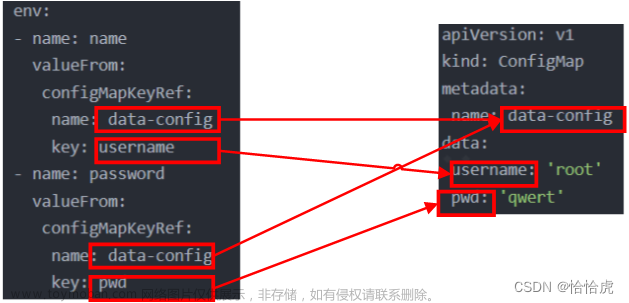
- 以环境变量的形式使用cm
1:创建cm
[root@node1 ~]# kubectl create cm cm-zifu --from-literal=testname=www --from-literal=testedge=30 -n configmap
configmap/cm-zifu created

2:pod使用
---
apiVersion: v1
kind: Pod
metadata:
  name: nginx-env
  namespace: configmap
spec:
  containers:
  - name: nginx
    image: docker.io/library/nginx:latest
    imagePullPolicy: IfNotPresent
    env:
    - name: testname
      valueFrom:
        configMapKeyRef:
          name: cm-zifu
          key: testname
    - name: testedge
      valueFrom:
        configMapKeyRef:
          name: cm-zifu
          key: testedge

 3:启动pod,查看env
[root@node1 ~]# kubectl apply -f  pod.yaml
pod/nginx-env created
[root@node1 ~]# kubectl get po -n configmap
NAME        READY   STATUS    RESTARTS   AGE
nginx       1/1     Running   0          16m
nginx-env   1/1     Running   0          5s
[root@node1 ~]# kubectl exec -it nginx-env bash -n configmap
kubectl exec [POD] [COMMAND] is DEPRECATED and will be removed in a future version. Use kubectl exec [POD] -- [COMMAND] instead.
root@nginx-env:/# env  | grep test
testedge=30
testname=www
root@nginx-env:/#
- 以启动参数传入
一下以nginx 为例
1:首选查看nginx镜像的启动参数
[root@node1 ~]# crictl   inspecti docker.io/library/nginx:latest |more
        "Entrypoint": [
          "/docker-entrypoint.sh"
        ],
        "Cmd": [
          "nginx",
          "-g",
          "daemon off;"
        ],

2:先以正常的pod启动,编辑yaml文件
---
apiVersion: v1
kind: Pod
metadata:
  name: nginx-cmd
  namespace: configmap
spec:
  containers:
  - name: nginx
    image: docker.io/library/nginx:latest
    imagePullPolicy: IfNotPresent
    command: ["/docker-entrypoint.sh"]
    args: ["nginx", "-g", "daemon off;"]

3:启动pod,查看启动日志
[root@node1 ~]# kubectl apply -f  pod.yaml
pod/nginx-cmd created
[root@node1 ~]#
[root@node1 ~]#
[root@node1 ~]# kubectl logs nginx-cmd -n configmap
/docker-entrypoint.sh: /docker-entrypoint.d/ is not empty, will attempt to perform configuration
/docker-entrypoint.sh: Looking for shell scripts in /docker-entrypoint.d/
/docker-entrypoint.sh: Launching /docker-entrypoint.d/10-listen-on-ipv6-by-default.sh
10-listen-on-ipv6-by-default.sh: info: Getting the checksum of /etc/nginx/conf.d/default.conf
10-listen-on-ipv6-by-default.sh: info: Enabled listen on IPv6 in /etc/nginx/conf.d/default.conf
/docker-entrypoint.sh: Launching /docker-entrypoint.d/20-envsubst-on-templates.sh
/docker-entrypoint.sh: Launching /docker-entrypoint.d/30-tune-worker-processes.sh
/docker-entrypoint.sh: Configuration complete; ready for start up
2023/06/19 08:14:36 [notice] 1#1: using the "epoll" event method
2023/06/19 08:14:36 [notice] 1#1: nginx/1.21.6
2023/06/19 08:14:36 [notice] 1#1: built by gcc 10.2.1 20210110 (Debian 10.2.1-6)
2023/06/19 08:14:36 [notice] 1#1: OS: Linux 3.10.0-1160.6.1.el7.x86_64
2023/06/19 08:14:36 [notice] 1#1: getrlimit(RLIMIT_NOFILE): 1048576:1048576
2023/06/19 08:14:36 [notice] 1#1: start worker processes
2023/06/19 08:14:36 [notice] 1#1: start worker process 32
2023/06/19 08:14:36 [notice] 1#1: start worker process 33
2023/06/19 08:14:36 [notice] 1#1: start worker process 34
2023/06/19 08:14:36 [notice] 1#1: start worker process 35

[root@node1 ~]# kubectl get po -n configmap  -o wide
NAME        READY   STATUS    RESTARTS   AGE   IP             NODE    NOMINATED NODE   READINESS GATES
nginx       1/1     Running   0          87m   10.233.96.28   node2   <none>           <none>
nginx-cmd   1/1     Running   0          15s   10.233.96.36   node2   <none>           <none>
nginx-env   1/1     Running   0          70m   10.233.92.33   node3   <none>           <none>
[root@node1 ~]# curl 10.233.96.36
<!DOCTYPE html>
<html>
<head>
<title>Welcome to nginx!</title>
<style>
html { color-scheme: light dark; }
body { width: 35em; margin: 0 auto;
font-family: Tahoma, Verdana, Arial, sans-serif; }
</style>
</head>
<body>
<h1>Welcome to nginx!</h1>
<p>If you see this page, the nginx web server is successfully installed and
working. Further configuration is required.</p>

<p>For online documentation and support please refer to
<a href="http://nginx.org/">nginx.org</a>.<br/>
Commercial support is available at
<a href="http://nginx.com/">nginx.com</a>.</p>

<p><em>Thank you for using nginx.</em></p>
</body>
</html>

4:**创建cm,指定参数**
[root@node1 ~]# kubectl create configmap nginx-cmd --from-literal=daemon="daemon off"  -n configmap
configmap/nginx-cmd created
[root@node1 ~]# kubectl get cm/nginx-cmd  -n configmap
NAME        DATA   AGE
nginx-cmd   1      18s

5:编辑pod使用cm
---
apiVersion: v1
kind: Pod
metadata:
  name: nginx-cmd
  namespace: configmap
spec:
  containers:
  - name: nginx
    image: docker.io/library/nginx:latest
    imagePullPolicy: IfNotPresent
    command: ["/docker-entrypoint.sh"]
    args: ["nginx", "-g", "$(daemon-cmd);"]
    env:
    - name: daemon-cmd
      valueFrom:
        configMapKeyRef:
          name:  nginx-cmd
          key: daemon

6:启动pod测试
[root@node1 ~]# kubectl apply -f  pod.yaml
pod/nginx-cmd created
[root@node1 ~]# kubectl get po -n configmap -owide
NAME        READY   STATUS    RESTARTS   AGE    IP             NODE    NOMINATED NODE   READINESS GATES
nginx-cmd   1/1     Running   0          2m5s   10.233.90.20   node1   <none>           <none>

[root@node1 ~]# kubectl logs nginx-cmd -n configmap
/docker-entrypoint.sh: /docker-entrypoint.d/ is not empty, will attempt to perform configuration
/docker-entrypoint.sh: Looking for shell scripts in /docker-entrypoint.d/
/docker-entrypoint.sh: Launching /docker-entrypoint.d/10-listen-on-ipv6-by-default.sh
10-listen-on-ipv6-by-default.sh: info: Getting the checksum of /etc/nginx/conf.d/default.conf
10-listen-on-ipv6-by-default.sh: info: Enabled listen on IPv6 in /etc/nginx/conf.d/default.conf
/docker-entrypoint.sh: Launching /docker-entrypoint.d/20-envsubst-on-templates.sh
/docker-entrypoint.sh: Launching /docker-entrypoint.d/30-tune-worker-processes.sh
/docker-entrypoint.sh: Configuration complete; ready for start up
2023/06/19 08:24:04 [notice] 1#1: using the "epoll" event method
2023/06/19 08:24:04 [notice] 1#1: nginx/1.21.6
2023/06/19 08:24:04 [notice] 1#1: built by gcc 10.2.1 20210110 (Debian 10.2.1-6)
2023/06/19 08:24:04 [notice] 1#1: OS: Linux 3.10.0-1160.6.1.el7.x86_64
2023/06/19 08:24:04 [notice] 1#1: getrlimit(RLIMIT_NOFILE): 1048576:1048576
2023/06/19 08:24:04 [notice] 1#1: start worker processes
2023/06/19 08:24:04 [notice] 1#1: start worker process 31
2023/06/19 08:24:04 [notice] 1#1: start worker process 32
2023/06/19 08:24:04 [notice] 1#1: start worker process 33
2023/06/19 08:24:04 [notice] 1#1: start worker process 34

7:测试业务正常
[root@node1 ~]# curl 10.233.90.20
<!DOCTYPE html>
<html>
<head>
<title>Welcome to nginx!</title>
<style>
html { color-scheme: light dark; }
body { width: 35em; margin: 0 auto;
font-family: Tahoma, Verdana, Arial, sans-serif; }
</style>
</head>
<body>
<h1>Welcome to nginx!</h1>
<p>If you see this page, the nginx web server is successfully installed and
working. Further configuration is required.</p>

<p>For online documentation and support please refer to
<a href="http://nginx.org/">nginx.org</a>.<br/>
Commercial support is available at
<a href="http://nginx.com/">nginx.com</a>.</p>

<p><em>Thank you for using nginx.</em></p>
</body>
</html>
- 使用某一个cm的key作为volume挂载
1:创建一个多个from-file的cm
kubectl create configmap multi-file --from-file=test-cm-define=/etc/yum.repos.d/local.repo --from-file=/root/cert.pem --from-file=/root/dashboard.yaml  -n configmap

2:编辑yaml 使用此cm的某一个key
---
apiVersion: v1
kind: Pod
metadata:
  name: nginx-key
  namespace: configmap
spec:
  containers:
  - name: nginx
    image: docker.io/library/nginx:latest
    imagePullPolicy: IfNotPresent
    volumeMounts:
    - name: localrepo
      mountPath: /etc/yum.repos.d
  volumes:
  - name: localrepo
    configMap:
      name: multi-file
      items:
      - key: test-cm-define     ###指定单独的key
        path: loca.repo         ###挂载路径

3:启动pod,查看
[root@node1 ~]# kubectl apply -f   pod-key.yaml
pod/nginx-key created
[root@node1 ~]# kubectl exec -it  nginx-key  bash -n configmap
kubectl exec [POD] [COMMAND] is DEPRECATED and will be removed in a future version. Use kubectl exec [POD] -- [COMMAND] instead.
root@nginx-key:/# cd etc/yum.repos.d/
root@nginx-key:/etc/yum.repos.d#
root@nginx-key:/etc/yum.repos.d# ls
loca.repo
root@nginx-key:/etc/yum.repos.d#
到了这里,关于k8s configmap 详解的文章就介绍完了。如果您还想了解更多内容,请在右上角搜索TOY模板网以前的文章或继续浏览下面的相关文章,希望大家以后多多支持TOY模板网!