大家好,我是csdn的博主:lqj_本人
这是我的个人博客主页:
lqj_本人的博客_CSDN博客-微信小程序,前端,python领域博主lqj_本人擅长微信小程序,前端,python,等方面的知识https://blog.csdn.net/lbcyllqj?spm=1011.2415.3001.5343哔哩哔哩欢迎关注:小淼Develop
本文"python人工智能【隔空手势控制鼠标】"解放双手" ",已存放到我的python专栏、python人工智能视觉专栏
目录
说在前面
创意描述
手势识别手掌检测
代码及讲解
导入相应的库
创建类,用于检测左手右手的标签:
main函数:
调用opencv库,实现图像
设置摄像头的编号【内接、外接摄像头】
设置摄像头的呈现画面的宽高
检测手部关键点坐标
判断食指和中指是否伸出
判断条件,若只有食指伸出,则进入只移动模式
坐标转换,食指在窗口坐标转换鼠标在桌面的坐标
判断条件,若食指和中指都伸出,且检测到两指间的距离足够短【达到设定的距离内】对应"鼠标点击事件"
调用opencv库,显示程序的图像
释放资源
完整的学习代码
视频展示
说在前面
随着美国openAI公司的CahtGPT诞生,人工智能开启了再度觉醒状态。在这样的一个时代的大背景下,演变出了“智能+万物”的潜在主题。全球智能化,已经成为了一个必然的趋势。人工智能时时代发展不可取代的产物。作为一名大学生,我甘愿为时代的发展贡献犬马之劳!!!
创意描述
我发现,当我们在学校讲课时,或者老师在学校的讲课中,会不断的去点击鼠标,从而切换ppt以及电脑的其他功能。这样我感觉是非常不方便的,所以我基于此问题开发了此人工只能脚本程序。它可以完美的运行在任何一个电脑上,然后调用摄像头,从而实现主要的功能。
手势识别手掌检测
目前现阶段手势识别的研究方向主要分为:基于穿戴设备的手势识别和基于视觉方法的手势识别。基于穿戴设备的手势识别主要是通过在手上佩戴含有大量传感器的手套获取大量的传感器数据,并对其数据进行分析。该种方法相对来虽然精度比较高,但是由于传感器成本较高很难在日常生活中得到实际应用,同时传感器手套会造成使用者的不便,影响进一步的情感分析,所以此方法更多的还是应用在一些特有的相对专业的仪器中。而本项目关注点放在基于视觉方法的手势研究中,在此特地以Mediapipe的框架为例,方便读者更好的复现和了解相关领域。
基于视觉方法的手势识别主要分为静态手势识别和动态手势识别两种。从文字了解上来说,动态手势识别肯定会难于静态手势识别,但静态手势是动态手势的一种特殊状态,我们可以通过对一帧一帧的静态手势识别来检测连续的动态视频,进一步分析前后帧的关系来完善手势系统。
MediaPipe在训练手掌模型中,使用的是单阶段目标检测算法SSD。同时利用三个操作对其进行了优化:1.NMS;2.encoder-decoder feature extractor;3.focal loss。NMS主要是用于抑制算法识别到了单个对象的多个重复框,得到置信度最高的检测框;encoder-decoder feature extractor主要用于更大的场景上下文感知,甚至是小对象(类似于retanet方法);focal loss是有RetinaNet上提取的,主要解决的是正负样本不平衡的问题,这对于开放环境下的目标检测是一个可以涨点的技巧。利用上述技术,MediaPie在手掌检测中达到了95.7%的平均精度。在没有使用2和3的情况下,得到的基线仅为86.22%。增长了9.48个点,说明模型是可以准确识别出手掌的。而至于为啥做手掌检测器而不是手部,主要是作者认为训练手部检测器比较复杂,可学习到的特征不明显,所以做的是手掌检测器。
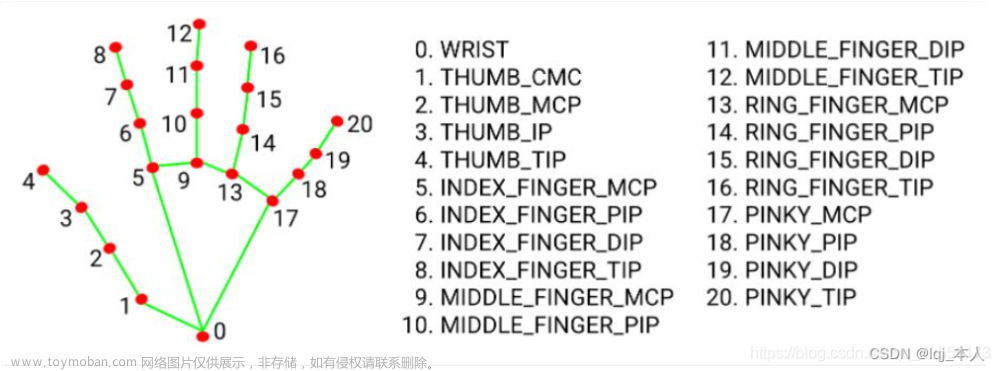
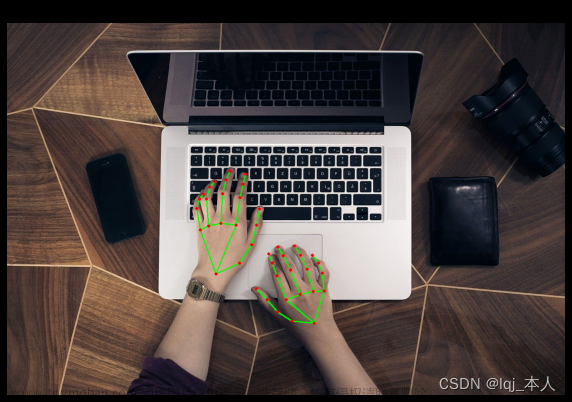
代码及讲解
导入相应的库
import cv2
import autopy
import numpy as np
import time
import math
import mediapipe as mp
创建类,用于检测左手右手的标签:
class handDetector():
    def __init__(self, mode=False, maxHands=2, model_complexity=1, detectionCon=0.8, trackCon=0.8):
        self.mode = mode
        self.maxHands = maxHands
        self.detectionCon = detectionCon
        self.trackCon = trackCon
        self.model_complexity = model_complexity

        self.mpHands = mp.solutions.hands
        self.hands = self.mpHands.Hands(self.mode, self.maxHands, self.model_complexity,self.detectionCon, self.trackCon)
        self.mpDraw = mp.solutions.drawing_utils
        self.tipIds = [4, 8, 12, 16, 20]

    def findHands(self, img, draw=True):
        imgRGB = cv2.cvtColor(img, cv2.COLOR_BGR2RGB)
        self.results = self.hands.process(imgRGB)

        print(self.results.multi_handedness)  # 获取检测结果中的左右手标签并打印

        if self.results.multi_hand_landmarks:
            for handLms in self.results.multi_hand_landmarks:
                if draw:
                    self.mpDraw.draw_landmarks(img, handLms, self.mpHands.HAND_CONNECTIONS)
        return img

    def findPosition(self, img, draw=True):
        self.lmList = []
        if self.results.multi_hand_landmarks:
            for handLms in self.results.multi_hand_landmarks:
                for id, lm in enumerate(handLms.landmark):
                    h, w, c = img.shape
                    cx, cy = int(lm.x * w), int(lm.y * h)
                    # print(id, cx, cy)
                    self.lmList.append([id, cx, cy])
                    if draw:
                        cv2.circle(img, (cx, cy), 12, (255, 0, 255), cv2.FILLED)
        return self.lmList

    def fingersUp(self):
        fingers = []
        # 大拇指
        if self.lmList[self.tipIds[0]][1] > self.lmList[self.tipIds[0] - 1][1]:
            fingers.append(1)
        else:
            fingers.append(0)

        # 其余手指
        for id in range(1, 5):
            if self.lmList[self.tipIds[id]][2] < self.lmList[self.tipIds[id] - 2][2]:
                fingers.append(1)
            else:
                fingers.append(0)

        # totalFingers = fingers.count(1)
        return fingers

    def findDistance(self, p1, p2, img, draw=True, r=15, t=3):
        x1, y1 = self.lmList[p1][1:]
        x2, y2 = self.lmList[p2][1:]
        cx, cy = (x1 + x2) // 2, (y1 + y2) // 2

        if draw:
            cv2.line(img, (x1, y1), (x2, y2), (255, 0, 255), t)
            cv2.circle(img, (x1, y1), r, (255, 0, 255), cv2.FILLED)
            cv2.circle(img, (x2, y2), r, (255, 0, 255), cv2.FILLED)
            cv2.circle(img, (cx, cy), r, (0, 0, 255), cv2.FILLED)
            length = math.hypot(x2 - x1, y2 - y1)

        return length, img, [x1, y1, x2, y2, cx, cy]
main函数:
检测手势并画出骨架信息
def main():
    pTime = 0
    cTime = 0
    cap = cv2.VideoCapture(0)
    detector = handDetector()
    while True:
        success, img = cap.read()
img = detector.findHands(img) 获取得到坐标点的列表文章来源:https://www.toymoban.com/news/detail-494618.html
lmList = detector.findPosition(img)调用opencv库,实现图像
        if len(lmList) != 0:
            print(lmList[4])

        cTime = time.time()
        fps = 1 / (cTime - pTime)
        pTime = cTime

        cv2.putText(img, 'fps:' + str(int(fps)), (10, 70), cv2.FONT_HERSHEY_PLAIN, 3, (255, 0, 255), 3)
        cv2.imshow('Image', img)
        cv2.waitKey(1)
设置摄像头的编号【内接、外接摄像头】
##############################
wCam, hCam = 1000, 1000
frameR = 100
smoothening = 5
##############################
cap = cv2.VideoCapture(0)
设置摄像头的呈现画面的宽高
cap.set(3, wCam)
cap.set(4, hCam)
pTime = 0
plocX, plocY = 0, 0
clocX, clocY = 0, 0

detector = handDetector()
wScr, hScr = autopy.screen.size()
检测手部关键点坐标
while True:
    success, img = cap.read()
    # 1. 检测手部 得到手指关键点坐标
    img = detector.findHands(img)
    cv2.rectangle(img, (frameR, frameR), (wCam - frameR, hCam - frameR), (0, 255, 0), 2,  cv2.FONT_HERSHEY_PLAIN)
    lmList = detector.findPosition(img, draw=False)
判断食指和中指是否伸出
    if len(lmList) != 0:
        x1, y1 = lmList[8][1:]
        x2, y2 = lmList[12][1:]
        fingers = detector.fingersUp()
判断条件,若只有食指伸出,则进入只移动模式
if fingers[1] and fingers[2] == False:坐标转换,食指在窗口坐标转换鼠标在桌面的坐标
x3 = np.interp(x1, (frameR, wCam - frameR), (0, wScr))
y3 = np.interp(y1, (frameR, hCam - frameR), (0, hScr))
clocX = plocX + (x3 - plocX) / smoothening
clocY = plocY + (y3 - plocY) / smoothening
autopy.mouse.move(wScr - clocX, clocY)
cv2.circle(img, (x1, y1), 15, (255, 0, 255), cv2.FILLED)
plocX, plocY = clocX, clocY
判断条件,若食指和中指都伸出,且检测到两指间的距离足够短【达到设定的距离内】对应"鼠标点击事件"
        if fingers[1] and fingers[2]:
            length, img, pointInfo = detector.findDistance(8, 12, img)
            if length < 40:
                cv2.circle(img, (pointInfo[4], pointInfo[5]),
                           15, (0, 255, 0), cv2.FILLED)
                autopy.mouse.click()
调用opencv库,显示程序的图像
    cTime = time.time()
    fps = 1 / (cTime - pTime)
    pTime = cTime
    cv2.putText(img, f'fps:{int(fps)}', (15, 25),
                cv2.FONT_HERSHEY_PLAIN, 2, (255, 0, 255), 2)
    cv2.imshow("I am Ai XiaoMiao", img)
    k=cv2.waitKey(1) & 0xFF
    if k == ord(' '):  # 退出
       break
释放资源
#释放摄像头
cap.release()
#释放内存
cv2.destroyAllWindows()
完整的学习代码
#coding=utf-8
import cv2
import autopy
import numpy as np
import time
import math
import mediapipe as mp
class handDetector():
    def __init__(self, mode=False, maxHands=2, model_complexity=1, detectionCon=0.8, trackCon=0.8):
        self.mode = mode
        self.maxHands = maxHands
        self.detectionCon = detectionCon
        self.trackCon = trackCon
        self.model_complexity = model_complexity

        self.mpHands = mp.solutions.hands
        self.hands = self.mpHands.Hands(self.mode, self.maxHands, self.model_complexity,self.detectionCon, self.trackCon)
        self.mpDraw = mp.solutions.drawing_utils
        self.tipIds = [4, 8, 12, 16, 20]

    def findHands(self, img, draw=True):
        imgRGB = cv2.cvtColor(img, cv2.COLOR_BGR2RGB)
        self.results = self.hands.process(imgRGB)

        print(self.results.multi_handedness)  # 获取检测结果中的左右手标签并打印

        if self.results.multi_hand_landmarks:
            for handLms in self.results.multi_hand_landmarks:
                if draw:
                    self.mpDraw.draw_landmarks(img, handLms, self.mpHands.HAND_CONNECTIONS)
        return img

    def findPosition(self, img, draw=True):
        self.lmList = []
        if self.results.multi_hand_landmarks:
            for handLms in self.results.multi_hand_landmarks:
                for id, lm in enumerate(handLms.landmark):
                    h, w, c = img.shape
                    cx, cy = int(lm.x * w), int(lm.y * h)
                    # print(id, cx, cy)
                    self.lmList.append([id, cx, cy])
                    if draw:
                        cv2.circle(img, (cx, cy), 12, (255, 0, 255), cv2.FILLED)
        return self.lmList

    def fingersUp(self):
        fingers = []
        # 大拇指
        if self.lmList[self.tipIds[0]][1] > self.lmList[self.tipIds[0] - 1][1]:
            fingers.append(1)
        else:
            fingers.append(0)

        # 其余手指
        for id in range(1, 5):
            if self.lmList[self.tipIds[id]][2] < self.lmList[self.tipIds[id] - 2][2]:
                fingers.append(1)
            else:
                fingers.append(0)

        # totalFingers = fingers.count(1)
        return fingers

    def findDistance(self, p1, p2, img, draw=True, r=15, t=3):
        x1, y1 = self.lmList[p1][1:]
        x2, y2 = self.lmList[p2][1:]
        cx, cy = (x1 + x2) // 2, (y1 + y2) // 2

        if draw:
            cv2.line(img, (x1, y1), (x2, y2), (255, 0, 255), t)
            cv2.circle(img, (x1, y1), r, (255, 0, 255), cv2.FILLED)
            cv2.circle(img, (x2, y2), r, (255, 0, 255), cv2.FILLED)
            cv2.circle(img, (cx, cy), r, (0, 0, 255), cv2.FILLED)
            length = math.hypot(x2 - x1, y2 - y1)

        return length, img, [x1, y1, x2, y2, cx, cy]


def main():
    pTime = 0
    cTime = 0
    cap = cv2.VideoCapture(0)
    detector = handDetector()
    while True:
        success, img = cap.read()
        img = detector.findHands(img)        # 检测手势并画上骨架信息

        lmList = detector.findPosition(img)  # 获取得到坐标点的列表


        # k = cv2.waitKey(1) & 0xFF  # 判断按键


        if len(lmList) != 0:
            print(lmList[4])

        cTime = time.time()
        fps = 1 / (cTime - pTime)
        pTime = cTime

        cv2.putText(img, 'fps:' + str(int(fps)), (10, 70), cv2.FONT_HERSHEY_PLAIN, 3, (255, 0, 255), 3)
        cv2.imshow('Image', img)
        cv2.waitKey(1)


##############################
wCam, hCam = 1000, 1000
frameR = 100
smoothening = 5
##############################
cap = cv2.VideoCapture(0)  # 若使用笔记本自带摄像头则编号为0  若使用外接摄像头 则更改为1或其他编号
#设置摄像头的呈现画面的宽高
cap.set(3, wCam)
cap.set(4, hCam)
pTime = 0
plocX, plocY = 0, 0
clocX, clocY = 0, 0

detector = handDetector()
wScr, hScr = autopy.screen.size()
# print(wScr, hScr)

while True:
    success, img = cap.read()
    # 1. 检测手部 得到手指关键点坐标
    img = detector.findHands(img)
    cv2.rectangle(img, (frameR, frameR), (wCam - frameR, hCam - frameR), (0, 255, 0), 2,  cv2.FONT_HERSHEY_PLAIN)
    lmList = detector.findPosition(img, draw=False)


    # k = cv2.waitKey() & 0xFF  # 判断按键

    # 2. 判断食指和中指是否伸出
    if len(lmList) != 0:
        x1, y1 = lmList[8][1:]
        x2, y2 = lmList[12][1:]
        fingers = detector.fingersUp()

        # 3. 若只有食指伸出 则进入移动模式
        if fingers[1] and fingers[2] == False:
            # 4. 坐标转换: 将食指在窗口坐标转换为鼠标在桌面的坐标
            # 鼠标坐标
            x3 = np.interp(x1, (frameR, wCam - frameR), (0, wScr))
            y3 = np.interp(y1, (frameR, hCam - frameR), (0, hScr))

            # smoothening values
            clocX = plocX + (x3 - plocX) / smoothening
            clocY = plocY + (y3 - plocY) / smoothening

            autopy.mouse.move(wScr - clocX, clocY)
            cv2.circle(img, (x1, y1), 15, (255, 0, 255), cv2.FILLED)
            plocX, plocY = clocX, clocY

        # 5. 若是食指和中指都伸出 则检测指头距离 距离够短则对应鼠标点击
        if fingers[1] and fingers[2]:
            length, img, pointInfo = detector.findDistance(8, 12, img)
            if length < 40:
                cv2.circle(img, (pointInfo[4], pointInfo[5]),
                           15, (0, 255, 0), cv2.FILLED)
                autopy.mouse.click()

    cTime = time.time()
    fps = 1 / (cTime - pTime)
    pTime = cTime
    cv2.putText(img, f'fps:{int(fps)}', (15, 25),
                cv2.FONT_HERSHEY_PLAIN, 2, (255, 0, 255), 2)
    cv2.imshow("I am Ai XiaoMiao", img)
    k=cv2.waitKey(1) & 0xFF
    if k == ord(' '):  # 退出
       break
#释放摄像头
cap.release()
#释放内存
cv2.destroyAllWindows()
视频展示
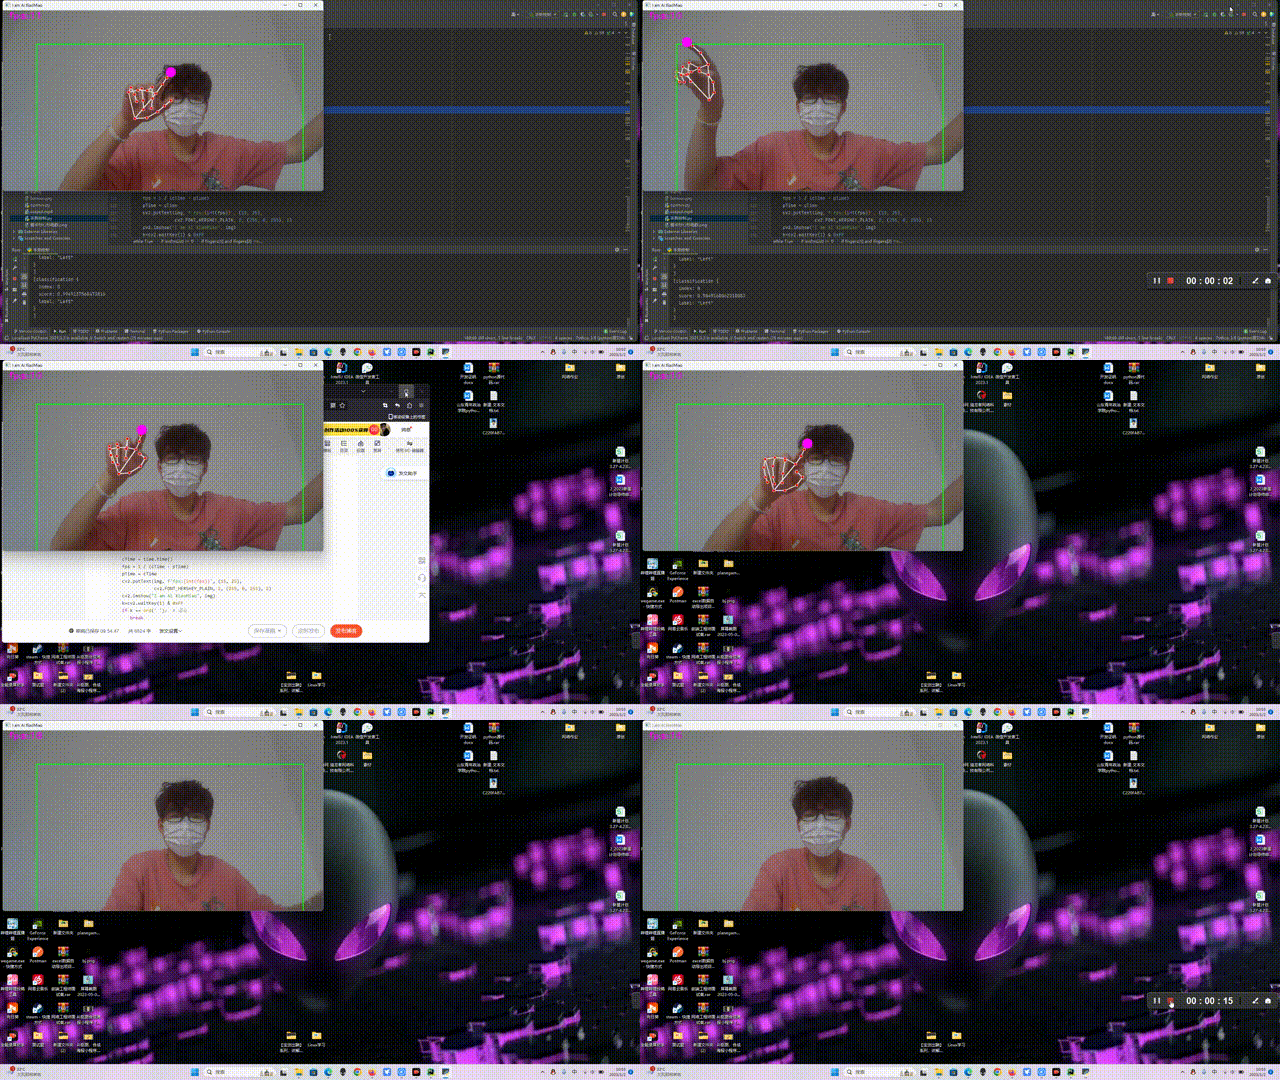 文章来源地址https://www.toymoban.com/news/detail-494618.html
到了这里,关于python人工智能【隔空手势控制鼠标】“解放双手“的文章就介绍完了。如果您还想了解更多内容,请在右上角搜索TOY模板网以前的文章或继续浏览下面的相关文章,希望大家以后多多支持TOY模板网!


