项目的源码和模型下载以及环境配置等可参考我的上一篇文章,这里不再赘述。
文章链接:https://blog.csdn.net/m0_63604019/article/details/130221434
在项目中创建一个名为segment-everything.py的文件,文件中写入如下代码:
import torchvision
import sys
import numpy as np
import torch
import matplotlib.pyplot as plt
import cv2
from segment_anything import sam_model_registry, SamAutomaticMaskGenerator, SamPredictor

def show_anns(anns):
    if len(anns) == 0:
        return
    sorted_anns = sorted(anns, key=(lambda x: x['area']), reverse=True)
    ax = plt.gca()
    ax.set_autoscale_on(False)
    polygons = []
    color = []
    for ann in sorted_anns:
        m = ann['segmentation']
        img = np.ones((m.shape[0], m.shape[1], 3))
        color_mask = np.random.random((1, 3)).tolist()[0]
        for i in range(3):
            img[:,:,i] = color_mask[i]
        ax.imshow(np.dstack((img, m*0.35)))


image = cv2.imread('B.jpg')    #将B.jpg改为自己的输入图片的路径
image = cv2.cvtColor(image, cv2.COLOR_BGR2RGB)

sam_checkpoint = "sam_vit_h_4b8939.pth"     #改为已下载的模型的存放路径

device = "cuda"     #默认是cuda,如果是用cpu的话就改为cpu
model_type = "default"      #default默认代表的是vit_h模型,可将其改为自己下载的模型名称(vit_h/vit_l/vit_b)

sam = sam_model_registry[model_type](checkpoint=sam_checkpoint)
sam.to(device=device)

mask_generator = SamAutomaticMaskGenerator(sam)
masks = mask_generator.generate(image)

plt.figure(figsize=(20,20))
plt.imshow(image)
show_anns(masks)
plt.axis('off')
plt.savefig('B_out.jpg')     #此处需填写输出结果的存放路径,B_out代表输出结果的文件名,.jpg表示将以jpg形式存放
plt.show()
然后右键点击【Run 'segment-everyting'】运行segment-everyting.py文件,运行过程可能需要几分钟,请耐心等待。
如果运行时出现如下报错:
OMP: Error #15: Initializing libiomp5md.dll, but found libiomp5md.dll already initialized.
OMP: Hint This means that multiple copies of the OpenMP runtime have been linked into the program. That is dangerous, since it can degrade performance or cause inc
orrect results. The best thing to do is to ensure that only a single OpenMP runtime is linked into the process, e.g. by avoiding static linking of the OpenMP runti
me in any library. As an unsafe, unsupported, undocumented workaround you can set the environment variable KMP_DUPLICATE_LIB_OK=TRUE to allow the program to contin
ue to execute, but that may cause crashes or silently produce incorrect results. For more information, please see http://www.intel.com/software/products/support/.
则在segment-everyting.py文件的顶部加入两行代码:
import os
os.environ["KMP_DUPLICATE_LIB_OK"]="TRUE"
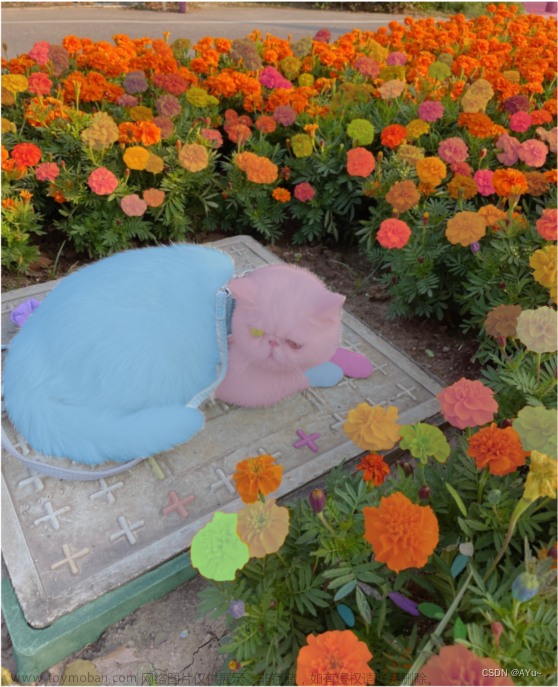
我的输入图片是我养的加菲猫(顺便夸一句我的小猪咪真可爱!):

分割后的输出结果:

感觉效果不是我想要的那种,一只完整的小猫咪都被分得四分五裂了......可能还需要添加一些提示还是啥的,我还没搞懂。
下面这个是在segment anything的demo(Segment Anything | Meta AI (segment-anything.com))中呈现的效果,这才是我想要的。文章来源:https://www.toymoban.com/news/detail-495099.html
 文章来源地址https://www.toymoban.com/news/detail-495099.html
到了这里,关于Segment Anything(SAM)全图分割做mask的文章就介绍完了。如果您还想了解更多内容,请在右上角搜索TOY模板网以前的文章或继续浏览下面的相关文章,希望大家以后多多支持TOY模板网!


