linux GPIO子系统
Linux的GPIO子系统驱动框架的组成部分
Linux的GPIO子系统驱动框架由三个主要部分组成:GPIO控制器驱动程序、平台驱动程序和GPIO字符设备驱动程序。
GPIO控制器驱动程序
GPIO控制器驱动程序是与硬件相关的代码,用于处理GPIO控制器与系统总线之间的通信。该部分代码通常由芯片厂商提供,以与特定的GPIO硬件交互。这些驱动程序通常以platform_driver结构体的形式提供,其注册和卸载函数被称为platform_driver_probe和platform_driver_remove。
**平台驱动程序**
平台驱动程序是用于与硬件平台交互的代码,用于识别GPIO硬件并将其与相关的GPIO控制器驱动程序关联起来。平台驱动程序通常以platform_device结构体的形式提供,其注册和卸载函数被称为platform_device_add和platform_device_del。
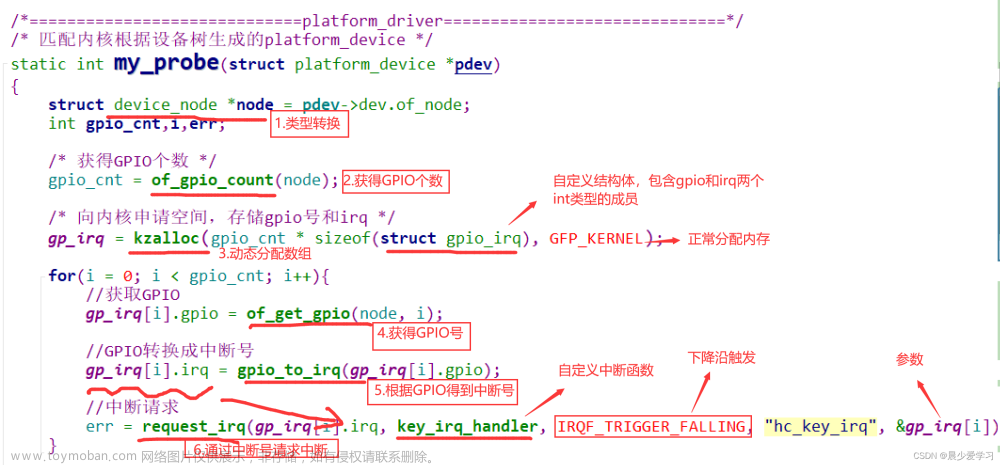
平台驱动程序的主要任务是向系统注册GPIO控制器设备,与GPIO控制器驱动程序进行绑定,并为其分配资源。平台驱动程序还需要为GPIO控制器分配适当的内存,并将其映射到内核地址空间中。
**GPIO字符设备驱动程序**
GPIO字符设备驱动程序提供了用户空间API,使应用程序能够使用GPIO。该驱动程序通常是通过字符设备驱动程序实现的。用户可以通过/sys/class/gpio目录下的文件系统接口,通过读取和写入GPIO寄存器,控制GPIO。
这些部分一起构成了Linux的GPIO子系统驱动框架,使开发人员能够与GPIO硬件交互,并在用户空间中访问GPIO。
驱动例程
以下是一个GPIO设备在设备树中的示例,以及相应的驱动程序。
设备树节点示例:
/ {
    gpio_example {
        compatible = "example,gpio";
        gpio-num = <4>;
        direction = "out";
    };
};
在这个设备树节点中,我们定义了一个名为gpio_example的节点,它包含了以下属性:
compatible:用于指定设备的兼容性字符串,可以用于匹配设备驱动程序。
gpio-num:指定要使用的GPIO编号。
direction:指定GPIO的方向,可以是“in”或“out”。
设备驱动程序示例:
#include <linux/module.h>
#include <linux/of.h>
#include <linux/of_gpio.h>
#include <linux/gpio.h>
#include <linux/platform_device.h>

static int gpio_example_probe(struct platform_device *pdev)
{
    int ret, gpio_num;
    const char *dir;

    // 从设备树中获取GPIO编号和方向
    struct device_node *np = pdev->dev.of_node;
    ret = of_property_read_u32(np, "gpio-num", &gpio_num);
    if (ret < 0) {
        dev_err(&pdev->dev, "failed to read gpio-num property\n");
        return ret;
    }
    ret = of_property_read_string(np, "direction", &dir);
    if (ret < 0) {
        dev_err(&pdev->dev, "failed to read direction property\n");
        return ret;
    }

    // 请求GPIO
    ret = gpio_request(gpio_num, "gpio_example");
    if (ret < 0) {
        dev_err(&pdev->dev, "failed to request GPIO\n");
        return ret;
    }

    // 设置GPIO方向
    if (strcmp(dir, "out") == 0) {
        gpio_direction_output(gpio_num, 0);
    } else if (strcmp(dir, "in") == 0) {
        gpio_direction_input(gpio_num);
    } else {
        dev_err(&pdev->dev, "invalid direction property: %s\n", dir);
        gpio_free(gpio_num);
        return -EINVAL;
    }

    // 在platform_device中保存GPIO编号
    platform_set_drvdata(pdev, (void *)gpio_num);

    dev_info(&pdev->dev, "GPIO device driver initialized\n");

    return 0;
}

static int gpio_example_remove(struct platform_device *pdev)
{
    int gpio_num = (int)platform_get_drvdata(pdev);

    // 释放GPIO
    gpio_free(gpio_num);

    dev_info(&pdev->dev, "GPIO device driver removed\n");

    return 0;
}

static const struct of_device_id gpio_example_of_match[] = {
    { .compatible = "example,gpio" },
    {},
};
MODULE_DEVICE_TABLE(of, gpio_example_of_match);

static struct platform_driver gpio_example_driver = {
    .probe = gpio_example_probe,
    .remove = gpio_example_remove,
    .driver = {
        .name = "gpio_example",
        .of_match_table = gpio_example_of_match,
    },
};

module_platform_driver(gpio_example_driver);
在此示例程序中,我们使用了of_property_read_u32和 of_property_read_string函数从设备树节点中读取GPIO编号和方向属性的值。然后,我们使用gpio_request函数请求GPIO并设置它的方向,如果方向属性无效,将释放GPIO并返回错误。
最后,我们使用platform_set_drvdata函数将GPIO编号保存在platform_device结构体中,以便在remove函数中使用。在remove函数中,我们使用platform_get_drvdata函数获取保存在platform_device中的GPIO编号,并使用gpio_free函数释放GPIO。
该驱动程序还包括一个of_device_id数组,用于在设备树中匹配设备兼容性字符串。然后,我们将这个数组传递给platform_driver结构体的driver字段中,以便内核可以自动加载此驱动程序并匹配适当的设备节点。
紧接着在驱动实现read write 接口
下面是例子文章来源:https://www.toymoban.com/news/detail-499222.html
#include <linux/module.h>
#include <linux/of.h>
#include <linux/of_gpio.h>
#include <linux/gpio.h>
#include <linux/platform_device.h>
#include <linux/fs.h>
#include <linux/uaccess.h>

#define BUF_SIZE 256

static int gpio_num;
static char gpio_direction;

static int gpio_example_open(struct inode *inode, struct file *filp)
{
    // 获取GPIO方向
    if (gpio_direction == 'o') {
        gpio_direction_output(gpio_num, 0);
    } else {
        gpio_direction_input(gpio_num);
    }

    return 0;
}

static ssize_t gpio_example_write(struct file *filp, const char __user *buf, size_t count, loff_t *f_pos)
{
    char kbuf[BUF_SIZE];

    if (count > BUF_SIZE) {
        return -EINVAL;
    }

    if (copy_from_user(kbuf, buf, count)) {
        return -EFAULT;
    }

    if (gpio_direction == 'o') {
        if (kbuf[0] == '1') {
            gpio_set_value(gpio_num, 1);
        } else {
            gpio_set_value(gpio_num, 0);
        }
    }

    return count;
}

static const struct file_operations gpio_example_fops = {
    .owner = THIS_MODULE,
    .open = gpio_example_open,
    .write = gpio_example_write,
};

static int gpio_example_probe(struct platform_device *pdev)
{
    int ret;
    const char *dir;

    // 从设备树中获取GPIO编号和方向
    struct device_node *np = pdev->dev.of_node;
    ret = of_property_read_u32(np, "gpio-num", &gpio_num);
    if (ret < 0) {
        dev_err(&pdev->dev, "failed to read gpio-num property\n");
        return ret;
    }
    ret = of_property_read_string(np, "direction", &dir);
    if (ret < 0) {
        dev_err(&pdev->dev, "failed to read direction property\n");
        return ret;
    }
    gpio_direction = dir[0];

    // 请求GPIO
    ret = gpio_request(gpio_num, "gpio_example");
    if (ret < 0) {
        dev_err(&pdev->dev, "failed to request GPIO\n");
        return ret;
    }

    // 注册字符设备
    ret = register_chrdev(0, "gpio_example", &gpio_example_fops);
    if (ret < 0) {
        dev_err(&pdev->dev, "failed to register char device\n");
        gpio_free(gpio_num);
        return ret;
    }

    dev_info(&pdev->dev, "GPIO device driver initialized\n");

    return 0;
}

static int gpio_example_remove(struct platform_device *pdev)
{
    // 取消注册字符设备
    unregister_chrdev(0, "gpio_example");

    // 释放GPIO
    gpio_free(gpio_num);

    dev_info(&pdev->dev, "GPIO device driver removed\n");

    return 0;
}

static const struct of_device_id gpio_example_of_match[] = {
    { .compatible = "example,gpio" },
    {},
};
MODULE_DEVICE_TABLE(of, gpio_example_of_match);

static struct platform_driver gpio_example_driver = {
    .probe = gpio_example_probe,
    .remove = gpio_example_remove,
    .driver = {
        .name = "gpio_example",
        .of_match_table = gpio_example_of_match,
        .owner = THIS_MODULE,
    },
};

module_platform_driver(gpio_example_driver);

MODULE_AUTHOR("Your Name");
MODULE_DESCRIPTION("GPIO device driver");
MODULE_LICENSE("GPL");
在这个代码中,我们使用了module_platform_driver宏,它自动将gpio_example_driver注册为平台驱动程序,并处理模块的加载和卸载。我们还定义了模块的作者,描述和许可证信息。文章来源地址https://www.toymoban.com/news/detail-499222.html
到了这里,关于gpio 子系统的文章就介绍完了。如果您还想了解更多内容,请在右上角搜索TOY模板网以前的文章或继续浏览下面的相关文章,希望大家以后多多支持TOY模板网!


