Vue-Uni-App小程序实现身份证识别~
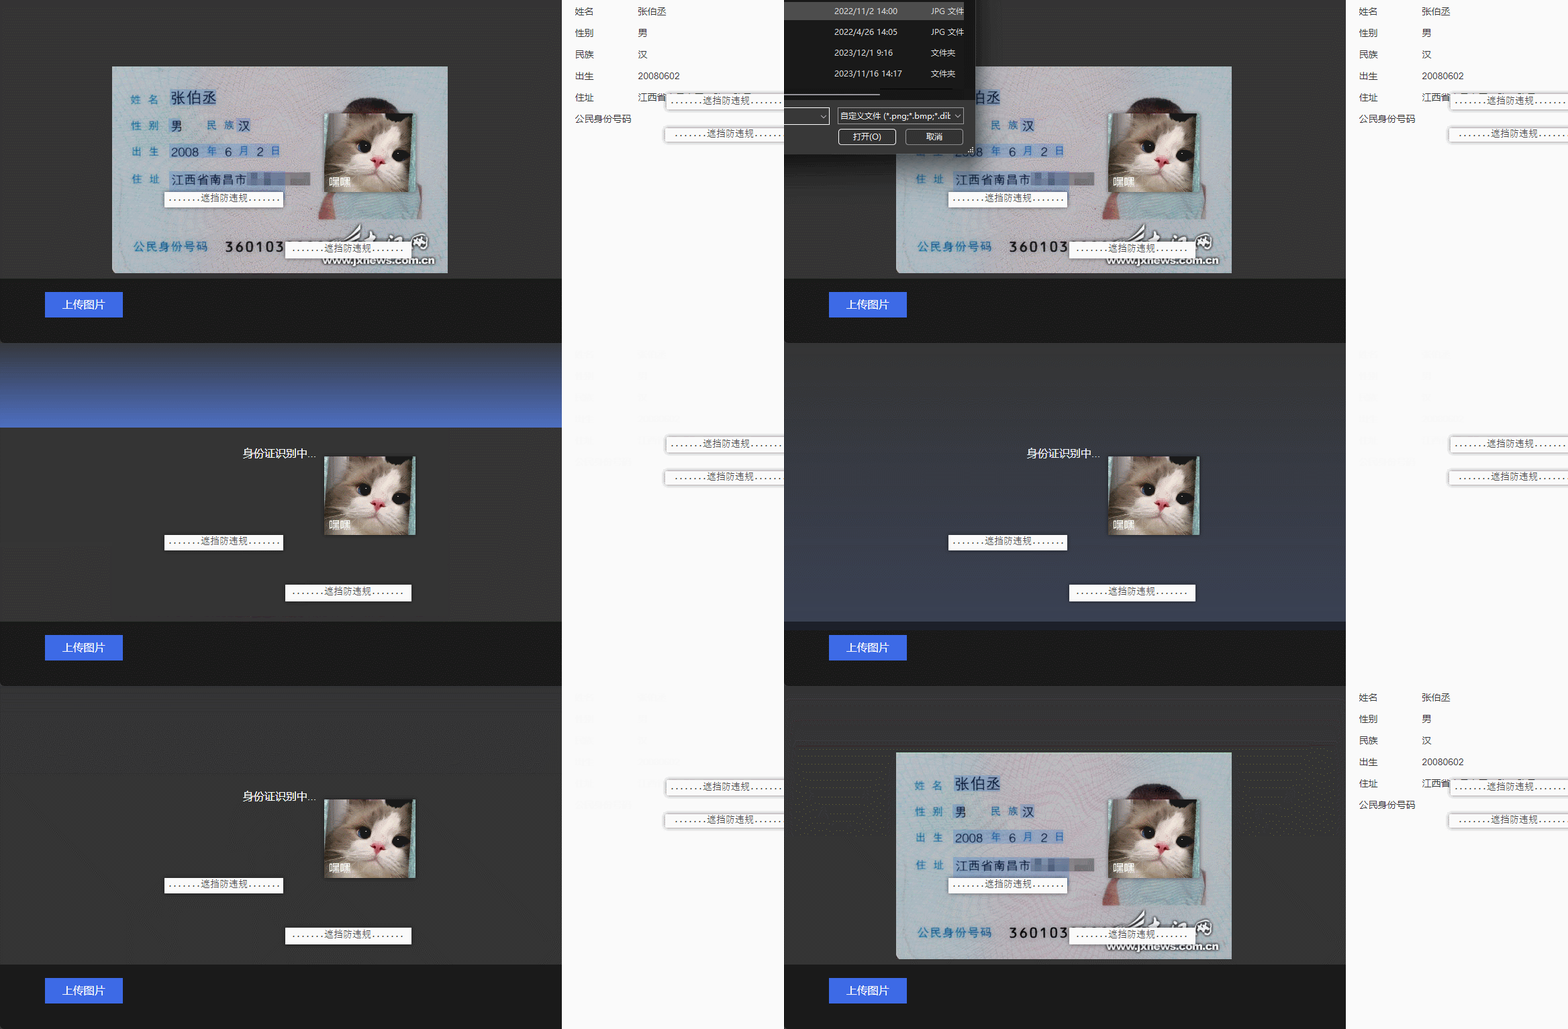
需求:实现一个身份证的识别功能!看下方图片!
思路:(把用户上传的身份证图片转成base64请求接口发送给后端,后端返回对应的信息渲染到页面上就行了!)
识别出来后

第一步:在components新建 image-uploader.vue 代码如下:
<template>
  <view class="uploader-container row wrap">
    <view
      class="upload-image-box"
      v-for="(item, index) in fileList"
      :key="index"
      :style="{ width: previewWidth, height: previewHeight }"
    >
      <image
        mode="widthFix"
        class="img-preview"
        :src="item.url"
        :style="{ width: previewWidth, height: previewHeight }"
      />
      <view
        v-if="deletable"
        class="close-icon row-center"
        @click="deleteImage($event, index)"
      >
        <icon type="cancel" size="30" color="white" />
      </view>
    </view>
    <view
      ref="input"
      class="uplader-upload row-center"
      :style="{ width: previewWidth, height: previewHeight }"
      @click="handleImage"
      v-show="(fileList.length == 0 || mutiple) && fileList.length < maxUpload"
      v-if="!useSlot"
    >
      <image
        mode="widthFix"
        class="img-preview"
        :src="defaultImage"
        :style="{ width: previewWidth, height: previewHeight }"
      />
      <icon v-if="deletable" type="cancel" size="30" color="white" />
      <!-- <view type="image" accept="image/*" class="uploader-input" /> -->
    </view>
    <view
      class="uplader-upload-slot row-center"
      @click="handleImage"
      v-show="(fileList.length == 0 || mutiple) && fileList.length < maxUpload"
      v-else
    >
      <slot></slot>
    </view>
  </view>
</template>

<script>
export default {
  name: "uploader",
  props: {
    fileList: {
      type: Array,
      default: () => [],
    },
    // 默认不允许多选图片
    mutiple: {
      type: Boolean,
      default: false,
    },
    // 限制上传文件数量
    maxUpload: {
      type: Number,
      default: 1,
    },
    previewWidth: {
      type: String,
      default: "",
    },
    previewHeight: {
      type: String,
      default: "",
    },
    previewImage: {
      type: String,
      default: "",
    },
    // 是否可删除
    deletable: {
      type: Boolean,
      default: false,
    },
    // camera
    camera: {
      type: Boolean,
      default: false,
    },
    useSlot: {
      type: Boolean,
      default: false,
    },
  },
  data() {
    return {
      defaultImage: null,
      inputId: "",
    };
  },
  create() {},
  mounted() {
    this.defaultImage = this.previewImage;
    this.inputId = "fileid" + "_" + Math.random() * 10;
    var input = document.createElement("input");
    input.id = this.inputId;
    input.type = "file";
    if (this.camera) {
      input.setAttribute("capture", "camera");
    }
    input.style.display = "none";
    input.className = "uploader-input";
    input.accept = "image/*";
    let that = this;
    input.onchange = (event) => {
      let file = document.getElementById(this.inputId);
      let fileName = file.value;
      let files = file.files;
      if (fileName == null || fileName == "") {
      } else {
        if (files[0]) {
          let reader = new FileReader();
          reader.readAsDataURL(files[0]);
          reader.onload = function(e) {
            var data = e.target.result;
            that.defaultImage = data;
            that.$emit("after-read", data);
          };
        }
      }
      // var file = this.file.target.files[0];
      // var reader = new FileReader();
      // reader.readAsDataURL(file);
      // reader.onload = function(e) {
      // 	var data = e.target.result;
      // 	me.imgbase = data;
      // 	console.log('Base64', data);
      // };
    };
    this.$refs.input.$el.appendChild(input);
  },
  methods: {
    handleImage() {
      let file = document.getElementById(this.inputId);
      file.click();
    },
    deleteImage(e, index) {
      this.$emit("delete", index);
    },
  },
};
</script>

<style lang="scss">
.uploader-container {
  .upload-image-box {
    position: relative;
    margin-right: 8rpx;
    margin-bottom: 8rpx;

    .img-preview {
      border-radius: 10rpx;

    }
    .close-icon {
      position: absolute;
      right: -20rpx;
      top: -15rpx;
      width: 40rpx;
      height: 40rpx;
      background-color: red;
      border-radius: 50%;
      z-index: 20;
    }
  }
  .img-preview {
    width: 100%;
  }
  .uplader-upload {
    position: relative;
    // background-color: #f7f8fa;
    cursor: pointer;
    .uploader-input {
      position: absolute;
      width: 100%;
      height: 100%;
      overflow: hidden;
      opacity: 0;
      top: 0;
      left: 0;
      z-index: 10;
      cursor: pointer;
    }
  }

  .uplader-upload-slot {
    position: relative;
    min-width: 160rpx;
    min-height: 160rpx;
    .uploader-input {
      position: absolute;
      width: 100%;
      height: 100%;
      overflow: hidden;
      opacity: 0;
      top: 0;
      left: 0;
      z-index: 10;
      cursor: pointer;
    }
  }
}
</style>
第二步:在你需要的页面注册组件:代码如下
import Uploader from "@/components/image-uploader.vue";
在export default 下面注册
  components: {
    Uploader
  },
开始使用
data card{}里面是放的背景图片!
data() {
    return {
      card: {
        url1: "../../static/imgs/idcard1.jpg",
        url2: "../../static/imgs/idcard2.jpg",
      },
    }
  },
template
<div class="box">
     <Uploader :previewImage="card.url1"/>
</div>
效果如下
可以看见背景图片已经出来了!用户点击也可以选择图片了!
把图片转成base64
template
<div class="box">
     <Uploader :previewImage="card.url1" @after-read="chooseImgFront"  class="uploader"/>
  </div>
图片已经转成了base64的转码,这打印base64到控制台!
chooseImgFront(e) {
    console.log(e);
 },

调用后端的接口,传入base64,根据你们的需求来,接口不是活的
import request from './http'

export default {
	// 身份证正面识别接口
	getIDCardFrontInfo(data) {
		return request({
		  url: `blade-lhyg/user/user_staff/identity/frontBase64`,
			method: 'POST',
			data
		});
	},
	// 身份证正面识别接口
	getIDCardReverseInfo(data) {
		return request({
		  url: `blade-lhyg/user/user_staff/identity/contraryBase64`,
			method: 'POST',
			data
		});
	},
	// 身份认证
	authentication(data) {
		return request({
		  url: `blade-lhyg/user/user_staff/identity/authentication`,
			method: 'POST',
			data
		});
	},
}
调用接口代码:
 async chooseImgFront(e) {
      uni.showLoading({
        title: "加载中",
        mask: true,
      });

      try {
        const { code, data } = await this.$api.certify.getIDCardFrontInfo({
          phoneNo: this.$store.getters.phoneNo,
          photo: e,
        });
        if (code === 200) {
          Object.assign(this.form, data);
        }
      } catch (error) {
      } finally {
        uni.hideLoading();
      }
    },
数据已经请求过来了
接下来就是数据渲染,数据渲染就不写了太简单了,就是把数据保存到list[]里面然后{{}}就行了!文章来源:https://www.toymoban.com/news/detail-499482.html
最终效果图 文章来源地址https://www.toymoban.com/news/detail-499482.html
到了这里,关于Vue-Uni-App小程序实现身份证识别的文章就介绍完了。如果您还想了解更多内容,请在右上角搜索TOY模板网以前的文章或继续浏览下面的相关文章,希望大家以后多多支持TOY模板网!


